Sometimes, DiskPart fails with the message “DiskPart has encountered an error”, accompanied by additional error information. Follow this MiniTool guide to fix common DiskPart errors by repairing the file system, modifying registry values, removing write protection, or formatting the disk.
Short Answer:
DiskPart errors can appear in different forms depending on the underlying issue. The table below summarizes the most common error messages and their corresponding solutions.
| Errors | Solutions |
| Access is denied | 1. Unlock the disk 2. Change the registry value of WriteProtect or AuthForwardServerList to 0 3. Remove the read-only attribute of the drive 4. Format the disk using Rufus |
| Data error (cyclic redundancy check) | 1. Run the CHKDSK command 2. Run disk error checking 3. Uninstall antivirus programs 4. Erase the hard disk |
| The parameter is incorrect | 1. Unlock the hard disk 2. Execute CHKDSK to repair file system errors 3. Format the drive |
| The media is write protected | 1. Unlock the disk 2. Remove the read-only attribute |
| I/O device error | 1. Update or reinstall the disk driver 2. Unlock the drive |
| Fatal device hardware error | 1. Unlock the hard drive 2. Run CHKDSK 3. Format the disk |
| A device which does not exist was specified | 1. Remove PSU extension 2. Reconnect the disk to another slot 3. Update the firmware of the disk 4. Scan for hardware changes manually |
DiskPart is a widely used Windows command-line utility for creating, deleting, and managing disk partitions.
However, when you try to delete, format, or resize partitions with it, the tool may return an error message saying “DiskPart has encountered an error”.
DiskPart Has Encountered an Error Overview
This error usually comes with specific messages indicating the nature of the problem.
Common examples include:
- Access is denied.
- Data error (cyclic redundancy check).
- The parameter is incorrect.
- The media is write protected.
- The request could not be performed because of an I/O device error.
- The request failed due to a fatal device hardware error.
All these errors prevent you from accessing or modifying the selected disk. Before fixing them, explore why these errors occur.
Common Causes for DiskPart Errors
DiskPart may return errors due to the following reasons:
- Physical connection issues. A loose or damaged USB cable, USB port, or SATA connector can prevent DiskPart from communicating properly with the disk.
- Software conflicts. Antivirus programs or other disk management utilities may interfere with DiskPart and cause conflicts during disk operations.
- Insufficient privileges. If DiskPart runs without administrative privileges, it may not have sufficient permission to modify the disk. This often results in the DiskPart access denied error.
- Write protection. The disk may be write‑protected because the physical switch is set to the Locked position or the disk attribute is set to read‑only. This prevents DiskPart from modifying the drive.
- Disk corruption. File system corruption or bad sectors on the disk can block DiskPart from performing actions on the partition.
- Disk driver problems. Outdated or damaged disk drivers can cause communication issues between the disk and the system. In this case, DiskPart may return an I/O device error.
Basic Checks Before Advanced Disk Repair
In some cases, the DiskPart error can be easily fixed with simple troubleshooting steps, without using additional tools or advanced repair methods.
Try the following simple actions when you encounter the DiskPart error:
- Restart your computer.
- If possible, reconnect the drive and try a different USB port or cable.
- Run Command Prompt as an administrator.
- If you need to complete the disk operation urgently, consider using an alternative tool to manage disk partitions.
If none of these steps restore DiskPart’s functionality, recover your files first and then proceed with more advanced solutions.

Recover Files From the Inaccessible Drive (if Necessary)
Under most circumstances, when the “DiskPart has encountered an error” message appears, you are unable to access the disk normally in File Explorer. If the disk contains important files, recover them first. This helps prevent:
- Inaccessible files from being deleted or erased during disk repair.
- Lost files from being overwritten during repair.
- Further disk damage caused by improper operations.
To recover files on Windows 11/10/8.1/8, you can use MiniTool Power Data Recovery.
This software supports recovering data from hard drives, SSDs, USB drives, SD cards, and other storage devices. Supported file types include documents, videos, audio files, emails, and archives.
It can recover non‑overwritten data even when the disk becomes RAW or the partition is damaged.
The free edition allows up to 1 GB of free data recovery. Download it and start restoring your files.
MiniTool Power Data Recovery FreeClick to Download100%Clean & Safe
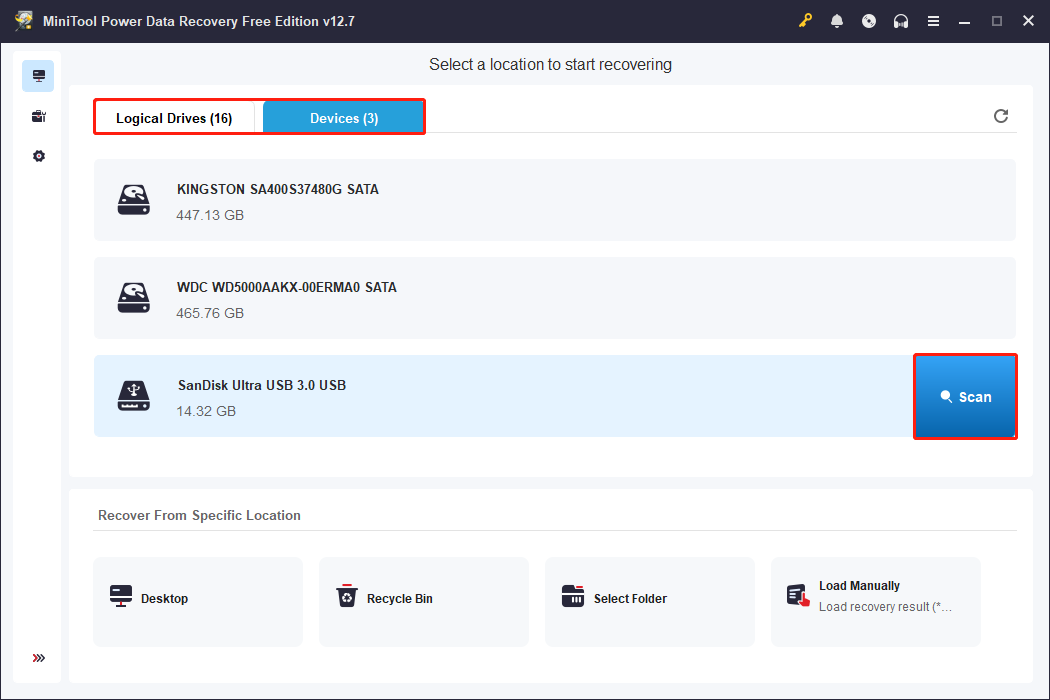
Step 1. Scan the Partition or Disk.
Open the software, and you are located in the Logical Drives module by default. Select the partition from which you need to recover files and click Scan.
Alternatively, if you are not sure which partition to scan, switch to the Devices module and scan the entire disk.
Step 2. Locate and Preview Files.
After scanning, browse the found files to find and select the files you want to recover.
This tool offers two file view options:
- Path: Displays files in a tree structure based on their original folder hierarchy.
- Type: Organizes files by file type and detailed data format.
Furthermore, this software provides two additional features to help you find the required files faster:
- Filter: Filter out unwanted files by file type, file modification date, file size, and file category.
- Search: Search for specific files or folders by entering a file name. Both partial and complete names are supported.
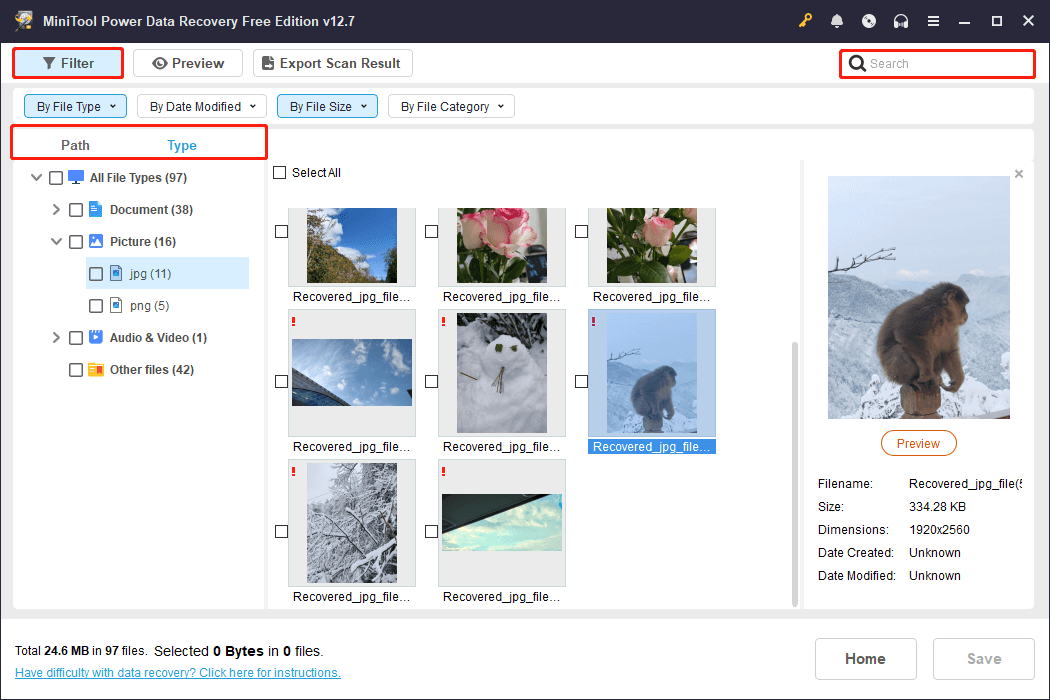
For the accuracy of data recovery, double-click on each file you want to recover to preview its content. Supported file types to preview include documents, photos, videos, audio files, and some other types of data.
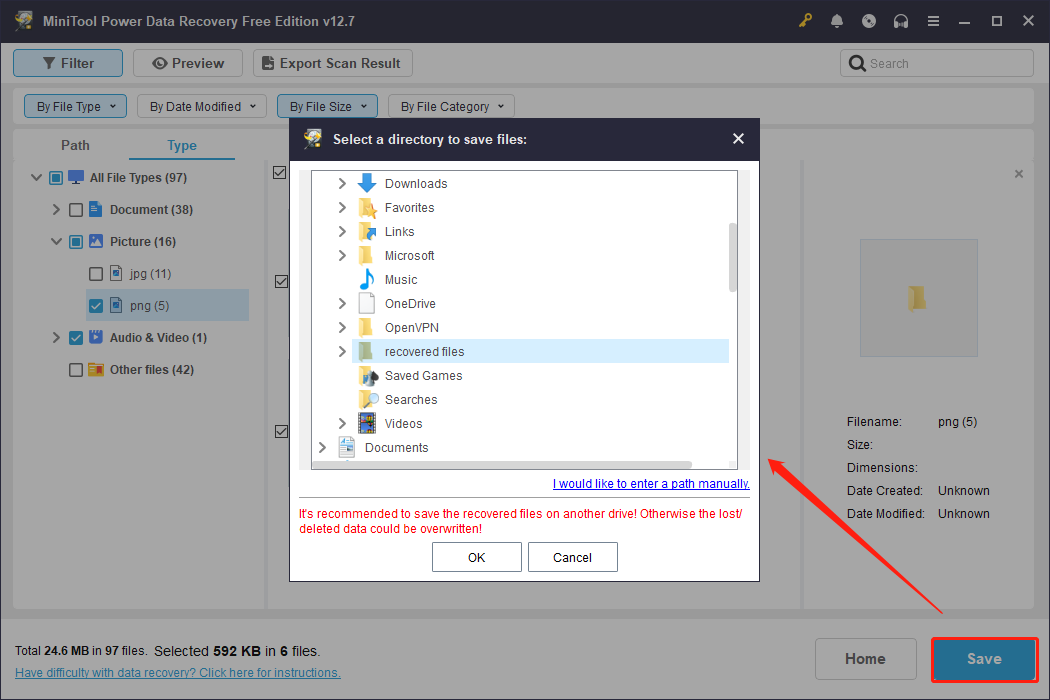
Step 3. Save Desired Files.
Finally, check if all the files you want to recover are selected. Once it is confirmed, click Save and choose a safe location to store the recovered items.
After recovering the files from the problematic disk, the next step is to fix the DiskPart error.
Different DiskPart errors require different solutions. In the following sections, we outline several common DiskPart errors and their corresponding fixes. Refer to the part that matches the message you are experiencing.
DiskPart Has Encountered an Error: Access Is Denied
The DiskPart access denied error can be fixed by unlocking the drive or formatting the drive with Rufus.
Fix 1. Unlock the Drive
Some USB drives and standard-size SD cards have a physical write protection switch that prevents modifications to the files on the drive.
When the switch is set to the Locked position, DiskPart will not be able to modify the disk partition.
In this case, check for a small switch on the side of the USB drive or SD card. If the switch is in the Locked position, slide it to the Unlocked position.
After switching to the unlocked state, try accessing the drive again through DiskPart to verify if the issue is resolved.
Fix 2. Modify the Registry
Some Windows registry values, such as AuthForwardServerList and StorageDevicePolicies, control disk access. Changing these values can sometimes fix the access denied error.
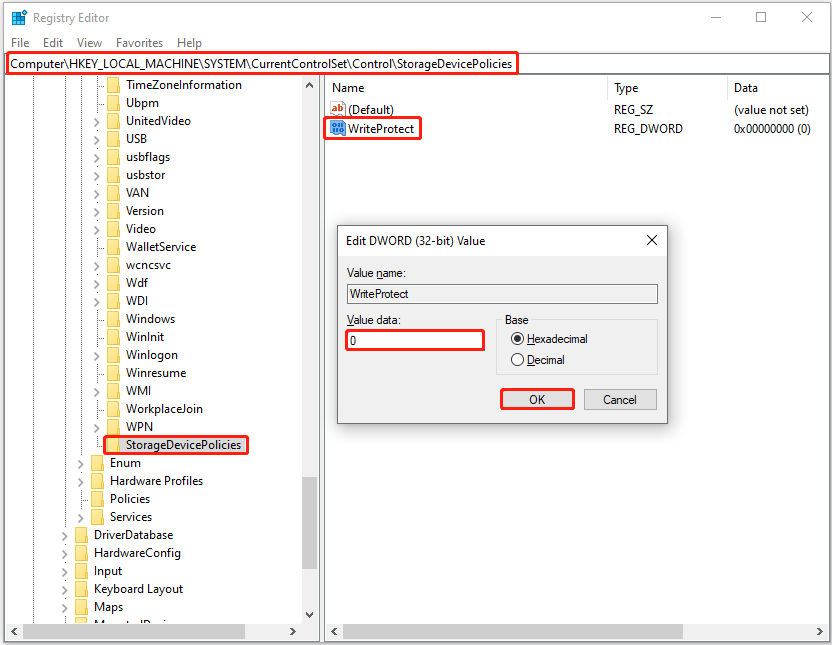
Option 1. Modify the StorageDevicePolicies Registry
The StorageDevicePolicies key controls write protection settings. Changing its value to disable write protection can sometimes resolve the error.
Step 1. Press Windows + R to open Run. Then type regedit in the box and press Enter to open the Registry Editor.
Step 2. Navigate to this location:
Computer\HKEY_LOCAL_MACHINE\SYSTEM\CurrentControlSet\Control
Step 3. Check if there is a key named StorageDevicePolicies. If not, right-click the Control folder and choose New > Key, and name it StorageDevicePolicies.
Step 4. Select StorageDevicePolicies. In the right panel, right-click on any blank area and choose New > DWORD (32-bit) Value. Name the newly created value to WriteProtect.
Step 5. Double-click WriteProtect, set the value data to 0, and click OK to confirm.
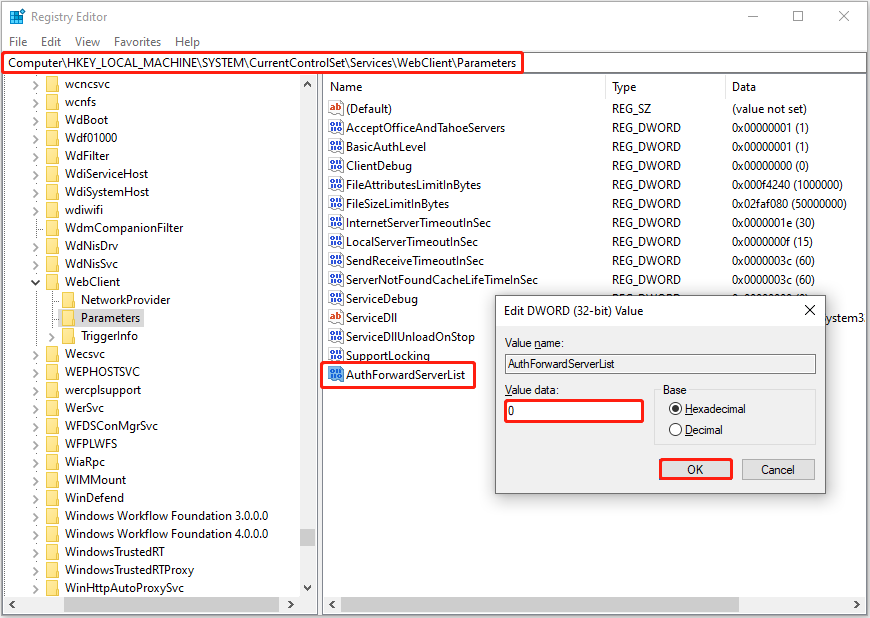
Option 2. Modify the AuthForwardServerList Registry
In some cases, setting the value data of the AuthForwardServerList registry to 0 can resolve the error. Follow the steps below to try it.
Step 1. Open the Registry Editor.
Step 2. Navigate to the following location:
Computer\HKEY_LOCAL_MACHINE\SYSTEM\CurrentControlSet\Services\WebClient\Parameters
Step 3. Right-click on the blank area in the right panel and choose New > DWORD (32-bit) Value. Name the value AuthForwardServerList.
Step 4. Double-click AuthForwardServerList, and then set its value data to 0.
Step 5. Click OK to apply this change. Afterward, restart your computer and check if the I/O device error disappears.
Fix 3. Remove the Read-Only Attribute
If the disk is set to read-only, use the Command Prompt tool to turn off the read-only mode.
Step 1. Run Command Prompt as an administrator.
Step 2. Input the following command lines and press Enter after each one:
- diskpart
- list disk
- select disk # (replace # with the actual disk number of the problematic drive)
- attributes disk clear readonly
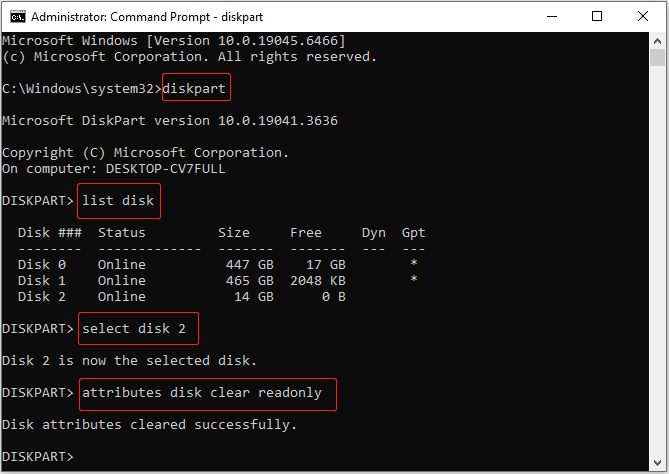
If the read-only attribute is cleared but the DiskPart error still exists, try the following method.
Fix 4. Format the Drive Using Rufus
Rufus is a free Windows tool used to create bootable USB drives from ISO files. When DiskPart encounters an error, you can use this tool to format the disk at a lower level.
Step 1. Download Rufus.
Step 2. Open Rufus to enter its main interface. Select the target disk from the Device drop-down menu. Then expand the Boot selection menu and choose Non bootable.
Step 3. Set up the format options, including volume label, file system, and cluster size.
Step 4. Finally, click START and wait for the formatting process to complete.
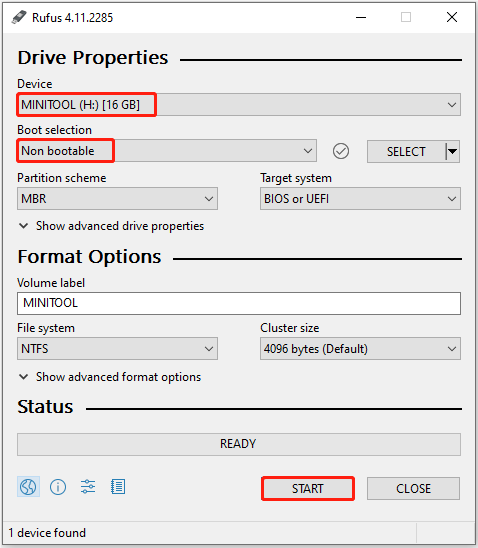
Once the disk is formatted, try managing the disk partition with DiskPart again and check if the error disappears.
DiskPart Has Encountered an Error: Data Error Cyclic Redundancy Check
The “data error cyclic redundancy check” message usually stems from file system corruption or software conflicts. When faced with this error, try repairing the file system integrity, uninstalling unnecessary programs, or erasing the drive.
Fix 1. Run CHKDSK to Repair File System Integrity
CHKDSK is the most commonly used command to check for and repair corruption of the disk file system. In addition, it can also isolate bad sectors and recover readable information.
Execute the CHKDSK command to fix the CRC error.
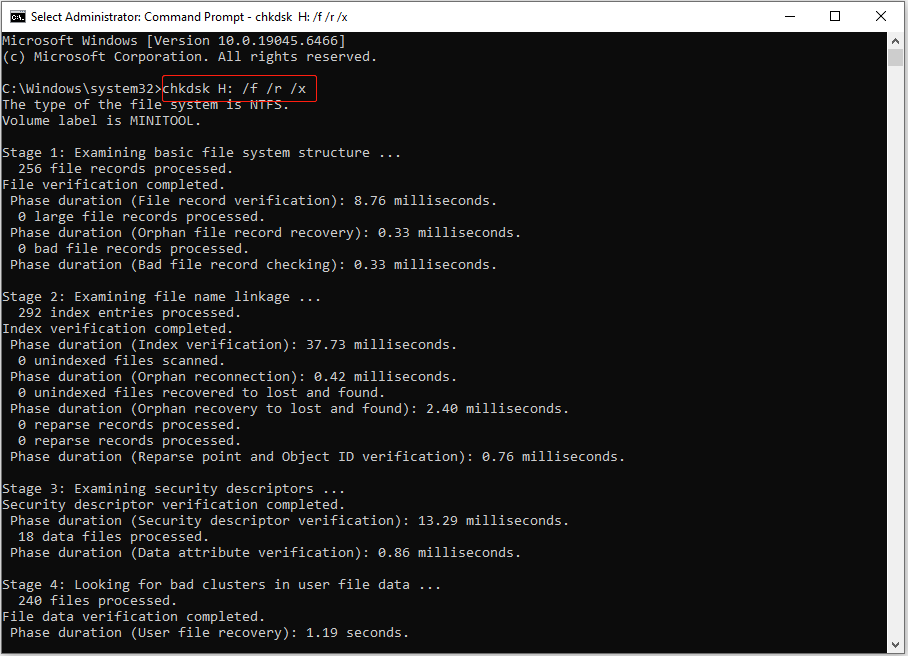
Step 1. Type cmd in the Windows search box. When Command Prompt shows up, right-click it and choose Run as administrator.
Step 2. Input chkdsk X: /f /r /x and press Enter. Replace X with the actual drive letter of your disk.
- /f: Repairs the corrupted directory structure.
- /r: Recovers readable information from bad sectors.
- /x: Forces the volume to dismount before the operation begins.
After scanning and repairing, check your disk status.
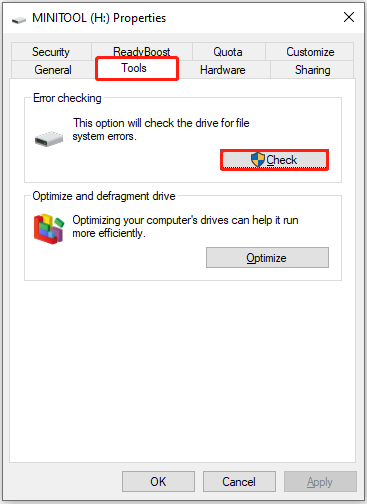
Fix 2. Run the Error-Checking Tool to Fix File System Errors
If you prefer a graphical interface rather than a command-line window, use the built‑in error-checking utility to scan the drive for file system errors.
Step 1. Open File Explorer, and go to the This PC section.
Step 2. Right-click the problematic drive and choose Properties.
Step 3. Go to the Tools tab and click Check in the Error checking section.
Fix 3. Uninstall Antivirus Software
Based on forum reports, uninstalling unnecessary software, especially third‑party antivirus programs such as Quick Heal, can sometimes resolve the error.
Therefore, try removing any non‑essential third‑party software from your computer, and then check whether the DiskPart error is resolved.
To uninstall a program, type its name in the search box, and then click Uninstall from the best results window.
Fix 4. Erase the Drive
When the disk has severe file system errors or other failures, and CHKDSK fails to repair it, formatting or cleaning the drive is usually a good option.
However, based on user experiences, DiskPart may also encounter errors in disk formatting or cleaning. In this case, use a professional disk testing tool like HDDScan to erase the drive and permanently delete all files on it.
Step 1. Download and install HDDScan. After that, extract the files and then launch the executable file.
Step 2. Agree to the license terms to load the software interface.
Step 3. Expand the top drop-down menu and select the drive that encounters errors.
Step 4. Click TESTS > ERASE.
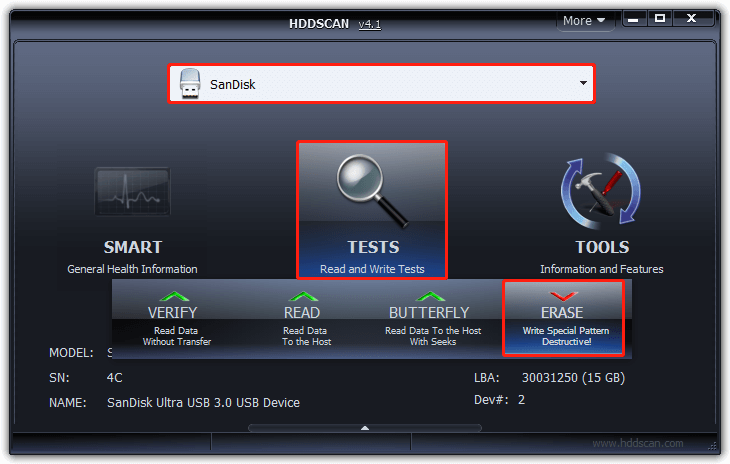
Step 5. Configure the disk settings and click the arrow on the right to continue. Finally, click Yes to confirm and wait for the process to complete.
Alternatively, you can use MiniTool Partition Wizard to wipe the problematic drive. Its Wipe Disk feature is available for free.
MiniTool Partition Wizard FreeClick to Download100%Clean & Safe
DiskPart Has Encountered an Error: The Parameter Is Incorrect
The “parameter is incorrect” error can be caused by disk access restrictions, corrupted file system, or bad sectors.
Restoring disk access or using disk repair tools to fix or format the disk can help resolve the issue.
Fix 1. Remove Access Restrictions
If the error is caused by a locked disk, a read-only attribute, or registry-based write protection, use the following methods to regain access.
Three methods are available, and the detailed steps are described in the Access Denied error section:
- Slide the physical lock switch to the Unlocked position.
- Change the registry settings.
- Remove the read-only attribute.
Fix 2. Run CHKDSK
When the problem is associated with file system corruption, executing the CHKDSK command can fix it.
Open Command Prompt as an administrator. Then execute the chkdsk X: /f /r /x command (replace X with the actual drive letter) to check for and repair file system errors and block bad sectors.
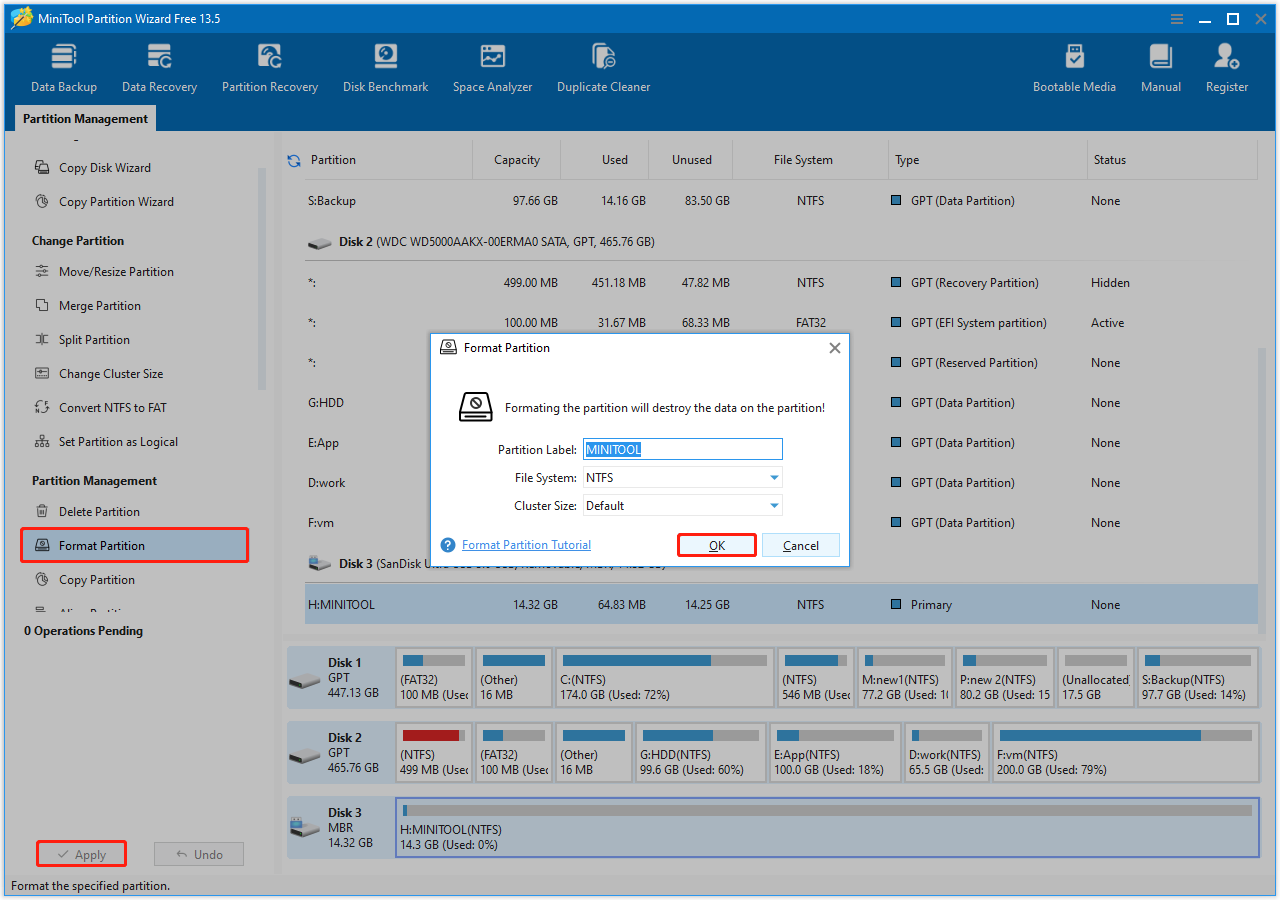
Fix 3. Format the Disk
If CHKDSK fails to restore the normal functionality of your disk, try formatting the drive.
If DiskPart refuses to format the drive, try using MiniTool Partition Wizard. It can help clear partition data and reconfigure parameters for the malfunctioning partition.
The Format Partition feature is available for free.
MiniTool Partition Wizard FreeClick to Download100%Clean & Safe
Step 1. On the main interface of the disk formatter, select the target disk partition in the right panel, and then click Format Partition from the left menu.
Step 2. Set up the volume label and file system, and click OK.
Step 3. Click Apply to confirm.
DiskPart Has Encountered an Error: The Media Is Write Protected
As the error message suggests, this issue occurs when the disk is protected, preventing any modifications to the files or partitions.
To resolve this, enable disk access.
- If your drive has a physical lock switch, slide it to the Unlocked position.
- If there is no physical switch, the write protection may be applied at the software level. Under this circumstance, use the attributes disk clear readonly command to unlock the disk.
- If none of these methods work, try modifying the StorageDevicePolicies and AuthForwardServerList registry settings.
![[Full Guide] How to Fix “The Media Is Write Protected” Win 10/11?](https://images.minitool.com/minitool.com/images/uploads/2023/03/the-media-is-write-protected-thumbnail.png)
DiskPart Has Encountered an Error: I/O Device Error
The I/O device error is usually caused by a corrupted or damaged disk driver or by configuration issues in the operating system.
To resolve this error, start by updating or reinstalling the disk driver. If that does not help, try unlocking the disk.
Fix 1. Update/Reinstall the Disk Driver
To update or reinstall the disk driver, use the built-in Device Manager:
Update the disk driver:
Step 1. Right-click the Start button and choose Device Manager.
Step 2. Expand Disk drives.
Step 3. Right-click the target disk and choose Update driver.
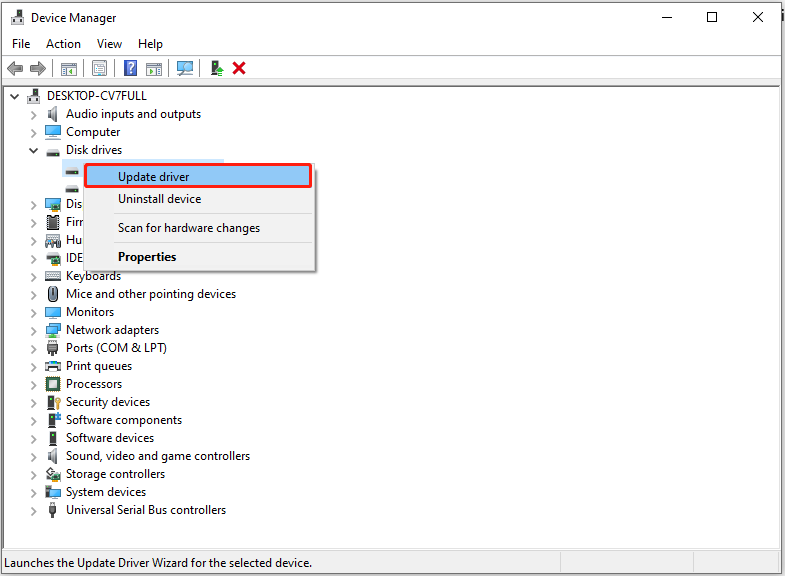
Step 4. Choose Search automatically for drivers, and then follow the prompts on your screen to update the driver.
Reinstall the disk driver:
Step 1. In Device Manager, right-click the disk and choose Uninstall device.
Step 2. In the new window, click Uninstall to confirm.
Step 3. Restart your computer, and Windows will reinstall the driver automatically.
If the I/O device error is not related to the driver, check the access restrictions.
Fix 2. Unlock the Disk
To disable access restrictions, follow the instructions below.
- Slide the physical lock switch on the side of the disk to Unlocked if available.
- If there is no switch, run the attributes disk clear readonly command.
- If that does not work, modify the StorageDevicePolicies and AuthForwardServerList registry values.
DiskPart Has Encountered an Error: A Fatal Device Hardware Error
The fatal device hardware error is usually linked with the locked disk, file system corruption, or compatibility issues.
Several feasible solutions are available, including removing access limitations, running CHKDSK, or formatting the disk via a gaming console.
Fix 1. Bypass Access Restrictions
Use these methods to regain disk access.
- Unlock the physical lock switch on the side of your disk.
- Modify the registry to remove write protection.
- Remove the read-only attribute.
Fix 2. Run CHKDSK (Not Applicable to Unknown Disks)
CHKDSK can resolve many common issues related to file system corruption or bad sectors.
When the fatal hardware device error occurs, open an administrative Command Prompt, and then run the chkdsk X: /f /r /x command. X represents the drive letter of the malfunctioning drive.
Fix 3. Format the Disk Using a Gaming Console
If DiskPart fails to format the disk and returns a fatal device hardware error, using a gaming console to format the drive can be a practical workaround.
Many users report that this method works when DiskPart cannot complete the formatting process, especially for removable or external disks.
We take PS5 as an example to show you the formatting steps.
Step 1. Connect your drive to your PS5 via a USB Type-C port or a USB Type-A port.
Step 2. Navigate to Settings > Storage.
Step 3. Select USB Extended Storage > Format as USB Extended Storage. Do not turn off your PS5 during the formatting process in case of further disk damage or data loss.
DiskPart Has Encountered an Error: A Device Which Does Not Exist Was Specified
The “A device which does not exist was specified” error usually occurs when Windows cannot properly detect or access the target storage device.
This is often related to connection issues, outdated firmware, incorrect hardware configuration, or unstable power delivery.
When this error appears, try reinitializing the hardware connection, checking physical components, or updating device firmware.
Fix 1. Remove PSU Extension
Unstable or low-quality power supply extensions may cause intermittent disk detection failures, especially for external drives or SATA devices connected via adapters.
Therefore, remove the PSU extension.
Step 1. Shut down your computer completely.
Step 2. Disconnect the PSU extension or power splitter.
Step 3. Connect the drive directly to the power supply unit.
Step 4. Restart the system and check disk recognition.
Fix 2. Update the Disk Firmware
Outdated firmware can cause compatibility issues and lead to incorrect device identification in Windows. To fix this issue, update the firmware of your disk.
Step 1. Identify your disk model in Device Manager.
Step 2. Visit the official manufacturer website and download the latest firmware update tool for your drive model.
Step 3. Follow the manufacturer’s instructions to update the firmware carefully.
Step 4. Restart the computer and check if the problem is solved.
Fix 3. Change a Slot
A faulty or unstable SATA/NVMe slot may prevent the system from properly detecting the drive. Reconnecting it via a different slot may help.
Step 1. Power off the computer and unplug it from the power source.
Step 2. Remove the storage device from its current slot. Then insert it into a different SATA port or M.2 slot.
Step 3. Boot the system and check if the disk is detected correctly.
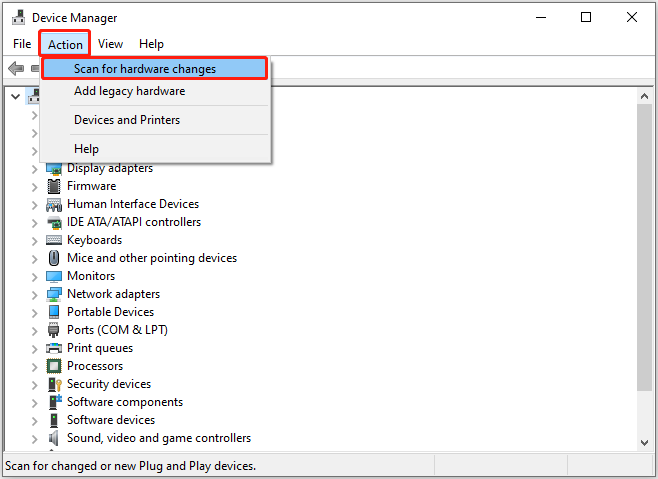
Fix 4. Scan for Hardware Changes
Scanning for hardware changes forces the system to re-detect connected devices. This fixes the problem caused by temporary detection issues.
Step 1. Press Windows + X and select Device Manager.
Step 2. Click Action > Scan for hardware changes. After that, try formatting your disk and verifying whether the error disappears.
Read More: Back up Files on Your Disk
Disk errors can occur at any time, and in most cases, they provide little opportunity to react and rescue your files. Therefore, it is important to back up your files regularly to cloud storage or a dedicated backup drive.
You can manually copy and paste important files to a safe location, or use professional backup software. If you are looking for a backup tool, try MiniTool ShadowMaker, which offers a free 30-day trial.
MiniTool ShadowMaker TrialClick to Download100%Clean & Safe
Bottom Line
To sum up, when you use DiskPart to manage your hard drives, various error messages may appear.
Most of these errors are related to system glitches, connection issues, file system corruption, or incorrect system configurations.
To resolve DiskPart errors, start with basic fixes, such as restarting the computer, reconnecting the drive, or changing a USB port.
If the basic fixes do not work, proceed with advanced solutions based on the error message. Common repair methods include:
- Running CHKDSK to repair file system errors and block bad sectors.
- Using the Command Prompt to remove the read-only attribute of the disk.
- Uninstalling unnecessary programs.
- Updating or reinstalling the disk driver.
- Formatting the disk.
Note that it is recommended to recover files first, as some repair methods will erase all data on the disk.
If all methods fail to restore the normal functionality of your drive, consider sending it to a repair center.
If you encounter any issues or have any questions while using MiniTool products, please send an email to the support team at [email protected].
About The Author

Position: Columnist
Shirley holds a bachelor’s degree in English and has been an editor at the MiniTool Team for many years. She specializes in IT-related content, with a focus on data recovery, file backup, disk management, and other technical topics. She is committed to delivering clear, accurate, and practical solutions to help users resolve common computer issues.
User Comments :