How Windows 10 disconnects USB has been changed since Windows 10 version 1809. The previous Windows versions are using Better performance as the default setting, but now it is Quick removal. Read this post to get some related information.
How Windows 10 Disconnects USB Has Been Changed
Microsoft has changed the way Windows 10 controls the disconnecting a USB or Thunderbolt storage device. The influenced devices include USB thumb drives, external hard drives, flash drives, and even the USB data transfer connections between PCs and smart phones.
This change came with the wide deployment of Windows 10 October 2018 Update which is also known as version 1809.
Is This Important? YES!
Up to now, when you disconnect a USB storage device from the computer, the default policy in the previous Windows versions was the setting of “Better performance”. Since Windows 10 version 1809, the way to remove a USB device was changed to “Quick removal”.
You may ask what the difference is. In facts, the different between these two removal methods is significant, and we will show them as follows:
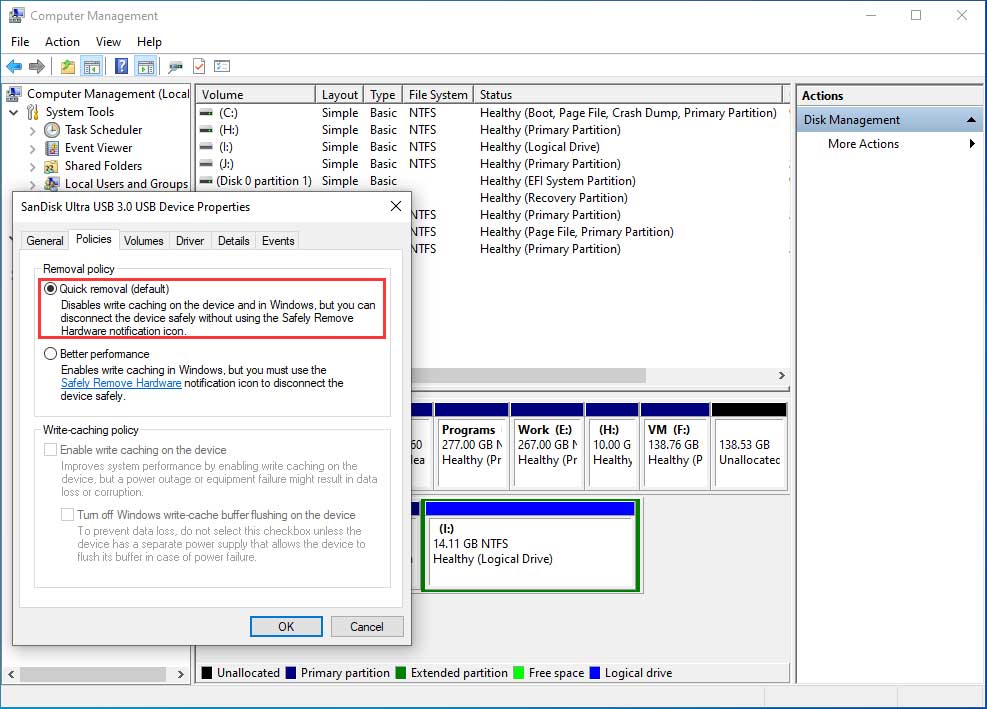
From the name of “Better performance”, you can know that this way can manage the data transfer and storage operations in a manner which can improve the device performance. This includes the process of caching files while they are being transferred, opened, and in the preparation for certain operations.
This continuous readiness on Windows’s part means that if you want to disconnect a USB device or Thunderbolt-connected storage device, you have to follow the “Safely Remove Hardware” process which means that you need to manually eject the USB device safely.
Generally, all Windows users know this procedure, and we will not repeat it here.
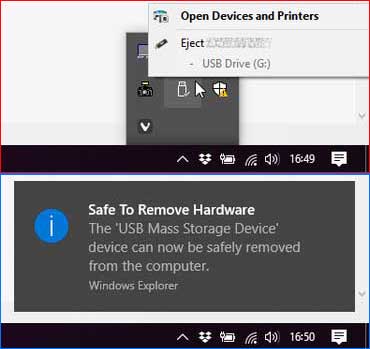
However, if you are using Windows 10 version 1809, the default state for all of the USB and Thunderbolt storage devices has been changed to “Quick removal”. This is a state where you can disconnect the external storage devices without following the “Safely Remove Hardware” process.
But, it is not easy to make the “Quick removal” as the default setting. The first important reason is that Windows will not cache disk writes anymore which means that it may take a longer time to move files to an external storage device
How to Keep “Better Performance”?
It is good news that Microsoft allows users to replace the default “Quick removal” state on a per-device basis.
If you need to copy backups to an external hard drives or copy crucial PowerPoint files or some other important business documents to a USB memory card, you must want to guarantee the safety of the transferred files without worrying data loss issue or some other potential issues. In this situation, you’d better use the “Better performance” state.

Before switching to “Better performance”, you need to know that once a USB or Thunderbolt storage device is go back to that state, you will always need to follow the “Safely Remove Hardware” process to remove the device.
Then, it is a detailed guide as follows:
Step 1: Connect the USB device with your computer, and then right-click Start to choose File Explorer. When you enter the File Explorer window, you need to identify the drive letter or label of the USB device.
Step 2: Right-click on Start and choose Disk Management. Then, choose the target drive and select Properties after right-clicking it.
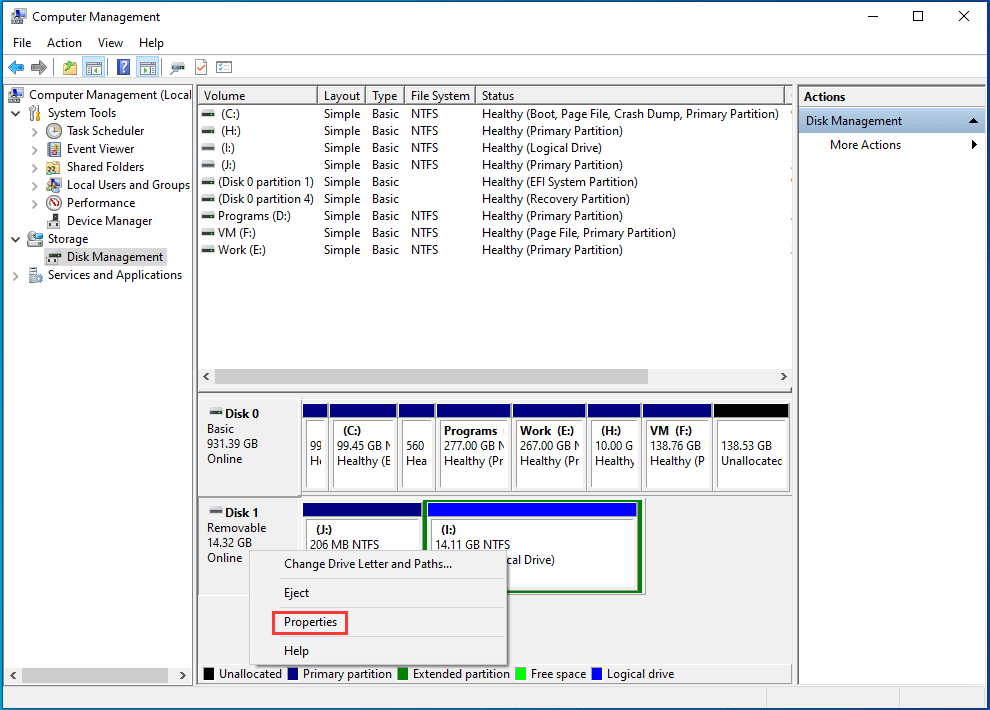
Step 3: Switch to the Policies section, and then choose the policy you want to use.
About The Author

Position: Columnist
Stella has been working in MiniTool Software as an English Editor for more than 8 years. Her articles mainly cover the fields of data recovery including storage media data recovery, phone data recovery, and photo recovery, videos download, partition management, and video & audio format conversions.
User Comments :