If you prefer using a USB flash drive on Windows 10/11, you may have faced a frustrating issue: the USB randomly disconnects and reconnects.
This problem not only disrupts file transfers, gaming, and work experience but may also cause data loss, corruption, or potentially damages the drive.
Real User Case:
“USB devices randomly disconnect on Windows 11. I upgraded to Windows 11 a pretty long time ago, don’t remember when exactly, but after a while, my computer started to have this issue. If anyone has any solution, please help.”www.reddit.com
In this comprehensive guide, we will provide several effective solutions to resolve the USB disconnection problem.
Most importantly, we will introduce how to safely recover lost files from an unstable USB drive, ensuring you never lose vital photos, documents, videos, or work-related files.
Before proceeding to the specific solution, understanding the cause of the disconnection issue can save you time and prevent potential data loss.
Why Does USB Keep Disconnecting and Reconnecting
The “USB keeps disconnecting and reconnecting” issue is primarily caused by the following factors:
- Loose or damaged USB port, cable, or drive connector.
- Windows power management may be cutting off power to USB devices.
- Outdated, missing, or corrupted USB controller drivers.
- File system errors, logical corruption, or bad sectors on the USB drive.
- Insufficient power supply for large USB drives.
- Multiple devices connected to the same hub can interfere with one another.
- System glitches or recent Windows updates might affect USB connection stability.
- Malware can disrupt your USB devices, leading to unexpected disconnections.
Now, follow the step-by-step fixes in the next part to fix the “USB keeps disconnecting” problem on Windows.
How to Fix USB Keeps Disconnecting on Windows
To resolve the USB keeps disconnecting problem, it’s advisable to start with some basic troubleshooting steps. If they don’t work, try more advanced solutions.
Quick Checks for Fixing USB Keeps Disconnecting
This USB disconnection issue may be triggered by hardware or system-related problems. Therefore, begin by trying some quick solutions:
#1. Reboot your computer to refresh system services.
#2. Clean dust from the USB port with a soft brush.
#3. Try a different USB port or PC. This will help identify if the original USB port is malfunctioning and confirm that the PC and USB drive are not faulty.
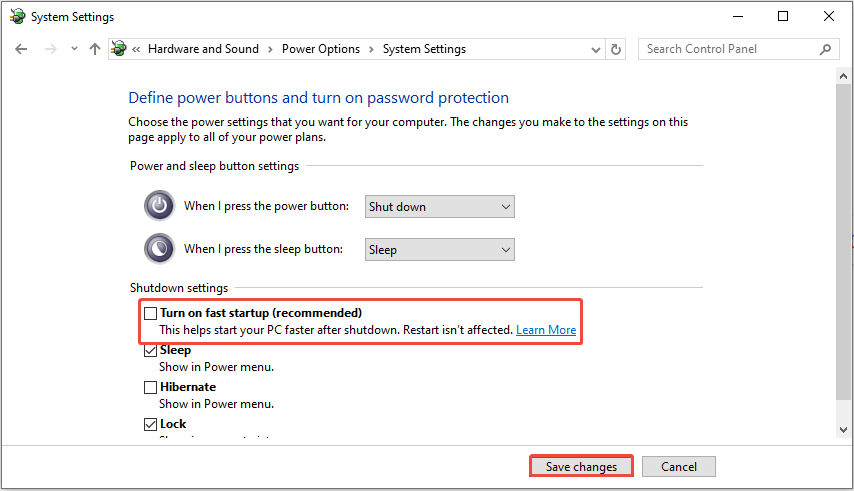
#4. Disable the fast startup settings to ensure all USB hardware is fully initialized.
Here’s the breakdown to turn off fast startup:
- Press Win + S to open the Windows search bar, type Control Panel, and press Enter.
- Go to Hardware and Sound > Power Options.
- Click Choose what the power buttons do and then Change settings that are currently unavailable.
- Uncheck Turn on fast startup (recommended) in the Shutdown settings section.
- Click Save changes and restart your computer.
If these quick steps don’t resolve the USB disconnection problem, read on to the advanced fixes below.
Fix 1. Disable USB Power Saving
Windows may automatically turn off USB devices to save power, which is a common reason for unexpected disconnections.
Here’s how to turn off the power saving setting:
Step 1. Press Win + X to open the Power User menu and choose Device Manager from the list.
Step 2. Navigate down and expand Universal Serial Bus controllers.
Step 3. Right-click on each USB Root Hub or a similar USB device, and then select Properties.
Step 4. In the Properties window, go to the Power Management tab.
Step 5. Deselect the Allow the computer to turn off this device to save power option.
Step 6. Click OK to apply the changes.
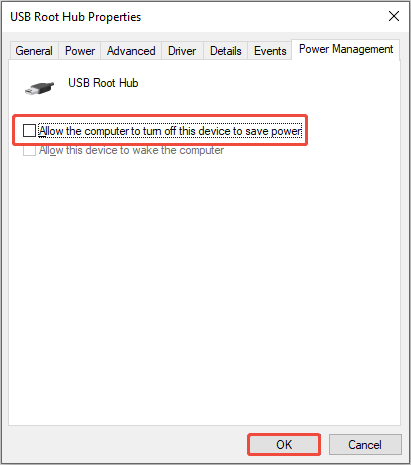
Reconnect your USB device to see if the problem is fixed.
Fix 2. Update/Reinstall the USB Drivers
USB drivers are programs that allow communication between the operating system and hardware components.
Outdated or corrupted drivers can often be the culprit behind USB devices disconnecting. Updating or reinstalling the drive can usually fix the issue.
>> Update the USB drivers:
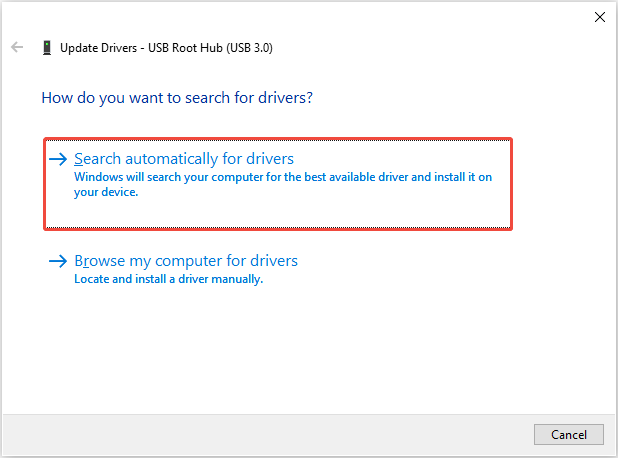
Step 1. Open Device Manager and navigate to Universal Serial Bus controllers.
Step 2. Right-click on your USB device, like USB Root Hub (USB 3.0), USB Massive Storage Device, or other problematic USB devices, and select Update driver.
Step 3. Choose Search automatically for drivers and allow Windows to install any updates.
>> Reinstall the USB drivers:
If the updates do not resolve the issue, right-click the USB device and select Uninstall device. In the pop-up window, click the Uninstall button to confirm.
Restart your computer, and Windows will automatically reinstall the driver upon reboot.
Fix 3. Disable USB Selective Suspend Setting
USB Selective Suspend is a feature in Windows designed to save power by putting inactive USB ports into a suspended state.
Although this feature is beneficial for saving energy, it may cause disconnection problems if a device is incorrectly recognized as inactive.
To disable the USB selective suspend setting, follow these steps:
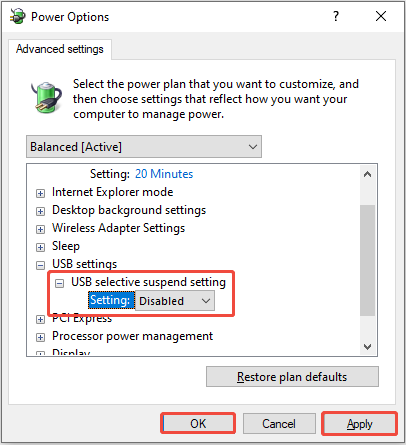
Step 1. Press Win + S to open the Windows search bar, type Control Panel, then select it from the results shown.
Step 2. Navigate to Hardware and Sound, and then click Power Options.
Step 3. Next to your currently active power plan (Balanced or Power saver), click Change plan settings.
Step 4. In the next interface, click Change advanced power settings.
Step 5. In the Advanced settings dialogue, expand USB settings, followed by USB selective suspend setting.
Step 6. Change the setting to Disabled for both On battery and Plugged in (if applicable).
Step 7. Click Apply, then OK to confirm the changes.
Restart your computer and reconnect your USB device to verify the connection.
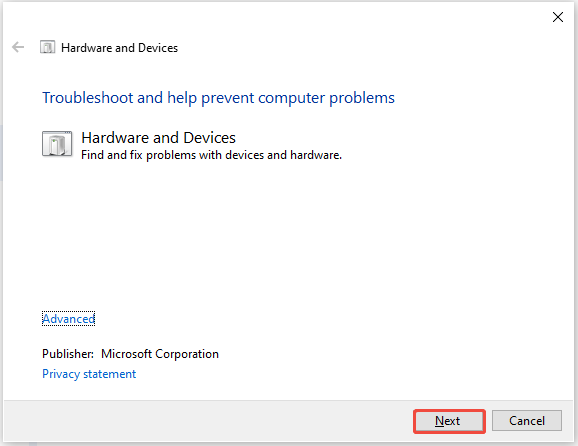
Fix 4. Run Hardware Troubleshooter
If your USB devices still disconnect after trying the previous fixes, consider using the Windows Hardware and Devices Troubleshooter.
This built-in tool will scan your computer for hardware conflicts, missing drivers, or configuration errors that may cause USB devices to disconnect.
Follow the steps to run this troubleshooting tool.
Step 1. Press Win + R to launch the Run dialog box, type command msdt.exe – id DeviceDiagnostic, and then press Enter.
Step 2. In the pop-up Hardware and Devices window, click the Next button to run the troubleshooter.
Step 3. After scanning, select Apply this fix to continue.
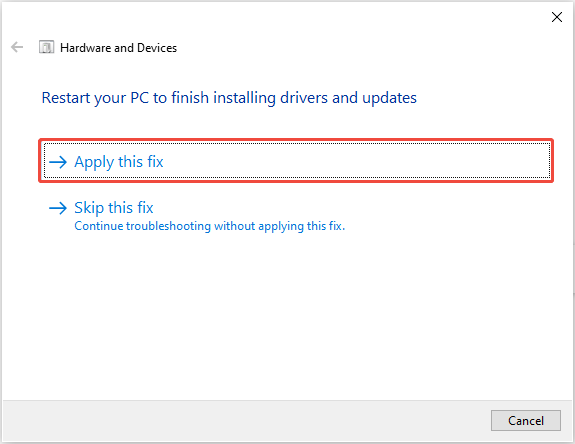
After rebooting your PC, reconnect your USB devices to check if the “USB keeps disconnecting” issue is fixed.
Fix 5. Use CHKDSK
Logical errors or bad sectors can make a USB drive unstable. Logical errors can result from improper ejection, file system corruption, or power outages. Bad sectors are physical defects on the drive.
In this situation, opt for using the CHKDSK tool to fix them. Here’s how to do it:
Step 1. Open the Windows Search bar, type cmd in the box, right-click on Command Prompt, and choose Run as administrator.
Step 2. Type the command: chkdsk X: /f /r /x, ensuring that you substitute “X” with the letter that represents your USB drive, then press Enter.
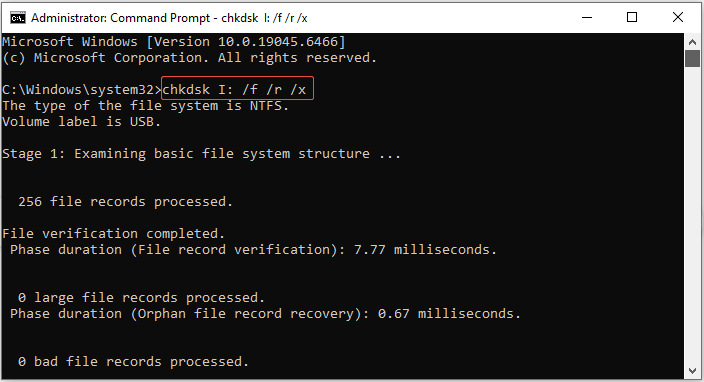
Wait for the process to finish, and then verify whether your USB drive is working correctly.
Fix 6. Update BIOS/UEFI
If all the above-mentioned solutions have been tried and USB disconnection problems continue, the issue may be related to your system’s firmware.
The BIOS or UEFI determines how your motherboard interacts with Windows and manages connected devices.
Updating it can repair deep hardware-level conflicts that cannot be solved by software or driver updates.
Follow the steps below to update the BIOS or UEFI firmware:
Step 1. Press Win + R to launch the Run dialog box, type msinfo32, and press Enter to check your existing BIOS/UEFI version and motherboard model.
Step 2. Go to your motherboard or PC manufacturer’s official site and find the Support or Downloads section.
Step 3. Download the most recent BIOS/UEFI firmware update that corresponds precisely to your motherboard model.
Step 4. Follow the manufacturer’s guidelines to create a bootable USB or use their suggested update tool.
Step 5. Restart your computer and access the BIOS/UEFI settings, usually by pressing Del or F2 during startup.
Step 6. Execute the BIOS/UEFI update carefully, following the provided directions. Ensure that you do not shut down your PC during this process.
How to Recover Data From an Inaccessible/Corrupted USB Flash Drive
When a USB keeps disconnecting or is inaccessible, your files can potentially be lost or unreadable.
In such cases, standard troubleshooting may help restore the connection but may not recover files. That’s where tools like MiniTool Power Data Recovery become useful.
For recovering data from a USB drive, MiniTool Power Data Recovery is the top option.
It can recover files under various circumstances, even if the USB drive is greyed out, turns RAW, has a corrupted file system, or the device cannot be accessed.
MiniTool Power Data Recovery is a highly targeted USB data recovery software that stands out for the following reasons:
- It can recover all kinds of files, including documents, videos, images, audio files, and emails.
- The read-only feature enables recovery without changing the data on the drive, thereby safeguarding the disk and its contents.
- The interface is user-friendly and easy to navigate, with essential functions prominently displayed.
- This software comes in various editions, including free, personal, and business versions, catering to your data recovery requirements in different scenarios.
- This free recovery tool allows for the recovery of up to 1GB of files at no cost.
Now, download and install this data recovery software to recover data from your inaccessible or corrupted USB drive.
MiniTool Power Data Recovery FreeClick to Download100%Clean & Safe
Step 1. Scan the Target USB Drive
Open MiniTool Power Data Recovery Free, and its main interface will appear. Your USB drive should be visible under Logical Drives with a USB icon.
Select it and click the Scan button to start the file scanning process.
If you encounter difficulty finding the desired USB partition here, navigate to the Devices tab next to Logical Drives and scan the entire USB disk.
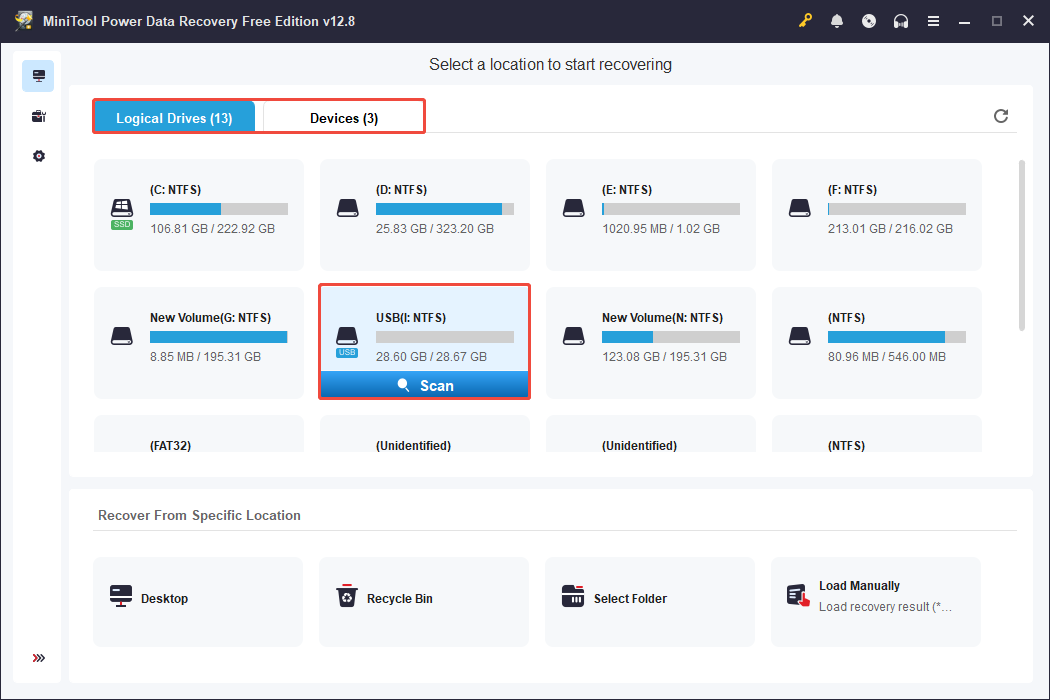
Various factors can influence the scanning duration, and it’s crucial to let the scan finish to ensure optimal scan results.
Step 2. Locate and Preview Desired Files
After the scanning process is complete, check the results and identify the files you want to recover.
There are some features to help you locate the wanted files quickly:
- The Path feature displays the scan results based on the directory structure of the files. Expand the folders one by one to discover the original location of the lost file.
- The Type feature organizes the files by file types, such as documents, pictures, videos, and audio files. Navigate to the relevant category to locate the needed file.
- The Filter feature provides a range of filtering options, including file type, date modified, file size, and file category.
- The Search feature allows you to type either the complete or partial filename for a quick search of the desired file.
Additionally, there is a function that enhances the accuracy of data recovery. The Preview feature allows you to view photos, videos, audio files, documents, and other file types before recovery.

Step 3. Save the Needed Files
Once you have checked the files, choose all the needed files and click the Save button in the scan results window.
In the new window, choose a secure location for the recovered files and click OK.
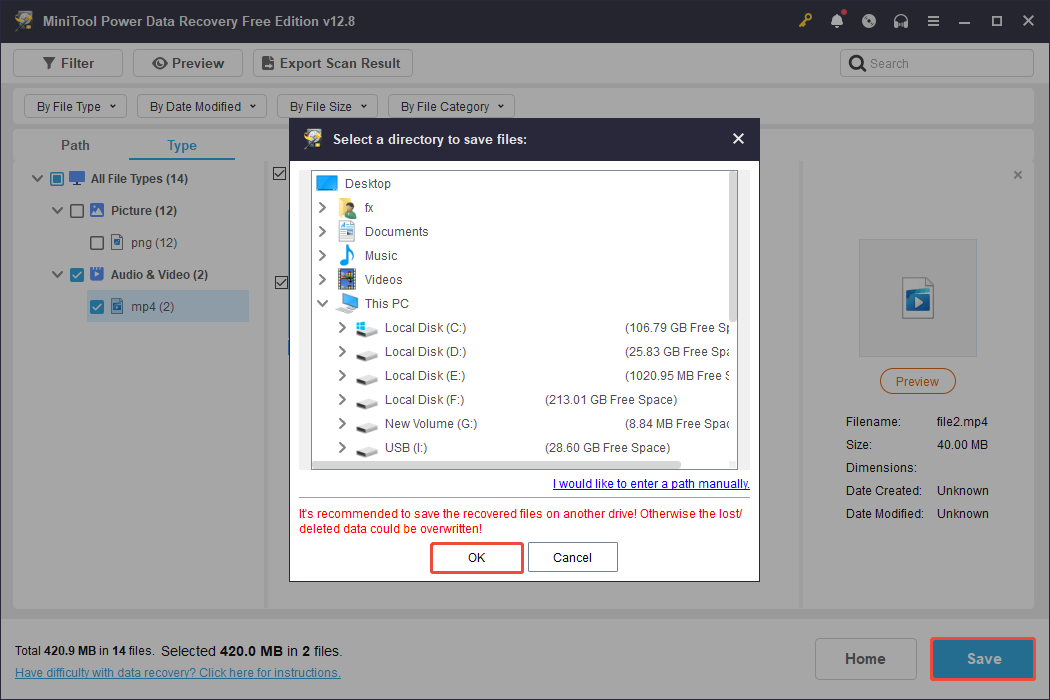
After the recovery process is complete, go to the specified directory to access the files you restored.
Recovering more than 1 GB of files is not supported in the free version; you need to upgrade to the full edition.
Bottom Line
To sum up, this post talks about how to fix the USB keeps disconnecting issue with four basic checks and six advanced fixes.
If you are facing USB data loss, try the professional and free data recovery tool – MiniTool Power Data Recovery, to rescue it.
If you encounter any issues or have any questions when using MiniTool data recovery software, please send an email to the support team via [email protected].
About The Author

Position: Columnist
Sandy became an English editor after graduation. She is devoted to finding effective solutions for diverse IT problems and provides articles on data recovery, data backup, and computer partitions and drives. In her spare time, she likes listening to music and playing games.
User Comments :