What is Net User Command
Net User is a command line tool available in Windows 11/10/8/7/Vista. The net user command is a command-line utility included with Windows that allows you to manage Windows local user accounts.
It allows you to create, delete, enable or disable users on the system and set passwords for network user accounts. Windows administrators can use the net user command-line tool to add or modify user accounts. Besides, you can get network user account information, enable or disable user accounts, set home directory paths, set account expiration times, and more.
Net User Command Syntax
Net user command follows the standard syntax system shown below. You need to launch the Command Prompt tool on your PC and you can start using the net user command.
net user [<UserName> {<Password> | *} [<Options>]] [/domain]
net user [<UserName> {<Password> | *} /add [<Options>] [/domain]]
net user [<UserName> [/delete] [/domain]]
Various functions can be performed using the appropriate parameters of the net user. You can use the following parameters with the net user command:
- <username> – Specify the username to the account you want to perform the action on.
- <password> – Set or change the password for the specified user account. Use * to get a prompt for the password.
- /domain – Used for managing domain accounts.
- /add – Create a new user account.
- /delete – Delete a user account.
- /active – Enable or disable the user account. Options are yes or no.
- /expire – Set the date when the account expires.
- /time – Specifies the times that a user is allowed to log in.
Net User Command Examples
How to use net user command? First, you need to open Command Prompt. To do this, type cmd into the Start menu, then right-click Command Prompt and choose Run as administrator.
Command 1: List All the User Accounts
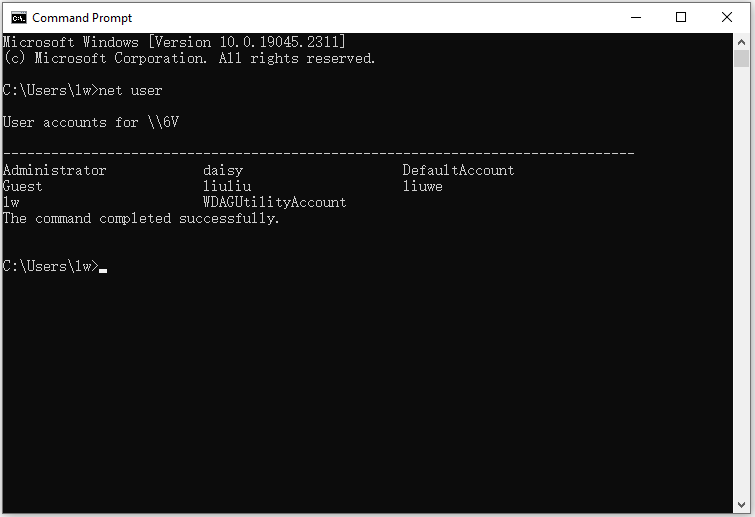
To list all the user accounts present in your system, type net user and press the Enter Key.
Tip: This WDAGUtilityAccount is part of Windows Defender Application Guard, which provides your computer with additional security against malicious attacks while using the Internet.

Command 2: Add a New User Account
To add a new user account in your Windows, you need to type net user /add username and press the Enter key.
To verify whether your new user account is created or not, you can either use the net user command again. Alternatively, you can go to Control Panel > User Accounts > Change Account Type. You can see your newly created user account.
Command 3: Create a Password for the New Account
To assign a password to your new account, type Replace user_name and new_password with the new account name you created previously and the password that you want to create.
Command 4: Enable or Disable User accounts
To enable and disable accounts, simply replace /Active:no with /Active:yes.
Command 5: Delete a Specific User Account
To delete a specific user account, you can use the command net user /delete user_account_name. Replace user_account_name with the name of the user account that you want to delete.


User Comments :