PktMon.exe is a Windows 10 snap-in tool that can help you find and solve network problems. It can help you find the reasons for network latency and identify impacted applications. It can also provide insight into top metrics when cooperating with an additional set of tools. This post from MiniTool Software will show you how to use it on Windows 10.
What Is Network Sniffer Tool PktMon.exe on Windows 10?
PktMon.exe, which is also known as Packet Monitor, is a new tool for network sniffer/diagnostic and packet monitoring tool on Windows 10. You can find it in the Systems folder. This means that you can open it from the Run or Command Prompt or PowerShell.
When this program shows you about Netsh Trace Command, you are right because this command can help you enable and configure the network tracing, helping you troubleshoot network connectivity issues on Windows 10.
What Can PktMon Do?
You can run PktMon.exe to find out what can it do for you. Here, we will show you how to run it from Windows PowerShell.
- Right-click on Start.
- Select Windows PowerShell (Admin) from the WinX menu.
- Type pktmon help and press Enter.
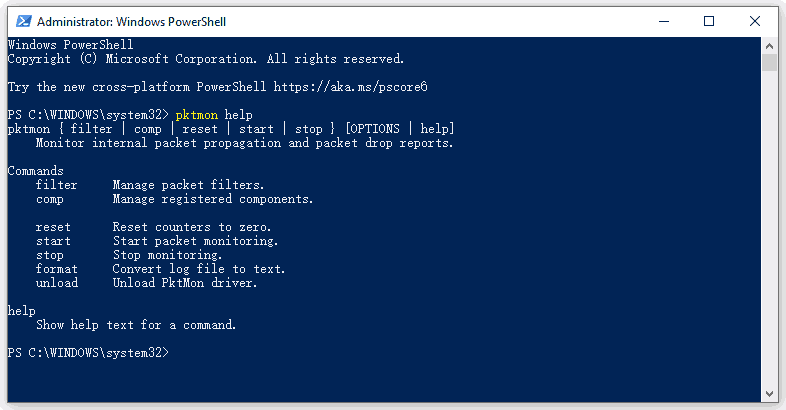
This tool will show you what can it do for you:
Commands
Filter Manage packet filters.
comp Manage registered components.
reset Reset counters to zero.
start Start packet monitoring.
stop Stop monitoring.
format Convert log file to text.
unload Unload PktMon driver.
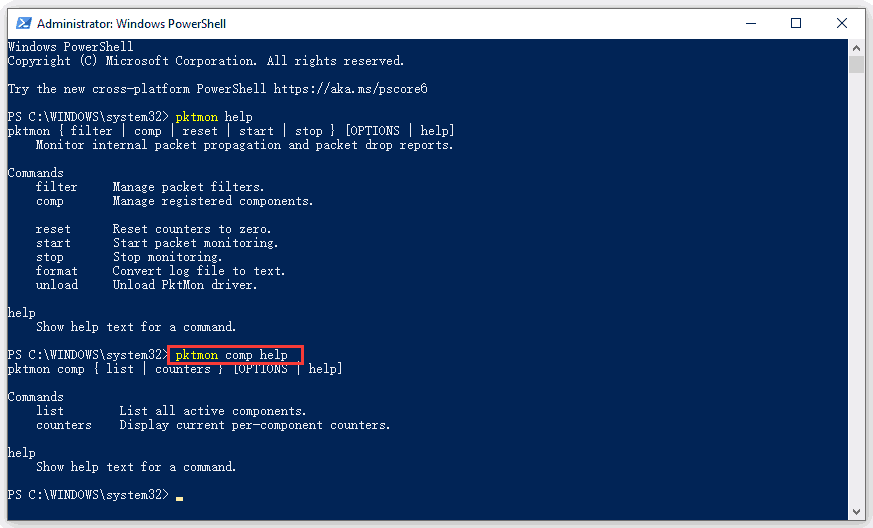
If you want to view the further help on a specific command, you can run help against that command to find more options. Take comp as an example:
You can type pktmon comp help and press Enter to find the details:
Pktmon comp{ list | counters } [OPTIONS | help]
Commands
List List all active components.
Counters Display current per-component counters.
How to Monitor Network Traffic via PktMon.exe?
Suppose that you want to monitor a port number on your PC. This is the guide:
Step 1: Create a Filter
The filter command enables you to monitor your computer network traffic. You can use this command to create a filter and then control which packets are reported based on Ethernet Frame, IP header, TCP header, and Encapsulation.
If you run the program this is mentioned as follows, you can get full details on what you can do using the filter:
pktmon filter add help
Here, we assume that you want to monitor the TCP port no 1088.
- Run Windows PowerShell or run Command Prompt as an administrator.
- Using the command of pktmon filter add -p [port] to create a packet filter. In this case, the command should be pktmon filter add -p 1088.
- Press Enter to run the command and then you can see a list of added filters.
- Run pktmon filter remove to remove all the filters.
Step 2: Start Monitoring
Here, you need to manually start the monitoring process. Now, run the following command to start monitoring: pktmon start –etw – p 0.
The monitoring process will start and create a log file at the mentioned location. If you want to stop the logging, you need to manually stop using the stop argument. Otherwise, it will automatically stop when your computer shuts down.
On the other hand, if you run the monitoring command with -p 0, this tool will capture 128 bytes of a packet.
Log filename: C:\Windows\system32\PktMon.etl
Logging mode: Circular
Maximum file size: 512 MB
Step 3: Export Log
The log file will be saved as a PktMon.ETL file. You can convert it to a readable format with the following command:
pktmon format PktMon.etl -o port-monitor-1088.txt
Then, you can use notepad to open the log file and read it. You can also use the Microsoft Network Monitor to directly read the ETL file.
Bottom Line
After reading this post, you should know how to use Network Sniffer Tool PktMon.exe to find and fix the network issues on Windows 10. Should you have any related problems, you can let us know in the comment.
About The Author

Position: Columnist
Stella has been working in MiniTool Software as an English Editor for more than 8 years. Her articles mainly cover the fields of data recovery including storage media data recovery, phone data recovery, and photo recovery, videos download, partition management, and video & audio format conversions.
User Comments :