Are you troubled by a problem that your PC always boots twice before starting? Many other people suffer from this problem as well. Don’t worry about this problem. You can get effective methods from this MiniTool post.
What Is Double-Boot
When your computer is in a double-boot, it means the PC always boots twice before starting. The double-boot is a feature of the BIOS menu that may occur after changing BIOS or configuration of system settings.
Sometimes, the parameter change of BIOS will cause your computer to power on and off twice in a short time, then boot up normally. In most cases, the fast startup/fast boot might be the trigger. If you want to know more causes of this problem, please keep reading.
MiniTool Power Data Recovery FreeClick to Download100%Clean & Safe
Why Does a Computer Turn on Twice Before Starting
Some possible reasons for this issue are listed as follows:
- Fast startup: Fast startup allows you to boot your computer quickly by saving your operation system to a hibernation file. But sometimes, it may cause the computer to boot twice quickly.
- Overlocking: Although more and more manufacturers allow users to overlock components of CPU or GPU to increase the performance of computers, it is still possible to cause problems like the dual boot.
- Outdated BIOS: Though updating BIOS might bring you new problems on your computer, it is the same as the outdated BIOS.
- Etc.
Fix PC Always Boots Twice Before Starting
There are four methods for you to fix the PC always boots twice before starting problem. You can try them one by one to figure out which works best for you.
Method 1: Disable Overlocking Software
If you have downloaded any overlocking software, you are suggested to disable them. Overlocking your CPU/GPU can improve the performance of your computer, but it will shorten the lifespan of your computer battery and might make your computer become unstable.
If you are puzzled by whether it is good to overlock your CPU, this article is a good place to find answers.
Method 2: Turn off Fast Startup
Fast startup probably becomes another cause of the computer’s dual boot. You can turn off the fast startup to see whether the problem can be solved.
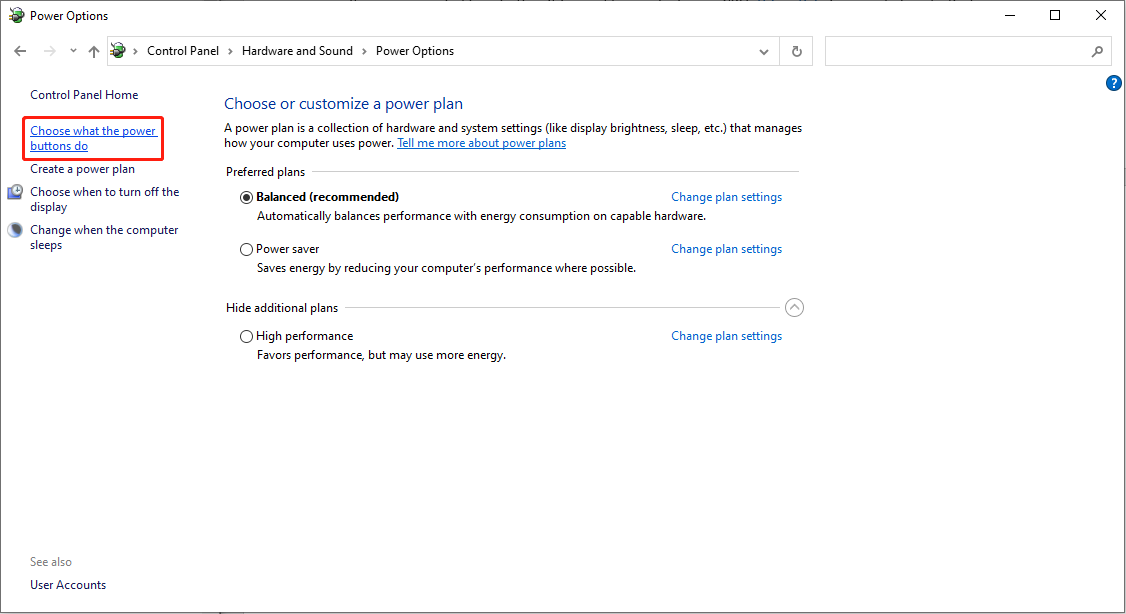
Step 1: Press Win + S and type Control Panel into the search box.
Step 2: Hit Enter to open the Control Panel window.
Step 3: Navigate to Hardware and Sound > Power Options.
Step 4: Select the Choose what the power button do option on the left side.
Step 5: Click on Change settings that are currently unavailable to configure the Shutdown settings.
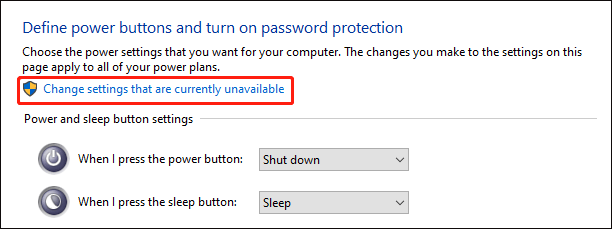
Step 6: Uncheck Turn on fast startup (recommended) in the Shutdown settings section, then click Save changes.
Now, you can restart your computer to check the problem. If you are unable to turn off fast startup, you can refer to this post:
Method 3: Update BIOS
As stated above, outdated BIOS might be responsible for the problem as well. But you should be careful when trying to update it. The first thing is to check whether your BIOS needs to be updated or not.
Part 1: Check the BIOS Version
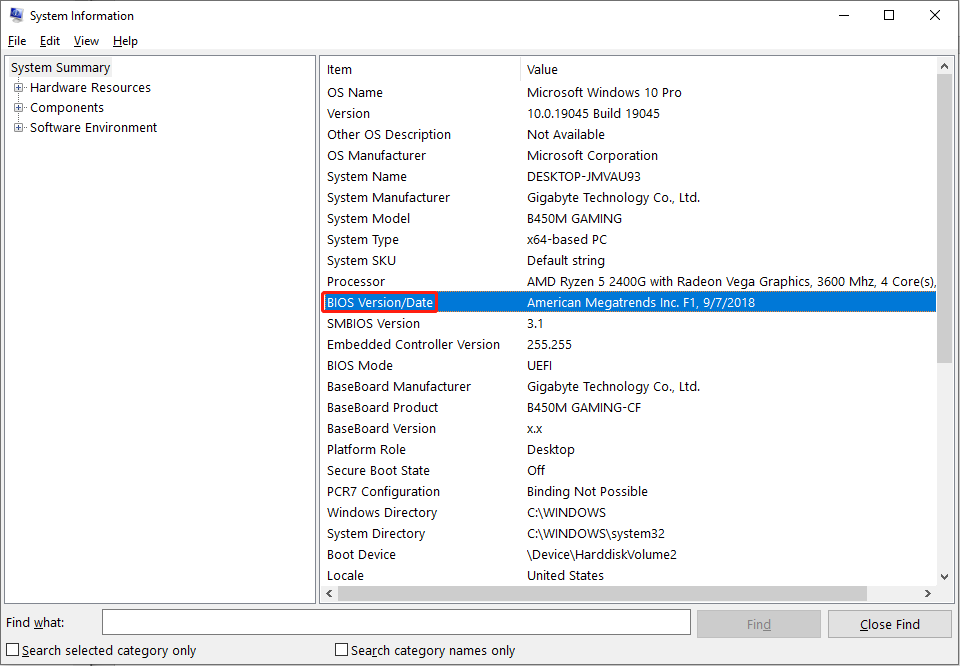
Step 1: Press Win + R to open the Run window.
Step 2: Type msinfo32 into the text box and hit Enter.
Step 3: Look for the BIOS Version/Date on the right pane, then you need to compare the version with the latest version from the manufacturer’s website of your computer.
If the BIOS is out of date, you can follow the next steps to update it.
Part 2: Update BIOS
Step 1: Go to the corresponding support page of your computer, then you need to enter your service tag or serial number to identify your computer.
Step 2: Look for the BIOS section to find and download the latest BIOS version. Follow the on-screen instructions to finish the rest steps.
Method 4: Reset BIOS
If all the methods above do not fix the problem, you can try this one as the last choice.
Step 1: Restart your computer and press and hold the F2 to boot into BIOS.
Step 2: You can look for the Load Setup Defaults choice or other similar options on your BIOS menu by using the arrow keys. When finding the choice, press Enter and select Yes.

Step 5: Press F10 to save the change and hit Enter to exit BIOS.
Bottom Line
Do not be annoyed when your PC always boots twice before starting. You can try the above methods to fix the problem. If your files get lost during the process, please retrieve them with MiniTool Power Data Recovery as soon as possible.
User Comments :