Issue: ProductInfo.dll Bad Image Error
ProductInfo.dll Bad Image Error is an error related to dynamic link library (DLL) files, which usually means that the ProductInfo.dll is missing from your computer and the system cannot load or run the file correctly. Here are some possible reasons:
- File corruption or missing: The ProductInfo.dll file may be damaged or accidentally deleted.
- Compatibility issues: The DLL file may not be compatible with the current Windows version or other software.
- Malware infection: Malware may have tampered with the DLL file, causing it to not work properly.
- Registry issues: The registry key for the DLL file may be damaged or missing.
- System update issues: Some system updates may cause DLL file loading errors.
How to Fix ProductInfo.dll Bad Image Error
Fix 1: Scan for Viruses
As mentioned before, Malware may have tampered with the DLL file, causing ProductInfo.dll bad image error. In this case, you can perform a virus scan.
Step 1: Press the Win + I keys to open the Settings app.
Step 2: Click on Update & Security > Windows Security.
Step 3: Under the Protection area section, click on Virus & threat protection.
Step 4: Click on Scan options. Choose the scan based on your needs and click on Scan now.
Fix 2: Try a Clean Boot
A clean boot will disable all non-essential startup programs and services, helping you determine if third-party software or a service is causing the DLL error. This operation can temporarily eliminate potential interference factors and allow the system to run with minimal load, thereby reducing the occurrence of errors.
Step 1: Press the Win + R keys to open the Run dialog.
Step 2: Type msconfig in the box and press Enter.
Step 3: Go to the Services tab, check the box for Hide all Microsoft services, and click on Disable all.
Step 4: Switch to the Startup tab and click on Open Task Manager.
Step 5: Right-click on every item, select Disable, and then close the window.
Step 6: Go to the Boot tab and tick Safe Boot.
Step 7: Finally, click on Apply > OK to make the computer restart in safe mode.
After restarting, enable every item to confirm the problematic one.
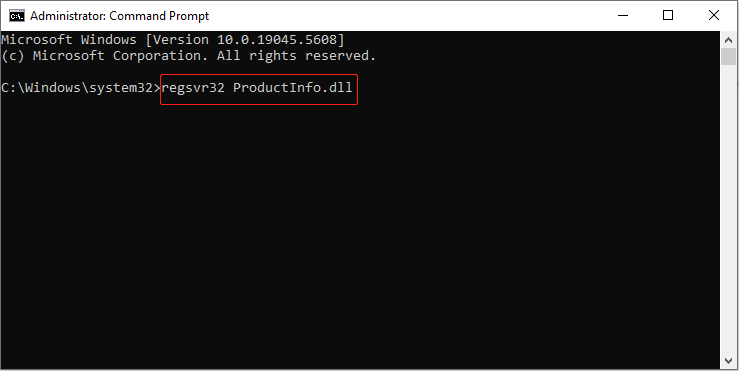
Fix 3: Re-register the DLL file
Re-registering the DLL file can fix problems related to dynamic link libraries (DLLs). Some applications may not be able to correctly load the required DLL files, and re-registering ensures that the application can find and use the correct files.
Step 1: Type cmd in the Windows search box, right-click on Command Prompt, and choose Run as administrator.
Step 2: When asked by UAC, click on Yes to open the utility.
Step 3: Type regsvr32 ProductInfo.dll in the window and press Enter to register the missing DLL file.

Fix 4: Run DISM and SFC Scans
Running DISM and SFC scans can repair system files and resolve issues in Windows. An SFC (System File Checker) scan checks for and repairs corrupted or missing system files to restore system functionality.
Step 1: Run Command Prompt as an administrator. Click on Yes in the pop-up UAC window.
Step 2: Type DISM.exe /Online /Cleanup-image /Restorehealth and press Enter.
Step 3: Continue typing sfc /scannow and press Enter.
Wait patiently for the process to complete.
Fix 5: Perform a System Restore
If you recently installed third-party software, that could also cause this problem. System Restore can restore your computer to its previous state and fix problems caused by software installations or changes in settings.
Step 1: Type System Restore in the Windows search box and press Enter.
Step 2: Click on the System Restore button. In the new window, click on Next.
Step 3: Choose a restore point and click on Next > Finish.
Restart your computer, and then a status report on the restore operation will be displayed.
Fix 6: Uninstall Related Programs
The associated program may contain corrupted DLL files or be incompatible with other software, which may cause DLL errors. Uninstalling related programs can replace these files. It is also necessary to remove remnants of files that may have corrupted the files, to avoid having to re-register them again when you reinstall the application and replace the files.
MiniTool Power Data Recovery FreeClick to Download100%Clean & Safe
Bottom Line
In the end, I hope these methods, including scanning for viruses, re-registering DLL files, repairing damaged system files, and more, can help you fix this error.
About The Author

Position: Columnist
Chelsea graduated from university with a major in English. She has a strong interest in English writing. It is this passion for writing that led her to become an English editor. Her articles mainly focus on data recovery and other computer industry news. As an energetic and outgoing girl, Chelsea enjoys listening to music, singing, riding bikes, and eating in her spare time.
User Comments :