Apple provides several Apps and features on the iOS devices to help users sync photos, especially those important to them. If you also want to sync photos from iPhone to Mac but don’t know how, please read the methods and steps introduced in the following content carefully.
There is a lot of MiniTool software that is available for photo backup, photo recovery, and disk management.
What does sync mean?
The word sync is shot for synchronize, which means to back up your data in another location. In this way, you are able to access the files easily and not afraid of sudden data loss.
The question is how to sync photos from iPhone to Mac. In fact, it’s easy to sync photos from iPhone (iPad or other iOS devices) to Mac since there are some built-in apps and features provided by Apple. This post focuses on demonstrating these methods to you.
How to transfer photos from iPhone to PC Windows 10?
Data Recovery for MacClick to Download100%Clean & Safe
How to access files on iPhone? You may use the Files app.
How to Sync Photos from iPhone to Mac
Photos can be very useful so many people want to sync them from iPhone or other iOS device to Mac. I advise you to sync photos from iPhone to Mac at fixed periods (pictures can also be synced together with photos).
Turn on iCloud Photos
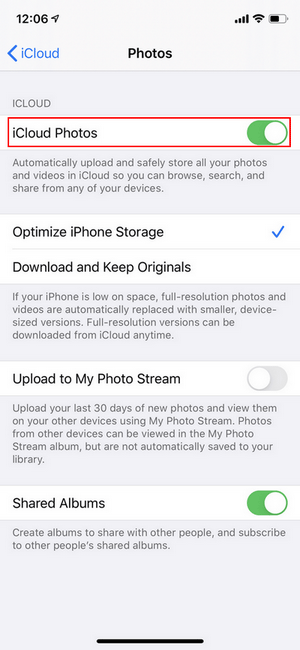
The photos (and pictures saved in your iPhone album) will be synced automatically once you turned on the iCloud Photos. How do I automatically sync photos from iPhone to Mac? The answer is turning on iCloud Photos.
How to turn on iCloud Photos on iPhone, iPad, or iPod touch:
- Navigate to Settings.
- Click on your username (the first option under Settings).
- Select iCould.
- Select Photos.
- Toggle the switch of iCloud Photos to On.

How to turn on iCloud Photos on Mac:
- Click on the Apple logo icon at the top left.
- Select System Preferences.
- Choose iCloud and then Options next to Photos.
- Turn on iCloud Photos.
You can also turn on the iCloud Photos option on your Apple TV or Windows PC.
How to recover files if you have deleted them on Mac by mistake?
Sync Photos from iPhone to Mac Using Finder
How to sync iPhone photos to Mac:
- Connect your iPhone to the Mac via a USB or USB-C cable. (You can also connect through Wi-Fi connection as long as you know how to turn on Wi-Fi syncing.)
- Open Finder on your Mac.
- Look for your iPhone in the Finder sidebar and select it.
- Select Photos from the menu bar. (Please make sure the iCloud Photos is turned off.)
- Check the Sync photos to your device from option.
- Choose Photos, Pictures, or a folder from the drop-down menu.
- Specify the photos to sync under guidance.
- Modify the syncing options according to needs; you can select Include videos, Only favorites, or Automatically include photos from a period.
- Click Apply to confirm your selection and wait for the syncing process to end.

You can turn off the Finder syncing (stop syncing some albums or stop syncing all photos) any time you want.
How To Check Storage On Mac: 5 Ways Available.
Sync Photos from iPhone to Mac via Photos App
Follow these steps to transfer photos from iPhone to Mac:
- Connect your iPhone to Mac.
- Unlock the iPhone and click Trust on iPhone.
- Launch Photos app.
- Shift to Import tab.
- Select the photos you want sync/transfer.
- Click Import Selected. (You can also click Import All New Photos to sync all new photos from iPhone to Mac.)

Sync Photos from iPhone to Mac Wirelessly Using AirDrop
- Open Mac -> navigate to Finder -> select Go -> choose AirDrop -> turn on Bluetooth and WiFi.
- Swipe down from the top of your iPhone screen -> tap & hold on the blank place in the area containing Airplane Mode, Cellular Data, WLAN, and Bluetooth -> click on the AirDrop icon -> select Contacts Only or Everyone.
- Open Photos app on iPhone -> select the photos you want to sync on iPhone -> click on the share icon at the bottom left -> select AirDrop -> click the name of your Mac.


![[SOLVED] How To Recover Deleted Files On Mac | Complete Guide](https://images.minitool.com/minitool.com/images/uploads/2018/09/mac-file-recovery-thumbnail.jpg)
User Comments :