It’s annoying to encounter the “This PC can’t run Windows 11 on VirtualBox” issue. Luckily, this post can help you solve the problem. You can follow this guide from MiniTool to get rid of the issue. Now, keep on your reading.
This PC can’t run Windows 11 on VirtualBox
When you try to install Windows 11 on your VirtualBox, you may receive the “This pc can’t run Windows 11 on VirtualBox” error message. This issue can also occur on Windows 10/11 hosts and Vmware Workstation.
Then, let’s see how to get rid of the “This PC can’t run Windows 11 on VirtualBox” issue.
How to Fix This PC can’t run Windows 11 on VirtualBox
Fix 1: Change the Windows Version You Choose
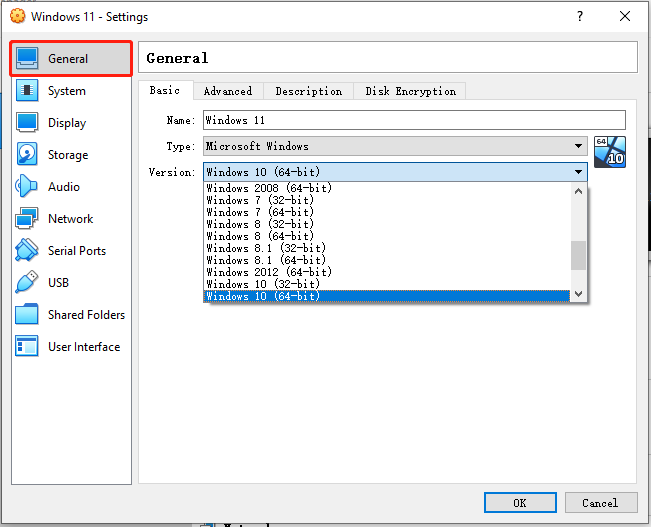
Virtualbox allows you to choose which version of Windows to install and set the virtual machine’s resources accordingly. You can change the Windows 11 version to Windows 10 or others. This method is proved useful to fix the “Windows 11 not installing on Virtualbox” issue.
Step 1: Open the VirtualBox and click the Settings icon and go to the General tab.
Step 2: Scroll down the menu next to the Version line and change the Windows version.
Related articles: Fixed: This PC Can’t Run Windows 11 on Vmware Workstation
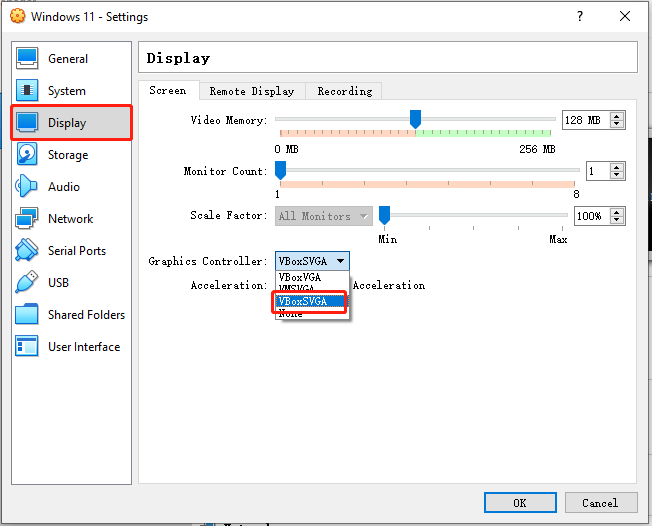
Fix 2: Select VBoxSVGA as Your Video Adapter
If you are unable to install Windows 11 on VirtualBox, you can also try to select VBoxSVGA as your video adapter.
Step 1: Open the VirtualBox and click the Settings icon and go to the Display tab.
Step 2: Scroll down the menu next to the Acceleration line and choose VBoxSVGA.
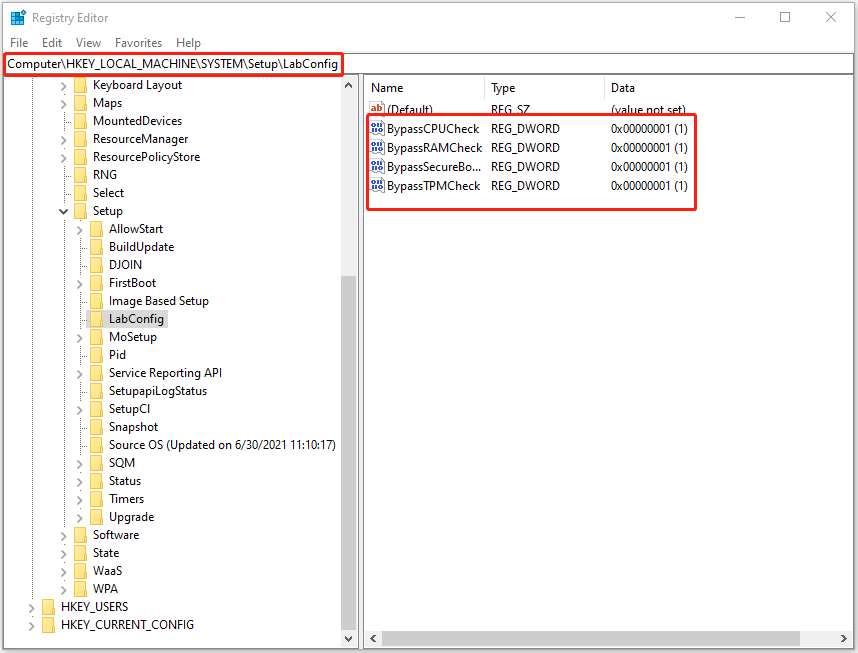
Fix 3: Bypass the Check
If the previous methods are not working, you should try to bypass the check. Follow the guide below:
Step 1: After you receive the “This PC can’t run Windows 11” on VirtualBox, you need to restart the VirtualBox.
Step 2: Then, press the Shift + F10 keys together to open the command line window on the first page of windows 11 installation.
Step 3: Type regedit and press the Enter key to open Registry Editor.
Ste 4: Then, go to this path – Computer\HKEY_LOCAL_MACHINE\SYSTEM\Setup.
Step 5: Right-click the Setup key, then, choose New and click Key. Name it as LabConfig. Step 6: Click LabConfig and right-click the empty space to select the DWORD (32-bit) Value option. Name it as BypassTPMCheck. Double-click it to change the value data to 1, and press OK.
Step 7: Right-click the empty space to select the DWORD (32-bit) Value option. Name it as BypassCPUCheck. Double-click it to change the value data to 1, and press OK.
Step 8: Right-click the empty space to select the DWORD (32-bit) Value option. Name it as BypassRAMCheck. Double-click it to change the value data to 1, and press OK.
Step 9: Right-click the empty space to select the DWORD (32-bit) Value option. Name it as BypassSecureBootCheck. Double-click it to change the value data to 1, and press OK.
Final Words
Here is how to fix the “This PC can’t run Windows 11 on VirtualBox” issue. Should you have any related issues, you can let us know in the comment.
User Comments :