Virtual Machine Management Service Is Not Present on This Machine
When using your computer, an error may appear on the computer screen and the detailed error message says “The Virtual Machine Management Service (VMMS) is not present on this machine. Ensure that the ‘Hyper-V Services’ feature is enabled”.
Hyper-V provides hardware virtualization so that you can run multiple operating systems as virtual machines on the virtual hardware. But sometimes Hyper-V doesn’t work as expected and the Virtual Machine Service not present error appears. This issue can happen on Windows 11 and Windows 10.
Well then, how can you get rid of this error from your computer? Take it easy and move to the next part to get some effective solutions.
Fixes for VMMS Is Not Present on This Machine
Check If Virtualization Is Enabled
First and foremost, go to check if virtualization is enabled on your computer. Or else, Hyper-V cannot work properly with the error mentioned. Just launch Task Manager in Windows 11/10, go to Performance and see if Virtualization is Enabled.
If it is disabled, go to enable it in BIOS. Here is a related article for you – 2 Ways – How to Enable Virtualization in Windows 10/11.
Ensure Hyper-V Features Are Installed
Perhaps Hyper-V features are not installed on your computer. So, install them by following the steps below.
Step 1: Type Windows feature in the search box and click Turn Windows features on or off.
Step 2: In the pop-up window, expand Hyper-V, check the boxes of Hyper-V Management Tools and Hyper-V Platform.
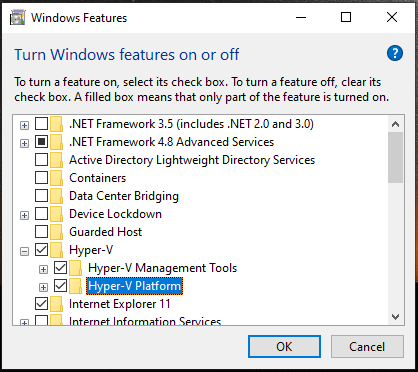
Step 3: Click OK to install the features.
Enable Hyper-V Services
If Hyper-V service is not enabled, the error “Virtual Machine Management Service is not present on this machine” may appear on your Windows 11/10 PC. So, enable the service to fix your issue.
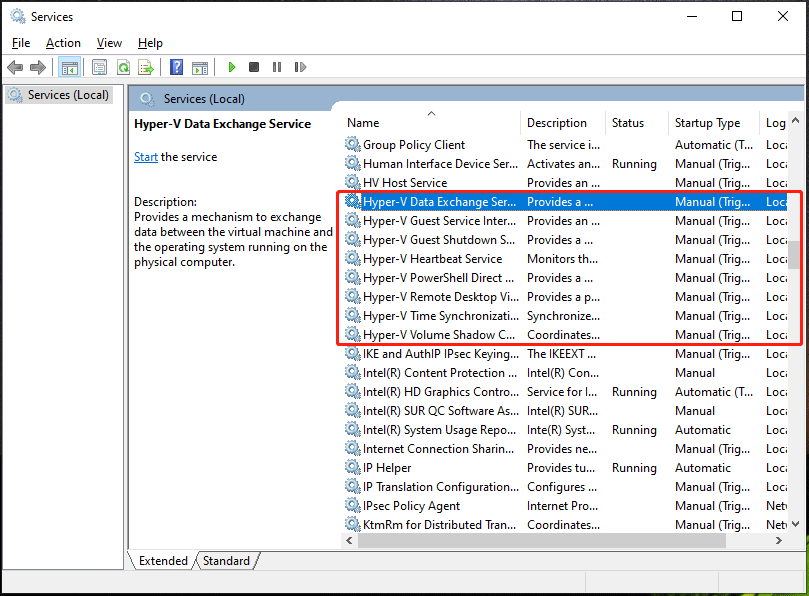
Step 1: Type services.msc in the search box and click Services to launch this app.
Step 2: Right-click on each Hyper-V service and choose Properties.
Step 3: Make sure the service is running. If not, click Start.
Step 4: Click Apply and OK to save the changes.
Enable Hyper-V in Command Prompt
This is another solution to fix Virtual Machine Management Service not present and see what you should do.
Step 1: Type cmd in the search bar and right-click Command Prompt to choose Run as administrator.
Step 2: Execute this command – DISM /Online /Enable-Feature /All /FeatureName:Microsoft-Hyper-V.
After that, reboot your computer and see if your issue is solved.
Related article: How to Enable Hyper-V on Windows 11? Here Are 3 Ways
Uninstall Third-Party Virtualization Software
If you have installed a third-party virtualization program on your Windows 11/10 PC, the app may interfere with Hyper-V, leading to the error “Virtual Machine Management Service is not present on this machine”. You need to uninstall this software from your computer.
Step 1: Press Win + R, type in appwiz.cpl and click OK to open the Programs and Features page.
Step 2: Right-click the target app and choose Uninstall to remove it.
Exclusive 50% OFF Revo Uninstaller Pro
Bottom Line
Do you get the error “Virtual Machine Management Service is not present on this machine” on a Windows 11/10 computer? When encountering this issue, try the solutions above and you can easily get rid of the trouble. Besides, leave a comment below if you have any other ways to fix this error.
About The Author

Position: Columnist
Vera has been working at the MiniTool Team for over 10 years as a technical editor and content writer. She mainly focuses on disk and partition management, data recovery, Windows backup and restore, and PC troubleshooting. Through in-depth software testing and hands-on experience, she has helped users solve a wide range of computer problems and better protect their data on Windows devices.
User Comments :