Why Do You Upgrade Acer Aspire Laptop Hard Drive?
Acer Aspire is a series of personal computers designed by Acer Inc. for casual household or light business use. There are different models and specifications for the Aspire series, while the 1, 3, 5, and 7 are the main models. Many people like to choose them as their personal computers.
Different models are equipped with different storage device configurations. Many Acer Aspire laptops only have an M.2 SSD, while some have a 2.5” HDD and an M.2 SSD.
Sometimes, users may want to do the Acer Aspire SSD upgrade for the following reasons:
- Upgrade the M.2 SSD to a larger or faster one to get a better read/write speed or more free storage space.
- Upgrade the HDD to a 2.5” SATA SSD to get better performance.
How to Upgrade the M.2 SSD?
How to upgrade the M.2 SSD? You can follow the guide below.
Part 1. Migrate the OS
The first step you should do to upgrade the M.2 SSD is to migrate the OS. To do that, I recommend you use MiniTool Partition Wizard. This app is very professional and reliable and provides the Migrate OS to SSD/HD feature to help you migrate OS to SSD without reinstalling OS.
In addition, this feature-rich tool can also help you format SD card FAT32, rebuild MBR, change cluster size, convert MBR to GPT, resize/move partitions, partition hard drive, recover data from hard drive, and more. Here’s how to do it:
Step 1. Put the new SSD into a compatible enclosure and connect the enclosure to your Acer Aspire laptop. Then, click the Download button to get the MiniTool Partition Wizard installation package, and follow the on-screen instructions to install it on your Acer Aspire laptop.
MiniTool Partition Wizard DemoClick to Download100%Clean & Safe
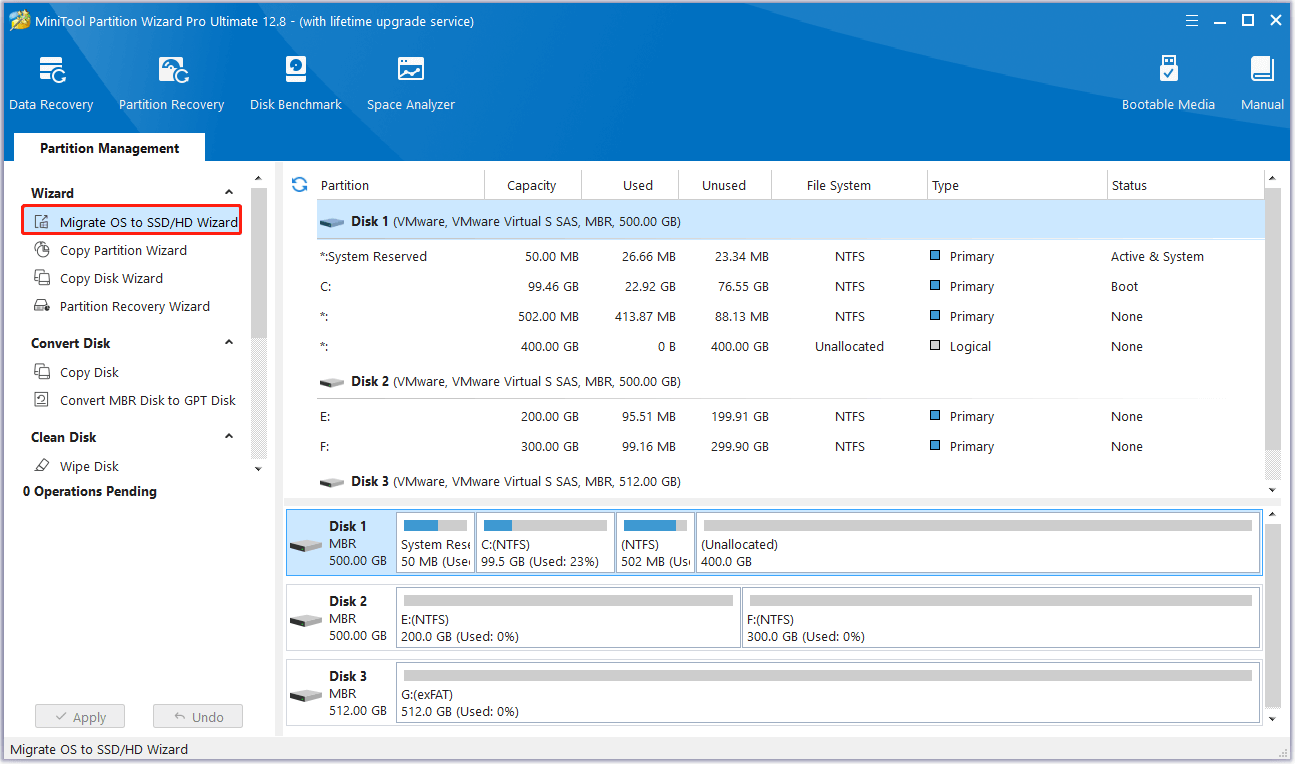
Step 2. Launch it into its main interface and select the Migrate OS to SSD/HD Wizard feature in the left panel.
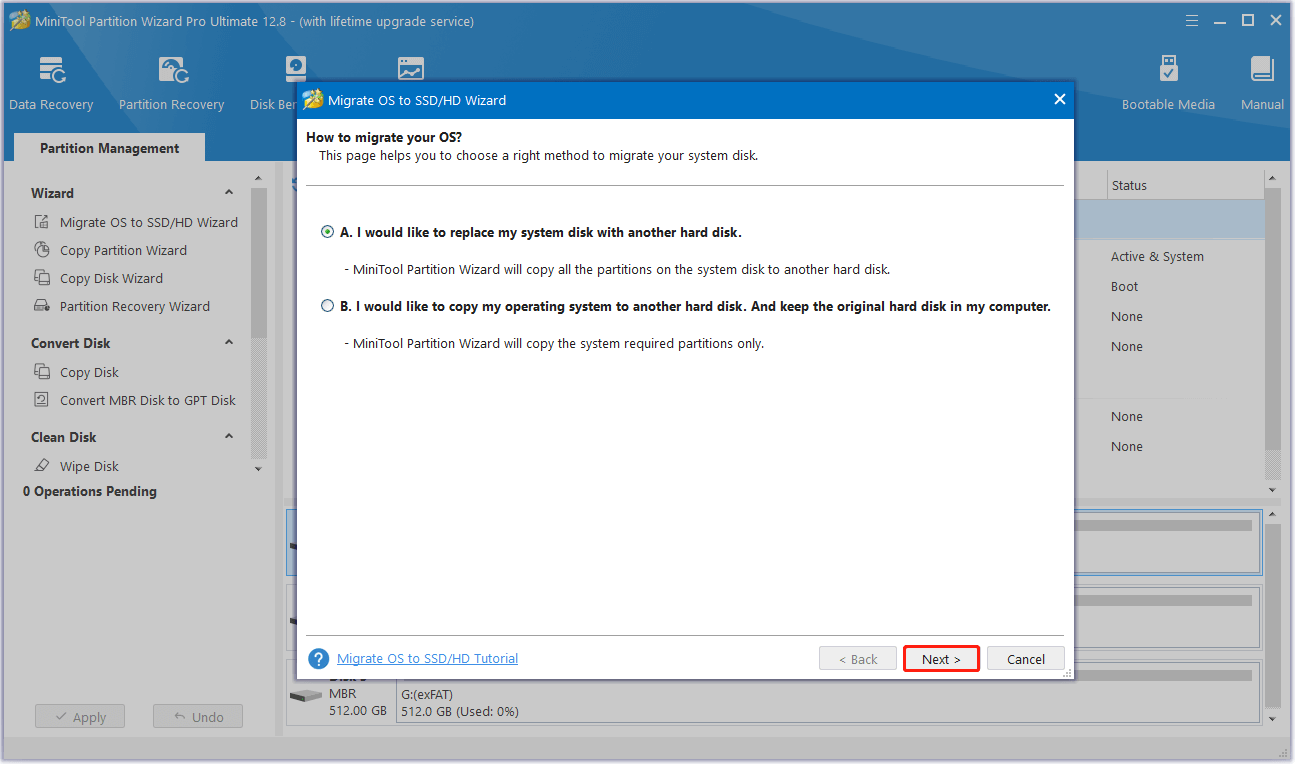
Step 3. In the Migrate OS to SSD/HD Wizard window, choose “A. I would like to replace my system disk with another hard disk.” and click Next.
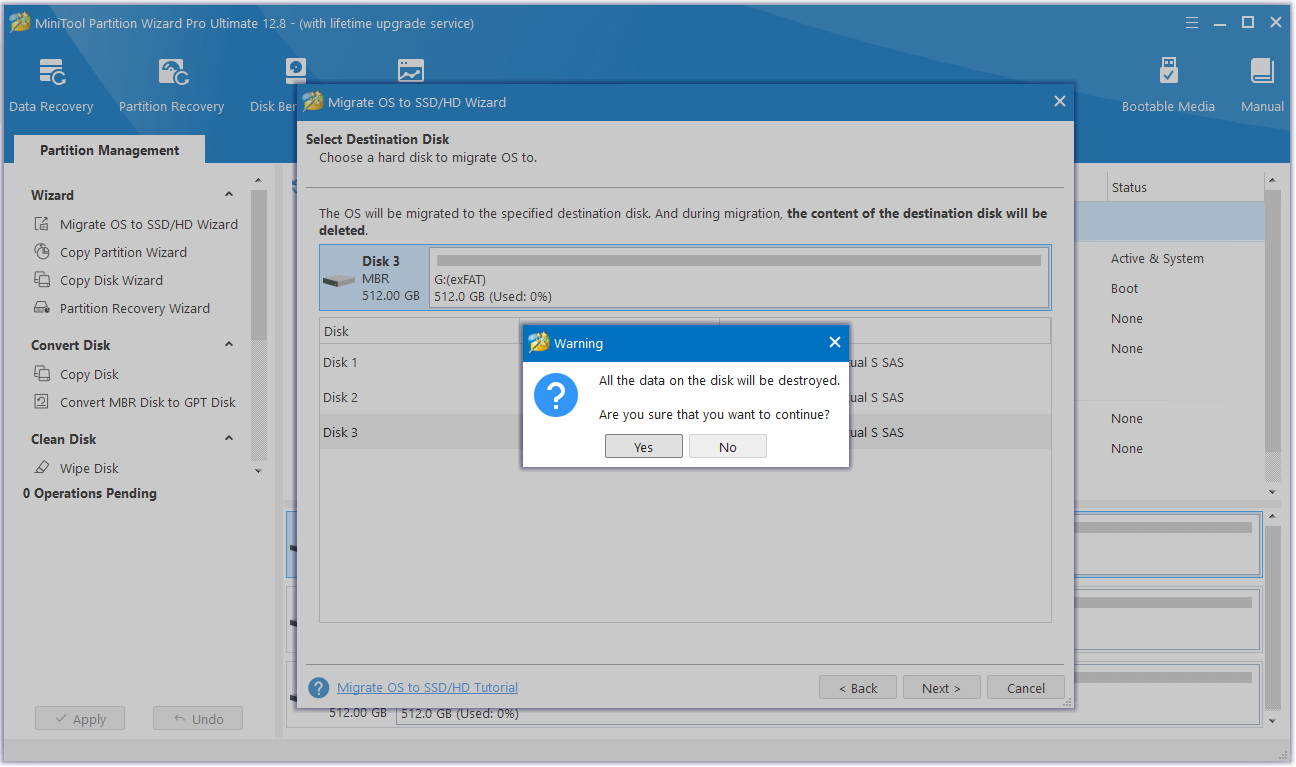
Step 4. Select the destination disk and click Next. Then, click Yes in the Warning window.
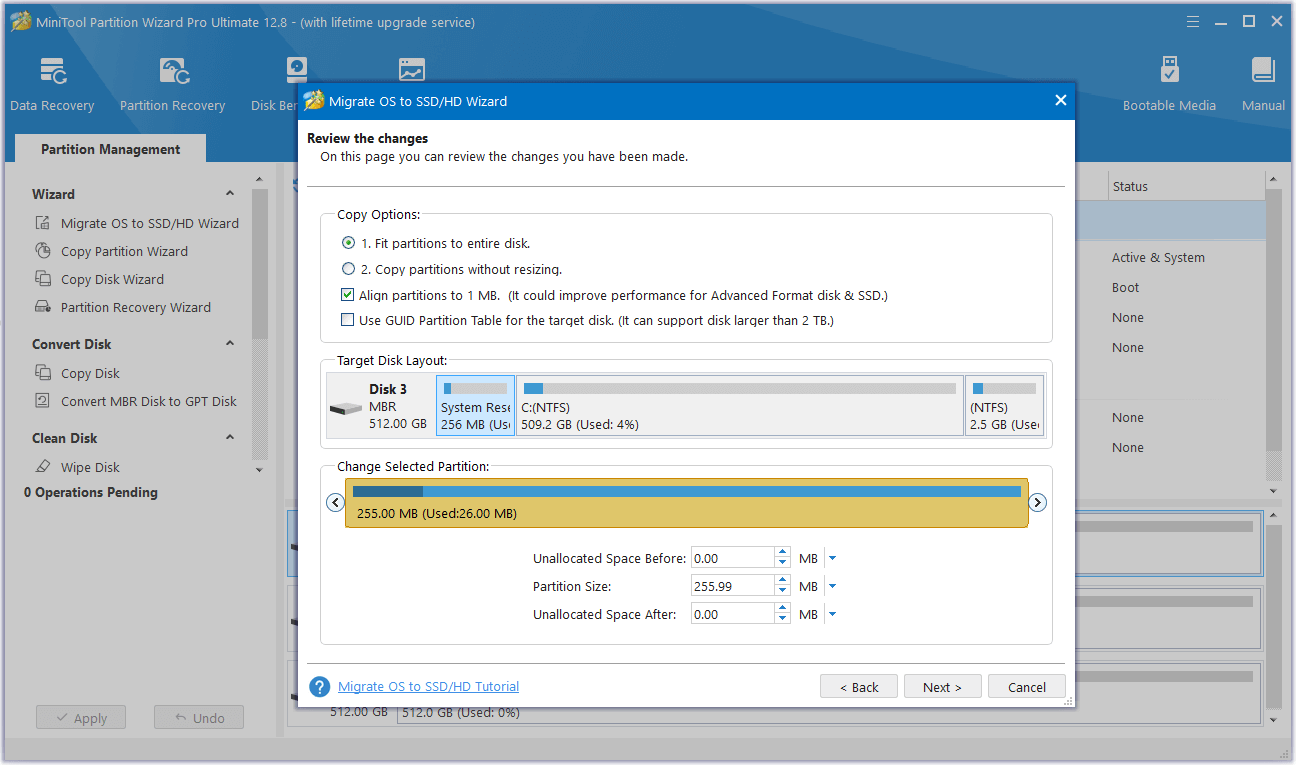
Step 5. Choose the copy options and configure the disk layout to change the default settings according to your needs.
Step 6. Please refer to the note on how to boot from the new SSD and press the Finish button. Once you’re back on the main interface, click Apply and then Yes to initiate the cloning process. Please note that the cloning process may take some time, so please be patient and wait until it is completed.
Part 2. Replace the M.2 SSD with the New One
Once you have cloned all of your data to the new SSD, you can proceed to open the back lid of your Acer Aspire laptop and replace the M.2 SSD with the new one. Note that the steps required to do this may vary depending on the specific model of your Acer Aspire laptop.
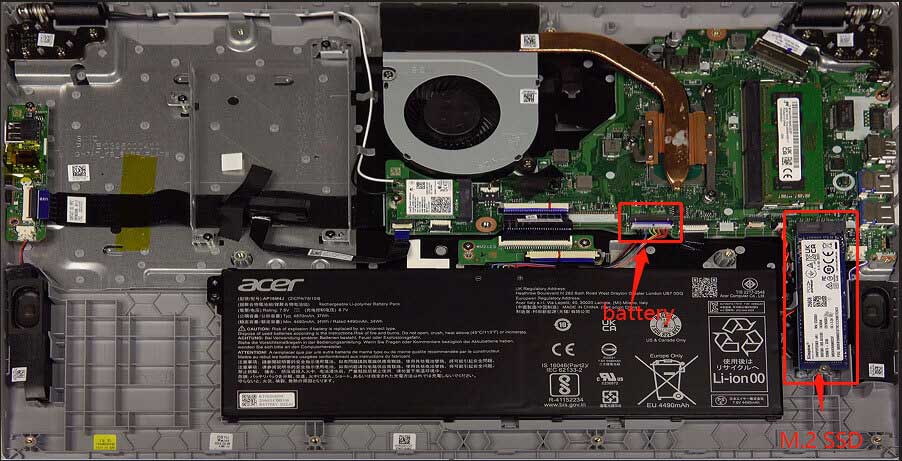
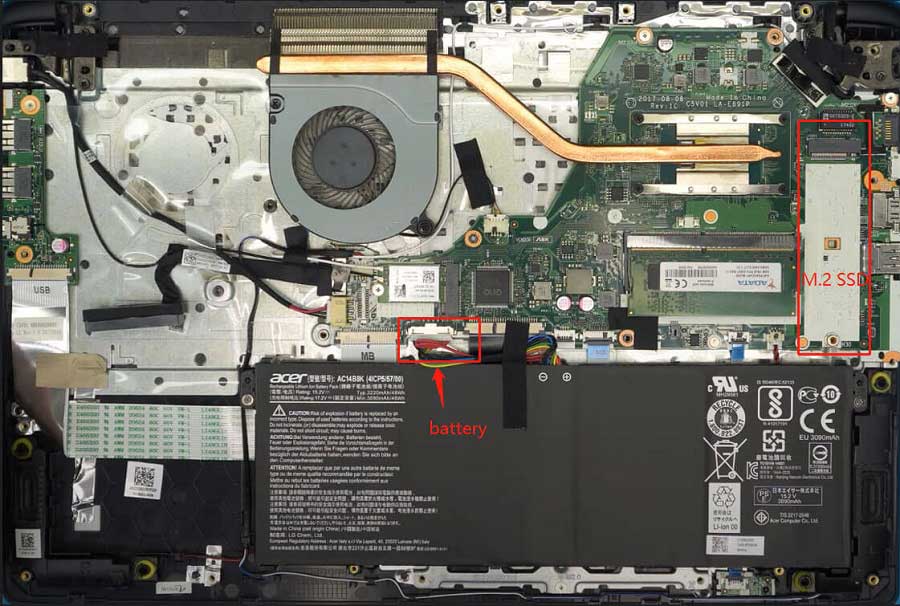
In this part, I will show you how to replace the M.2 SSD in the Acer Aspire 3 A315-56-594W and Acer Aspire 5 A515-51G models. Then, you can know better the difference in replacement steps.
Acer Aspire 3 A315-56-594w:
- Turn off your Acer Aspire laptop completely.
- Turn over the laptop and use a Phillips screwdriver to unbolt all the screws.
- Insert a guitar plectrum to release the back case front and remaining clips.
- Lift the case from the chassis and remove it.
- Use a spudger to disconnect the battery from its socket.
- Hold the power buttons a couple of times to discharge any residual power.
- Use a Phillips screwdriver to remove the screw securing the SSD.
- Take out the original SSD and replace it with the new SSD. Then, tighten the screws.
- Next, connect the battery to its socket, place the bottom cover and then tighten with its screws.
Acer Aspire 5 A515-51G:
- Turn off your Acer Aspire laptop completely.
- Flip the laptop over and use Phillipe’s screwdriver to remove the screw on the bottom left of the lower case to access the HDD hatch.
- Use a spudger to pry the HDD hatch up, and then remove it.
- Use a Phillips head screwdriver to remove the screws from the HDD, and then remove the HDD assembly.
- Then, use Phillipe’s head screwdriver to remove the other screws from the bottom cover.
- Insert a guitar plectrum to release the back case front and remaining clips. Then, lift the case from the chassis and remove it.
- Disconnect the battery by using a spudger to detach it from its socket. Make sure to discharge any remaining power by holding down the power buttons a few times.
- Use a Phillips screwdriver to remove the screw securing the M.2 SSD.
- Take out the original SSD and replace it with the new SSD. Then, tighten the screws.
- Next, connect the battery to its socket, place the bottom cover and then tighten with its screws.
- Install the HDD and its case back, and tighten its screws.
How to Upgrade A 2.5’’ SSD?
Adding a 2.5’’ SSD is similar to and simpler than upgrading the HDD to a 2.5’’ SATA SSD. So, I only show you how to upgrade a 2.5’’ SSD in this section.
Part 1. Clone the HDD (Optional)
Before doing the upgrade, you’d better clone all your data on the HDD to the new 2.5’’ SATA SSD to avoid data loss. To do that, you can use MiniTool Partition Wizard’s Copy Disk feature. This feature is free If you just clone the data disk. Here’s how to do it:
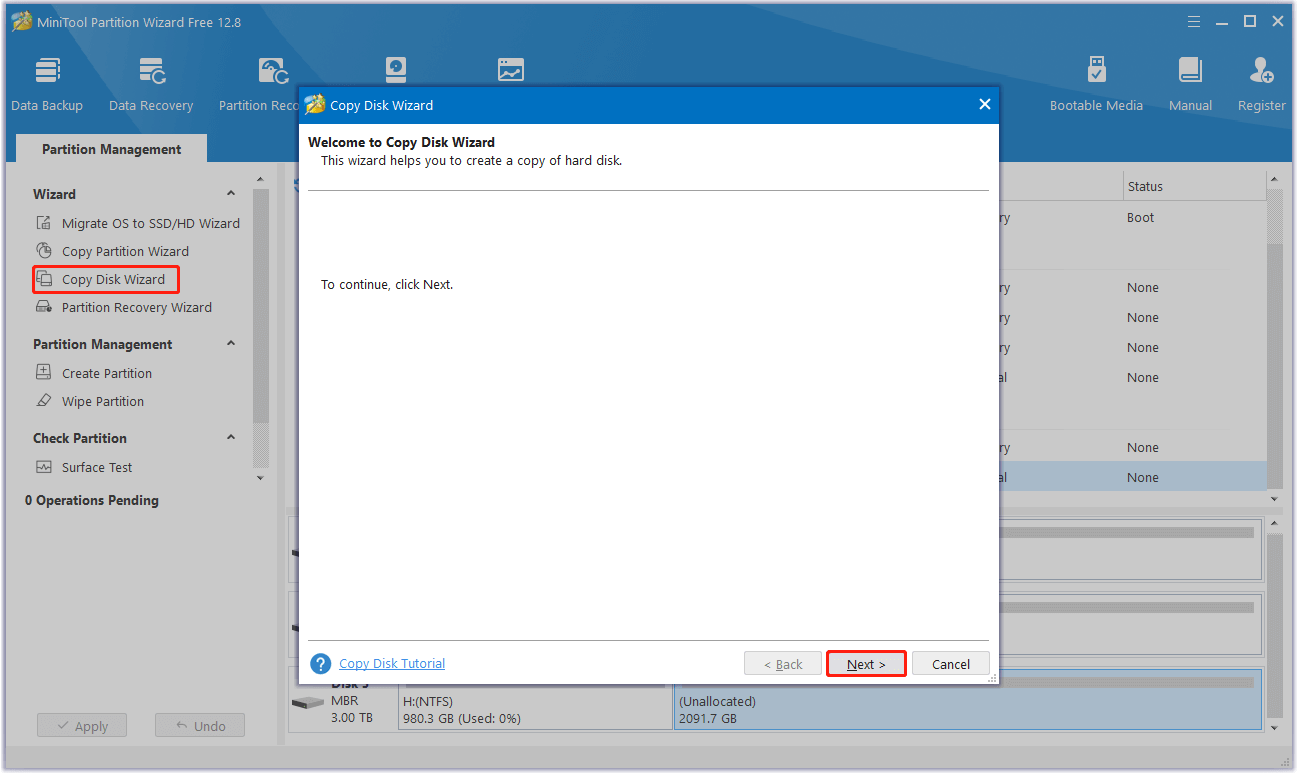
Step 1. Connect the new 2.5’’ SATA SSD externally using a compatible enclosure. Launch MiniTool Partition Wizard to its main interface, and choose the Copy Disk Wizard feature from the left pane. Then, click Next in the pop-up window.
MiniTool Partition Wizard FreeClick to Download100%Clean & Safe
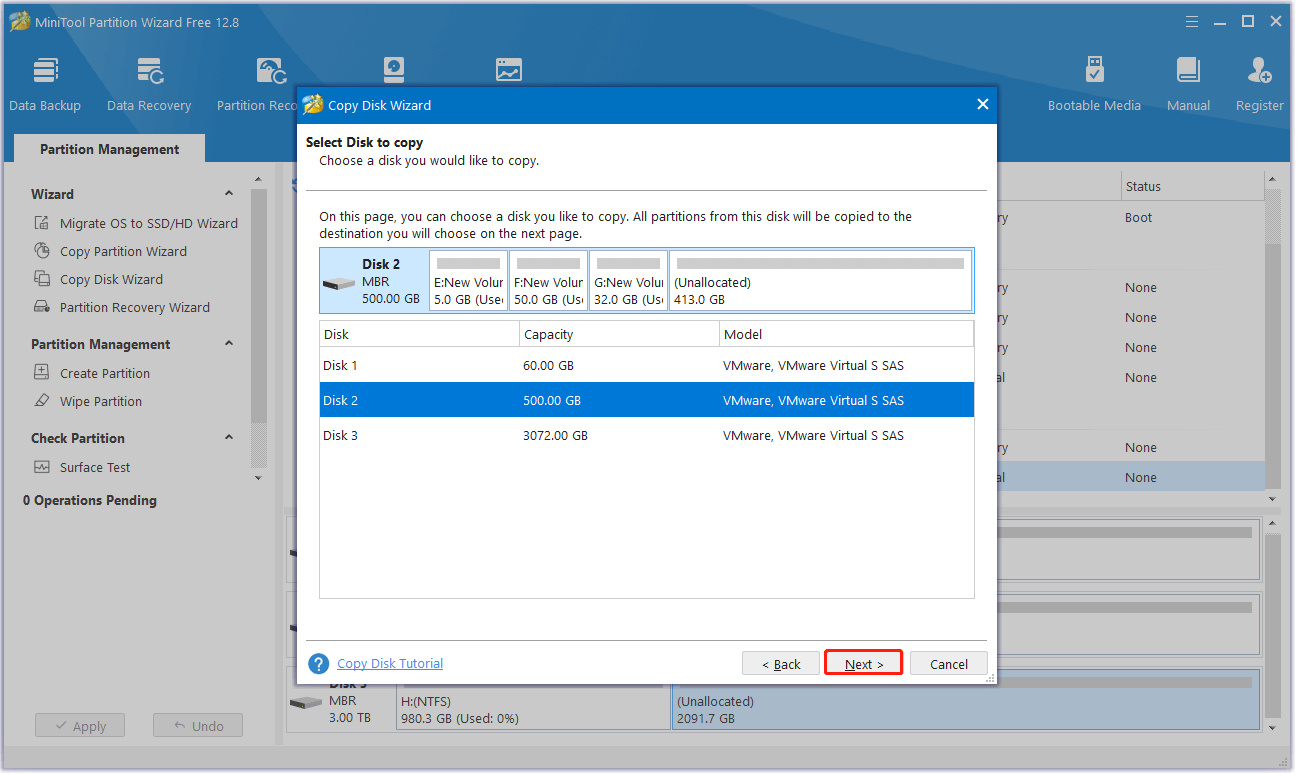
Step 2. In the next window, select the disk to copy and click Next.
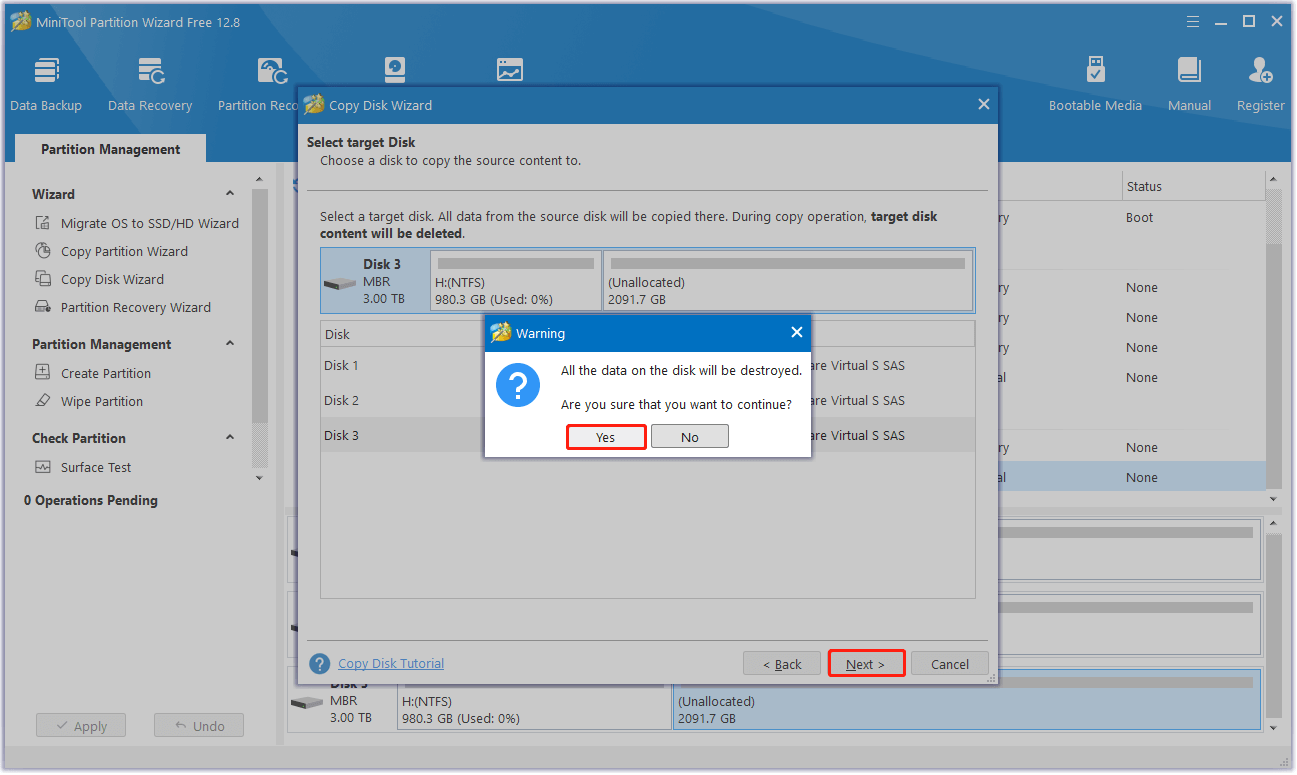
Step 3. Choose the target disk and press Next. In the pop-up Warning window, tap the Yes button.
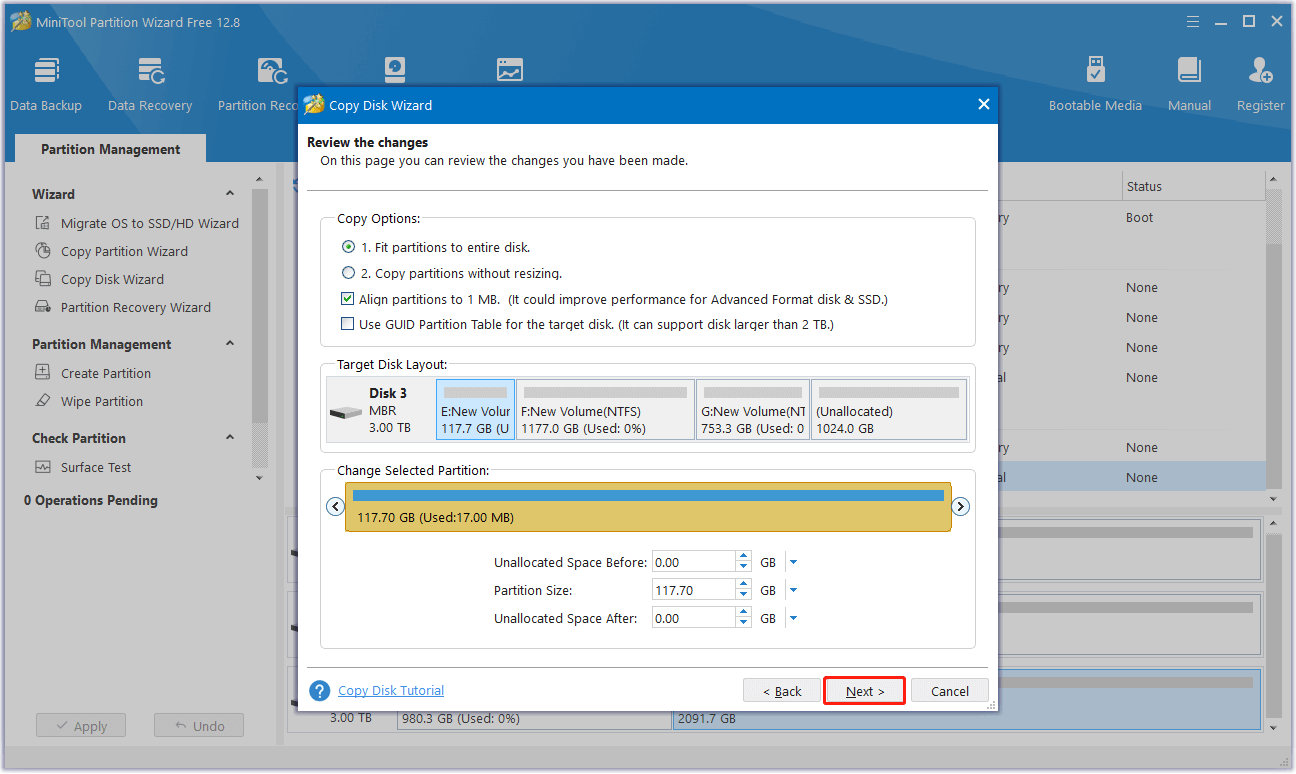
Step 4. Set the copy options and change the disk layout according to your preferences. Then, click Next to continue.
Step 5. Then, click Finish. After that, tap Apply and Yes sequentially to execute the changes.
Part 2. Install the New 2.5’’ SATA SSD
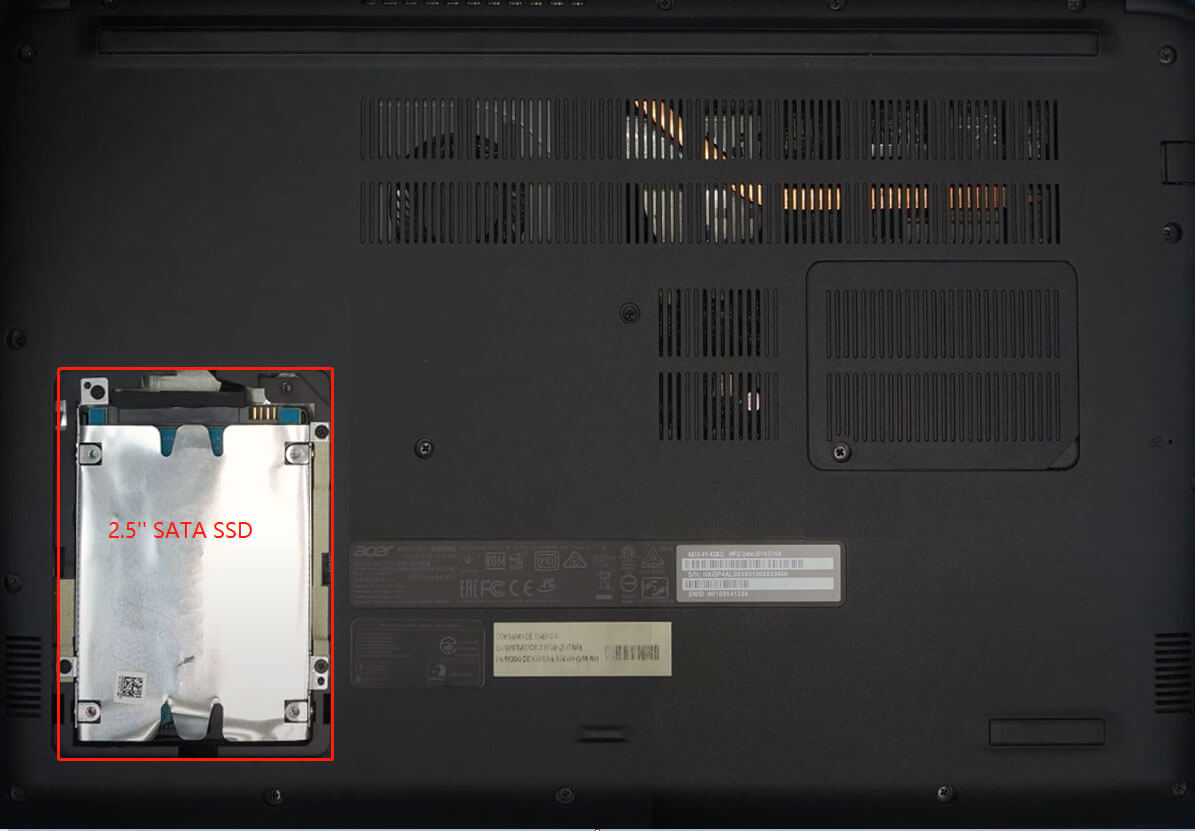
After cloning all the data on the HDD to SSD, you can update HDD to 2.5’’ SATA SSD with ease. Here I take the Acer Aspire 5 A515-51G as an example:
- Follow the steps 1 to 4 of the Acer Aspire 5 A515-51G M.2 SSD replacement guide to remove the HDD.
- Remove the metal carry of the HDD, and then put a 2.5” SSD on it.
- Use a Phillips head screwdriver to tighten them, and install them back into the Acer Aspire laptop.
- Restore all the things back to the original, and power on your PC. You can see the 2.5” SSD has been added to your PC successfully.
Bonus Tip
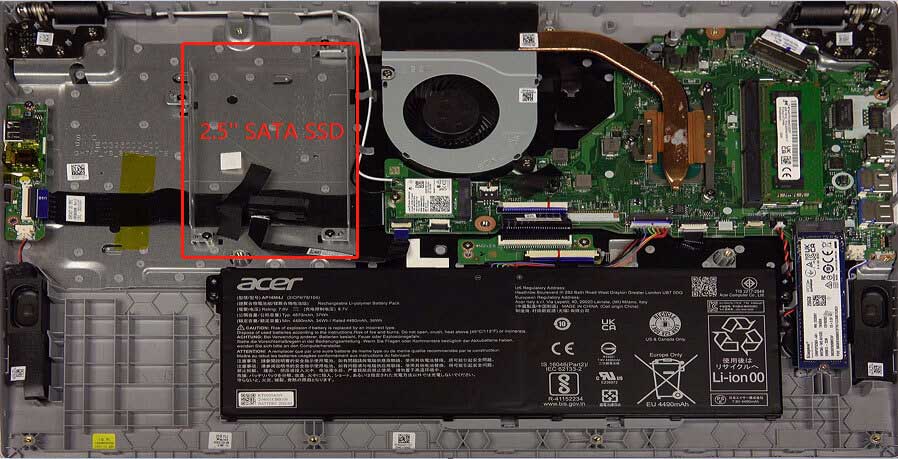
Some Acer Aspire laptops like Acer Aspire 3 A315-56-594w only have the SATA SSD location but don’t a SATA SSD pre-installed. In this case, you can add a 2.5’’ SATA SSD to get more free storage space directly. Here are the steps (taking Acer Aspire 3 A315-56-594w as an example).
- Follow steps 1 to 6 of the Acer Aspire 3 A315-56-594w M.2 SSD replacement guide to remove the bottom cover and battery.
- Find the SATA 2.5” port, and open the SATA connector and the SSD caddy.
- Peel off the SATA connector cable, and insert one side of your SATA connector cable into the port on the Acer Aspire laptop.
- Connect your SATA connector cable to your SATA connector.
- Put the 2.5” SSD into the SSD caddy and tighten them via screws.
- Next, insert the SSD connector inside the SSD port and then tighten it again.
- Connect the battery and bottom cover and then restore all the things back to the original.
- After that, power on your PC, you can see the 2.5” SSD has been added to your PC successfully.
After adding the 2.5’’ SATA SSD, you can start using it. If you don’t see it on your File Explorer, the reason may be that there aren’t any partitions on the newly added SSD. So, you need to create a partition on the SSD and then it can show in File Explorer successfully. Here’s the way:
- Press the Win + X keys simultaneously to open the Quick Menu.
- Select the Disk Management from the menu.
- In the Disk Management window, right-click the newly added SSD and select New Simple Volume.
- Click Next in the pop-up window.
- Set the Simple volume size in MB and click Next.
- Assign a drive letter for the simple volume and click Next.
- Choose Format this volume with the following settings option, and set File system, Allocation unit size, and Volume label.
- Check the box of Perform a quick format and click Next. Then, click Finish to continue.
- Once you’re finished, close the Disk Management window and you’ll be able to see the partitions of the newly added SSD in the File Explorer window.
Bottom Line
This guide offers you a detailed walkthrough to upgrade the SSD on your Acer Aspire laptop. It also shows you how to use the best disk cloning software, MiniTool Partition Wizard, to transfer all of your data during the upgrade process.
Besides, if you have difficulty using MiniTool Partition Wizard, contact us via [email protected] and we will back to you as soon as possible.
User Comments :