How to upgrade the ASUS X505ZA SSD? If you are searching the guide for this question, you come to the right place. This post of MiniTool provides a comprehensive guide on the ASUS X505ZA SSD upgrade.
The ASUS X505ZA is a popular budget-friendly laptop known for its sleek design and decent performance. However, its stock storage, typically a slow and sluggish HDD, can hold it back. Upgrading to an SSD can dramatically improve your laptop’s speed, responsiveness, and overall user experience.
This comprehensive guide will equip you with everything you need to know about upgrading the SSD in your ASUS X505ZA, from choosing the right SSD to performing the upgrade itself.
Why Need to Upgrade the ASUS X505ZA SSD?
Before we dive into the specifics, let’s understand why an SSD upgrade is a worthwhile investment for your ASUS X505ZA:
- Faster Boot Times: An SSD can shave off minutes from your boot time, making your laptop feel significantly more responsive.
- Blazing Fast Application Load Times: An SSD loads applications and programs lightning fast, dramatically enhancing your workflow.
- Improved Overall Performance: With an SSD, your entire system will feel snappier. Everything will feel smoother and faster, from browsing the web to launching games.
- Quieter Operation: SSDs lack the mechanical components of HDDs, making them completely silent and contributing to a quieter working environment.
Choosing the Right SSD for Your ASUS X505ZA
Before you start upgrading the ASUS X505ZA SSD, you need to choose a proper SSD for your computer first. Here are the main aspects that you need to notice:
1. Form Factor: The ASUS PC features a standard 2.5-inch SATA SSD/HDD slot. Additionally, it supports the addition of an M.2 SATA 2280 SSD.
2. Interface: The X505ZA features a SATA III interface, which offers faster data transfer speeds compared to older SATA II. Make sure the SSD you choose supports SATA III for optimal performance.
3. Capacity: The capacity you choose depends on your storage needs. Consider how much space you currently use and how much space you anticipate needing in the future.
4. Read and Write Speeds: Pay attention to the SSD’s read and write speeds, as they directly impact performance. Generally, higher read and write speeds translate to faster application load times and overall responsiveness.
5. Budget: SSDs come in a wide range of prices, so it’s important to set a budget before shopping.
Here I summarize some compatible SSDs, you can choose according to your preferences and budget:
2.5-inch SSD Recommend:
- Samsung 870 EVO
- Crucial MX500
- Western Digital Blue 3D NAND
M.2 SATA SSD Recommend:
- Western Digital 3D NAND SATA M2 2280 SSD
- TEAMGROUP MS30 M.2 2280 SATA III SSD
- KingSpec M.2 SATA SSD
After choosing the new compatible SSD, you can continue reading the following contents to start upgrading the ASUS X505ZA SSD.
How Can You Perform ASUS X505ZA SSD Upgrade?
How to perform ASUS X505ZA SSD upgrade? To upgrade the ASUS X505ZA SSD, you have two choices:
- Upgrade a 2.5-inch HDD to an SSD
- Add an M.2 SATA SSD
Before You Begin
Before you embark on the SSD upgrade journey, here are some essential things to do:
- Back up your data: It’s crucial to back up all your important data before starting the upgrade. This can be done using an external hard drive, cloud storage, or a USB drive.
- Download necessary drivers: Make sure you download the latest drivers for your laptop’s motherboard from the ASUS support website. This ensures smooth operation after the SSD upgrade.
- Migrate data and system to the new SSD. SSD runs faster than SSD. So, it is necessary to migrate OS and data from HDD to SSD.
MiniTool ShadowMaker TrialClick to Download100%Clean & Safe
To migrate the system and data to the new SSD, you can use MiniTool Partition Wizard. It is a professional and reliable partition disk manager that provides the Copy Disk and Migrate OS to SSD/HD feature to help users safely transfer data and the system.
In addition to cloning data and migrating OS to SSD without reinstalling OS, this feature-rich tool also can convert MBR to GPT, rebuild MBR, format USB to FAT32/NTFS/Ext 2/Ext 3/Ext 4, check disk for errors, partition hard drive, and more.
Here’s how to use the MiniTool Partition Wizard to transfer system and data:
Method 1. Use the Migrate OS to SSD/HD Feature
The Migrate OS to SSD/HD feature can help you transfer your OS and data to an SSD or HDD with ease. So, you can try using this feature to achieve your goals. Here’s the way:
Step 1. Use the SSD closure to connect the new SSD to your computer. Download and install MiniTool Partition Wizard on your computer, and then launch this app on your computer.
MiniTool Partition Wizard DemoClick to Download100%Clean & Safe
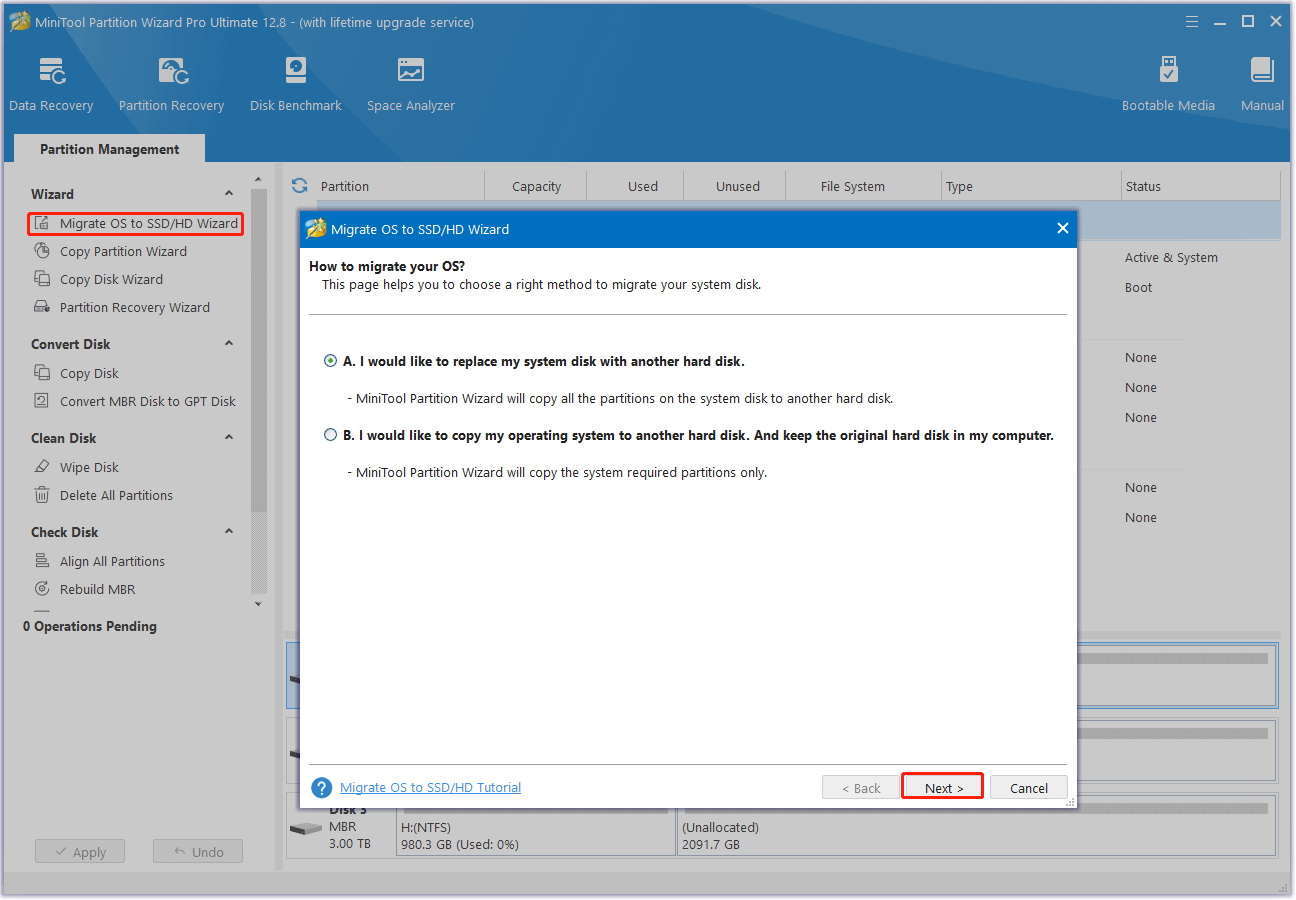
Step 2. Select Migrate OS to SSD/HD Wizard from the left action panel. In the pop-up window, choose an option to migrate the OS based on your needs. Then click Next.
Step 3. In the next window, select the new SSD and click Next. When prompted, click Yes to continue.
Step 4. After that, choose the desired copy options and click Next.
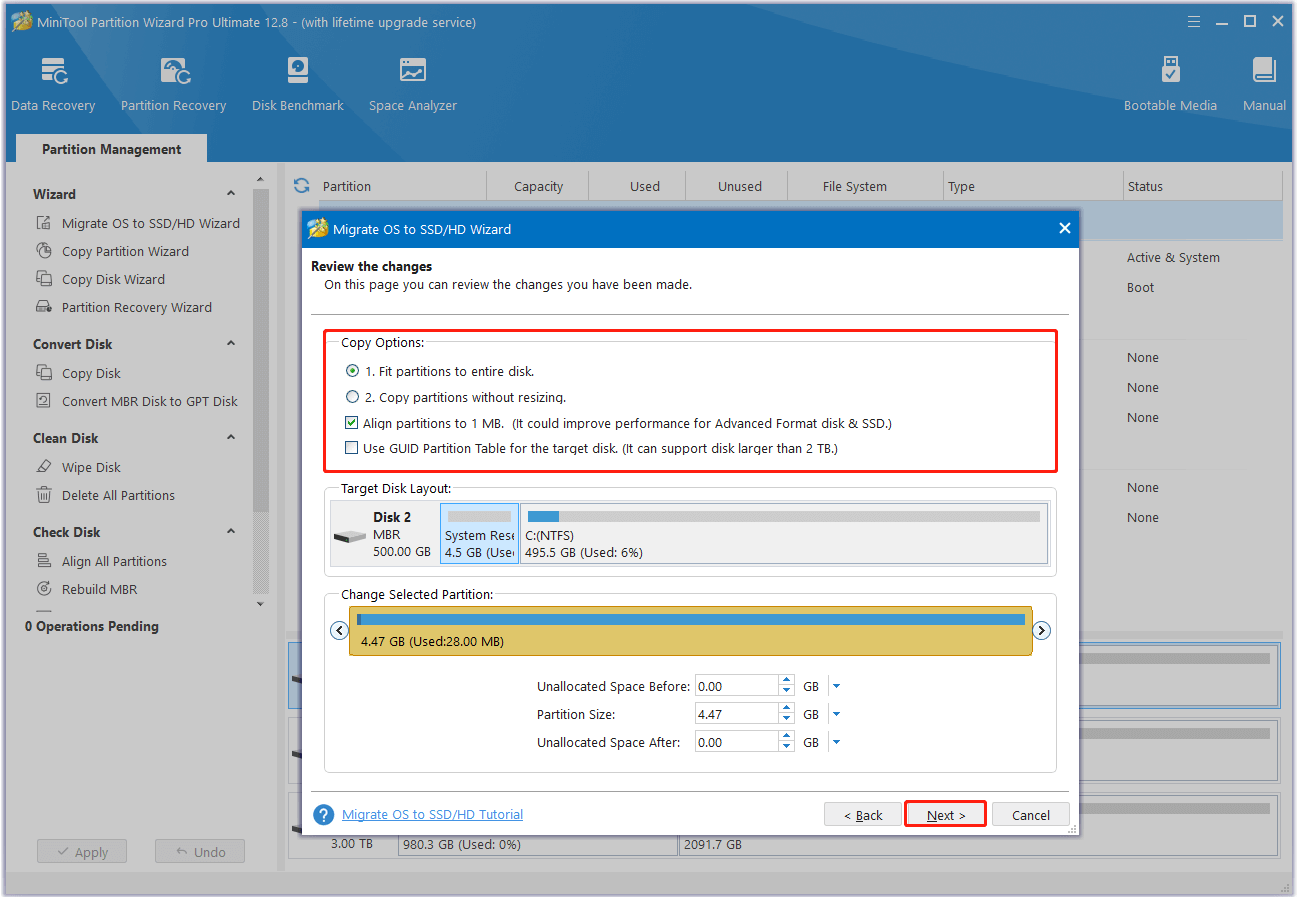
Step 5. Finally, click Finish and Apply to save the pending operation.
Method 2. Use the Copy Disk Feature
The Copy Disk feature can help you copy data to a new SSD as well. If you are interested in this way, you can also have a try. Here’s how to do that:
Step 1. Connect the SSD externally using a compatible enclosure.
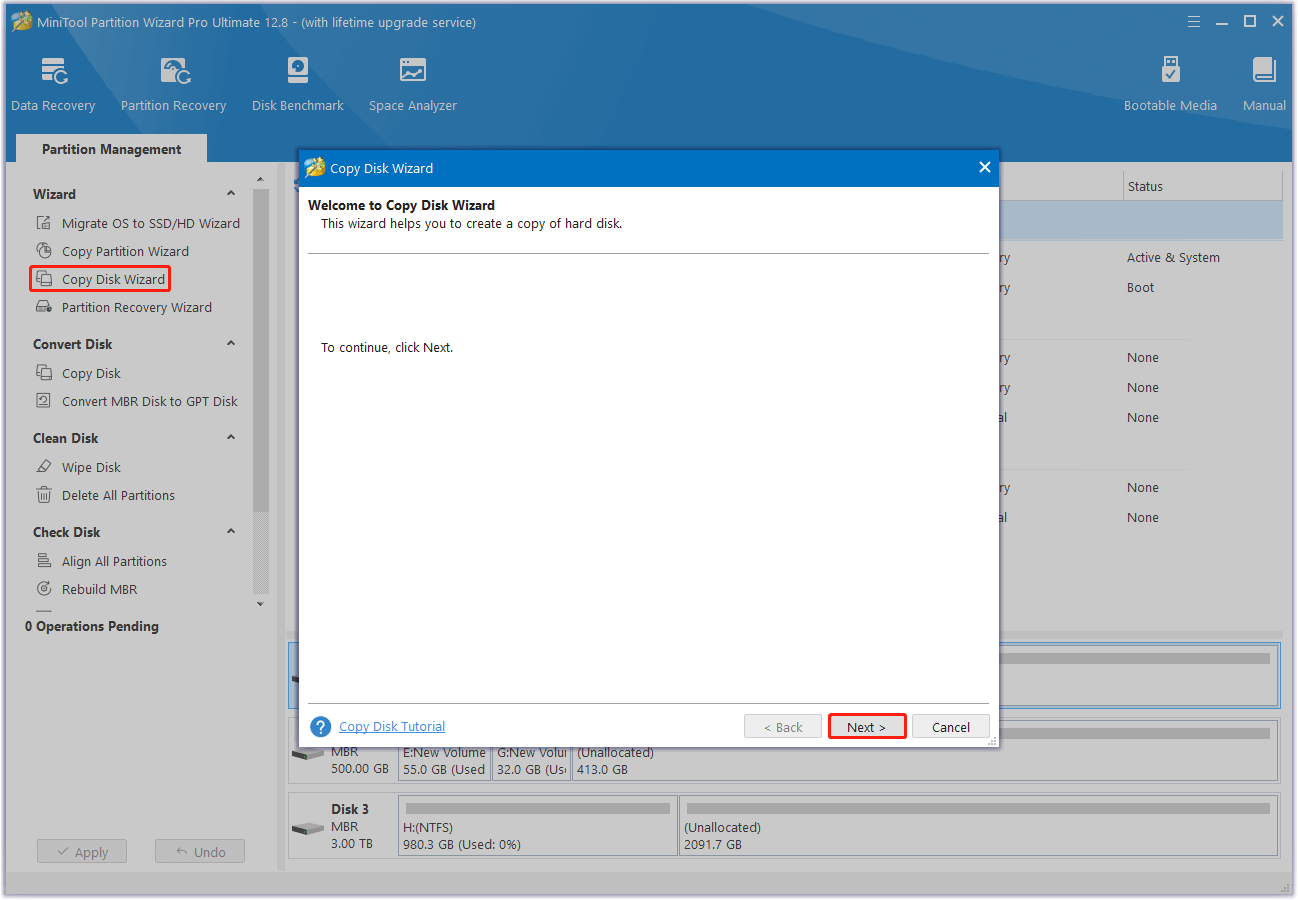
Step 2. Launch MiniTool Partition Wizard to its main interface, and choose the Copy Disk Wizard feature from the left pane. Then, click Next in the pop-up window.
Step 3. In the next window, select the disk to copy and click Next.
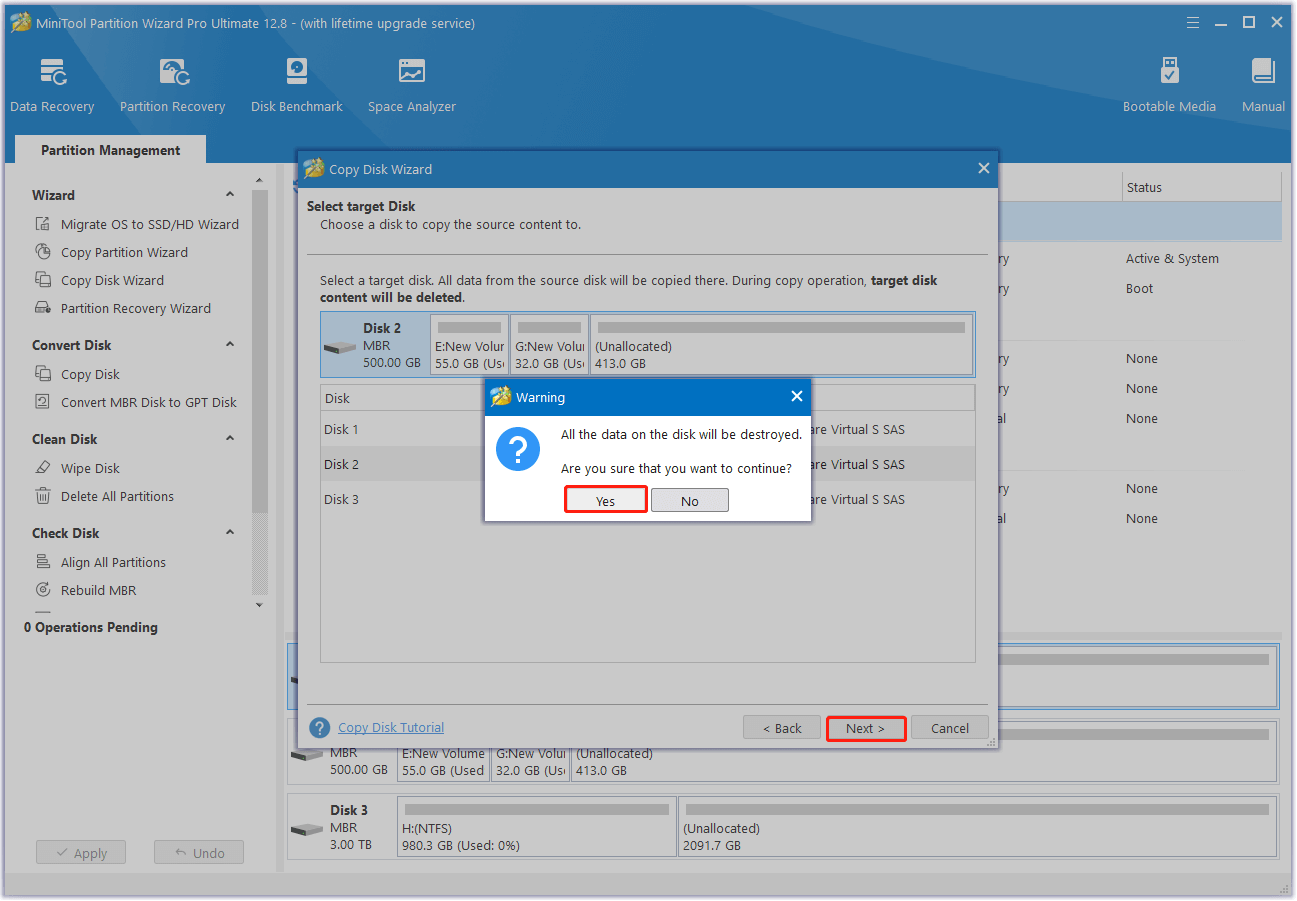
Step 4. Choose the new SSD and press Next. In the pop-up Warning window, tap the Yes button.
Step 5. Set the copy options and change the disk layout according to your preferences. Then, click Next and Finish to continue.
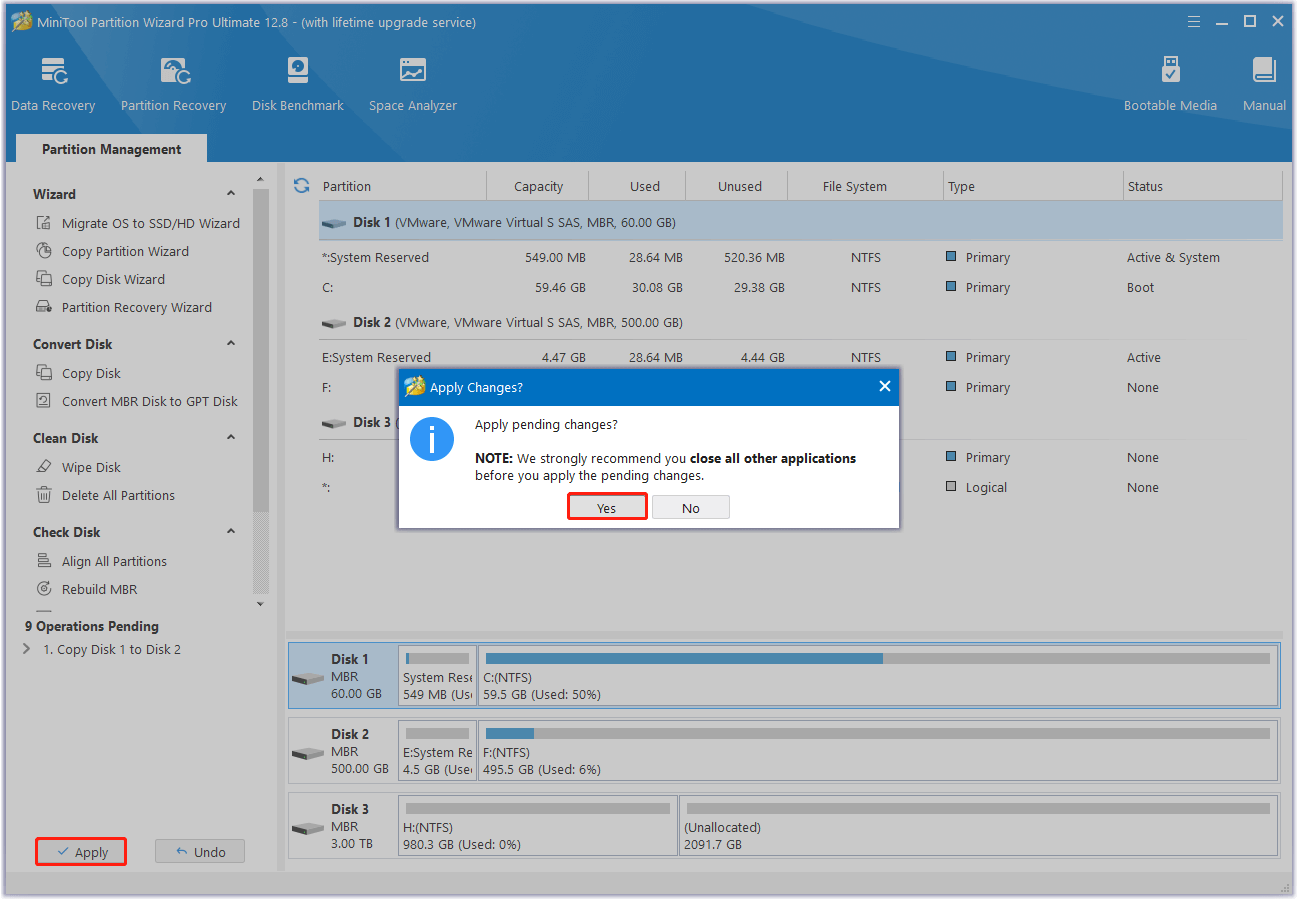
Step 6. After that, tap Apply and Yes sequentially to execute the changes.
# 1. Upgrade a 2.5-inch HDD to an SSD
Once you finishing migrate the operating system and data to the new SSD, you can disconnect it from your ASUS laptop and shut down your system. Then, do the following steps to complete perform ASUS VivoBook X505ZA SSD upgrade by upgrading the 2.5-inch HDD to SSD:
Step 1. Shut Down Your Laptop. Ensure your laptop is completely powered off and unplugged from the power source.
Step 2. Turn the laptop over so the bottom side faces you.
Step 3. Carefully use a Phillips-head screwdriver to remove all the screws securing the bottom panel.
Step 4. Using a plastic opening tool or a spudger, gently pry open the bottom panel. Avoid using excessive force to damage the laptop’s casing.
Step 5. Disconnect the power cord and connection cable between the touchpad & keyboard and then the motherboard.
Step 6. Remove the 4 screws that hold the hard drive, and then pull the hard drive to unplug it from the SATA connector.
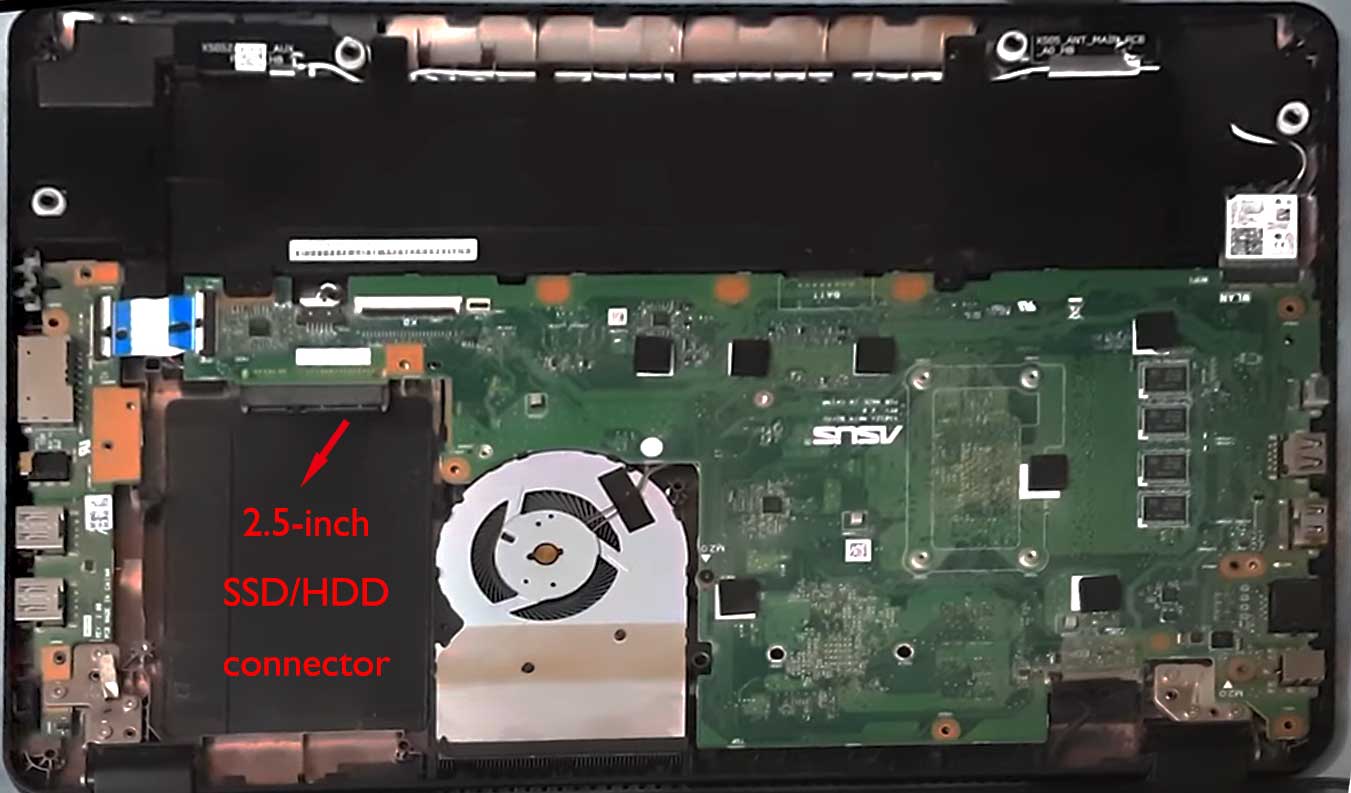
Step 7. The hard disk is secured in the rack by 4 screws. Remove these screws to release the hard disk from the rack.
Step 8. Mount the SSD onto the rack and secure it with screws.
Step 9. After that, reassemble everything in reverse order.
Step 10. Once done, reboot your ASUS X505ZA laptop. Then, you have successfully upgraded the ASUS X505ZA SSD.
# 2. Add a New M.2 SATA SSD
You can also add a new M.2 SSD to upgrade ASUS X505ZA SSD. This way is not complex as well, you can do the following steps:
Step 1. Repeat Step 1 to Step 6 of upgrading the 2.5-inch HDD to SSD to remove the original HDD from the laptop.
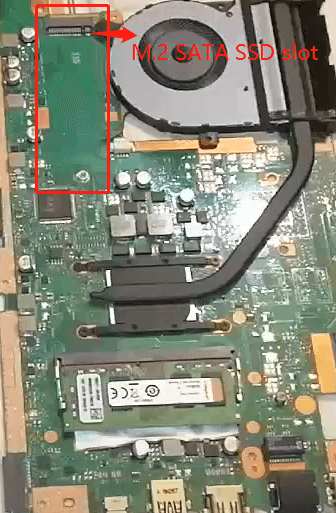
Step 2. The M.2 SSD slot is located on the motherboard, you need to lose the motherboard screws and then flip the motherboard to the other side.
Step 3. Find the M.2 SSD slot on the motherboard. Then, insert the M.2 SSD on the motherboard and fasten it with a screwdriver. And retrace your steps to reassemble everything.
Step 4. Once done, you can add a new M.2 SSD to ASUS X505ZA laptop successfully.
Troubleshooting Tips:
In this section, I will summarize common issues that may arise after the ASUS X505ZA SSD upgrade and their solutions. If you come across any of the issues below, you can follow the mentioned solutions to resolve them.
- No Boot: If your laptop doesn’t boot after the upgrade, check all the connections, especially the SATA data cable and power connector. Ensure they are properly secured.
- Blue Screen of Death: If you encounter a blue screen of death (BSOD), try reinstalling the drivers for your motherboard and other essential components.
- Data Loss: Always back up your data before attempting any hardware upgrade. If you haven’t backed up your data before, you can use a data recovery tool to recover lost data.
To Sum Up
Upgrading the SSD in your ASUS X505ZA is a simple and cost-effective way to significantly boost your laptop’s performance. By following this guide, you can confidently perform the upgrade yourself and enjoy a much faster and more responsive laptop.
During the ASUS X505ZA upgrade process, we highly recommend you use MiniTool Partition Wizard to clone the entire disk to the new SSD. If you encounter certain issues while using MiniTool Partition Wizard, you can send us an email via [email protected] to get a quick reply.
User Comments :