Is Anycubic or Ender 3 V2/Pro not reading, recognizing, or detecting SD cards? If you encounter the discussed issue, read this post now! Here, MiniTool summarizes the possible reasons and provides feasible solutions to the Ender 3 not reading SD card issue.
While printing with Ender 3 V2/Pro, Anycubic, or other 3D printers, you may randomly find it does not recognize SD card. Why is Anycubic/Ender 3 not reading SD card? How can you deal with this issue? To get the answers, you can focus on the following guide.
Why Is Ender 3 Not Reading SD Card
Many factors can lead to the “Anycubic/Ender 3 not reading/recognizing/detecting SD card” issue. Here, this post summarizes some of the most common reasons why Ender 3 not reading SD card.
- A dirty SD card: There is dust or grime gathering on the SD card.
- A wrongly inserted SD card: You insert the SD card inappropriately in the card slot of the Ender 3 printer.
- A large SD card: The size of the SD card you use for the Ender 3 printer is too large.
- Incorrect file names: The names of the G-code files (the most widely used 3D printing programming language) on the SD card are too long or contain spaces.
- Incompatible file system: The file system of the SD card is not supported by Ender 3.
- The outdated firmware: The firmware version on Ender 3 is out of date.
- Insufficient disk space: Many files are stored on the SD card, leaving less free space.
- …
After knowing the reasons for the “Ender 3 not recognizing SD card” issue, let’s get down to the troubleshooting fixes for this issue. The following solutions also work for the Anycubic 3D printer not reading SD card issue.
How to Fix Ender 3 Not Reading SD Card
In this section, we explore how to solve the “Ender 3 not reading SD card” issue in detail. If you encounter the same issue, you can try to fix it with the methods below.
Method 1: Re-insert the SD Card Properly
If you plug the SD card into the card slot loosely or improperly, the card may not be detected by your printer. Therefore, when the “Anycubic/Ender 3 V2 not reading SD card” issue happens, you should check if there are any connection issues first. To make sure the SD card clicks into place, you can try removing it and then re-inserting it into the slot carefully.
Once you reinsert the SD card properly, power on the Ender 3 printer or Anycubic 3D printer to see if the issue persists. If it does, then you need to try other solutions.
Method 2: Clean the SD Card
The dust on the SD card may also result in the “Ender 3 Pro/Anycubic not reading SD card” issue. To fix it, you’d better clean the card. You need to turn off the Ender 3/Anycubic printer and remove the SD card from the slot. Then wipe the SD card gently by using a soft cloth. If necessary, you can also use a soft brush to clean the card slot.
Method 3: Rename Files and Folders on the SD Card
Generally, many 3D printers like Ender 3 Pro/V2 can only recognize a file or folder whose name is no longer than 8 characters. If you have files and folders with a long file name on the SD card, the printer cannot access them, causing the “Ender 3 SD card not reading” issue.
In this case, you can get rid of this issue by shortening file names within 8 characters. Meanwhile, if any file or folder contains spaces or other special symbols in its name, deleting them can also help you fix the “Ender 3 not detecting SD card” issue.
Method 4: Format the SD Card
If the SD card’s file system is incompatible with Ender 3 or Anycubic, you may run into the “Ender 3 V2/Anycubic not reading SD card” issue as well. On this occasion, to solve this issue, you may need to format the SD card to FAT32. There are several ways you can try to execute the Ender 3 SD card format on your Windows PC. Just connect the SD card to your PC and then pick one preferred way.
Way 1: Via Disk Management
Disk Management is a Windows built-in utility that allows you to perform basic tasks related to partitions and disks, including formatting the SD card. You can complete the format with this SD card formatter by following the steps below.
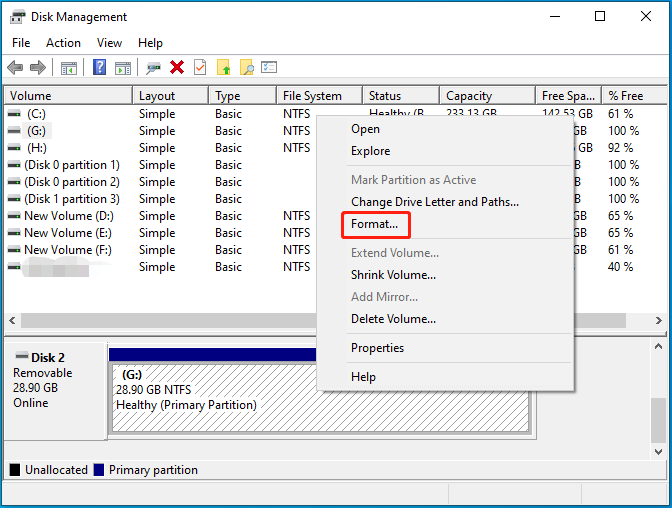
Step 1: Right-click the Start icon and select Disk Management.
Step 2: Right-click the partition on the SD card and then select Format.
Step 3: In the pop-up window, select FAT32 from the drop-down menu. Then tick the checkbox next to the Perform a quick format option.
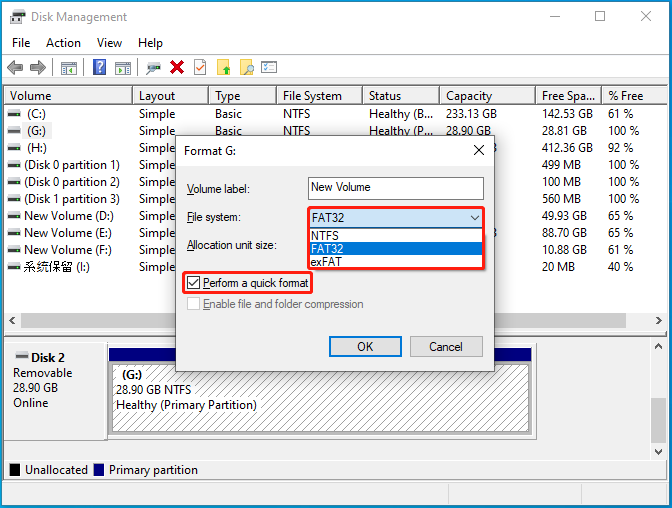
Step 4: After that, click OK to begin the process. If prompted, click OK to confirm the operation.
Way 2: Via Diskpart
Diskpart is another Windows built-in tool that enables you to format the SD card easily. Here’s a step-by-step guide on the Ender 3 SD card format.
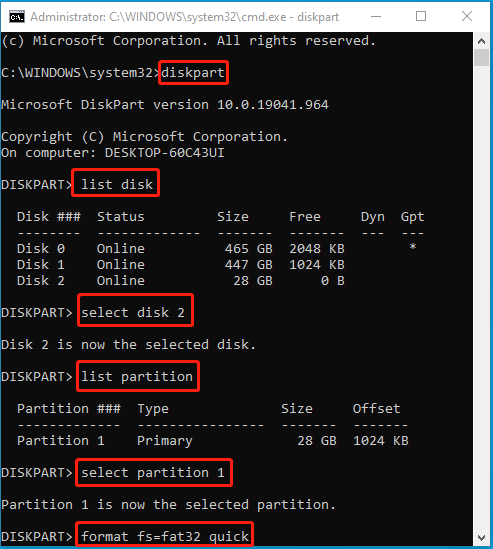
Step 1: Press Windows + R to open the Run dialog.
Step 2: Type cmd in the text box and then press Ctrl + Shift + Enter to open Command Prompt as an administrator.
Step 3: In the elevated Command Prompt, type the following commands one by one and press Enter after each.
- diskpart
- list disk
- select disk N (N represents the disk number of the SD card)
- list partition
- select partition * (* is the number of the partition on the SD card)
- format fs=fat32 quick
Way 3: Via MiniTool Partition Wizard
In addition to the built-in utilities, you can also take advantage of a third-party SD card formatter to execute the formatting operation. MiniTool Partition Wizard is a great choice. It’s a professional and reliable partition manager that provides you with a wide range of features to manage your partition and disks.
For instance, you can use MiniTool Partition Wizard to create/format/resize partitions, copy/wipe disks, migrate OS to SSD/HDD, etc. To format the SD card for Ender 3 with this disk partition software, you can follow the given steps.
Step 1: Download and install MiniTool Partition Wizard on your PC. Then launch it to enter the main interface.
MiniTool Partition Wizard FreeClick to Download100%Clean & Safe
Step 2: Right-click the partition on the SD card and then select Format. Alternatively, highlight the target partition and select Format Partition from the left action panel.
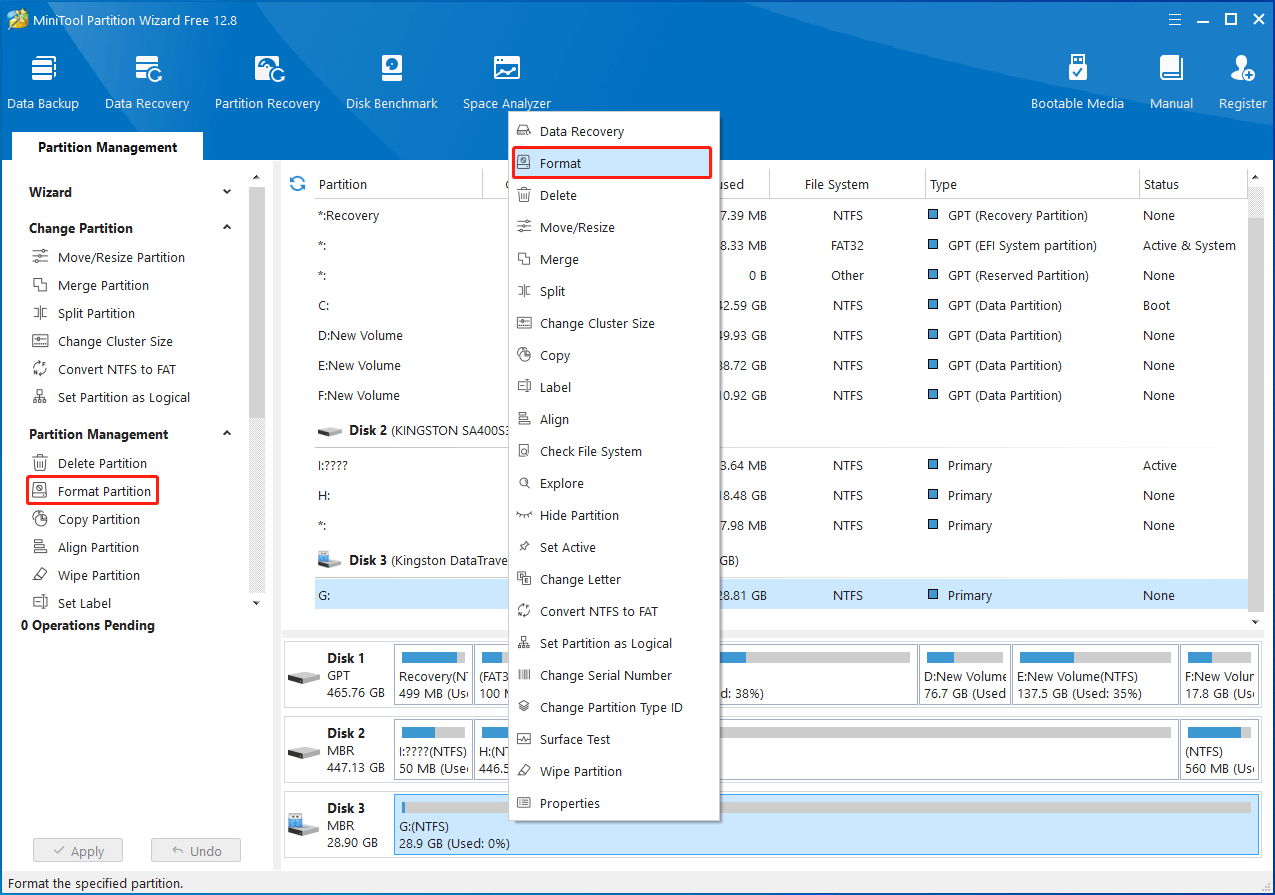
Step 3: Select FAT32 as the File System and then click OK.

Step 4: Finally, don’t forget to click Apply and then Yes to save the pending change.
Once you successfully format the SD card to FAT32, re-insert it to Ender 3 and check if your printer can recognize it normally.
Method 5: Free Up Storage Space on the SD Card
As mentioned earlier, the “Ender 3 Pro not reading SD card” issue may also happen if there is not enough space on the SD card. To fix this issue, we recommend you delete unnecessary files from the SD card to get more free space. Below MiniTool Partition Wizard tells you how to do this in detail.
Step 1: Connect the SD card to your PC. Then launch MiniTool Partition Wizard and select Space Analyzer at the top toolbar.
MiniTool Partition Wizard FreeClick to Download100%Clean & Safe
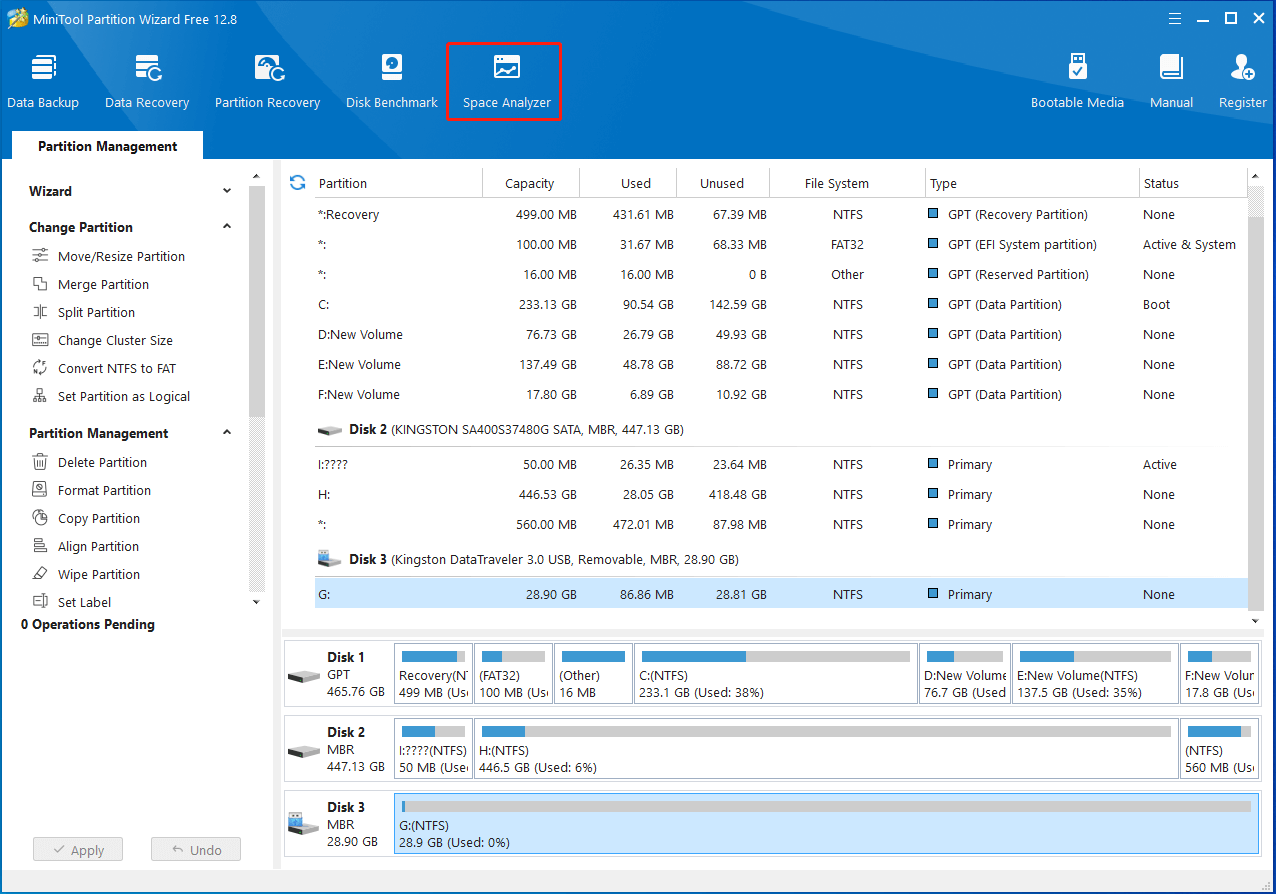
Step 2: In the next window, select the SD card from the drop-down menu. Then click the Scan button.
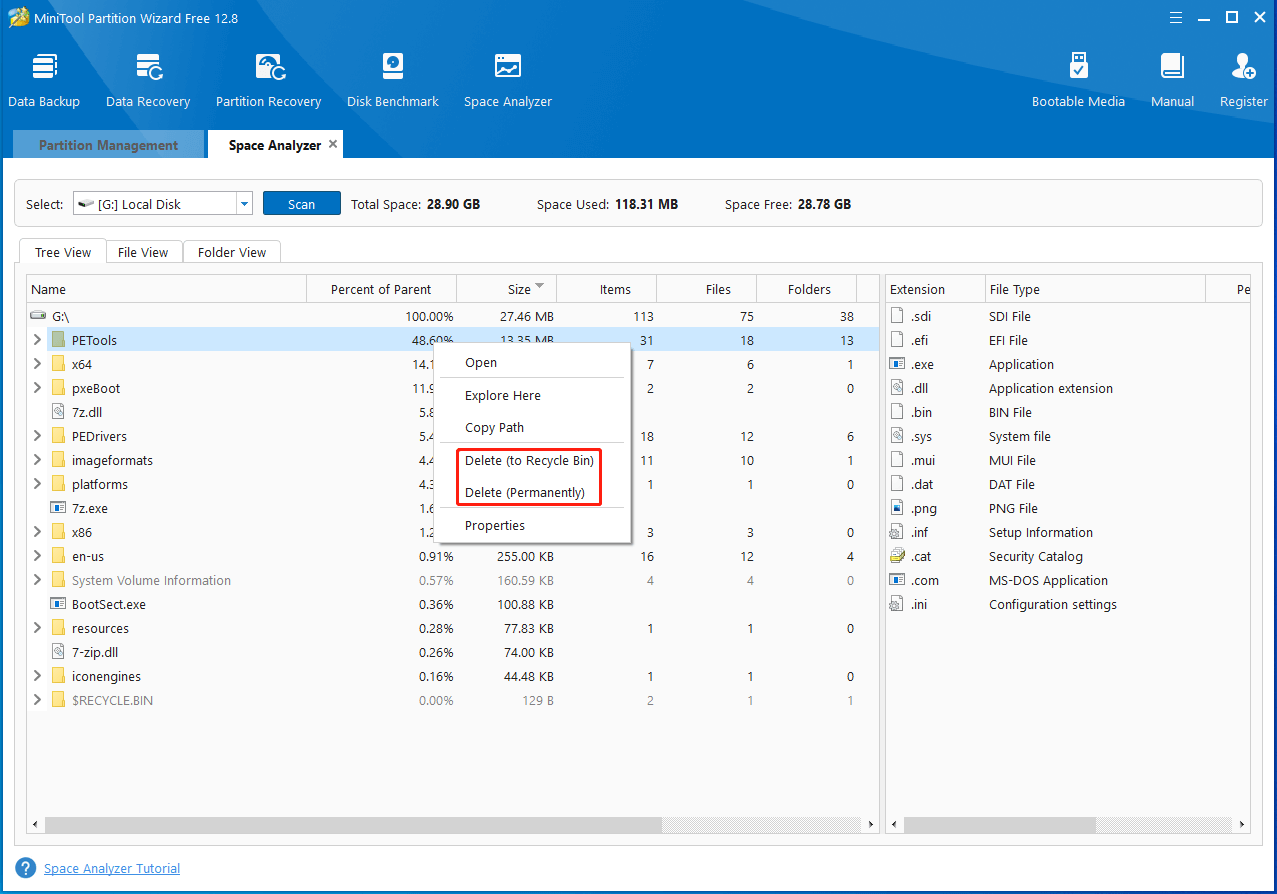
Step 3: Wait until the scanning completes. Right-click the space-consuming and useless files. Then select Delete (Permanently) or Delete (to Recycle) to remove them.
Step 4: Once done, re-plug the SD card to Ender 3 to see if the issue is repaired.
Method 6: Update Ender 3 Firmware
The outdated firmware on your printer may be another reason for the “Ender 3/Anycubic not recognizing SD card” issue. As for this, you can try to fix this issue by upgrading the firmware on Ender 3. You can execute this update with this Ender 3 firmware update tutorial.
Method 7: Replace the SD Card
Although Ender 3 supports SD cards up to 64GB, many users complain they suffer issues while using a large-capacity SD card for their 3D printer. Therefore, to troubleshoot the “Ender 3/Anycubic 3D printer not reading SD card” issue, you can try replacing the current SD card with a smaller one. Usually, a 4GB or 8GB SD card is the best recommendation.
In addition, you may experience the SD card not reading issue if the SD card gets physically damaged. In this situation, you can use a new SD card to see if the issue disappears.
Bottom Line
This post discusses why Ender 3/Anycubic 3D printer not reading SD card. Moreover, it offers several feasible solutions to this issue. When you get stuck in this issue, you can try to fix it with the above methods.
For any issues associated with MiniTool Partition Wizard, you can contact us via [email protected]. We’ll reply to you as soon as possible.
User Comments :