Many Windows users find that their dynamic disk is marked as Foreign in Disk Management. Here is a true example on the superuser.com forum:
I have an attached a secondary hard drive (NTFS) to a system having Windows XP SP3 with some important data on it. When I go to the disk management, the secondary disk is shown as a foreign disk without showing any partitions. Is it safe to import a foreign disk? How to import foreign disk without losing data? Please, help me! https://superuser.com/questions/30664/import-foreign-disks
What Is A Foreign Dynamic Disk

- Case 1: The dynamic disk was moved to a computer that installed Windows XP 64-bit Home Edition, Windows XP Professional, Windows 2000, or Windows Server 2003 family operating systems.
- Case 2: You move a dynamic disk to a dual-boot computer or portable computer that installed Windows XP Home Edition and another operating system such as Windows 2000 Professional.
Does Import a Foreign Disk Destroy Data
When your dynamic disk is flagged as Foreign in Disk Management, the data on the disk is still here but invisible. To access data on the dynamic disk, you need to import foreign disk. However, many users worry about importing a foreign disk will destroy data. The data will remain entirely intact only if you add the disk to the system configuration that supports a dynamic disk.
How to import foreign disk? If your Windows system supports dynamic disk, you can directly use the “Import Foreign Disks”. However, if you are using the system that doesn’t support dynamic disk like Windows XP, you can’t use this feature. To help you import foreign disk without losing data, we summarize the following methods based on the 2 situations. Let’s keep reading.
How to Import Foreign Disk Without Losing Data
If your Windows computer supports the dynamic disks, you can directly use the “Import Fore Disk” feature of Disk Management or Diskpart. Here you can add the disk to your computer’s system configuration by follow the instructions below:
Method 1. Import Foreign Disks via Disk Management
The easiest and fast method is to use the Import Foreign Disks feature via Disk Management. Here we take Windows 10 for example.
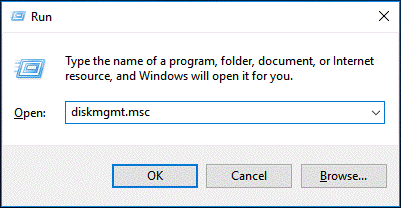
Step 1. Press Win +R keys to open the Run dialog box. Then input diskmgmt.msc in the text box and click on OK to open the Disk Management.
Step 2. Right-click the foreign dynamic disk and select the Import Foreign Disks option from the context menu.
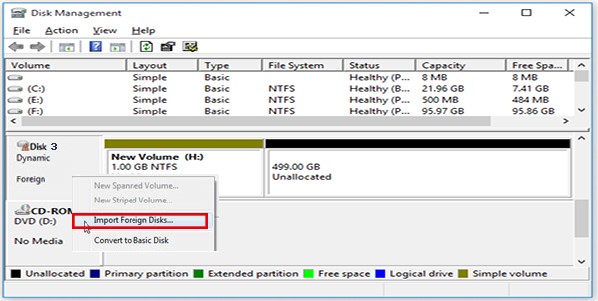
After that, all the existing volumes on the foreign dynamic disk will be visible and accessible.
Method 2. Import Foreign Disks via Diskpart
Diskpart is another Windows built-in tool that can help you import foreign disks. Let’s see how to use it.
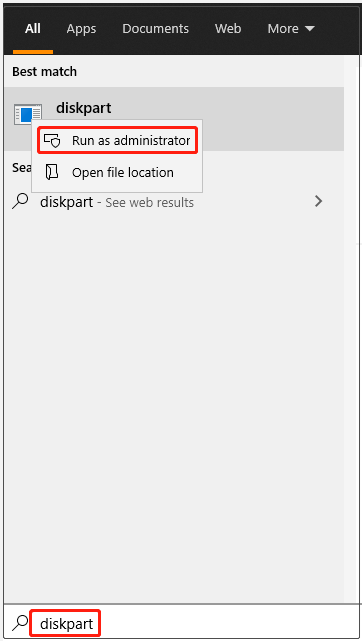
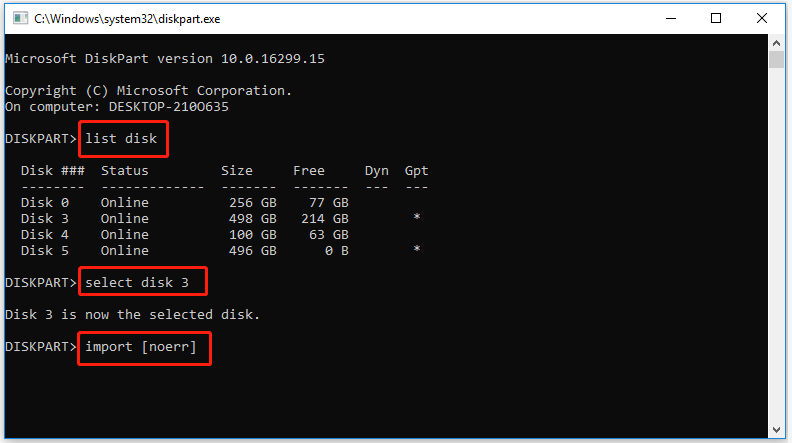
Step 1. Type diskpart in the search box, and then right-click the diskpart app and select Run as administrator from the context menu.
Step 2. In the elevated command prompt, type the following commands one by one and hit Enter after typing each command.
- list disk
- select disk *(replace * with the number of the dynamic disk that you are moving)
- import [noerr]
The above 2 methods can work when your Windows computer supports dynamic disks. However, some users report that the Import Foreign Disk option is greyed out. What can you do if the computer can’t support the dynamic disk? Let’s go on to the following part.
How to Do If You Can’t Import Foreign Disk
If you are using a computer with an old Windows operating system such as Windows XP and Windows 2003 Server, then you can’t use the disk by selecting Import Foreign Disks. To access the data on the foreign dynamic disk smoothly, you have to convert it to a basic disk. How to do that? There are 2 main options for you:
Option 1. Use Disk Management
There are 2 Windows built-in tools – Disk Management and Diskpart that can help you convert a dynamic disk to basic. But both 2 tools require you to delete all volumes on the disk for the conversion. So, it is highly recommended you make a backup for all important data beforehand.
Here we will show you how to convert to basic disk via Disk Management.
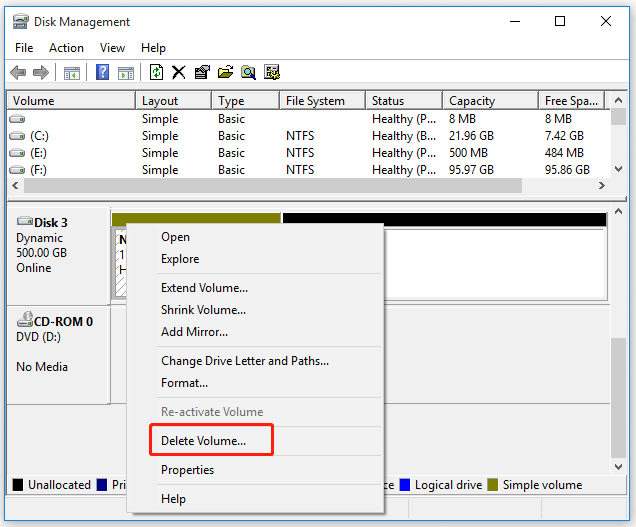
Step 1. Open Disk Management by running the diskmgmt.msc command in the Run dialog box.
Step 2. Right-click a volume on the dynamic disk and select Delete Volume.
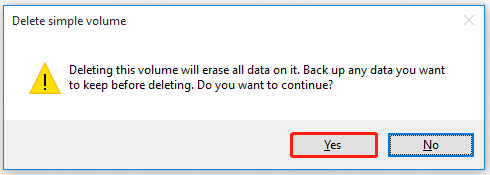
Step 3. If you have backed up all important data on the volume, you can click on Yes to confirm this operation.
Step 4. Repeat Step 2 and Step 3 until you delete all volumes on the disk
Step 5. When all volumes on the disk have been deleted, you will find the dynamic disk has been converted to basic.

Option 2. Use Diskpart
You can use Diskpart to convert a dynamic disk to basic. If you have backed up all important data on the disk, follow the steps below to start converting.
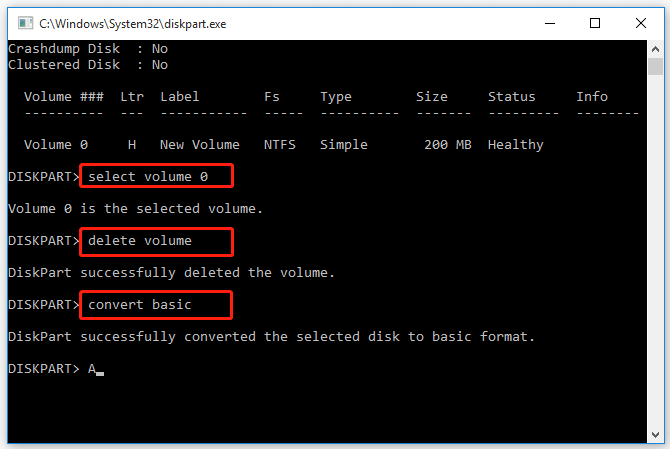
Step 1. Open the Diskpart command prompt again by type diskpart in the search box.
Step 2. Type the following commands one by one and press Enter after typing each command.
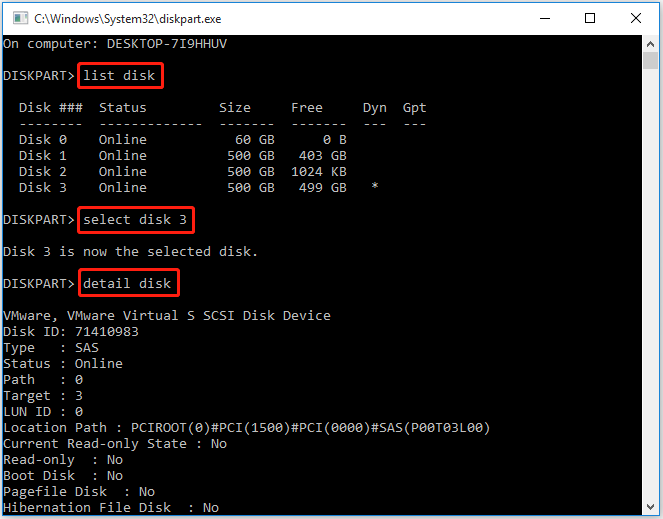
- list disk
- select disk* (replace * with the number of the dynamic disk that you want to convert)
- detail disk
- select volume * (replace * with the number of the volume you will delete)
- delete volume (you need to repeat the above 2 commands for each volume on the disk)
- select disk * (the one that you want to convert to basic)
- convert basic
Although you can convert dynamic disk to basic via the Disk Management or Diskpart, you have to delete all volumes. Is there a way to convert dynamic disk to basic without data loss? Move on to the next part and see the method.
Option 3. Use MiniTool Partition Wizard
In addition to using Disk Management or Diskpart, MiniTool Partition Wizard provides you with an easier way to convert dynamic disk to basic without data loss. It is a powerful partition manager that is widely used on Windows 10/8/7, Vista, and XP. With this software, you can convert NTFS to FAT, convert MBR to GPT, recover lost data, migrate OS to SSD/HD, rebuild MBR, etc.
Let’s see how to convert to basic disk using MiniTool Partition Wizard
MiniTool Partition Wizard DemoClick to Download100%Clean & Safe
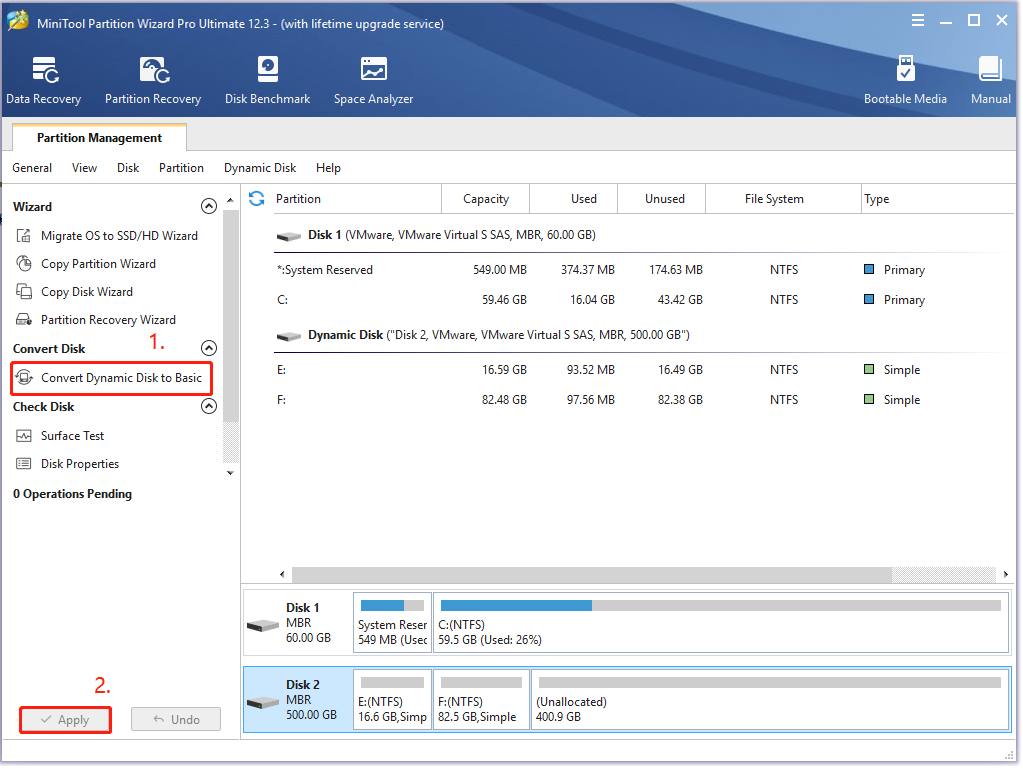
Step 1. Open this dynamic disk converter to enter its main interface.
Step 2. Select the dynamic disk that you want to convert from the disk map, and click on Convert Dynamic Disk to Basic from the action panel. Also, you can right-click the dynamic disk and select Convert Dynamic Disk to Basic from the context menu.
Step 3. Now, you can preview this dynamic disk becomes basic and all volumes on it are turned into primary partitions. To execute this conversion, please make sure you click on Apply.
Now, the foreign dynamic disk should be converted to a basic disk and you can access the data on it.
![[Fixed] PBR Image Is Almost Full & Can You Delete It](https://images.minitool.com/minitool.com/images/uploads/2021/03/pbr-image-thumbnail.jpg)
Bonus: How to Restore Data from the Dynamic Disk
Some users delete all volumes on the dynamic disk for converting to a basic disk when they can’t import a foreign disk. Under this situation, you may lose important data. Fortunately, there is a way to recover the lost data — using MiniTool Partition Wizard, a professional data recovery tool that can help you recover data.
MiniTool Partition Wizard DemoClick to Download100%Clean & Safe
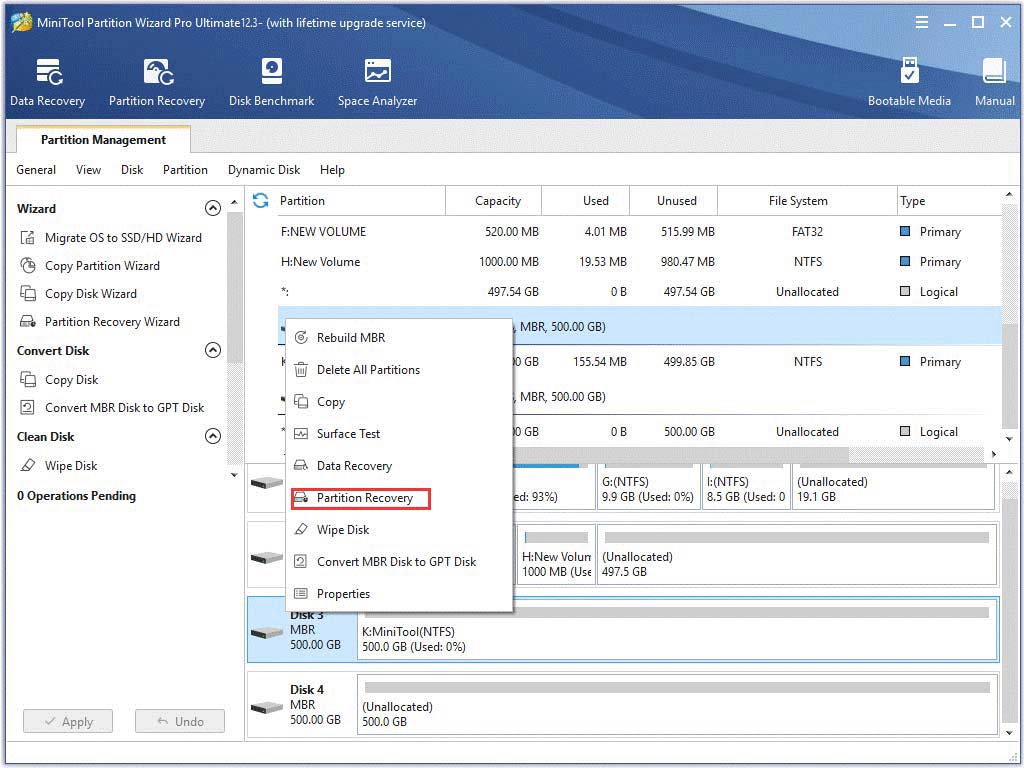
Step 1. In the main interface, right-click the dynamic disk that you lost data and select Partition Recovery from the context menu.
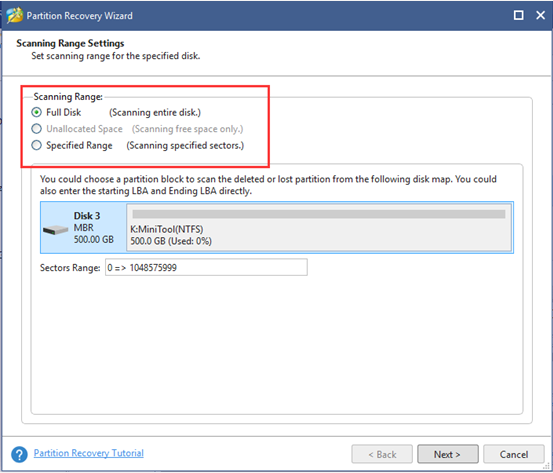
Step 2. Choose a scanning range based on your needs. Here you can choose Full Disk, Unallocated Space, and Specified Range and clock on Next to go on.
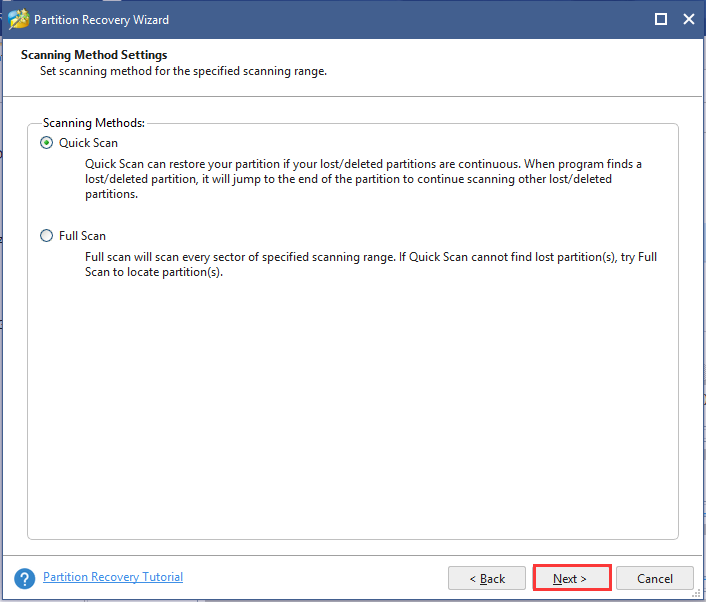
Step 3. Select a scanning method to scan the disk and click Next. If you want to scan the disk with less time, you can select the Quick Scan option.
Step 4. Wait for some time until the scanning completes. Once done, make sure that you check all partitions including the existing partitions and deleted/lost partitions, and click on the Finish button.
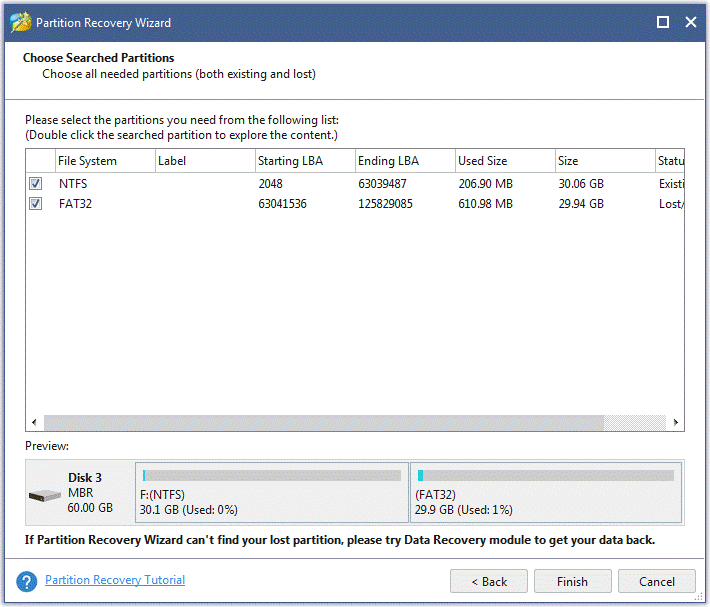
Now, the deleted volumes should be recovered. For the recovered volumes, you can assign a drive letter for them
What’s Your Opinion
What is a foreign dynamic disk? How to import foreign disk without losing data? After reading this article, we believe that you already have gotten the answers. If you can’t import foreign disks, you can use MiniTool Partition Wizard to convert dynamic disk to basic without data loss.
If you have any opinions on this subject, you can write them in the comment area. For any difficulties when using the MiniTool program, you can send us an email to [email protected]
Foreign Dynamic Disk FAQ
If you find the dynamic disk is marked as Offline or Invalid, you can follow the steps below to reactivate it:
- Right-click the Start menu at the bottom of your window and select Disk Management.
- Right-click the dynamic disk and select Reactivate Disk. After that, this disk should be marked as Online. If you encounter the invalid dynamic disk issue, you can repair it with this post.
User Comments :