Unallocated space is a space that is not used. To improve the disk performance and utilization, you need to format unallocated space on the disk. If you don’t know how to format unallocated disks, this guide on MiniTool Website will offer you the most suitable method.
What Is Unallocated Disk & Why Do You Need to Format It?
Unallocated space refers to the free space on the disk that can be used to place files but no application can write to it. Unallocated space is not available on the disk because there is no partition on the disk. Therefore, to make full use of your disk, you need to format unallocated disk.
In this guide, we will discuss how to format unallocated disk Windows 10/11 in 3 ways. If you are concerned about the detailed guidelines, you are in the right place.
How to Format Unallocated Disk on Windows?
Way 1: via MiniTool Partition Wizard
If you are not an expert in computer, the best way to format unallocated disk on Windows is to draw support from a piece of professional third-party software – MiniTool Partition Wizard.
This free partition manager allows you to move, resize, extend, format, delete, copy partition and it enables you to perform many basic & advanced partition management operations on both basic and dynamic disks on Windows machine.
To format unallocated disk, you can create a partition on the unallocated space and choose the wanted file system format with MiniTool Partition Wizard. Let’s see the detailed instructions:
Step 1. Run MiniTool Partition Wizard.
MiniTool Partition Wizard FreeClick to Download100%Clean & Safe
Step 2. Right-click on the unallocated space on the hard drive or external storage device and choose Create.
Step 3. Then, you need to confirm advanced parameters including Partition Label, Partition Type, Drive Letter, File System, Cluster Size, and Partition Location.
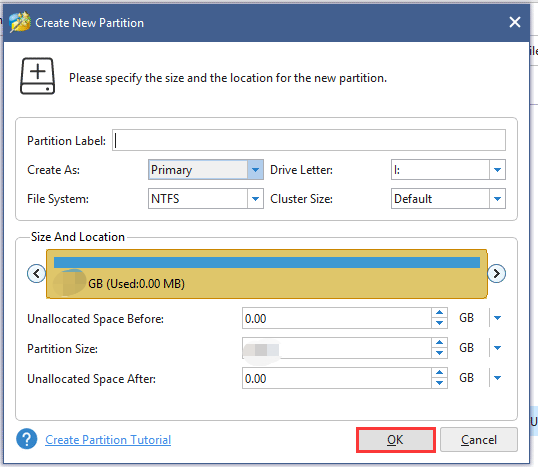
Step 4. Now, you can preview the new partition newly created. Click Apply to confirm this action.
- How to Merge Unallocated Space in Windows 10 for a Large Drive
- How to Recover Unallocated Partition With Data on It
- 2 Ways to Recover Files from Unallocated Space in Windows 10/8/7
Way 2: via Disk Management
Disk Management can help to manage your hard disk partitions without rebooting the system. Using this utility, you can initialize, format, or partition hard disks. Here’s how to format unallocated disk with it:
Step 1. Press Win + R altogether to open the Run dialog box.
Step 2. Type diskmgmt.msc and hit Enter to launch Command Prompt.
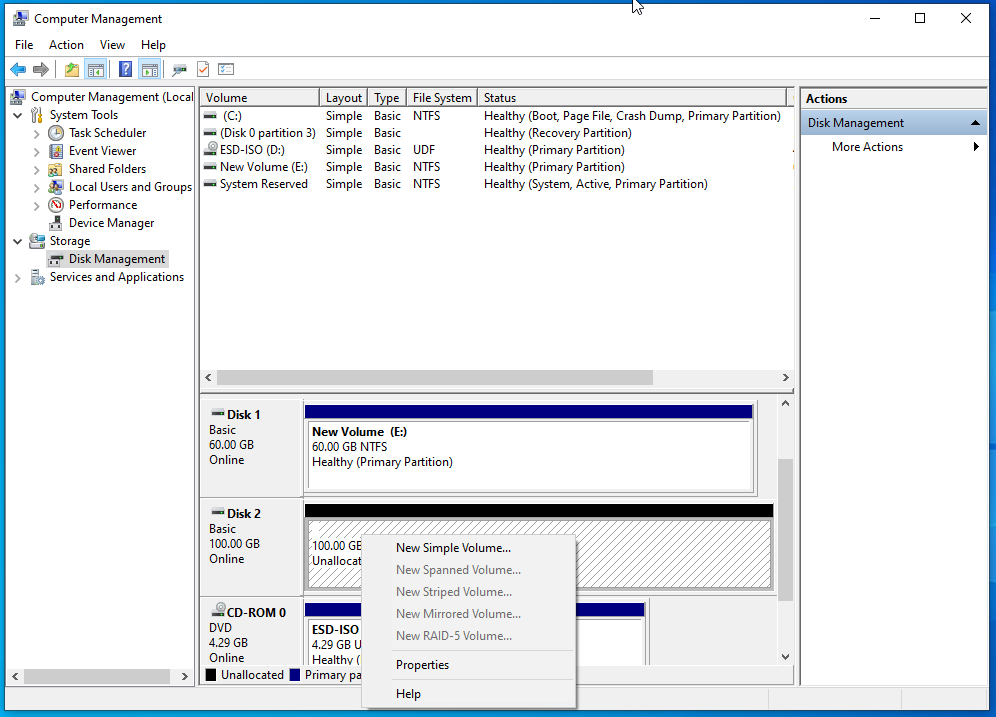
Step 3. Right-click on the unallocated space on the drive and choose New Simple Volume from the drop-down menu.
Step 4. On the Welcome to New Simple Volume Wizard dialog, hit Next.
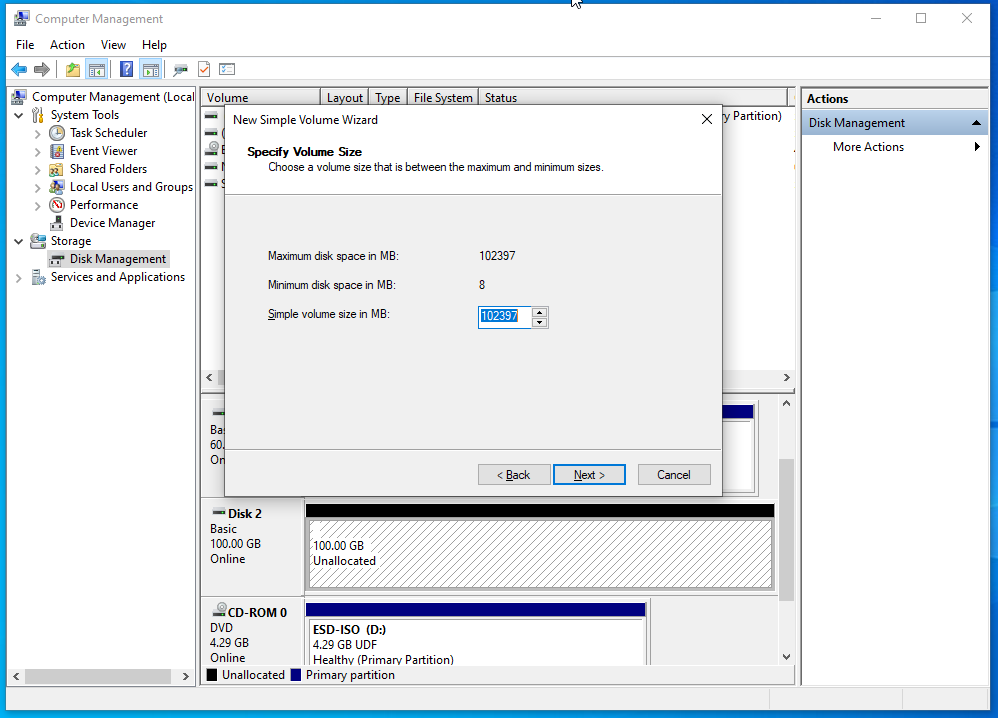
Step 5. Set the size of simple volume and it should be smaller than Maximum disk spaced listed. Hit Next.
Step 6. Tick Assign the following drive letter > select a drive letter for the new partition > hit Next.
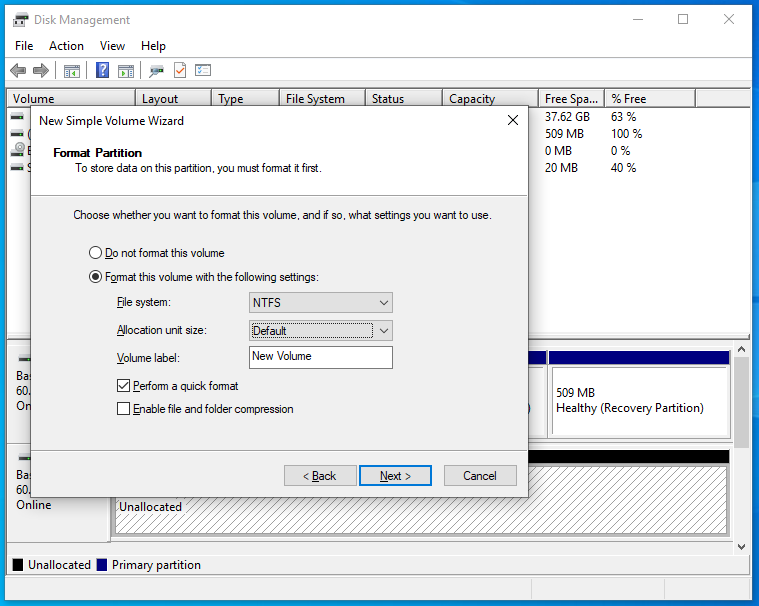
Step 7. Tick Format this volume with the following settings > change file system, allocation unit size, and volume label according to your need > hit Next to continue.
Step 8. After the format completes, click on Finish, and you will return to Disk Management.
Also see: Windows 11 Disk Management: Features, Opening, and Alternatives
When you fail to create a new partition from unallocated space via Disk Management, please check your disk size and format. For MBR, the maximum capacity is 2TB. For GPT, it supports more than 2 TB. If you need to change the disk format, see the guide - How to Convert MBR Disk to GPT.
Way 3: via Diskpart Command
Diskpart is an inbuilt disk partition management command-line tool that helps you to create partition, format partition, delete partition and so on. Also, it supports formatting the unallocated disk using Command Prompt. To format unallocated disk via CMD, follow these guidelines with caution:
Do you know what the difference between Disk Management and Diskpart is? See this guide to get the answer - DiskPart vs Disk Management: What’s the Difference Between Them.
Step 1. Right-click on the Start icon to open the quick menu.
Step 2. In the drop-down menu, hit Run.
Step 3. In the Run box, type diskpart and click on OK.
Step 4. In the command window, you can run the following commands:
list disk – to list all the disks in the system.
select disk x – x should be replaced by the disk number of the unallocated disk that you need to format.
create partition primary – to create a primary partition.
format fs=fat32 – fat32 refers to the format, you can change it to exfat or ntfs based on your needs.
assign letter=i – i can be replaced by other letters you want.
Step 5. After all the process is down, you can see the formatted partition on File Explorer.
You might receive an error message – no usable free content could be found while creating a partition with the Diskpart commands. To solve the problem, you can try the solutions in this guide - How to Fix: No Usable Free Extent Could Be Found.
We Need Your Voice
In summary, this post discusses three ways to format unallocated disks on Windows. You can utilize two Windows inbuilt tools: Disk Management and Diskpart command, or select a piece of reliable third-party partition manager – MiniTool Partition Wizard. You can give them a try and inform us which works. If you have any question about our product, please feel free to contact us via [email protected].
User Comments :