DiskPart commands can be used in Windows, WinRE, and WinPE to manage disks, partitions, and volumes. This post of MiniTool shows you how to use them step by step. If you're not familiar with command-line tools, you can use MiniTool Partition Wizard or Disk Management.
What Is DiskPart?
DiskPart is a command-line partitioning utility integrated in Windows 2000 and later versions of Windows to manage disks, partitions, volumes, and virtual hard disks (VHDs).
Compared to Windows Disk Management, DiskPart can handle both basic and more complex partitioning needs. To be more specific, DiskPart has the following capabilities:
- It can do basic disk and partition management tasks. For example: clean disks, convert disks between MBR and GPT, create/format/delete partitions, extend/shrink partitions, assign drive letters, set attributes on disks or partitions, etc.
- It can do some disk management tasks that Disk Management cannot do. For example, it can change partition type fields, display or set the GUID partition table (GPT) identifier or master boot record (MBR) signature, etc.
- As a command-line utility, DiskPart can work normally in WinPE (Windows Preinstallation Environment) and WinRE (Windows Recovery Environment).
- It allows automation and scripting of disk management operations. Hence, professionals can streamline and automate repetitive tasks in their environments.
How to Access DiskPart
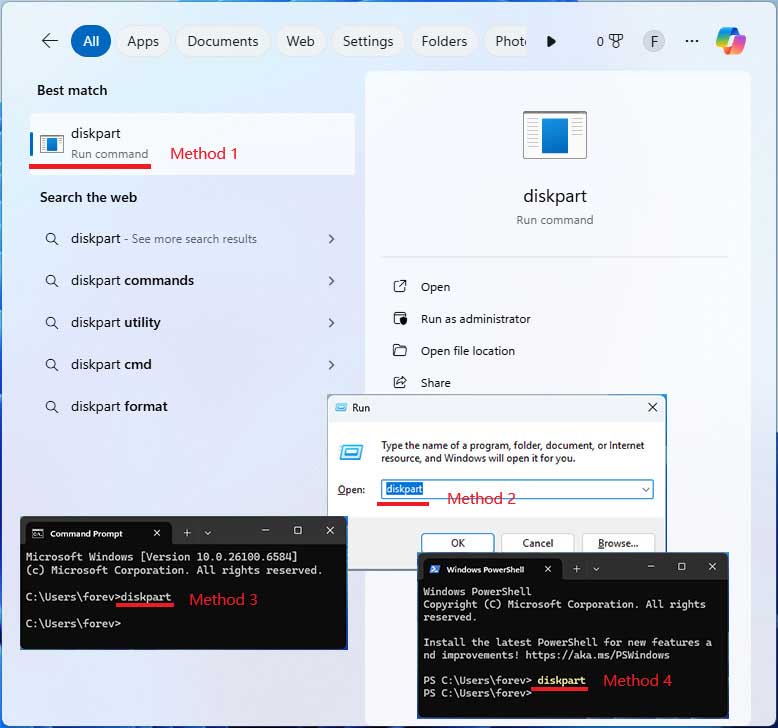
If your computer can boot into Windows, you can use any of the following methods to open DiskPart.
- In the Windows Search bar, type “diskpart” and then select DiskPart from the results.
- Press the Windows logo key + R to open Run. Type “diskpart” and then press Enter.
- Open Command Prompt from the Windows Search bar and then type “diskpart” in the Command Prompt window.
- Press Windows logo key + X and select PowerShell (or Terminal) from the menu. Then, type “diskpart” in the terminal window and press Enter.
If your computer can’t boot into Windows, you can open DiskPart in WinRE or WinPE to manage disks and partitions.
How to open DiskPart in WinRE:
- If your PC is unbootable, you can force shut it down and restart three times to automatically enter WinRE.
- In WinRE, navigate to Troubleshoot > Advanced options > Command Prompt.
- Choose your account and enter your password.
- Once Command Prompt opens, type “diskpart” and press Enter to open DiskPart.

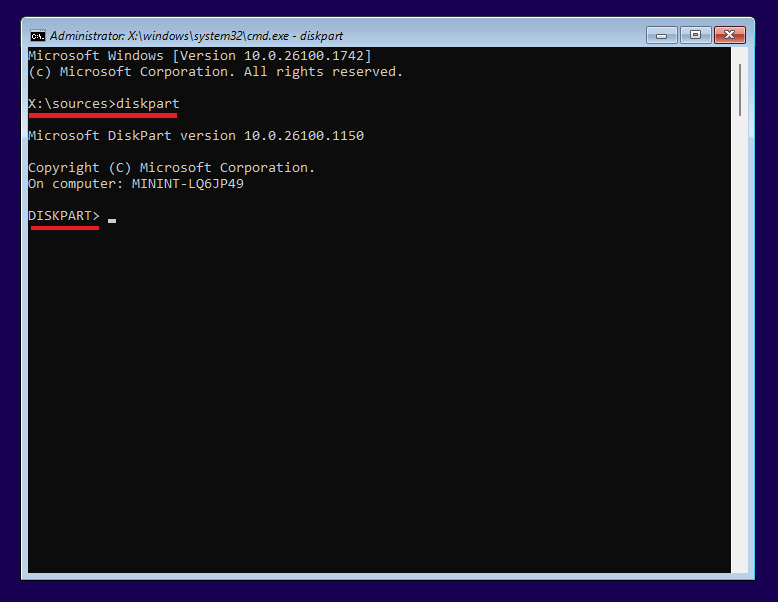
How to open DiskPart in WinPE:
- Make a Windows installation USB drive and then boot your PC from the USB drive.
- Once the Windows setup wizard launches, press Shift + F10 on your keyboard to open the Command Prompt.
- Type “diskpart” and press Enter to open DiskPart.
Precautions When Using DiskPart
When you use DiskPart commands, you must first list and then select an object to give it focus. The focus object can be a disk, a partition, or a volume.
After an object has focus, all subsequent DiskPart commands that you type will act on that object until you select a different object.
Note that some commands automatically change the focus. For example, when you create a new partition, the focus will be switched to the new partition.
Some DiskPart commands may delete data, such as format, delete partition, clean, etc. Therefore, it’s recommended to verify disk and partition selection before performing DiskPart commands.
Additionally, if you are not familiar with DiskPart commands, it’s recommended to back up the system in advance.
DiskPart Commands: Explanation and Usage
In this part, DiskPart commands are classified into different groups according to the focus object. Then, you can get the explanation and usage tutorial of these commands in order.
Before learning how to use DiskPart commands, you should know that DiskPart commands may have a little difference depending on the focus object and the disk type.
#1. Differences Caused by Disk Types
Disk type can be MBR or GPT. They are different in the partition table, partition addressing mode, boot mode, etc. Therefore, some DiskPart commands may only apply to one type of disk. For example:
- DiskPart active and inactive commands only apply to MBR disks. The DiskPart gpt attributes command only applies to GPT disks.
- In addition, DiskPart create partition extended and DiskPart create partition logical commands only apply to MBR disks. DiskPart create partition msr and DiskPart create partition efi commands only apply to GPT disks.
#2. Differences Caused by Focus Objects
Disk, partition, and volume are three different things. Therefore, the commands applying to them are different.
A disk refers to a storage device. To use the space on the disk, partitions or volumes should be created on the disk.
What’s the difference between a partition and a volume?
A partition is usually a contiguous storage area on a basic disk. However, in DiskPart commands, volume has a broader definition.
A volume can be a partition on a basic disk, and it can also be a single partition or a combination of multiple partitions (contiguous or non-contiguous) on dynamic disks.
DiskPart Commands for Disk Management
The DiskPart commands for managing disks are as follows:
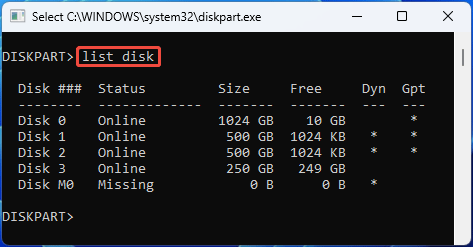
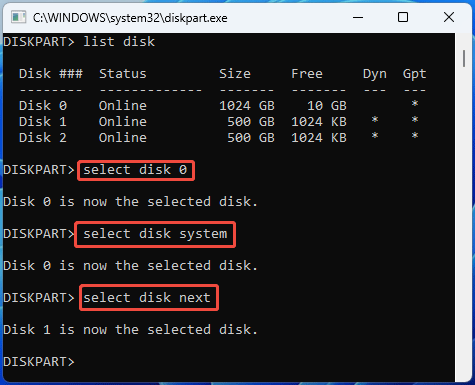
#1. List Disk
It lists all disks connected to a computer and displays the disk number, status (online or offline), size, free space, and disk types (dynamic or not, and GPT or not). It helps you identify the disk and gives focus to the right disk.
#2. Select Disk *
Select a specified disk and give the focus to it. You can replace * with a disk number (shown in List Disk command), system, next, or a disk location path (shown in Detail Disk command).
- Select disk system: On BIOS computers, disk 0 will be selected. On UEFI computers, the disk containing the EFI system partition (ESP) will be selected. This command will fail if there’s no ESP or more than one ESP, or if the computer is in WinPE.
- Select disk next: The next disk in the list receives focus.
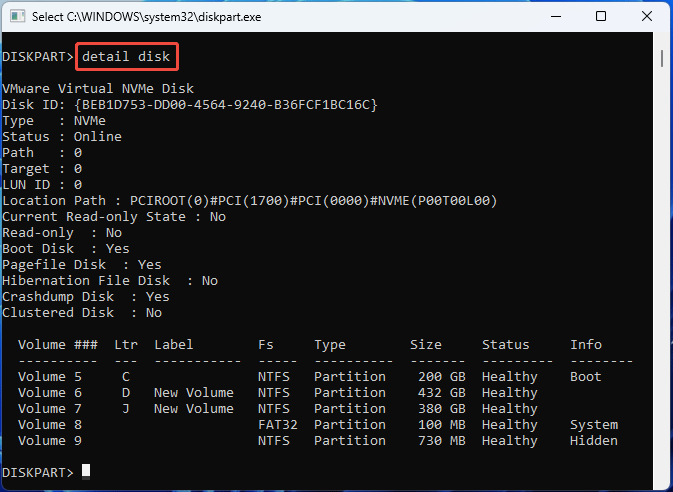
#3. Detail Disk
It displays the properties of the selected disk and the volumes on that disk. You can see the disk ID, type, status, LUN ID, location path, etc.
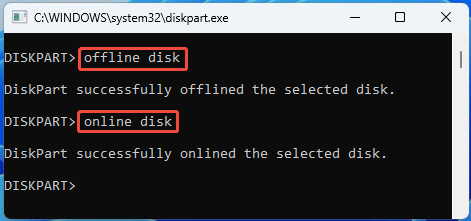
#4. Online/Offline Disk
A disk’s status can be either online or offline. The Online status means the disk is running and can be accessed, while the Offline status means the disk is unavailable or not connected.
The Online Disk command can bring a disk back online, if it becomes offline suddenly.
The Offline Disk command can take a disk to the offline state, making the disk ideal for storing data that is infrequently accessed or backup of online data to deal with risks such as data loss.
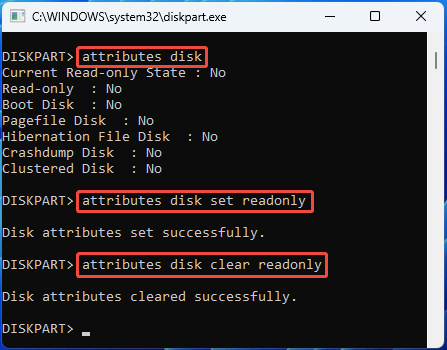
#5. Attributes Disk (Set/Clear Readonly)
It displays, sets, or clears the attributes of a specific disk. Note that the only attribute that you can set or clear is the read-only attribute.
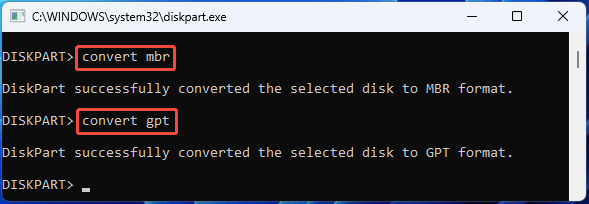
#6. Convert MBR/GPT
It initializes or converts an empty basic disk into MBR or GPT style. Note that this command has two prerequisites:
- The disk is basic, not dynamic.
- The disk is empty, without any partitions or volumes on it.
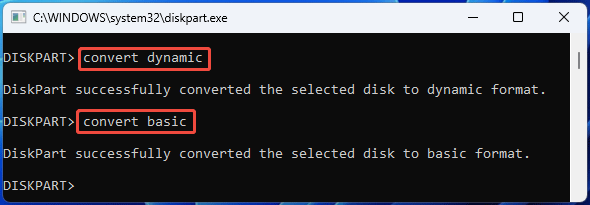
#7. Convert Basic/Dynamic
The Convert Dynamic command can convert a basic disk into a dynamic disk. Any existing partitions on the basic disk become simple volumes.
The Convert Basic command can convert an empty dynamic disk into a basic disk. If the dynamic disk is not empty, an error will occur. Click What Are Basic & Dynamic Disks to know more.
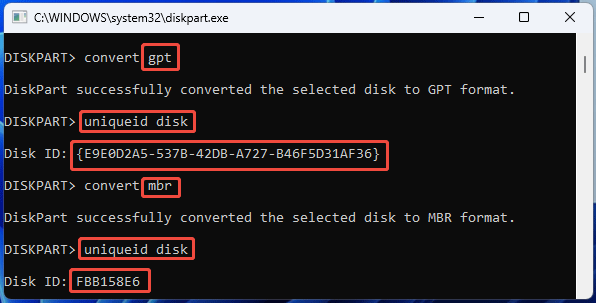
#8. Uniqueid Disk (Id=*)
It displays or sets the ID (GUID partition table (GPT) identifier or master boot record (MBR) signature) of a disk.
Disk ID is a special identifier used to identify and distinguish hard disks. It is created by the Windows system when initializing the hard disk. If the disk ID is corrupt, Windows will think that the disk is not initialized and prompt you to initialize it.
Windows does not allow two disks with the same disk ID to be online simultaneously to prevent data confusion. If this issue occurs, Windows will offline one disk. That’s why you get the error “This disk is offline because it has a signature collision with another disk that is online.”
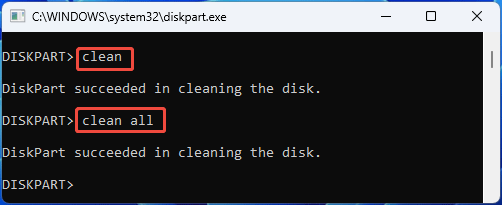
#9. Clean (All)
The DiskPart Clean command will remove all partitions or volume formatting from a disk.
Specifically, it will overwrite the MBR partitioning information and hidden sector information on MBR disks, and the GPT partitioning information (including the Protective MBR) on GPT disks.
As you can see, the Clean command won’t overwrite partitions. Therefore, you can recover partitions or data easily.
The Clean All command will specify that each and every sector on the disk is set to zero, which completely deletes all data contained on the disk.
After performing the command, the data recovery job is almost impossible, unless you send the disk to a professional data recovery lab.
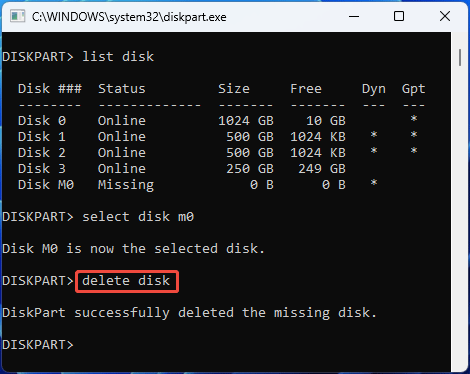
#10. Delete Disk
It deletes a missing dynamic disk from the list of disks. You may need this command if a dynamic disk becomes missing due to corruption, power down, or disconnection.
Select a disk and then use this command to delete it.
#11. Rescan
You may need this command if you add a new disk. This command lets the DiskPart command interpreter locate new disks added to your computer.
DiskPart Commands for Partition Management
The DiskPart commands for managing partitions are as follows:
#1. Create Partitions
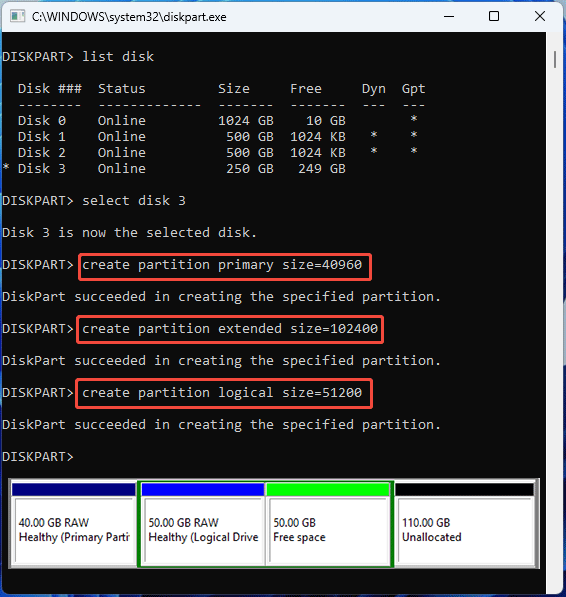
To use the DiskPart create partition commands, a disk should be selected. Then, you should also make sure there is unallocated space on this disk.
You can create partitions with the following commands:
- Create Partition EFI (Size=*) (Offset=*): Creates an Extensible Firmware Interface (EFI) system partition on a GPT disk. Only system disks can have it. This partition is the so-called ESP partition that contains the boot loaders, boot managers, kernel images of installed operating systems, etc.
- Create Partition MSR (Size=*) (Offset=*): Creates a Microsoft Reserved (MSR) partition on a GPT disk. This partition is usually located after the EFI partition, preventing a GPT disk from being treated as an unformatted empty hard disk when connected to an old system.
- Create Partition Primary (Size=*) (Offset=*) (Id=*) (Align=*): Creates a primary partition on the selected basic disk.
- Create Partition Extended (Size=*) (Offset=*) (Align=*): Creates an extended partition on an MBR disk. An MBR disk can have only one extended partition.
- Create Partition Logical (Size=*) (Offset=*) (Align=*): Creates a logical partition on an existing extended partition. You must create an extended partition before you can create logical drives.
Here are the explanations of those parameters:
- Size determines the size of the created partition in MB. If no size is given, the partition continues until there is no more free space in the current region. For logical drives, their size should be smaller than the extended partition.
- Offset is the start location of the created partition, and its unit is KB. If no offset, EFI and MSR partitions will be created in the first disk extent that is large enough to hold them, primary and extended partitions will be created in the largest disk extent, and logical drives will be created in the largest disk extent available in the extended partition.
- ID specifies the partition type. Note that MBR disks use a Partition ID, while GPT disks use GUID/UUID (Globally/Universally Unique Identifier). To learn common MBR and GPT partition IDs, read Microsoft Create Partition Parameters Structure.
- Align parameter sets the number of kilobytes (KB) from the beginning of the disk to the closest alignment boundary. Then, all partitions will be aligned to it.
Note that the DiskPart create partition commands won’t give file systems and drive letters to the created primary or logical partitions.
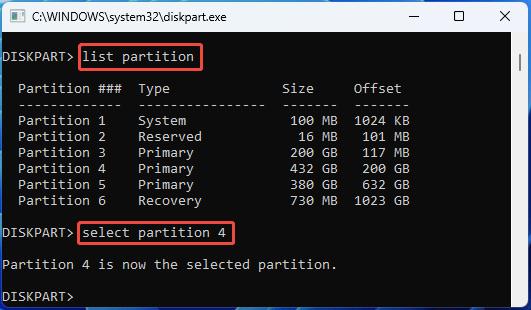
#2. List/Select Partition
The List Partition command will display all partitions listed in the partition table of the selected disk. You will see their number, type, size, and offset.
Note that the partitions might not correspond to the dynamic volumes on the disk when you list partitions on a dynamic disk.
On the selected disk, the Select Partition * command will shift the focus to the selected partition. * is the number of the selected partition.
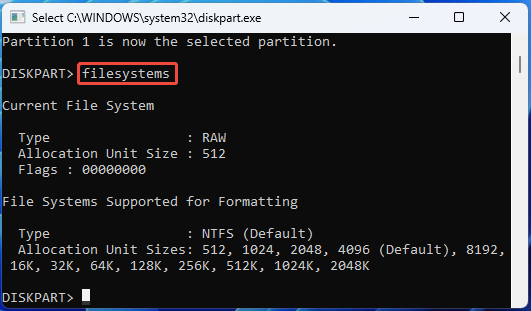
#3. Filesystems
You should select a partition or a volume first. Then, use this command to display the current file system information of the partition/volume and list the file systems that are supported for formatting the volume or partition.
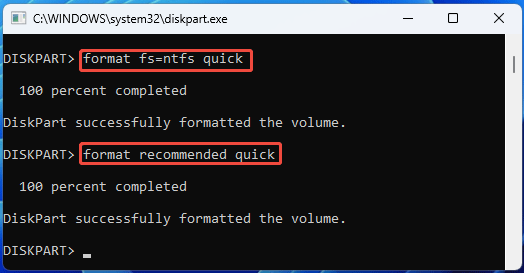
#4. Format FS=*
The DiskPart format command will format a partition or volume with the focus. The FS parameter specifies the type of file system (NTFS, FAT, FAT32, exFAT, or UDF).
2. The extended partition can’t be formatted.
There are other parameters that you should notice.
- Revision=* (following the FS parameter, specifies the file system revision)
- Label=* (Specifies the volume label)
- Unit=* (Overrides the default allocation unit size)
- Quick (Performs a quick format. Without this parameter, performs a full format)
- Compress (Only applies to the NTFS file system. When you use this command, files created on the new volume will be compressed by default)
- Duplicate (Applies only to the UDF revision 2.50 and above, for use with CD-RW media and hard drives. It duplicates the file system metadata on a second set of sectors on the disk)

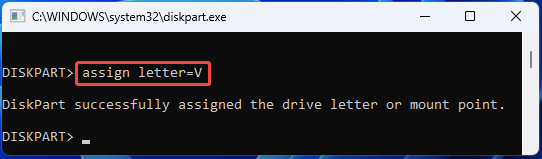
#5. Assign Letter/Mount=*
The Assign Letter=* command allows you to add a drive letter to a partition or volume, making it show in Windows File Explorer. You can also use this command to change the drive letter.
If no drive letter is specified, the next available drive letter is assigned. If the drive letter is already in use, an error is generated.
Note that you can’t assign drive letters to system partitions/volumes, boot partitions/volumes, partitions/volumes that contain the paging file, OEM (Original Equipment Manufacturer) partition, or any GPT partition other than a basic data partition.
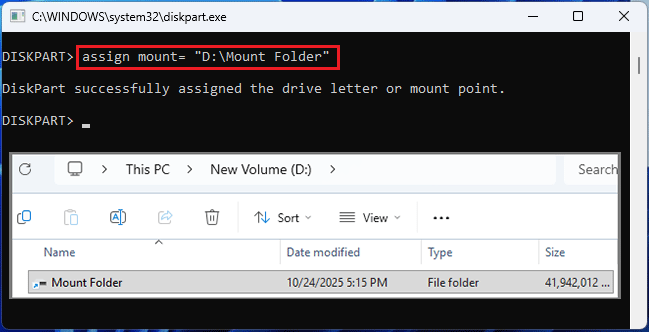
The Assign Mount=* command assigns a mount point (an empty folder in an NTFS or ReFS partition or volume) to the selected partition or volume, which lets you use a drive as if it were a regular folder, making storage management more flexible.
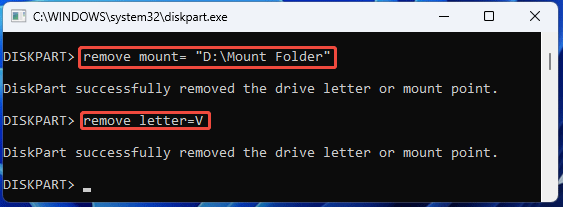
#6. Remove Letter/Mount
It removes a drive letter or mount point from a selected partition or volume. If no drive letter or mount point is specified, DiskPart removes the first drive letter or mount point it encounters.
You can also add the “All” parameter. Then, it will remove all current drive letters and mount points.
#7. Extend/Shrink Partitions
You can extend or shrink an NTFS partition or a partition without a file system (RAW).
To extend a partition, you should make sure there is adjacent unallocated space to the right of the partition.
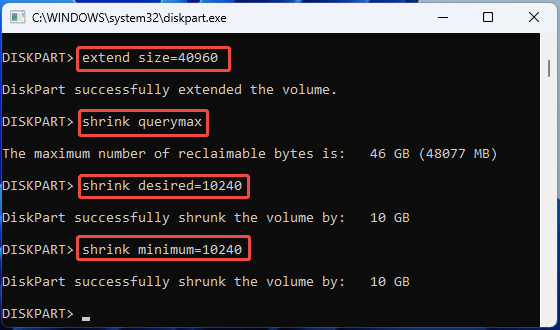
Then, you can use the command “Extend Size=*” to add space in MB to the partition. If no size is given, all of the contiguous free space that is available on the disk is used.
To shrink a partition, the command is “Shrink Desired=*”. It will reduce the size of the selected volume by the amount you specify, making free disk space available from the unused space at the end of the volume.
You can also use the “Shrink Minimum=*” command to shrink a partition. If you use both “Desired=*” and “Minimum=*” parameters, DiskPart will take a value, higher than the minimum value and close to the desired value, if circumstances permit.
2. If a minimum amount is specified, but not enough free space is available, the command fails.
3. If neither a minimum amount nor a desired amount is specified, the volume is reduced by as much as possible.

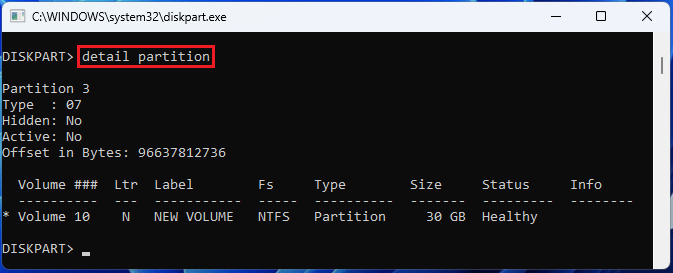
#8. Detail Partition
It displays the properties of the selected partition, including the partition number, type ID, hidden or not, active or not, offset, volume number, drive letter, label, file system, size, status, etc.
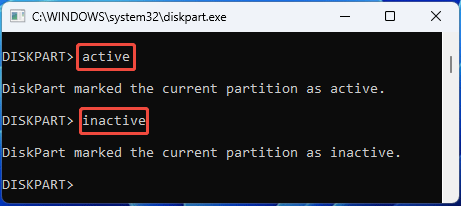
#9. Active/Inactive
They set a partition of an MBR disk active or inactive.
Setting a partition active means telling the firmware that this partition is a valid system partition that contains the operating system startup files. Then, the firmware can load the startup files from the partition.
Therefore, if you set the system partition inactive, the computer also won’t boot up because the firmware can’t find the system partition to load the startup files.
2. A disk can only have one active partition. When there is already an active partition, setting another partition active will make the original active partition inactive. Therefore, mistakenly marking a partition as active will also result unbootable PC.
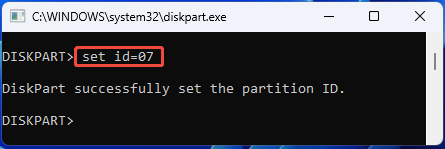
#10. Set ID
It changes the partition type field for the selected partition.
Unless you are experienced with partition ID or GUID, you should not change partition type fields by using this parameter, because wrong partition type fields might cause your computer to be unable to boot or access data.
2. DiskPart doesn't check the validity of the value that you specify (except to ensure that it is a byte in hexadecimal form or a GUID).
3. On MBR disks, the partition type byte is in hexadecimal form. On GPT disks, GUID is used. Recognized GUIDs include c12a7328-f81f-11d2-ba4b-00a0c93ec93b (EFI system partition) and ebd0a0a2-b9e5-4433-87c0-68b6b72699c7 (basic data partition).
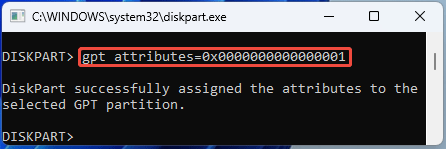
#11. Gpt Attributes=*
On basic GPT disks, this command assigns the gpt attribute(s) to the selected partition. The gpt attribute is a 64-bit field that gives additional information about the use of the partition.
Read Microsoft Create Partition Parameters Structure (https://learn.microsoft.com/en-us/windows/win32/api/vds/ns-vds-create_partition_parameters) to know the common GPT partition field.
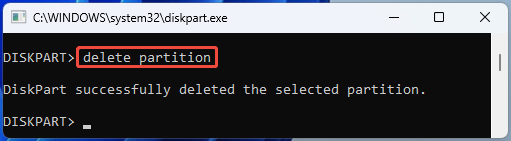
#12. Delete Partition
The DiskPart Delete Partition command will delete the selected partition, destroying the data and converting it to unallocated space.
2. Deleting a partition on a dynamic disk can delete all dynamic volumes on the disk because the entire dynamic disk is displayed as a partition, destroying any data and leaving the disk in a corrupt state.
DiskPart Commands for Volume Management
The DiskPart commands for managing volumes are as follows:
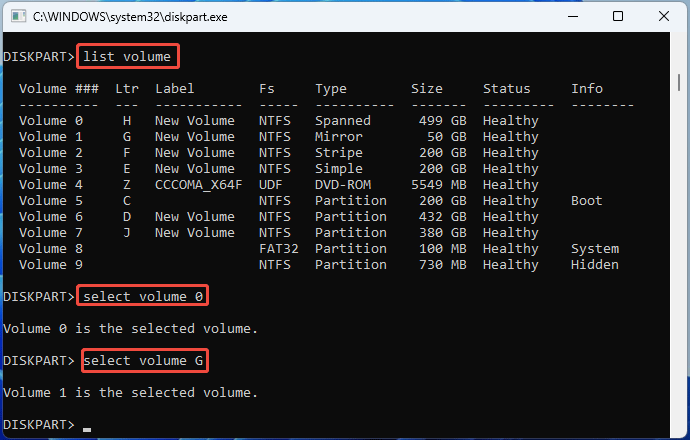
#1. List/Select Volume
Use the “List Volume” command directly, without a disk selected. It displays a list of basic and dynamic volumes on all disks.
You can select a volume by its volume number, drive letter, or mount path. If no volume is specified, this command displays the volume that currently has the focus in the selected disk.
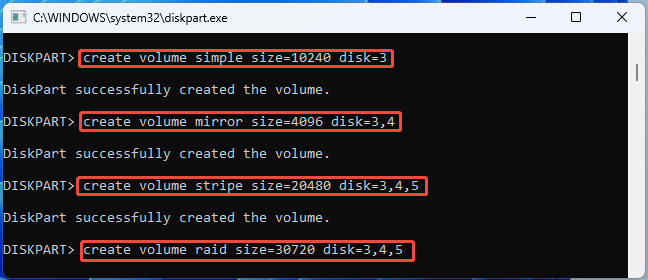
#2. Create Volume
You can create simple, striped, mirror, and RAID-5 volumes on dynamic disks using the following commands.
- Create Volume Simple (Size=*) (Disk=*) (Align=*): Creates a simple volume of size in *MB, on the specified dynamic disk.
- Create Volume Mirror (Size=*) Disk=n1, n2 (Align=*): Creates a volume mirror by using the two specified dynamic disks (n1 and n2).
- Create Volume Stripe (Size=*) Disk=n1, n2 (,n3,…) (Align=*): Creates a striped volume using two or more specified dynamic disks (n1, n2, and more).
- Create Volume Raid (Size=*) Disk=n1, n2, n3, (,n4,…) (Align=*): Creates a RAID-5 volume using three or more specified dynamic disks (n1, n2, n3, and more).
Here are the explanations of those parameters:
- For simple volumes, if no size is given, the new volume takes up the remaining free space on the disk. If no disk is specified, the current disk is used.
- For other volumes, the Size parameter determines the amount of disk space that the volume will occupy on each disk. If no size is given, the new volume takes up the remaining free space on the smallest disk and an equal amount of space on each subsequent disk.
- The Align parameter sets the number of kilobytes (KB) from the beginning of the disk to the closest alignment boundary. Then, all volumes will be aligned to it.
If the DiskPart Create Volume Raid command fails on Windows 11/10, you can use Windows Storage Spaces to create a RAID-5 volume.
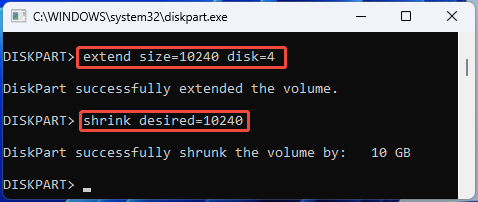
#3. Extend/Shrink Volume
The extend and shrink operations are only supported on simple and spanned volumes, and the file system should be NTFS or RAW.
- Extend (Size=*) (Disk=*): Extends a simple or spanned volume by size of *MB to any dynamic disk. If no size is given, all free space on the specified disk is used. If no disk is given, the volume is extended on the current disk.
- Extend Filesystem: Extends the file system of the selected volume. For use only on disks where the file system was not extended with the volume.
- Shrink (Desired=*) (Minimum=*): Reduces the size of the selected volume by the amount you specify (either desired or minimum value), from the end of the volume. If neither a minimum amount nor a desired amount is given, the volume is reduced by as much as possible.
2. If both desired and minimum amounts are given, DiskPart will take a value close to the desired value as much as possible.
3. A spanned volume can be regarded as a simple volume on two or more dynamic disks. Therefore, they can be converted into each other by using the Extend and Shrink commands.
#4. Add Disk=*
This command can add a mirror to a simple volume, converting it into a mirrored volume. You should first select a simple volume and then use the “Add Disk=*” command. Note that the disk should be dynamic.

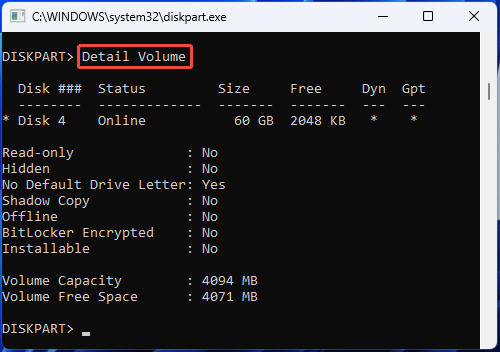
#5. Detail Volume
Once a volume is selected, this command can display the disks on which the selected volume resides. You can see the disk’s size, attributes, and other information.
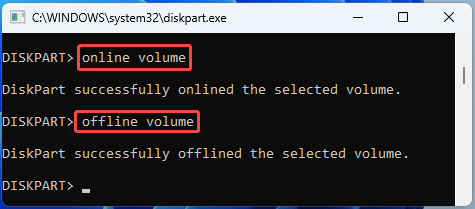
#6. Online/Offline Volume
They take the volume to the online or offline state. If you want to use the data stored in the volume, keep it online. If you do not want others to access or edit the volume, bring it offline.
2. The Offline Volume command will fail if the volume has a drive letter.
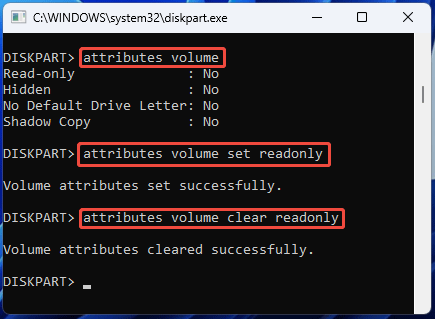
#7. Attributes Volume
After selecting a volume, the Attributes Volume command can display the current attributes on the selected volume: the Read-only status, Hidden status, No Default Drive Letter status, and Shadow Copy status.
If you want to make the selected read-only, hidden, not receive a drive letter by default, or a Shadow Copy volume, use the Attributes Volume Set * command. The Attributes Volume Clear * command can remove the attributes.
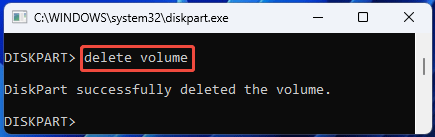
#8. Delete Volume
This command deletes the selected volume. Note that it can’t delete the system volume, boot volume, or any volume that contains the active paging file or crash dump (memory dump).
Some Special Parameters
There are some special parameters for DiskPart commands. For example:
- Override: Lets DiskPart force perform the command, regardless of normal error conditions or restrictions.
- Noerr: Lets DiskPart continue to process commands when an error is encountered. Without this parameter, an error causes DiskPart to exit with an error code. This parameter is very useful for scripting.
- Nowait: Forces the command to return immediately while the process is still in progress.
DiskPart Commands for HDD vs SSD
Most DiskPart commands work the same on both SSDs and HDDs, except for the DiskPart format (no quick parameter) and clean all commands.
The two commands will write zeros to every sector or block of the partition or disk. This behavior is safe on an HDD. However, SSDs have a limited number of erase cycles. Writing useless data to an SSD will waste its lifespan.
At the same time, pay attention to the align parameter of DiskPart commands. Make sure the partitions and volumes are 4K aligned, especially on SSDs.
The 4K misalignment issue will affect the performance of both HDD and SSD disks. Moreover, because SSDs write data in blocks, 4K misalignment exacerbates the write amplification problem of SSDs, affecting the lifespan of SSDs.
Common DiskPart Errors
In this part, I will list some common errors that you may encounter when using DiskPart commands and give corresponding solutions.
#1. DiskPart Has Encountered an Error
| Detailed Error Information | Common Causes | Solutions |
| The parameter is incorrect | Corrupt file system and system files | 1. Go to the partition’s Properties > Tools to run Error checking. 2. Open CMD as administrator and then run the sfc /scannow command. |
| Access is denied | 1. Lack of administrator privilege 2. Write protection | 1. Run DiskPart or Command Prompt as administrator. 2. Remove the write protection of the disk or partition (a physical switch or BitLocker). |
| Incorrect function | 1. Loose or faulty drive connection 2. Write protection 3. Outdated or corrupt disk drivers 4. Insufficient permissions | 1. Check the drive connection. 2. Remove the write protection. 3. Update disk drivers. 4. Run DiskPart or Command Prompt as administrator. |
| Data error (Cyclic redundancy check) | 1. Corrupt system files 2. Bad sectors | 1. Run the sfc /scannow command to repair system files. 2. Check the disk or partition for bad sectors using the CHKDSK command. |
| The device is not ready | 1. Loose drive connection 2. Corrupt file system 3. Bad sector | 1. Reconnect the drive. 2. Do error checking. 3. Check the drive for bad sectors. |
| A device which not exist was specified | 1. Improper drive connection 2. Corrupt system files 3. Bad sectors 4. Drive letter issue | 1. Check the drive connection. 2. Repair system files using sfc /scannow. 3. Use the CHKDSK command. 4. Change the drive letter. |
| The request could not be performed because of an I/O device error | 1. Drive connection issue 2. Bad sectors or blocks 3. Drive letter issue | 1. Replug the drive. 2. Run the CHKDSK command. 3. Change the drive letter. |
| The request failed due to a fatal device hardware error | 1. Physical damage 2. Corrupt file system | 1. Check the drive connection. 2. Verify S.M.A.R.T. status using the wmic diskdrive get status command. 3. Run CHKDSK. 4. Do error checking. 5. Format the drive. |
| The system cannot find the file specified | 1. Damaged file system 2. Offline or inactive system partition 3. Bad sectors | 1. Repair the file system. 2. Set the system partition online or active. 3. Run the CHKDSK command. |
#2. Virtual Disk Service Error
| Detailed Error Information | Common Causes | Solutions |
| The volume size is too big | The volume is larger than 32GB | 1. Format the volume to NTFS or exFAT file system. 2. Use MiniTool Partition Wizard or other third-party software to format the volume to FAT32. |
| There is not enough usable space for this operation | 1. No adjacent unallocated space on the right of the partition 2. No free space on the dynamic disk | 1. Use MiniTool Partition Wizard to move the unallocated space to the right of the partition. 2. Use MiniTool Partition Wizard to extend the partition, regardless of the free space’s location. 3. Shrink volumes to get free space. |
| Clean/Delete/Format is not allowed | 1. System disk 2. System and boot volumes or volumes containing the pagefile | Clean the disk or delete/format the volume in WinPE. |
| The object is not found | 1. Improper drive connection 2. Offline disk 3. Bad sectors | 1. Check the drive connection. 2. Bring the disk online. 3. Check the disk for bad sectors. 4. Use MiniTool Partition Wizard to initialize the disk or create partitions. |
| The file system is incompatible | 1. Incorrect command input 2. Incompatible file system | 1. Check if the file system name is typed correctly. 2. Use file systems compatible with Windows (NTFS, FAT32, and exFAT) |
| The specified disk is not convertible | 1. CD-ROMS or DVDs 2. Offline or read-only disk 3. Bad sectors | 1. Make sure the disk is not a CD-ROM or DVD. 2. Online the disk and remove the read-only attribute from the disk. 3. Run CHKDSK. |
| The media is write protected | Write protection | 1. Remove the write protection (a physical switch or BitLocker) 2. Remove the read-only attribute. |
| The disk is not empty | Existing volumes on the dynamic disk | 1. Delete all volumes on the dynamic disk and then convert it into basic. 2. Convert the dynamic disk to basic using MiniTool Partition Wizard, without deleting volumes. |
| The extended partition is not empty | Existing logical drive in the extended partition | 1. Delete all logical drives and then delete the extended partition. 2. Convert the disk from MBR to GPT using MiniTool Partition Wizard, and then the extended partition disappears automatically. |
#3. DiskPart Failed to Clear Disk Attributes
| Error | Common Causes | Solutions |
| DiskPart failed to clear disk attributes | 1. Physical write protection 2. Bad sectors 3. Damaged file system | 1. Turn off the physical write protection. 2. Run CHKDSK to check and repair bad sectors. 3. Reformat the partitions. |
DisKPart Alternatives
In addition to DiskPart, there are other tools for you to manage disks, partitions, and volumes. Among them, Partition Wizard and Disk Management are outstanding. Let’s take a look at their features.
MiniTool Partition Wizard
MiniTool Partition Wizard is third-party disk and partition management software. It features powerful functionality and a friendly and easy-to-use interface.
MiniTool Partition Wizard DemoClick to Download100%Clean & Safe
It includes the following functions.
- Initialize a fresh disk to MBR or GPT.
- View disk properties including device name, sector size, GPT GUID, MBR signature, etc.
- Convert a disk between MBR and GPT without deleting partitions.
- Convert a dynamic disk to basic without deleting partitions.
- Align all partitions on the disk to 4K.
- Delete all partitions on the disk with just a few clicks.
- Copy a disk to another one.
- Check a disk for bad sectors.
- Test disks’ write and read speeds.
- Create primary and logical partitions.
- Format a partition to NTFS, FAT32, exFAT, EXT2/3/4.
- Move/resize partitions to get a better disk layout.
- Extend a partition by taking free space from an existing partition or unallocated space on the same disk, regardless of the distance.
- Merge or split partitions.
- Change the partition cluster size without formatting.
- Copy a partition to unallocated space.
- Change the partition drive letter or remove it.
- Convert a FAT partition to NTFS or vice versa without data loss.
- Change the partition serial ID and type ID.
- View partition properties, including partition serial ID, type ID, file system, etc.
- Delete a partition.
- Wipe a disk or partition to erase data completely.
- Migrate the OS to another hard drive.
- Recover lost partitions and data.
- Analyze disk space to find unnecessary files to delete.
- Create a bootable USB drive based on WinPE.
- Set a partition active or inactive.
- Rebuild MBR.
- Create simple, striped, spanned, and mirrored volumes.
- Format or delete volumes.
- Copy volumes to basic disks or dynamic volumes.
- Move/resize simple, spanned, striped, and mirrored volumes.
- Extend simple and spanned volumes.
Disk Management
Disk Management is a GUI disk and partition manager built into Windows. Therefore, it is free and no installation is required.
Disk Management is able to do basic disk and partition tasks. For example:
- Initialize disk to MBR or GPT.
- Convert disk to MBR or GPT.
- Offline or online disk.
- Convert a disk from basic to dynamic or vice versa.
- Check disk information and update the disk driver.
- Create, format, and delete partitions and volumes.
- Extend and shrink partitions and simple/spanned volumes.
- Set partition active or inactive.
- Add, change, or remove the drive letter and mount path.
- Create simple, spanned, striped, or mirrored volumes.
- Add a mirror to a simple volume or break a mirrored volume into two simple volumes.
Obviously, MiniTool Partition Wizard is more powerful. It’s worth trying.
DiskPart FAQ
1. List disk
2. Select disk * (* is the disk number of the USB drive)
3. List partition
4. Select partition * (* the number of the USB partition)
5. Format fs= FAT32 (NTFS and exFAT file systems are also OK)
Conclusion
This post tells you what DiskPart is and illustrates how to access DiskPart and use its commands to manage disks, partitions, and volumes.
In addition, it also introduces two alternatives to DiskPart: MiniTool Partition Wizard and Disk Management. Pick one according to your need.
About The Author

Position: Columnist
Linda has been an editor at MiniTool for seven years. She continuously learns about computers and puts her knowledge into practice. Moreover, she is particularly knowledgeable in disk management, data recovery, system installation, and PDF editing. Her articles typically reference multiple examples or are based on her own experience, providing users with the most suitable solutions.
User Comments :