Long-term use of the computer will make your computer's hard disk capacity less and less, and you may receive a prompt for you to free up disk space on Windows 7/8. Don't worry, this article from MiniTool introduces you to 5 ways to free up disk space. Please continue reading.
Reasons for Full Disk Space
When your disk space is full, the performance of your computer will decline, and you may experience delays or freezes when performing tasks. This greatly affects your work progress. Let’s first understand what causes the disk space to be full.
- Accumulation of temporary files and caches: The system and applications generate a large number of temporary files and caches, which take up a certain amount of hard disk space.
- System update files: When Windows updates, it will download and retain update files, especially old versions of update files, which will occupy disk space when you do not automatically delete them.
- Large programs or games: Installed programs, games, and multimedia files (such as videos, music, and pictures) may take up a lot of storage space.
- Recycle Bin is not emptied: Files, pictures, etc. in the Recycle Bin are not cleaned up in time.
- System restore points: The System Restore function will create restore points, which will take up a certain amount of disk space.
- Log files and error reports: Log files and error reports generated when the system is running may also cause space to be full.
Now that you have a rough idea of what can cause a disk to be full, you may want to know how your disk space is distributed. Well, MiniTool Partition Wizard can help you do that.
You can use the Space Analyzer feature of MiniTool Partition Wizard to scan your hard drive. It lets you know which files and folders are taking up more space on the drive, making it easier for you to manage your files.
The Space Analyzer feature supports various hard drives, such as SSD, HDD, external hard drives, and other removable devices. So, how do you use the disk space analyzer? Please read on.
MiniTool Partition Wizard FreeClick to Download100%Clean & Safe
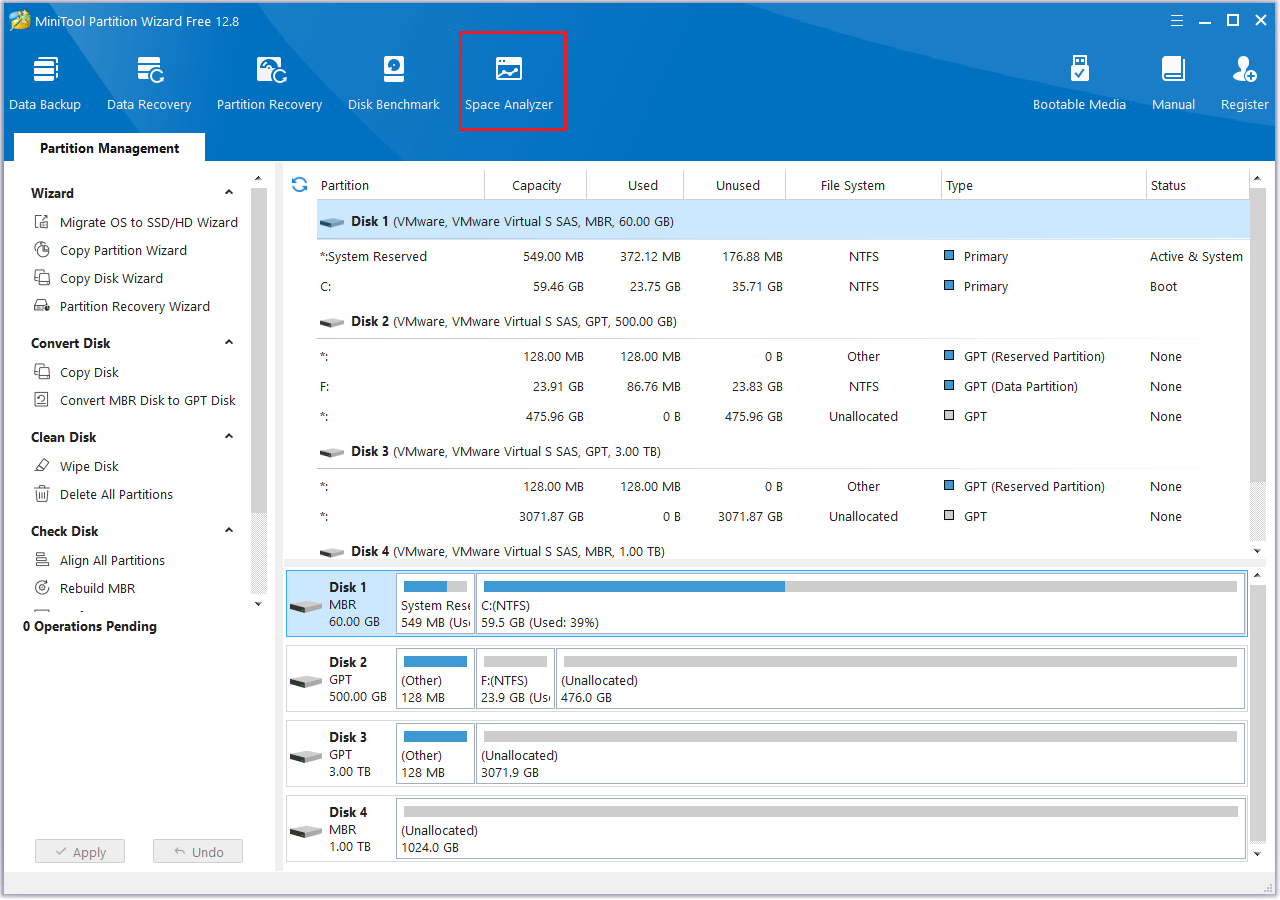
Step 1: Launch MiniTool Partition Wizard to get its main interface. Click the Space Analyzer feature on the top toolbar to launch the disk usage analyzer.
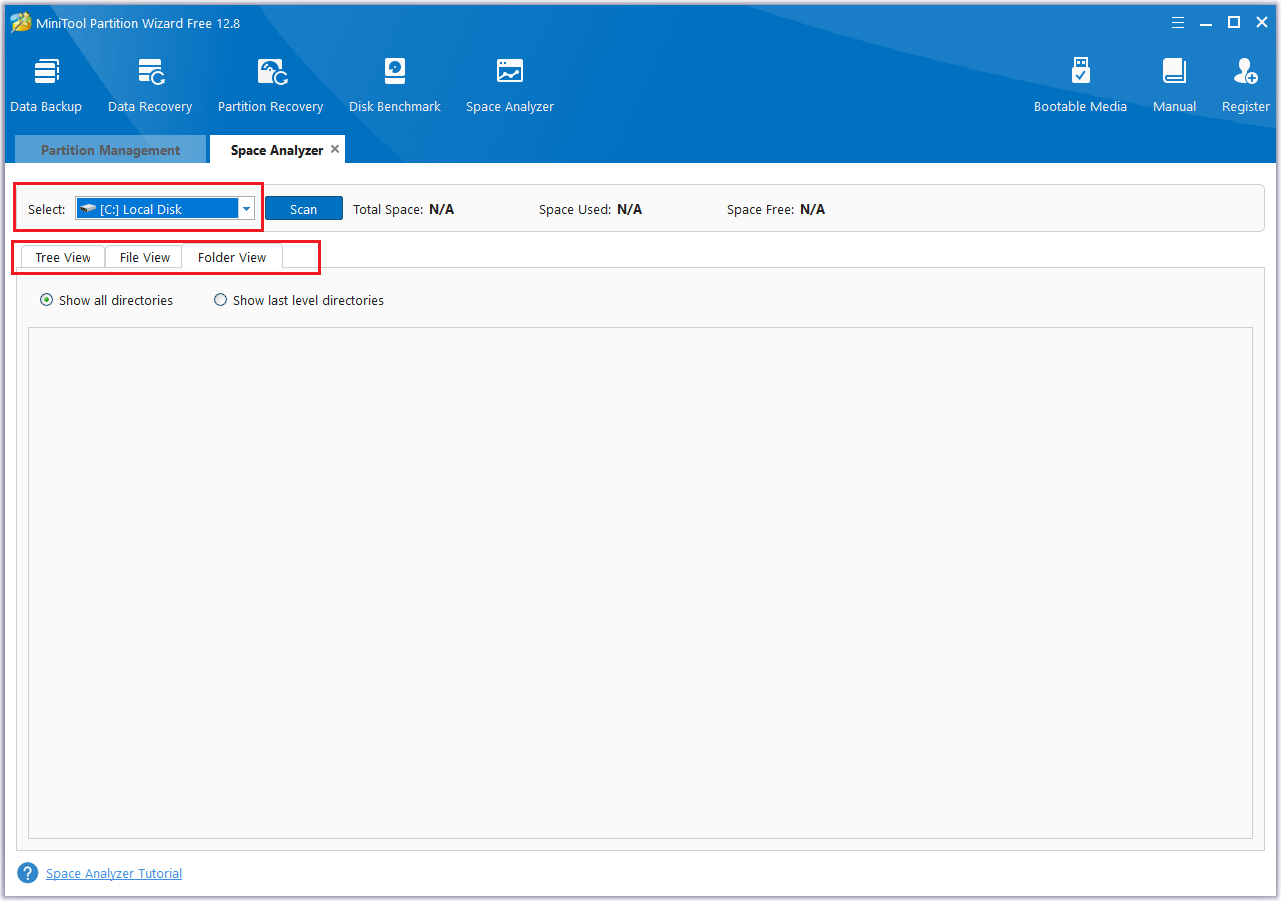
Step 2: You can select the drive you want to scan and click Scan. By default, MiniTool Partition Wizard displays the scan results in a Tree View and you can also navigate to File View and Folder View. It mainly includes Total Space, Space Used, and Space Free, and also displays the size of each file or folder and the percentage of the total space.
Knowing how much space your files are taking up on your disk can help you free up hard drive space more effectively. So read on and learn how to free up disk space on Windows 7/8.
Also read: 10 Ways to Free up Disk Space in Windows 10/11 [Guide]
How to Free up Disk Space on Windows 7/8
In this section, I will introduce you to 5 methods to help you clear disk space on Windows 7/8. Once you’re done, you’ll have more free space to store important files and make your PC run faster.
Method 1: Run Disk Cleanup
The first method is to use the built-in Windows Disk Cleanup tool to help you free up hard drive space. It can delete temporary files, download program files, Windows update files, etc.
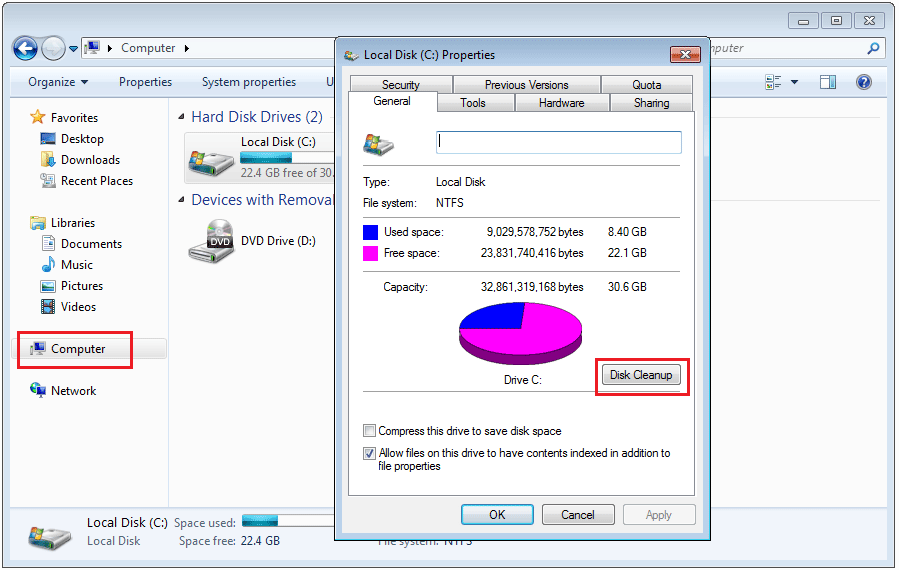
Step 1: In File Explorer, click Computer from the left side and right-click C drive. Then choose Properties to open. Finally, click Disk Cleanup.
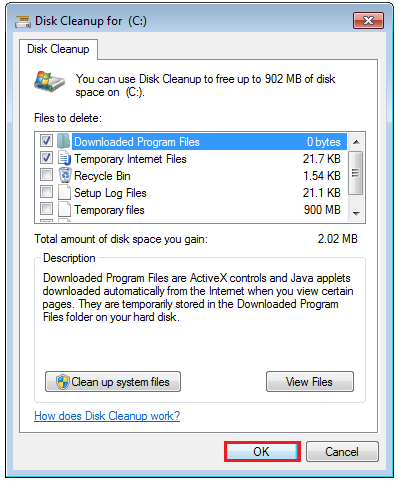
Step 2: You will get a new interface that lists the total files that can be cleaned. You can check the files you don’t need and click OK.
Method 2: Empty Recycle Bin
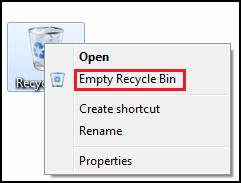
When you delete unwanted pictures, folders, documents, etc., these deleted data will be temporarily stored in the Recycle Bin. To free up the space on the C drive, you can choose to empty the Recycle Bin. The method is very simple. You need to right-click the icon on the desktop and then select Empty Recycle Bin.
Method 3: Uninstall Unnecessary Apps
If you have used your PC for a while, you may no longer need some of the previously downloaded applications. If you want more disk space, you can uninstall these programs to free up space. Here are the steps:
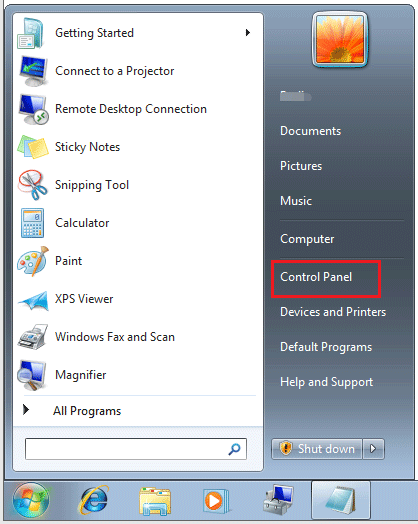
Step 1: Click the Start icon and choose Control Panel from the right side.
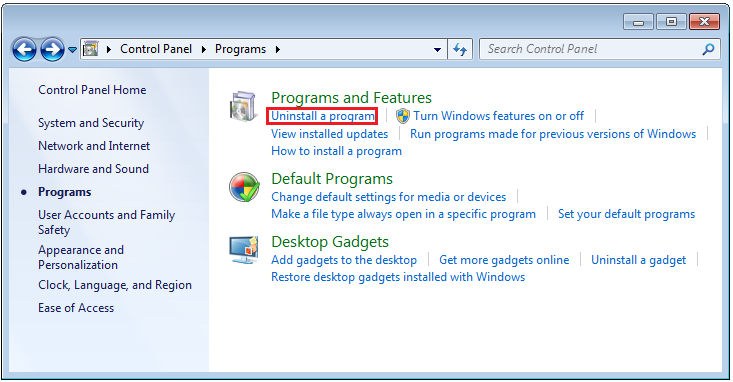
Step 2: Select View by: Category and then click Programs.
Step 3: Then click Uninstall a program under Programs and Features.
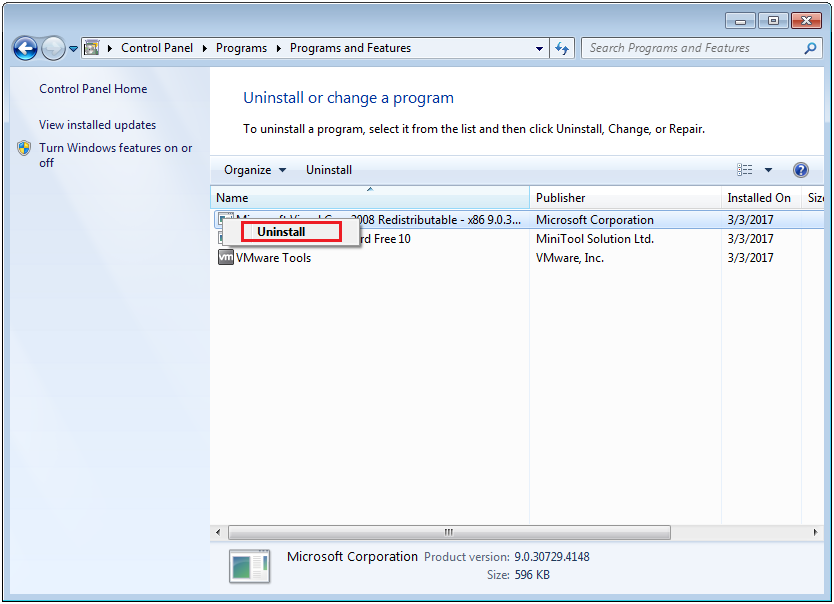
Step 4: Right-click the program you want to uninstall and select Uninstall.
Method 4: Disable Hibernation Mode
Hibernation in a computer means turning off the computer but leaving it in its state. In this state, you will find that the Hiberfil.sys file takes up a lot of space. Therefore, if you are in a hurry to free up disk space, it is best to disable it on Windows 7/8.
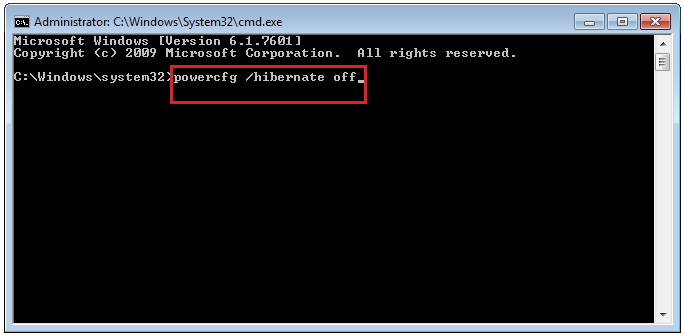
Follow the instructions below to disable hibernation mode using the CMD command line:
Step 1: Click the Start icon and type cmd in the Search box. Find cmd and right-click it to choose Run as administrator.
Step 2: Type powercfg /hibernate off and press Enter.
Method 5: Get More Disk Space
The above method is to free up disk space by deleting unnecessary files, etc. In fact, you can also increase disk memory by expanding disk space, or you can migrate the data from the old disk to a larger disk. Let’s introduce you to how to do it.
To complete the following operations, you need to use the third-party software MiniTool Partition Wizard.
MiniTool Partition Wizard is a professional partition manager. It not only provides powerful features to delete/format/split/merge/ copy partitions but also provides functions to clone a hard drive, convert MBR to GPT, and format a USB drive.
#1. Extend Partition
By extending the partition size, you can directly free up some disk space so that you can better store files.
MiniTool Partition Wizard FreeClick to Download100%Clean & Safe
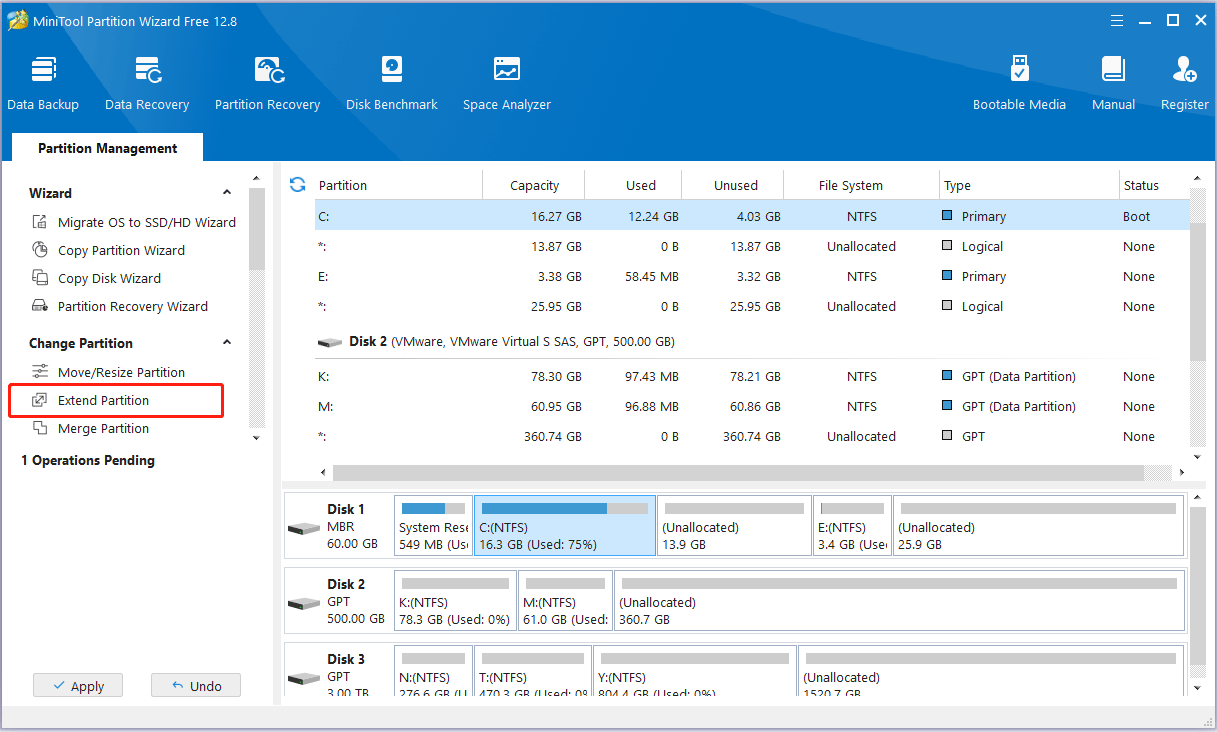
Step 1: Install and open MiniTool Partition Wizard to view the overall disk partition layout. Then, select the partition you wish to extend and click on the Extend Partition feature from the operation panel on the left.
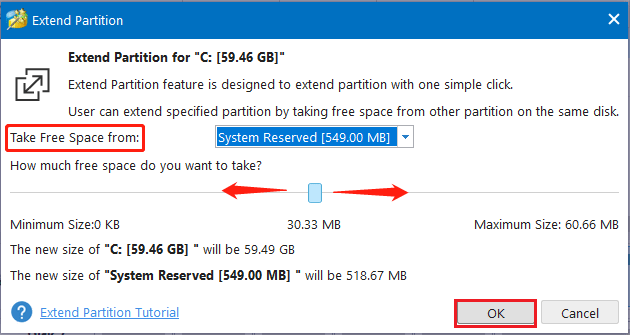
Step 2: Select a partition or unallocated space from the drop-down Take Free Space from list to extend the drive. Then drag the sliding handle left or right to decide how much space to take. After that, click OK to continue.
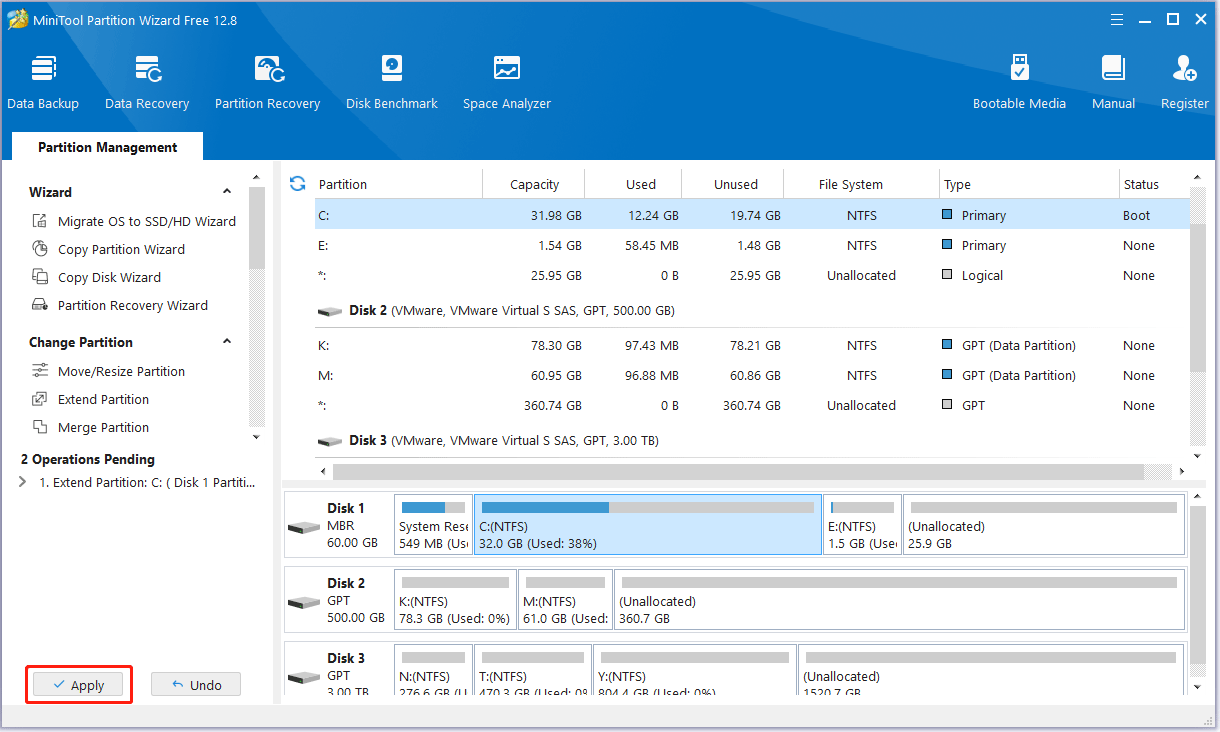
Step 3: In the main interface, you can preview the changes in the disk layout. Verify if the partition has increased in size to confirm the success of the operation. Then, click Apply to finalize and save all changes.
#2. Migrate OS to SSD/HD
For better performance on your PC, you can migrate the operating system to a larger drive. The Migrate OS to SSD/HD feature of MiniTool Partition Wizard can help you do that. Here are the steps below:
MiniTool Partition Wizard DemoClick to Download100%Clean & Safe
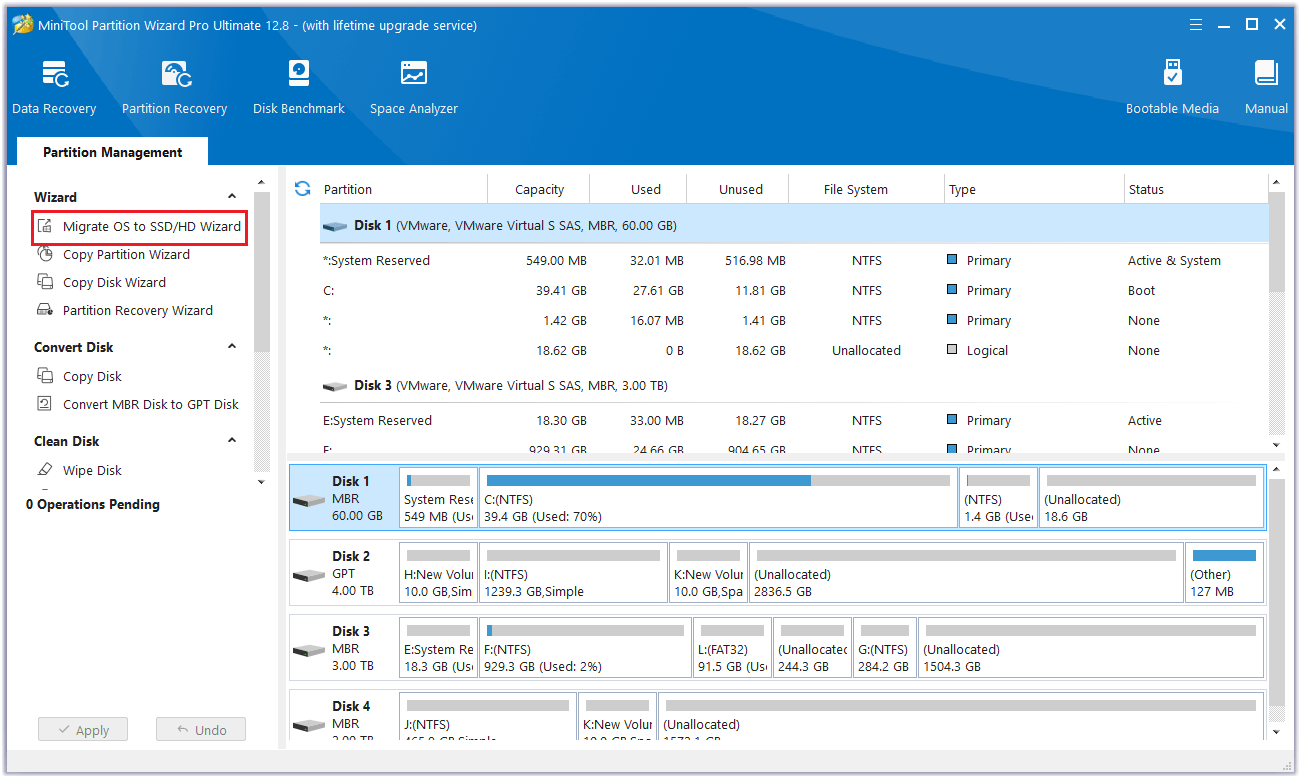
Step 1: Run MiniTool Partition Wizard to its main interface. Click on the disk that needs to be cloned and select Migrate OS to SSD/HD Wizard from the left action panel.
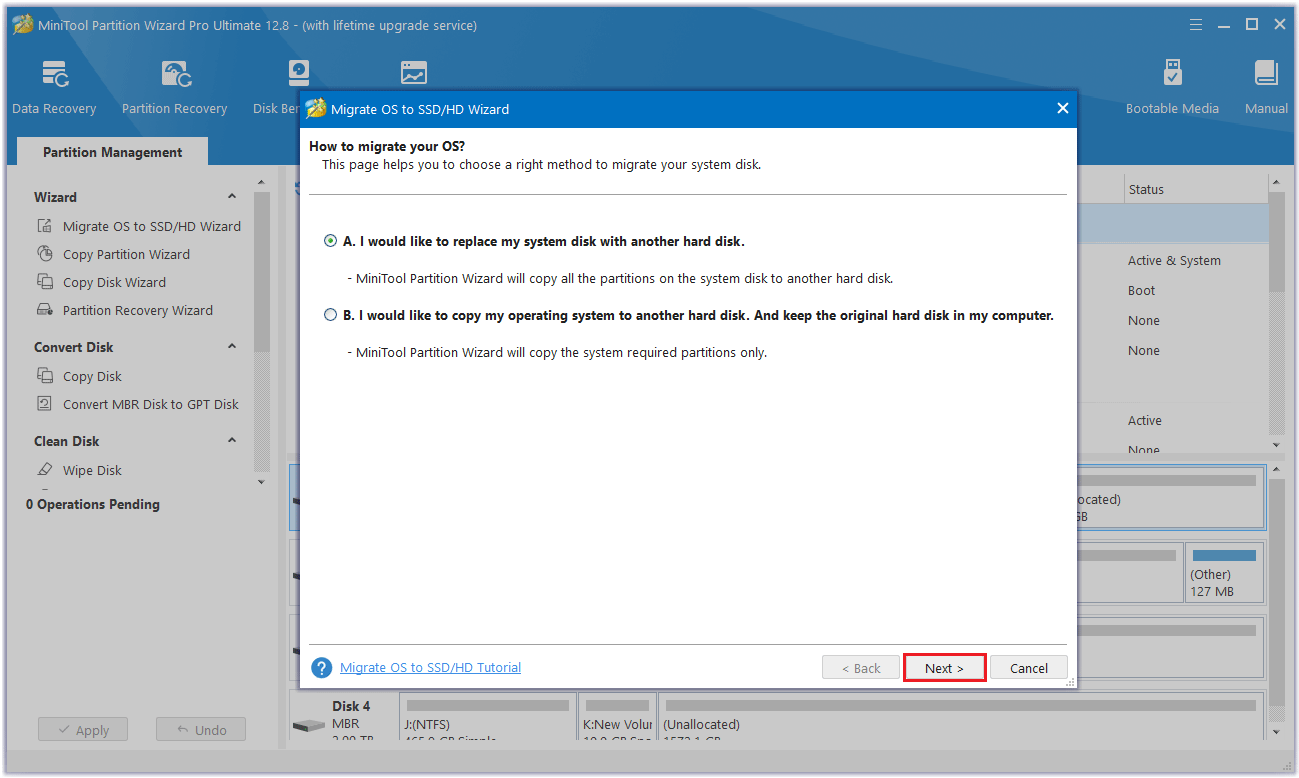
Step 2: In the pop-up window, choose option B “I would like to copy my operating system to another hard disk.”
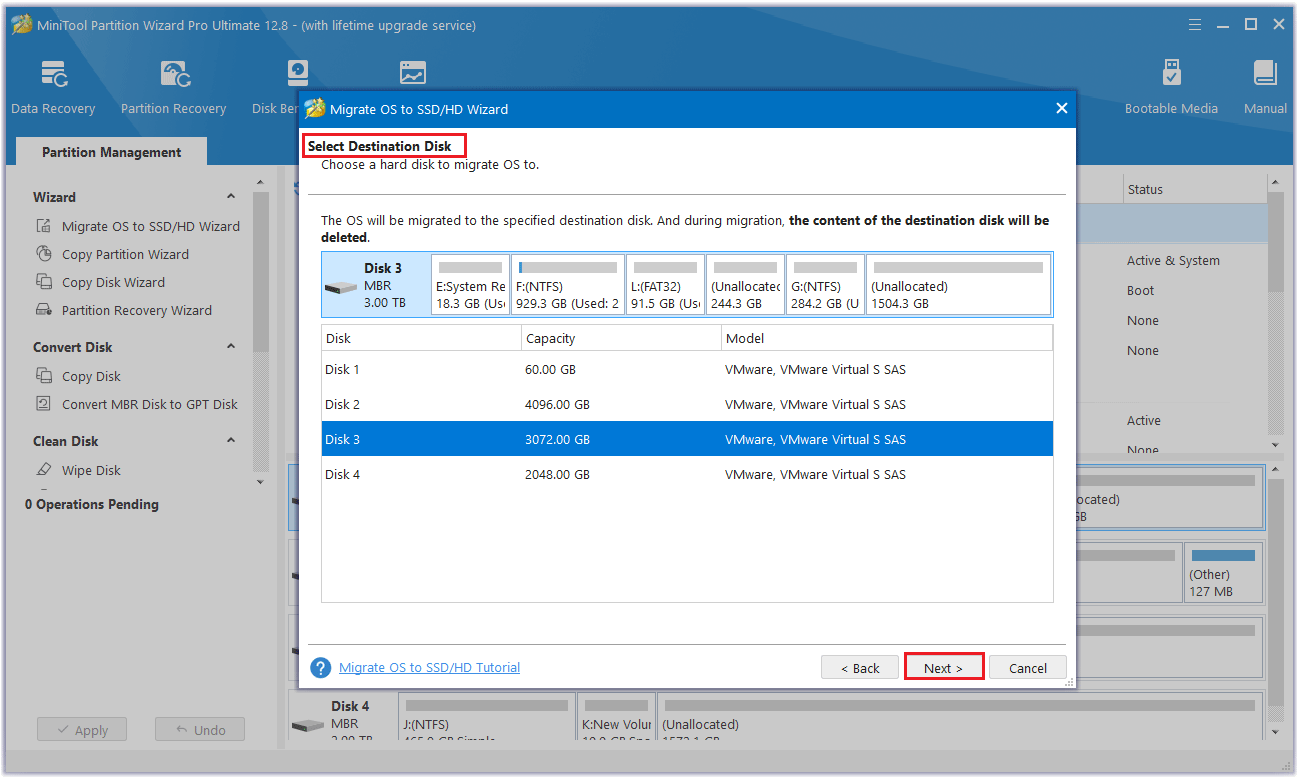
Step 3: Select a hard drive as the destination disk and click Next.
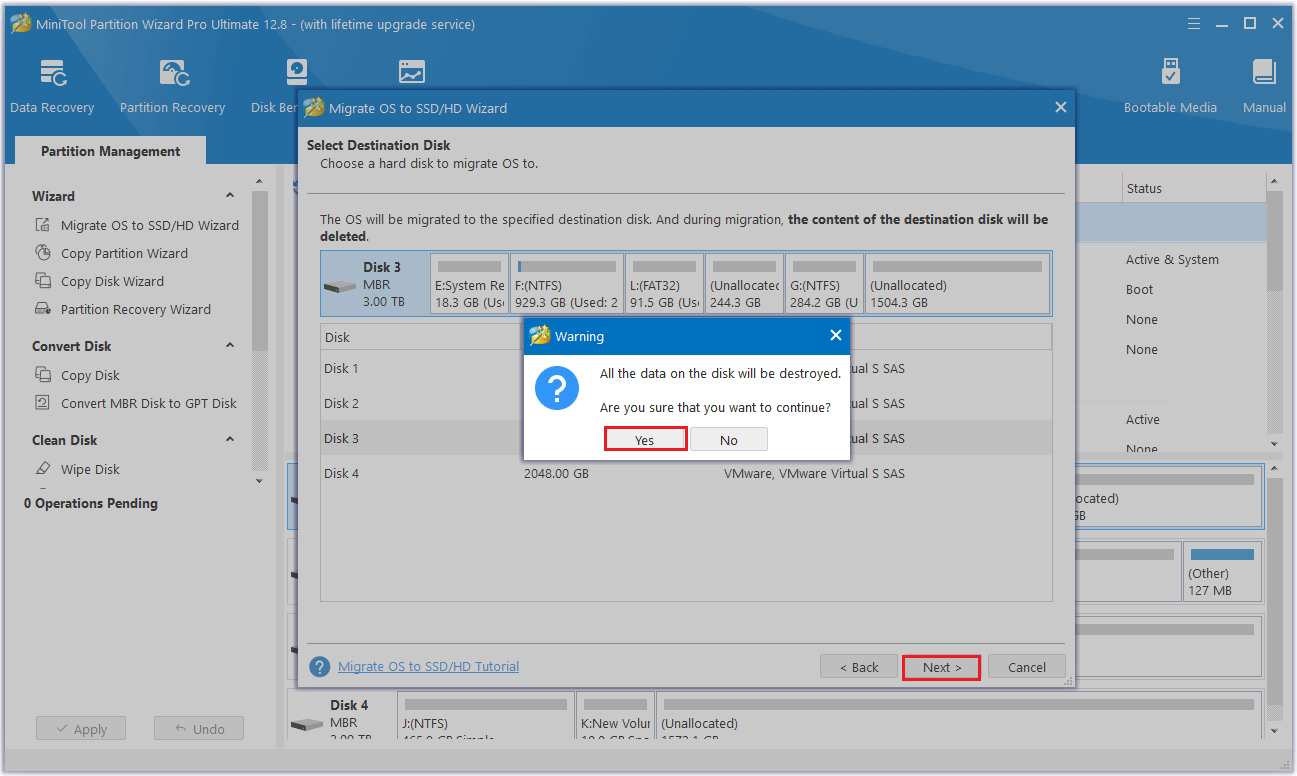
Step 4: Then a warning box prompts that the data on the disk will be destroyed. To perform the cloning operation successfully, click the Yes button.
Step 5: Select a copy option and click Next.
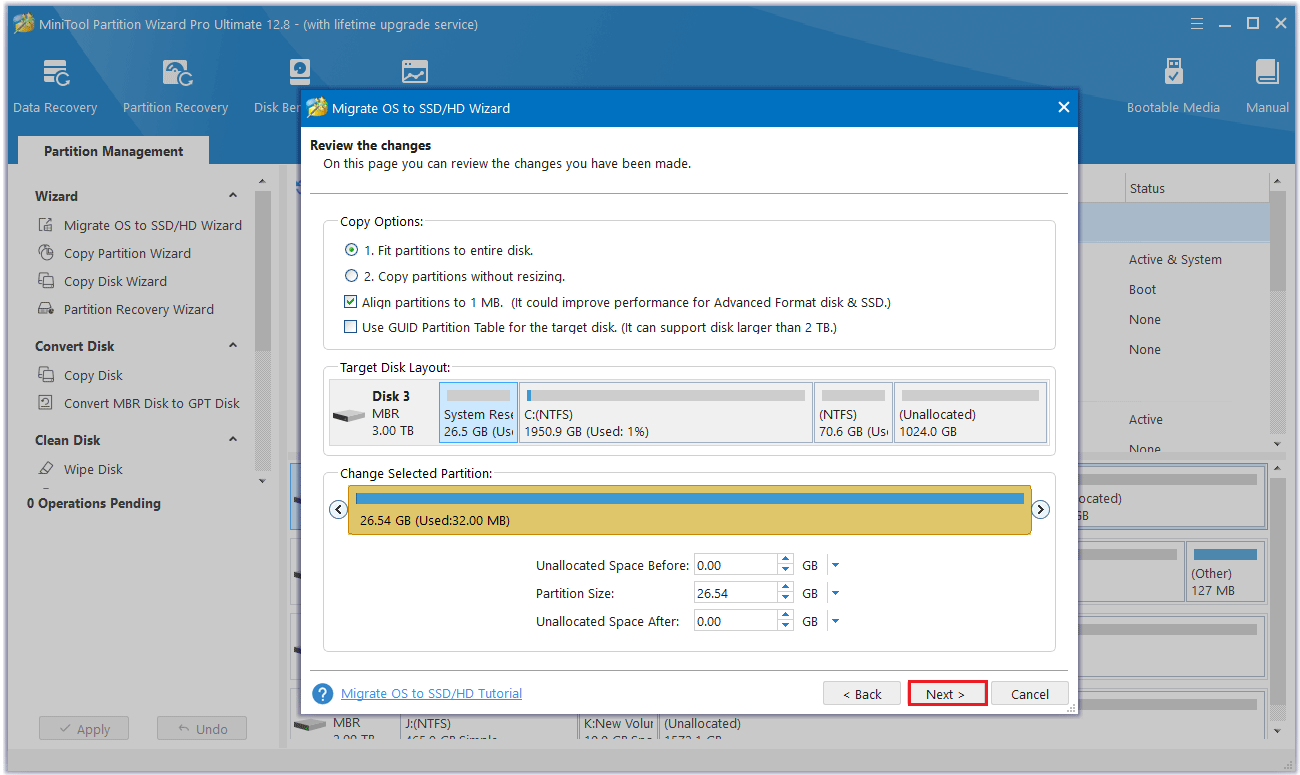
Step 6: Read the Note carefully and click Apply to finish.
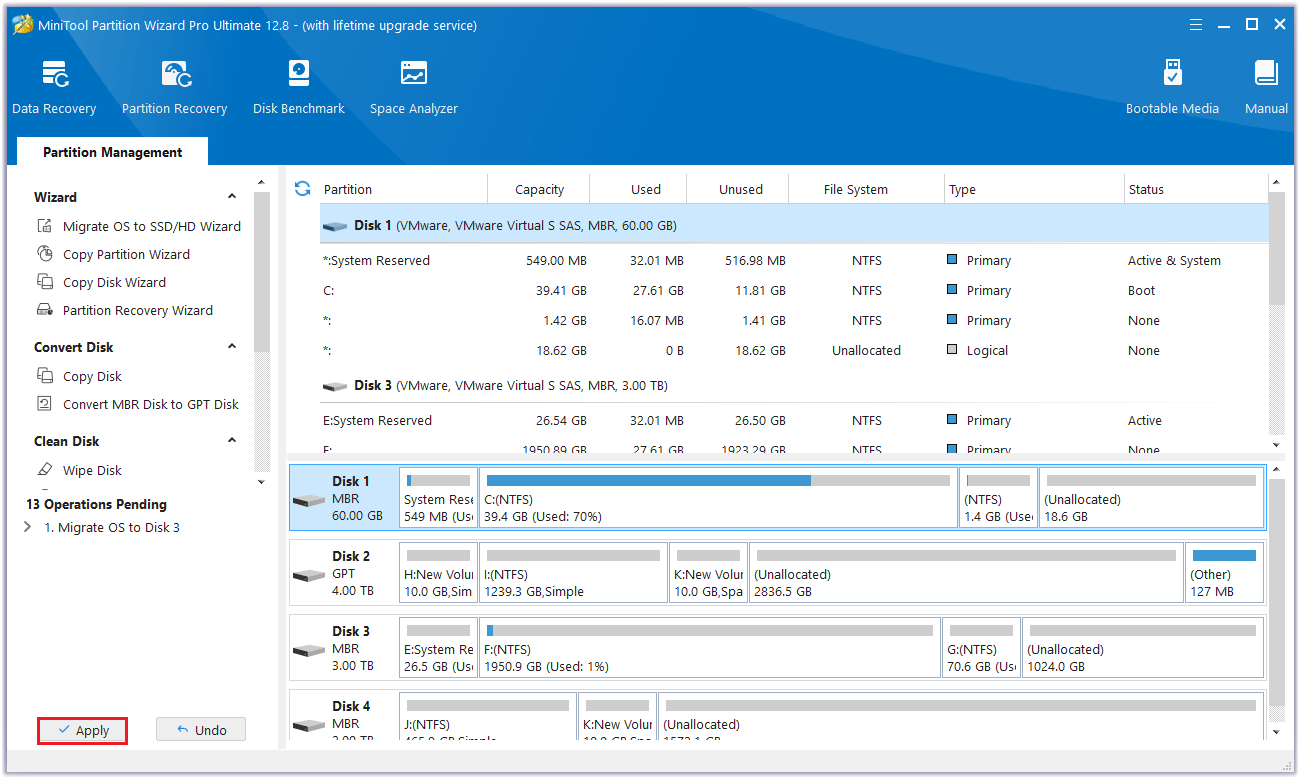
Step 7: Once the migration is finished, restart your PC and enter the BIOS to change the boot order, setting the new drive as the primary boot device. Then, boot the computer from the new drive.
#3. Clone Disk
The Copy Disk feature in MiniTool Partition Wizard will completely copy the source disk data to the larger disk, allowing you to better free up disk space.
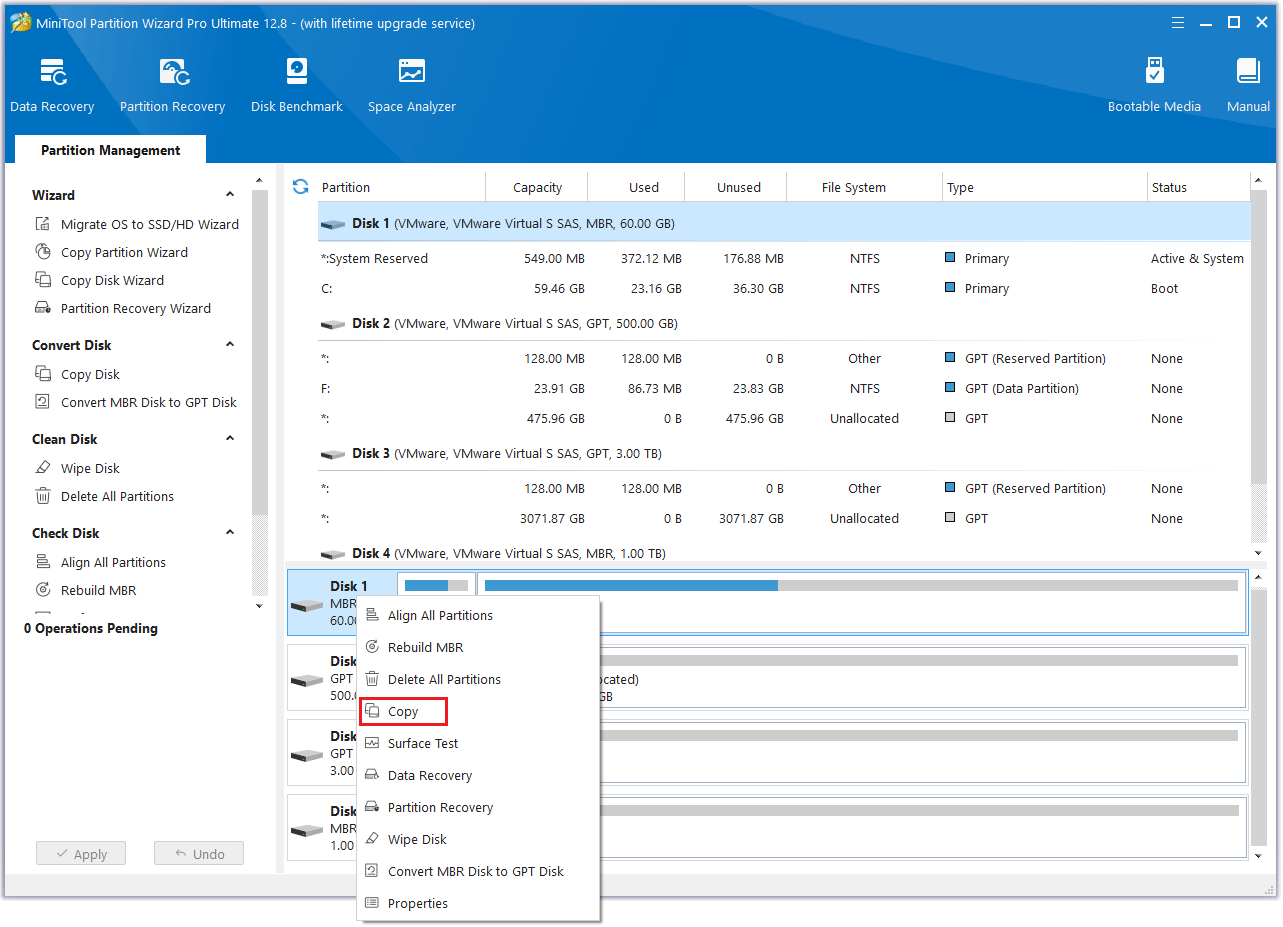
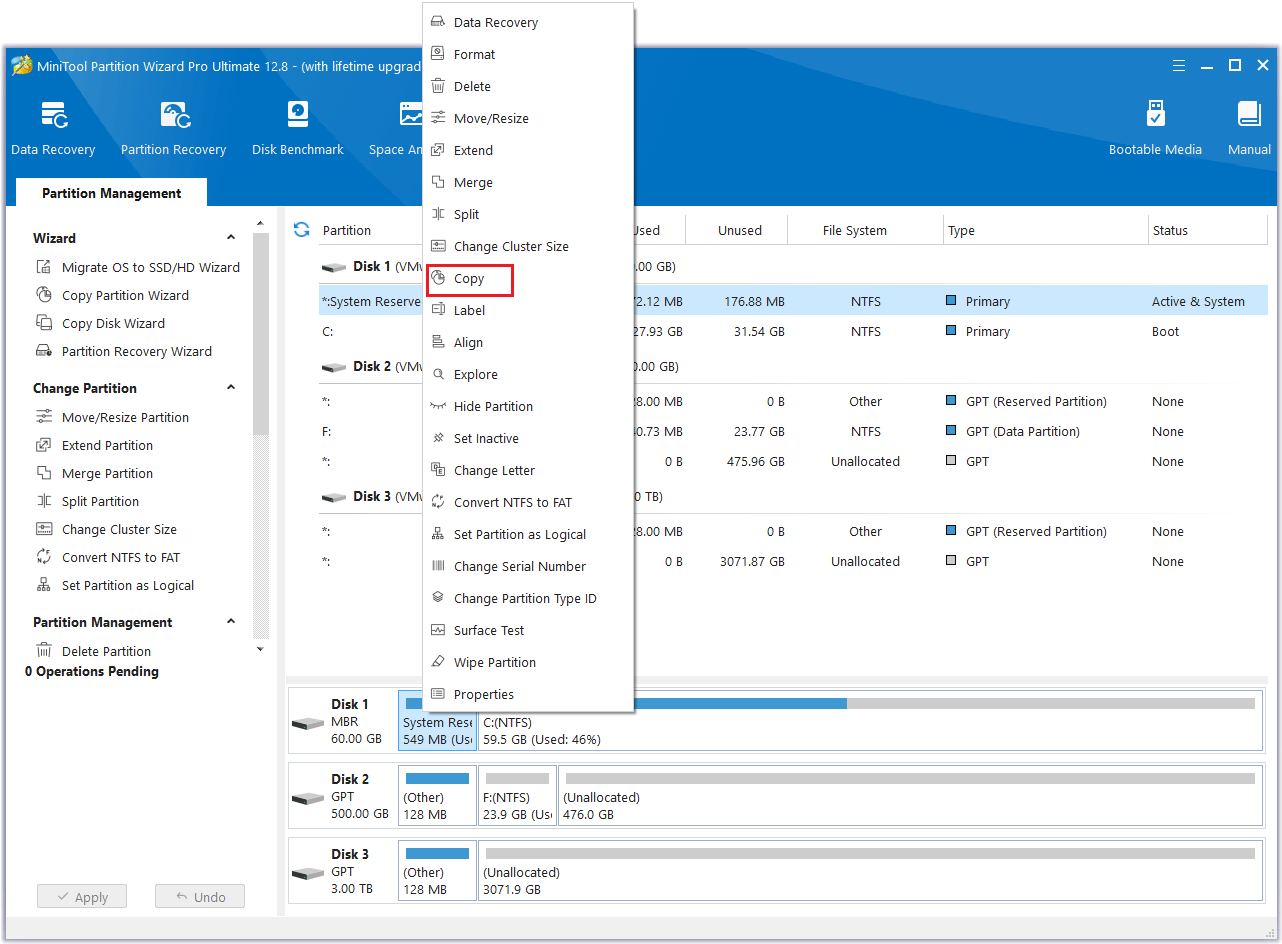
Step 1: Run MiniTool Partition Wizard to its main interface. To clone a disk, right-click on the disk that needs to be cloned and select Copy. You can also click Copy Disk Wizard from the left action panel.
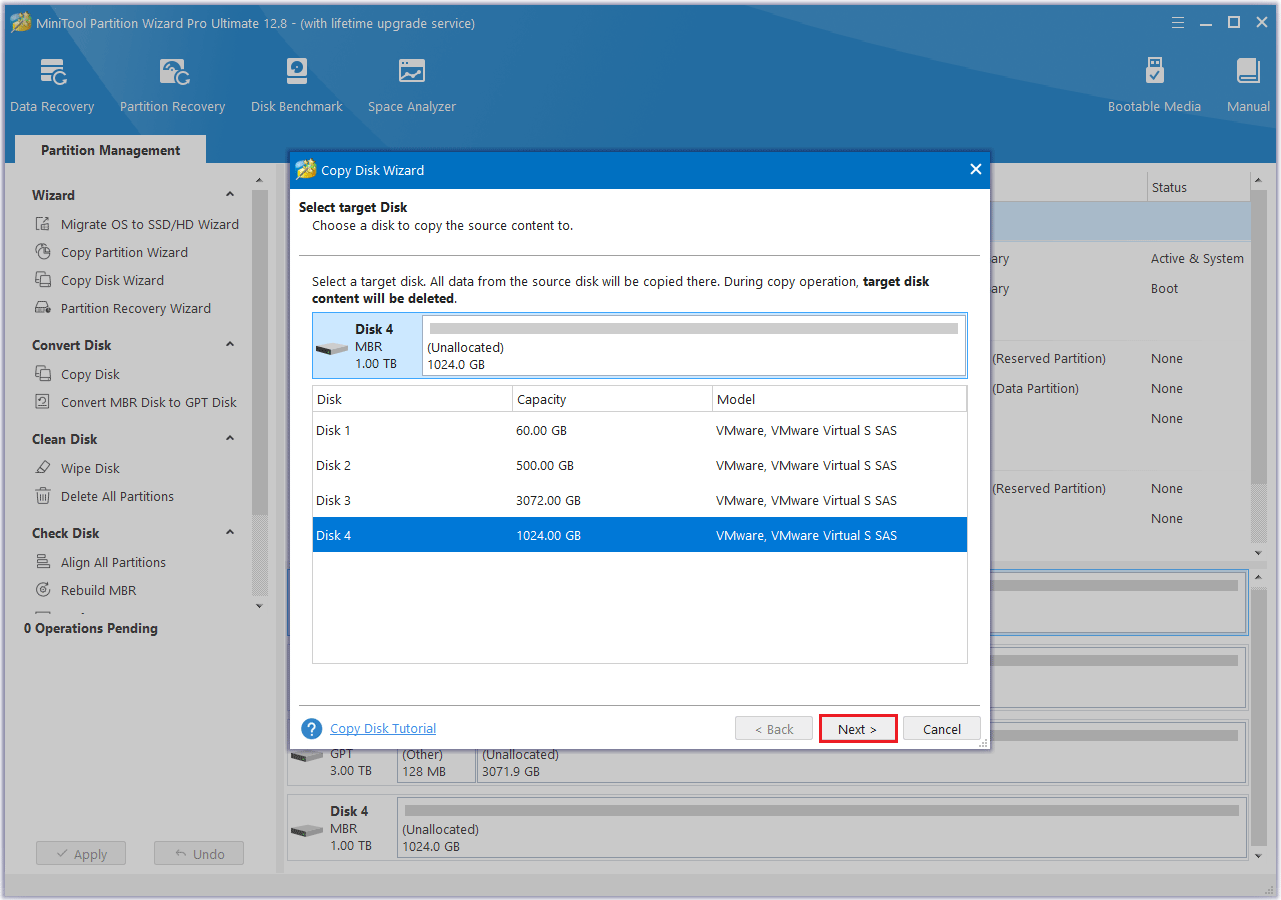
Step 2: In the new pop-up window, select another disk. Then click the Next button.
Step 3: Select the copy options according to your needs. It’s important to note that whether you choose Fit partitions to entire disk or Copy partitions without resizing, you can adjust the size of each partition by moving the slider in the box below. Then click Next.
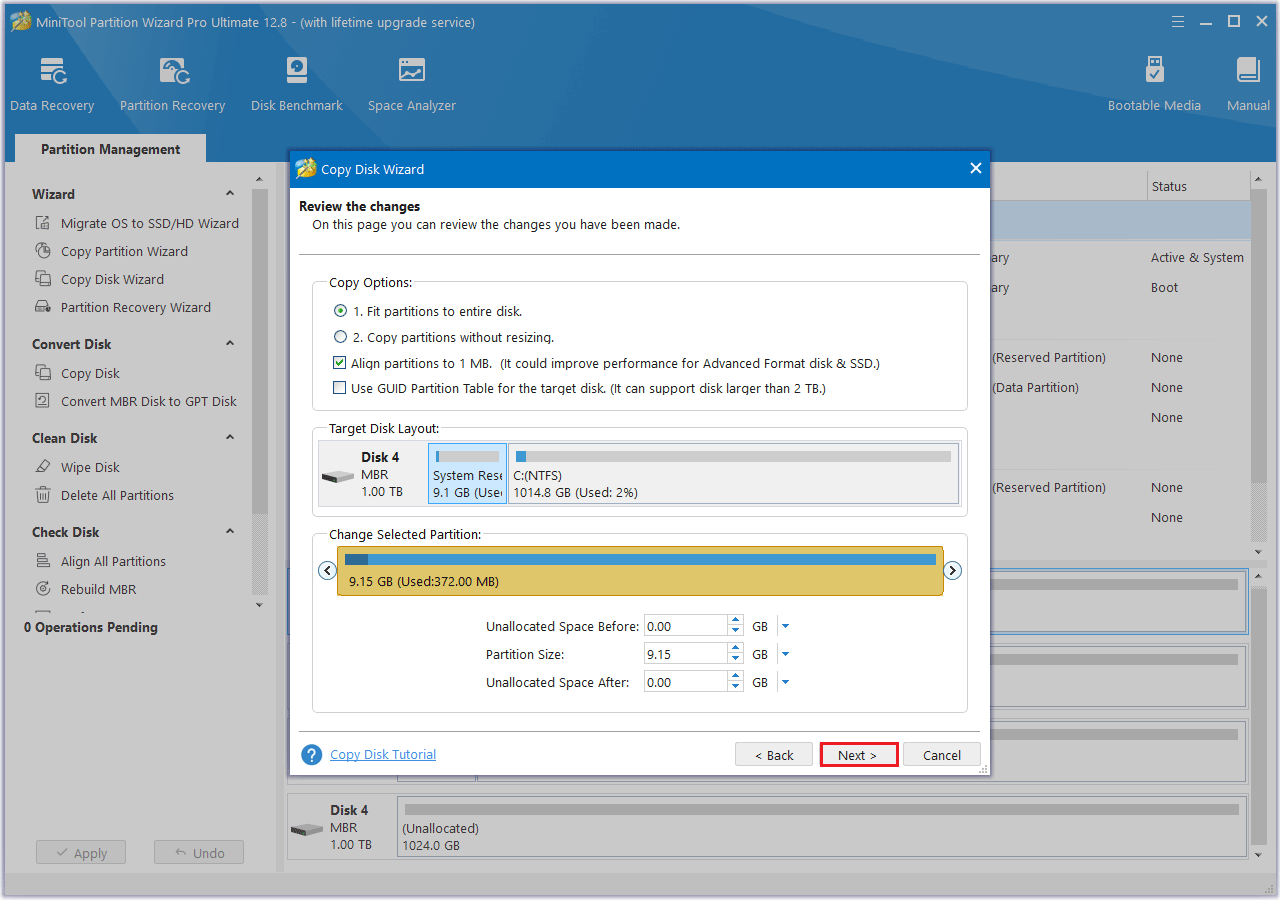
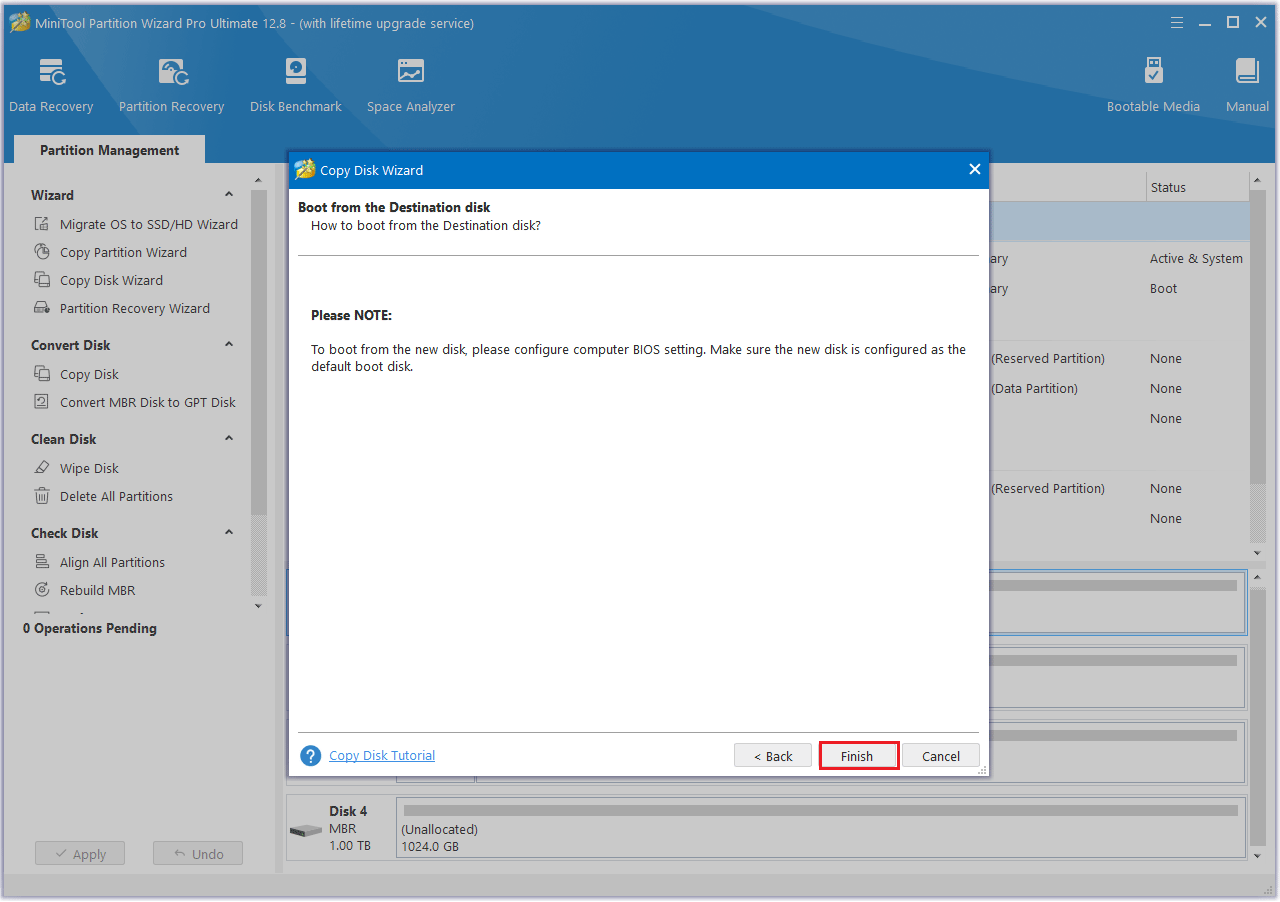
Step 4: Read the note carefully which shows how to boot from the target disk, and click Finish to go back to the main interface.
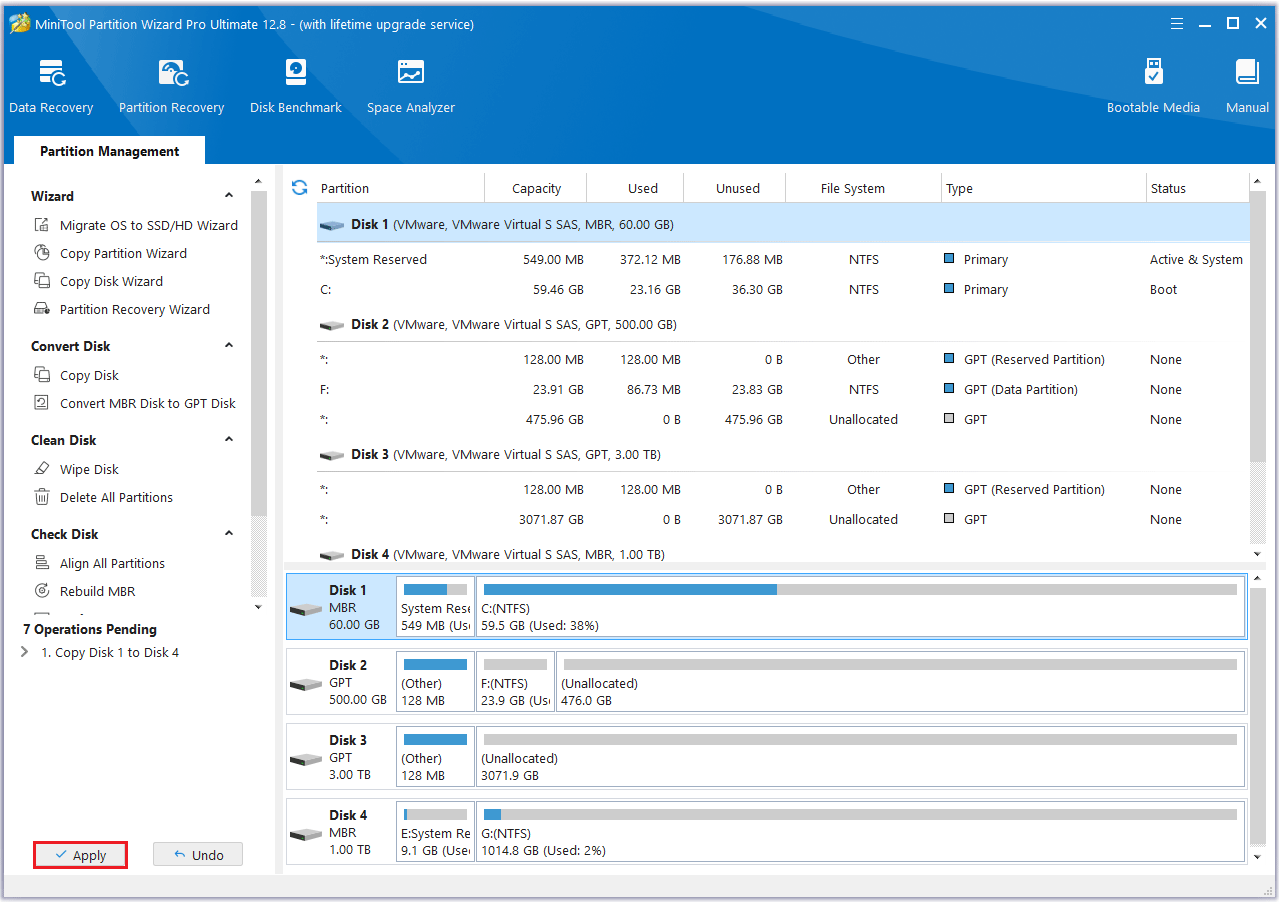
Step 5: MiniTool Partition Wizard will return to its main interface, where you can preview all the changes on the disk. Click Apply to confirm the operation.
#4. Copy Partition
You can also choose to migrate only one partition’s data to another large partition, which will free up disk space to the greatest extent.
Step 1: Run MiniTool Partition Wizard to enter its main interface. Right-click the partition and select Copy from the pop-up menu.
Step 2: Select the drive that you’re ready to move the partition to and click on Next.
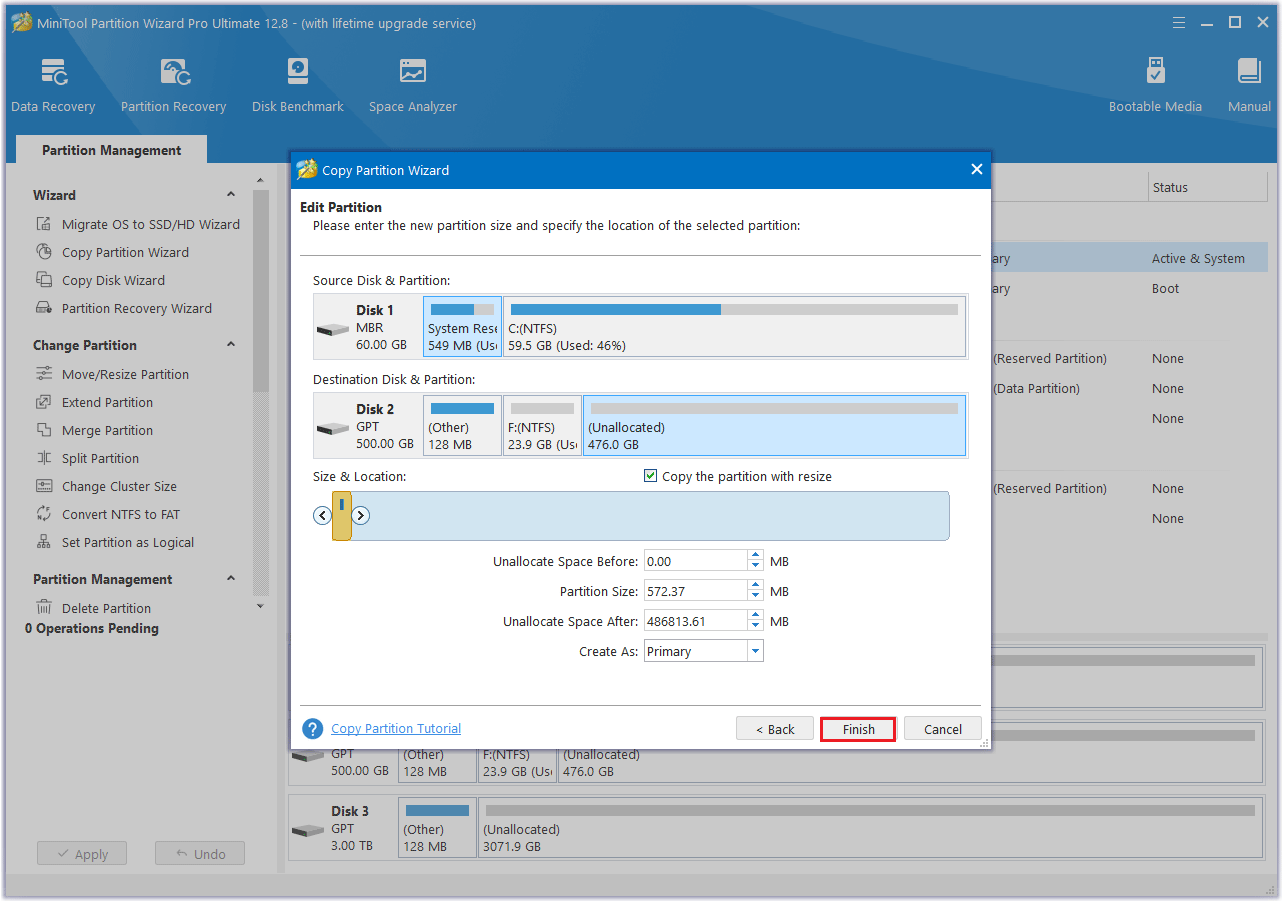
Step 3: You can move the handle to expand or shrink the new partition. Alternatively, you can type the exact partition size in MB. In addition, you can choose the partition type (primary or logical) for the new partition. Then, click Finish.
Step 4: Click the Apply button to make changes performed.
Bottom Line
This article ends here. The above is all the information about freeing up disk space on Windows 7/8, including reasons why the disk space is full and the method of clearing disk space on Windows 7/8. I hope this article helps you.
If you have any questions or suggestions while using the MiniTool Partition Wizard, you can contact us via [email protected] to get a quick reply.
User Comments :