After using a computer for one or two years, it may be filled with piles of junk files and dusts, especially for users who don’t have good habits. You might notice that it starts running slowly. More seriously, the PC may become unresponsive, lag, freeze, or even crash.
In cases like that, it’s time to clean up your computer. What is PC cleanup and how to clean up computer to run faster? Explore the answer in this post now!
About Computer Cleanup
This section introduces the advantages, disadvantages, and types of PC cleanup. Based on that, it tells what computer cleanup means in detail.
Benefits of Cleaning Computer
Why do you need to clean up your computer? It’s because the operation is beneficial to your PC.
To be specific, it frees up space, speeds up computer, prolongs the lifespan of the computer, and even protects data and device.
Deleting unnecessary files and programs can free up space to increase disk space. With abundant free space, the computer runs faster. When the PC is virus-free, your personal data will be safe and the PC won’t be infected by viruses.
If the heatsink works properly and airflow is enough, your computer won’t suffer from overheating. It reduces the risk of component damage. Then the computer will have a longer lifespan.
Possible Issues after PC Cleanup
As each coin has two sides, PC cleanup also has pros and cons. Indeed, cleaning the computer brings you PC performance boost. However, you sometimes can encounter some issues after cleaning the computer.
Potential problems include performance issues, boot failures, and even component damage. Why these issues occur? They mainly result from wrong cleaning techniques, inadequate reassembly, or pre-existing techniques.
To be specific, insufficient cooling leads to overheating, while improper seated components or damaged system files cause boot failures.
How to deal with these issues? Here are solutions for you.
Computer Overheating
- Check if all fans are spinning normally.
- Check if airflow is abundant.
- Verify all components are seated properly.
- Make sure thermal paste is applied properly.
Performance Issues
- Run disk cleanup again.
- Check startup programs.
- Scan for viruses and malware.
- Check for system updates.
If you handle components improperly, they will be damaged. If so, you can do nothing but replacing the damaged component.
Two Types of Computer Cleanup
PC cleanup mainly includes digital file and software cleanup and physical hardware components cleaning. Here, I explain two types of computer cleanup respectively.
Digital cleanup
It involves disk cleanup, malicious software removal, browser data deletion, and Windows fresh install. To clean the disk, you can delete useless files/folders, uninstall unimportant programs, run disk defragmentation, and fix disk errors.
If you want to protect your computer against viruses and malware, you should scan the computer for the malicious software. You can delete browsing history, cache, and cookies in the browser to boost browsing speed and privacy.
To deeply clean the computer, consider reinstalling Windows. All settings and installed apps will be removed during the reinstallation process.
Physical cleanup
Simply clean the dust and debris on some components of the computer, such as monitor, keyboard, mouse, fan, heatsink, motherboard, etc.
As you directly operate on the components, you should be careful. Use a soft and dry cloth to clean the monitor, keyboard, mouse. You should use compressed air to remove dust on the fan, heatsink, and motherboard.
If you are a computer expert, you can clean the computer physically by yourself. Nevertheless, if you are not, send the computer to a repair store. Then let the professional staff to physically clean the computer for you. This is a worry-free and safe method.
What Does Computer Cleanup Mean
Cleaning up computer means that you free up the disk space or physically clean the hardware components of the PC. To be specific, you delete unnecessary files/programs to release disk space and boost PC performance.
A virus and malware scan helps you remove malicious software on the computer, protecting the device from virus attacks.
As for physical cleanup, it cleans dust and debris on the PC components to ensure that the computer dissipates heat smoothly. It helps you avoid overheating and prevent other subsequent issues from happening.
How to Clean Computer Digitally
Here, I show you how to clean computer digitally, including freeing up disk space, scanning the computer for viruses, clearing browser data, and reinstalling Windows.
#1: Free Up Disk Space
If you plan to clean the computer, cleaning the disk space is strongly recommended. Among the multiple available methods, this method is the most common one. Firstly, it frees up disk space. Secondly, it helps boost PC performance.
To free up disk space, you can delete temporary Internet files, duplicate files, application leftovers, files in the Recycle Bin, and other junk files on the hard drive. Moreover, uninstalling unused programs or transferring/saving files to external drives is also available.
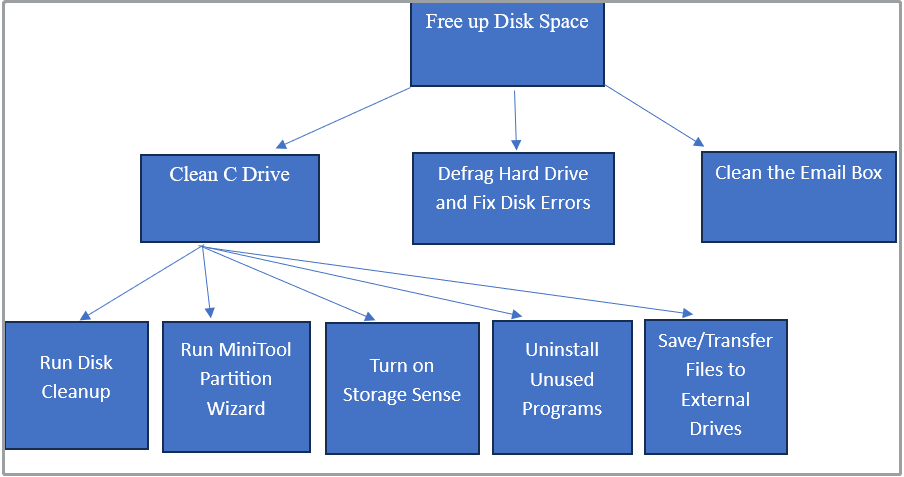
Move 1: Clean the C Drive to Make the PC Faster
First and foremost, you should clean the C drive to speed up the computer. Tools like Disk Cleanup and MiniTool Partition Wizard help you clean up system files and other useless files on the C drive.
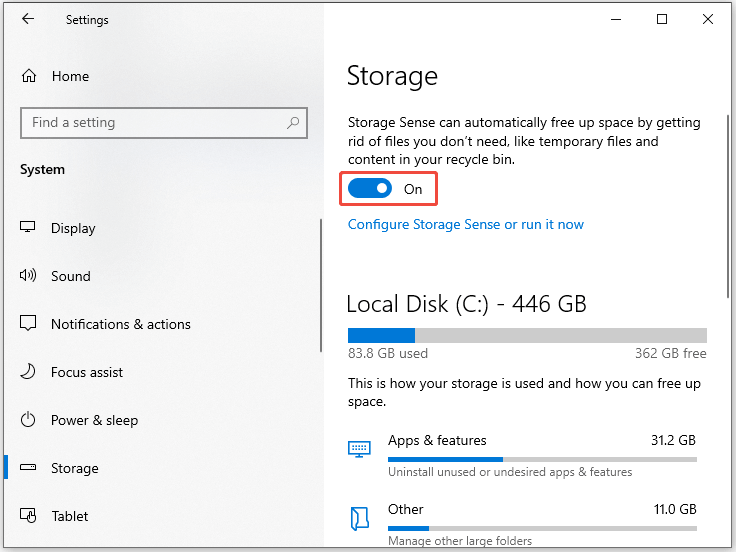
Windows also has a built-in feature: Storage Sense. It can automatically free up space by removing unnecessary files. Simply toggle on it if you want to use it. Besides, uninstalling unused programs is also an available way to release disk space.
To free up space without deleting files/folders, try transferring files to external hard drives or save them to the cloud. According to your preference, select a way to clean the C drive.
Option 1: Run Disk Cleanup
Disk Cleanup is a utility that comes with the Windows system. It allows you to delete temporary files, system files, Windows Update files, files in the Recycle Bin, and other unnecessary files on the C drive. Moreover, it can also remove programs and delete system restore points.
How to free up disk space via Disk Cleanup? You just need to open Disk Cleanup, choose files to delete, and execute the operation. Detailed steps are shown as follows.
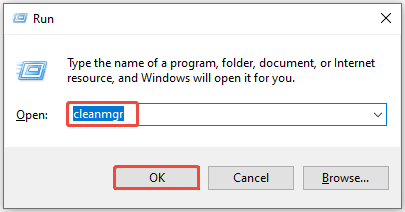
Step 1: Open Disk Cleanup from the Run window.
- Press Windows and R to open the Run dialog window.
- Type cleanmgr in the Run window and click OK.
Step 2: With the C drive selected, click OK to continue. Then Disk Cleanup will calculate the amount of space you can free up. Once done, Disk Cleanup appears.
Step 3: Tap on the Clean up system files button.

Step 4: Click OK in the pop-up window.
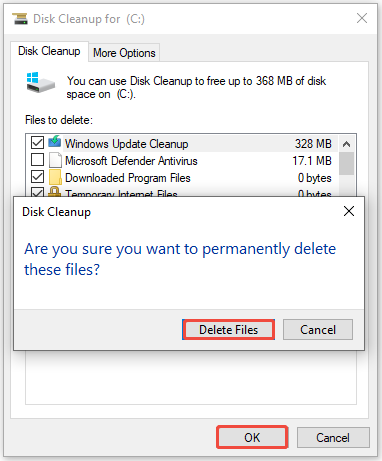
Step 5: Pick files to delete and confirm the operation.
- Under the Files to delete section, tick the box in front of the files you want to delete.
- Click OK to save changes.
- Tap Delete Files in the prompted window to confirm the operation.
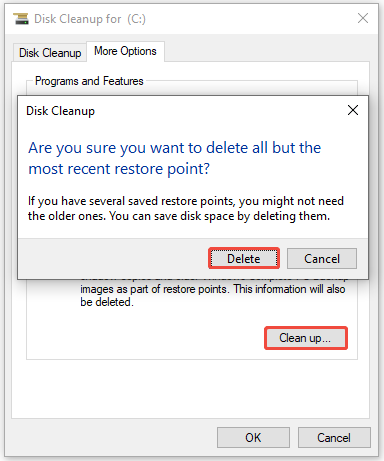
Step 6: Switch to the More Options tab, click the Clean up button under the Programs and Features or System Restore and Shadow Copies section, and then follow the on-screen instructions to complete the operation.
Option 2: Run MiniTool Partition Wizard
As a free PC cleaner, MiniTool Partition Wizard is highly recommended. Compared with Disk Cleanup, it’s more powerful and advanced.
Its Space Analyzer is capable of analyzing disk space usage and finding large files on the C drive. In short, this tool helps you find what’s taking up your hard drive space.
Now, check disk space usage and release disk space using MiniTool Partition Wizard.
Step 1: Download, install, and launch the software on your computer.
MiniTool Partition Wizard FreeClick to Download100%Clean & Safe
Step 2: Tap on Space Analyzer in the toolbar.
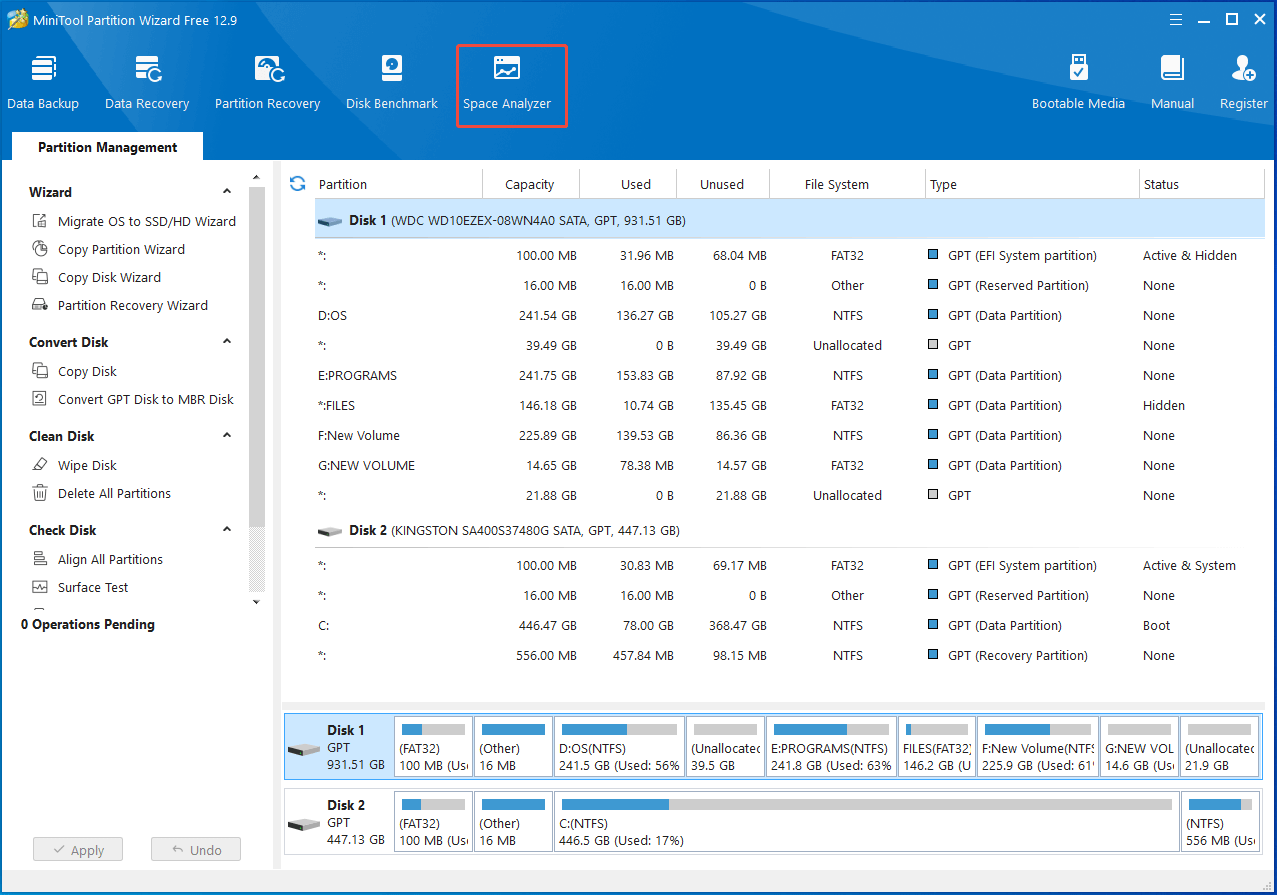
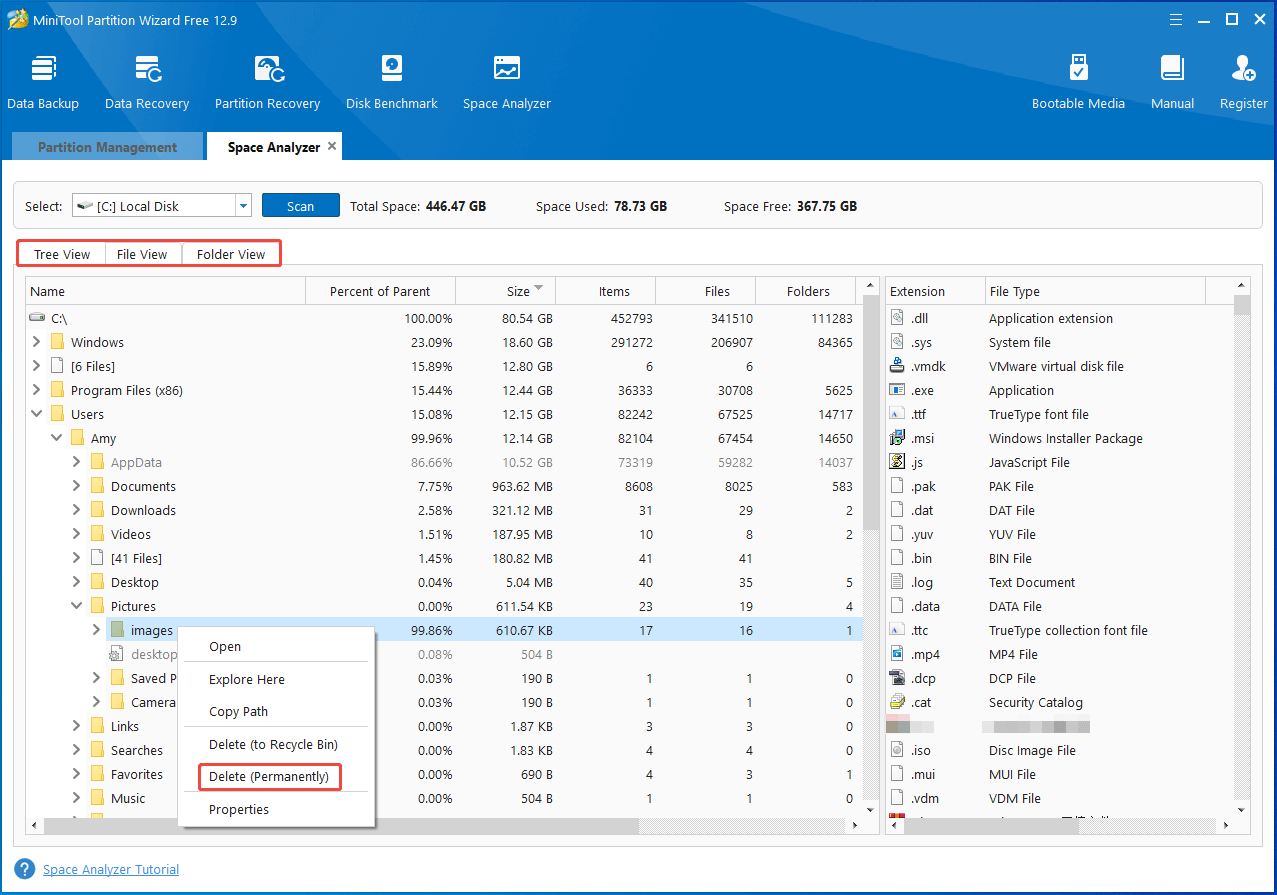
Step 3: Since the C drive is selected by default, simply click the Scan button to start scanning. After the scan process ends, the scanning result will be displayed in Tree View, File View, and Folder View. You can switch between 3 view modes by clicking the tab.

Step 4: Find the target file or folder and delete it permanently. The software offers you the search option, helping you find a certain file/folder or duplicate files quickly.
- Navigate to the space-consuming file or folder. Here, I locate the images folder.
- Right-click the folder and choose Delete (Permanently).
- In the prompted window, click Yes to confirm the operation.
Step 5: Repeat the above operation to delete all useless files/folders on the C drive.
Option 3: Turn on Storage Sense
How to clean up the computer via Storage Sense? You simply need to enable Storage Sense in Settings. Here are the steps for you.
Step 1: Open Settings by holding the Windows and I keys.
Step 2: In Settings, tap System.
Step 3: Click Storage in the left pane and then toggle on Storage Sense on the right side.
Step 4: Alternatively, click Configure Storage or run it now, configure space cleanup settings with the instructions below, and then hit Clean now.
- Run Storage Sense: Choose the frequency or a specific situation to run Storage Sense from the drop-down menu. Options include Every day, Every week, Every month, and During low free disk space.
- Tick the Delete temporary files that my apps aren’t using option.
- Delete files in the recycle bin if they have been there for over: You can choose Never, 1 day, 14 days, 30 days, or 60 days.
- Delete files in the Downloads folder if they haven’t been opened for more than a period of time: The supported options include Never, 1 day, 14 days, 30 days, and 60 days.

Option 4: Uninstall Unused Programs
Some programs can take up dozens of gigabytes (GB) disk space. If there are multiple such space-consuming programs, they will occupy a considerable amount of space.
When you receive low disk space warning, you can consider uninstalling them, especially old and unused ones. Both Control Panel and Settings enable you to uninstall programs on Windows computers.
To perform the uninstallation via Settings, open the Settings app, navigate to the program to uninstall, and then select Uninstall and confirm the operation. Here’s a more detailed breakdown.
Step 1: Open the Settings app on your computer.
- Right-click the Start icon to open the Quick Link menu.
- Hit the Settings option.
Step 2: Click on Apps in the home screen of Settings.
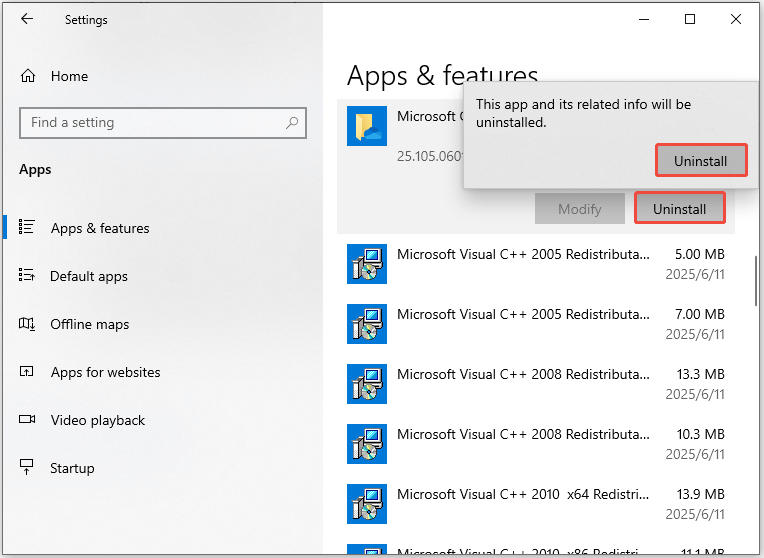
Step 3: Find the target program and uninstall it.
- Scroll down the list of installed apps & features to locate the program to remove.
- Click on the program, click Uninstall.
- Hit the Uninstall option again to confirm.
Step 4: Repeat the above procedure to uninstall other programs with a big size.
Additionally, you can uninstall games and other space-consuming items on your disk. This helps you free up dozens or hundreds of GB disk space immediately.
Option 5: Save/Transfer Files to External Drives
If you want to clean the C drive without data loss, try saving or transferring files to external storage devices like external hard drives and USB flash drives.
How to save new files to another drive? Well, change the save location of new content in Settings with the steps below.
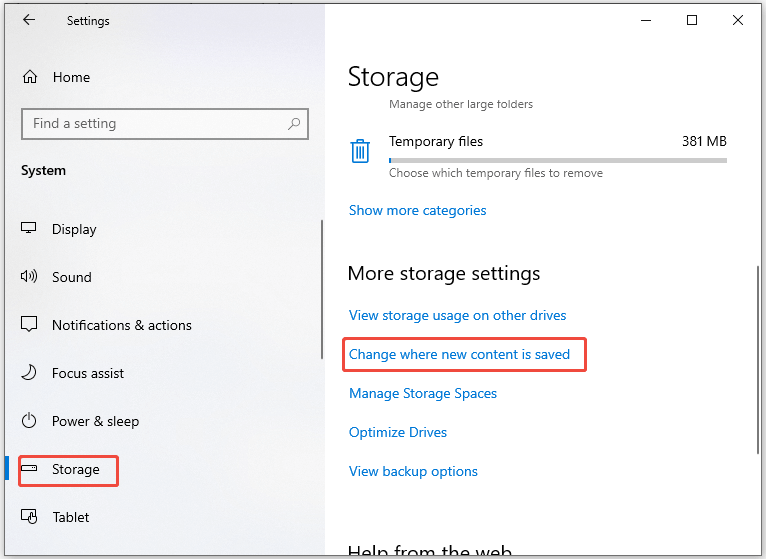
Step 1: Open Settings and tap System > Storage.
Step 2: Move to the right side of the window and locate the More storage settings section.
Step 3: Choose Change where new content is saved.
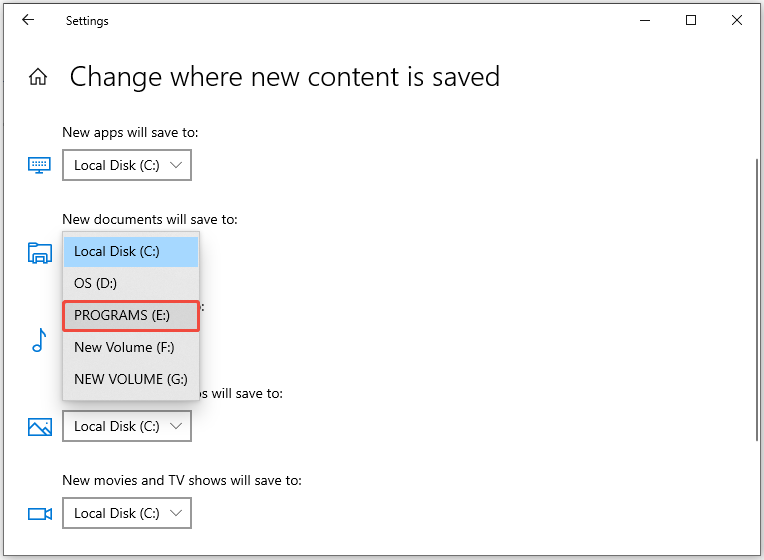
Step 4: By default, apps, documents, music, pictures, videos, and maps are saved to C drive. Now, modify the location where these contents are saved with the steps below.
- Open the drop-down menu by clicking the down arrow icon.
- Select the drive to save the item.
- Click Apply.
To save downloads to the external drives, you should change the download location in your browser.
How to transfer existing files on the drive to external drives? Directly use the Copy and Paste feature. Connect the external hard drive or USB to the computer, copy the files on the drive, paste them to the connected external drive.
MiniTool Partition Wizard DemoClick to Download100%Clean & Safe
Move 2: Defrag the Hard Drive and Fix Disk Errors
In addition to releasing disk space, you should also defrag hard disk and scan the disk for errors. The two operations help you maintain the disk’s performance and health.
Besides, they optimize storage space, prevent data loss, and ensure smooth running. Now, perform the operation with the given steps.
Defrag the Hard Disk
The more programs and files you use, the more cluttered the disk becomes. Fragmented files can lead to slower read/write speeds, storage capacity drop-down, system crashes, and other issues.
To avoid these issues, you should defrag the disk periodically. For doing that, you can use Windows built-in utility (Defragment and Optimize Drives) or third-party disk defragmentation software like Defraggler.
In this scenario, I show you how to use the Windows tool to defragment hard disk.
Step 1: Type defrag in the search box and click Open under Defragment and Optimize Drives.
Step 2: Select the drive you want to defrag and click Analyze or Optimize.
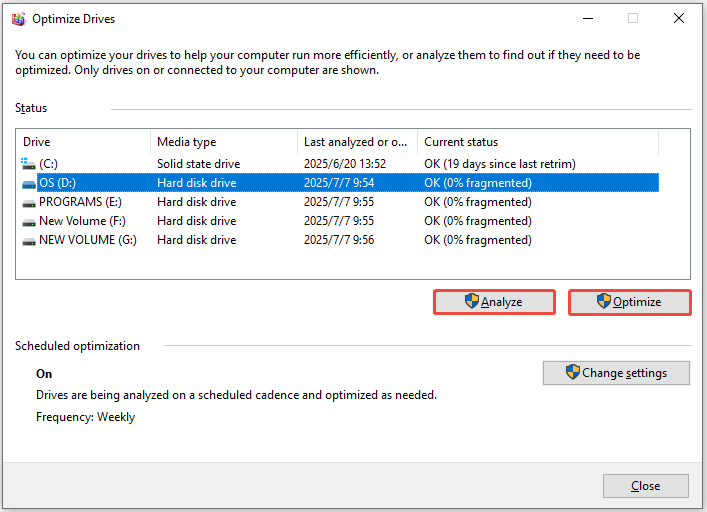
Step 3: Wait patiently until the process ends.
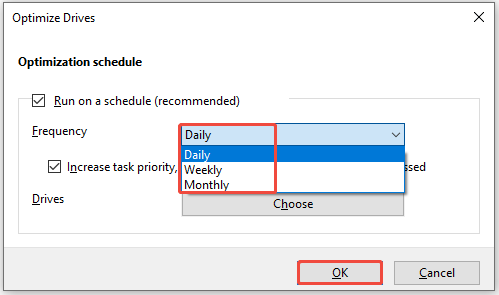
Step 4: To change the optimization frequency, follow the instructions below.
- Click Change Settings in the Optimize Drives window.
- Select Daily, Weekly, or Monthly from the drop-down menu.
- Tap OK to save changes.
Detect and Fix Disk Errors
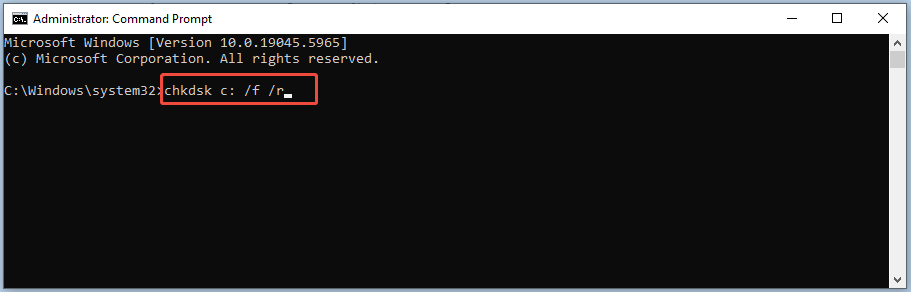
CHKDSK is a Windows command-line tool, helping you check the file system and file system metadata of a volume for logical and physical errors. Not only can it scan and repair logical file system errors, it can also identify and mark bad sectors on the disk.
Now, run Command Prompt as administrator and run CHKDSK commands to fix potential errors on your disk.
Step 1: Type cmd in the search box and hit Run as administrator under Command Prompt.
Step 2: In the User Account Control (UAC) window, click Yes to allow the operation.
Step 3: In Command Prompt, type chkdsk c: /f /r and hit Enter on the keyboard. Then CHKDSK will scan the drive and fix detected errors on it.
Move 3: Clean the Email Box
Email messages and any contained attachments can occupy the computer’s disk space or email provider’s cloud storage. To free up disk space, you can clean the email box, unsubscribe unwanted newsletters, organize emails into folders or labels, etc.
If you use Gmail, follow the steps below to clean the email box.
Step 1: Log in to your Gmail account on your browser.
Step 2: To delete all emails on the page, check the box at the top toolbar and hit the Recycle Bin icon. If you just need to delete certain emails, right-click on them and choose Delete. Alternatively, tick the box in front of these emails and tap the Recycle Bin icon.
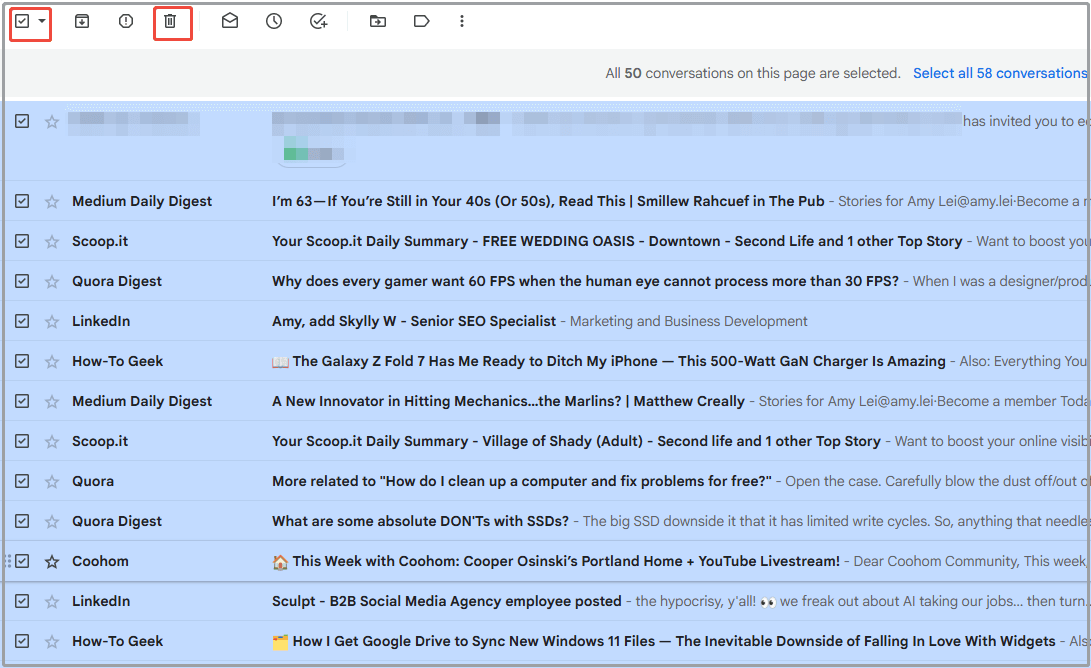
Then the selected emails will be deleted. Email box’s space will be released successfully.
#2: Scan the Computer for Malicious Software
How to clean a computer? Another available method is to scan the computer for malicious software like viruses and malware. Detecting and removing malicious software cleans the computer. Additionally, it protects the PC from virus attacks.
Windows built-in utilities like Windows Security and Microsoft Windows Malicious Software Removal Tool can scan the system for malicious software effectively. Here, I show you how to use the second tool.
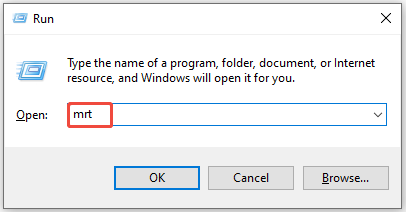
Step 1: Open the Microsoft Windows Malicious Software Removal Tool from the Run window.
- Call out the Run window.
- Type mrt in Run and press Enter.
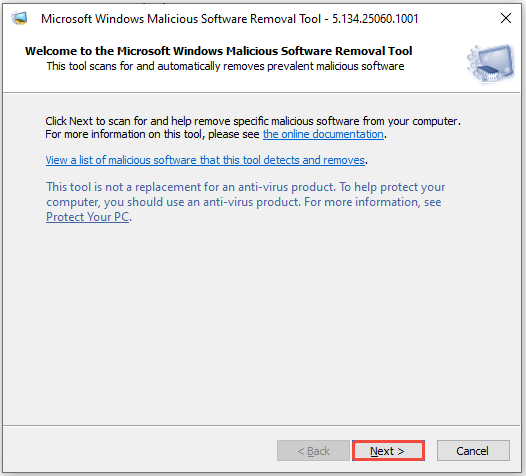
Step 2: In the prompted window, click Next to scan for and remove specific malicious software on the computer.
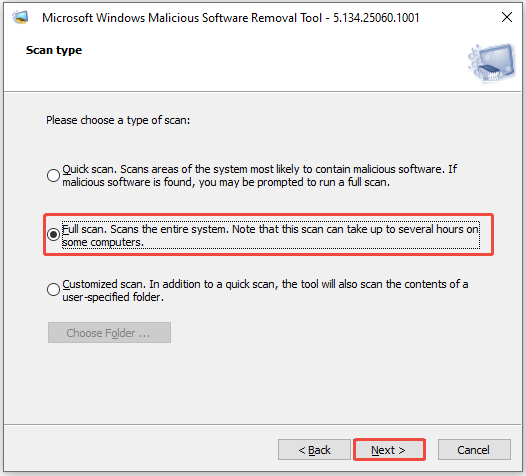
Step 3: Select a scan type from the listed options and click Next.
- Quick scan: It scans areas of the system mostly likely to contain malicious software. Once the malicious software is found, you will be required to run a full scan.
- Full scan: It scans the whole system. However, the scan process will take up to several hours on some computers.
- Customized scan: It allows you to scan the contents of a user-specified folder.
Step 4: Wait for the finish of the scanning process. Once done, your computer will be free of viruses and malware.
#3: Clear Browser Data
Web browsers also affect the performance of the computer. The browser itself consumes system resources. Besides, the more tabs you open, the lower the performance will be.
Running multiple extensions simultaneously will burden the memory and result in lag. So, you’d better only keep the most useful add-ons.
You should also clear other web browser data, like browsing history, cache, and cookies to enhance browsing and privacy. To do that, open Settings of the browser, choose the data to clear, and then delete it.
The following steps show you how to clear browsing data in Google Chrome.
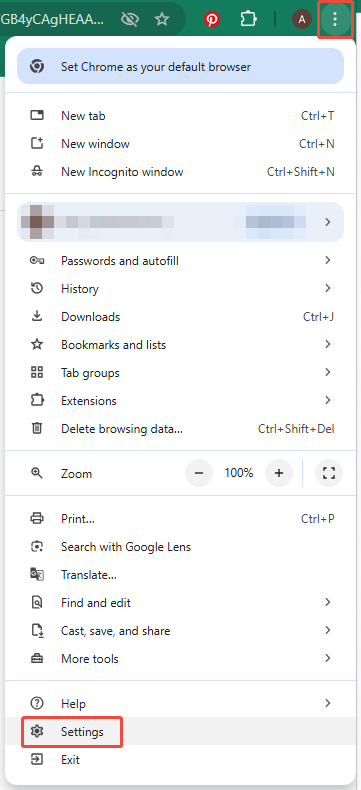
Step 1: Open the Chrome browser on your computer.
Step 2: Open the Settings menu.
- Tap on the three-dot icon at the upper right corner of the browser.
- Click Settings from the drop-down menu.
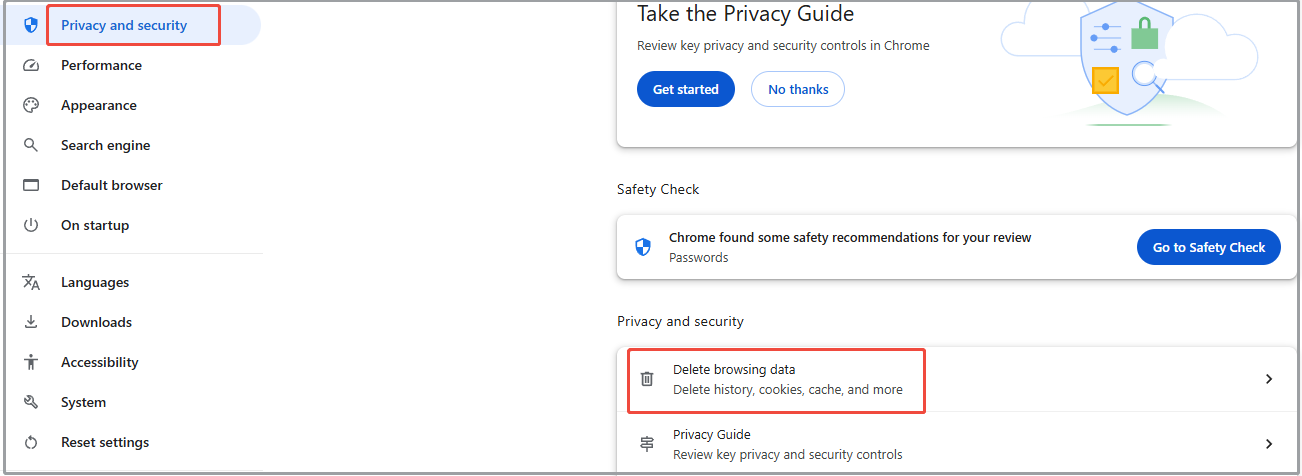
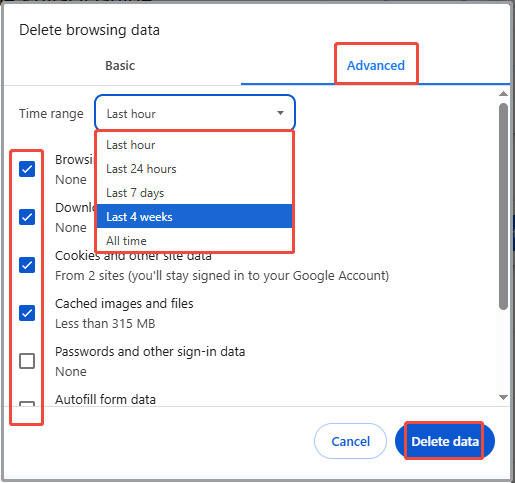
Step 3: Tap Privacy and security and then navigate to Delete browsing data.
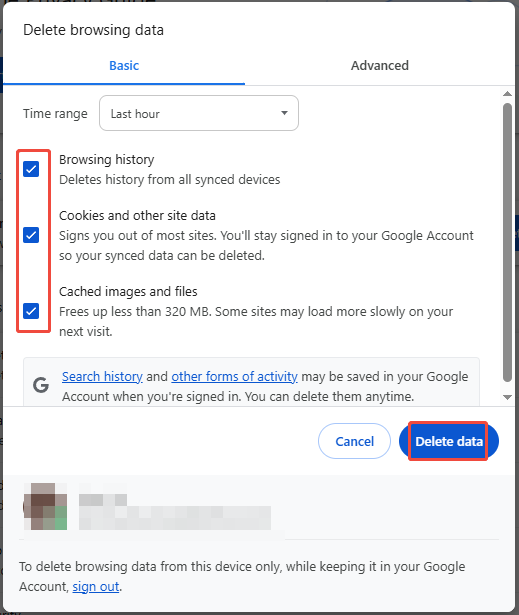
Step 4: Pick the time range of data saved, choose the file to delete, and apply the operation.
- Select the time range from the drop-down menu. Five options are available: Last hour, Last 24 hours, Last 7 days, Last 4 weeks, and All time.
- Under the Basic tab, tick the box in front of the file to delete.
- Click Delete data.
Step 5: To delete more browsing data, switch to the Advanced tab and refer to the instructions above to complete the operation.
#4: Reinstall Windows
Reinstalling Windows is an effective and straightforward way to clean up computer. It makes your computer run like new, especially if you perform a clean install.
You can reinstall Windows with the Reset this PC feature on the computer or using Windows installation media. If the computer runs normally, reinstall Windows with the offered feature.
However, if the PC fails to start, reinstall Windows by using a bootable USB drive. Download the ISO file of the desired system version, create a bootable USB, and set up Windows step by step.
#1: Use Reset This PC Feature
The following steps show you the process of reinstalling Windows via the Reset this PC feature.
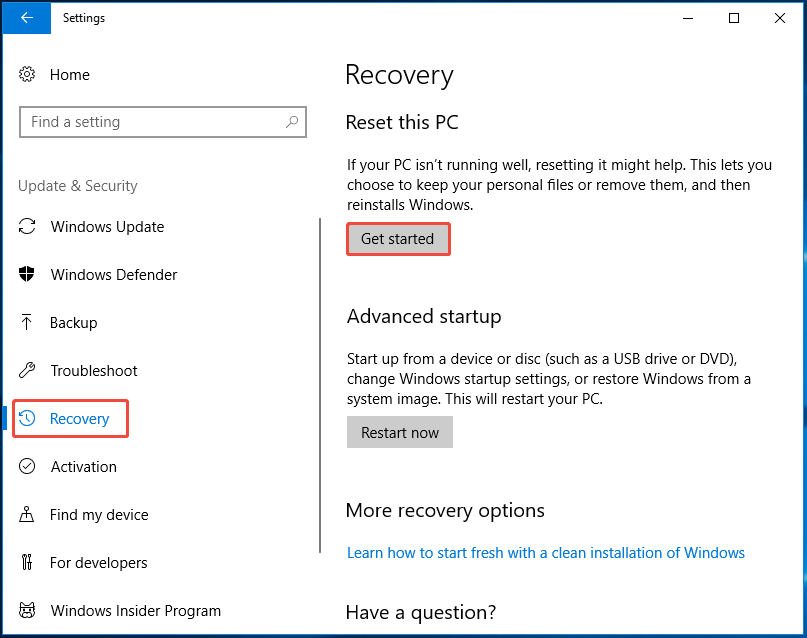
Step 1: Open Settings and tap on Update & Security.
Step 2: Hit Recovery and click Get started under Reset this PC.
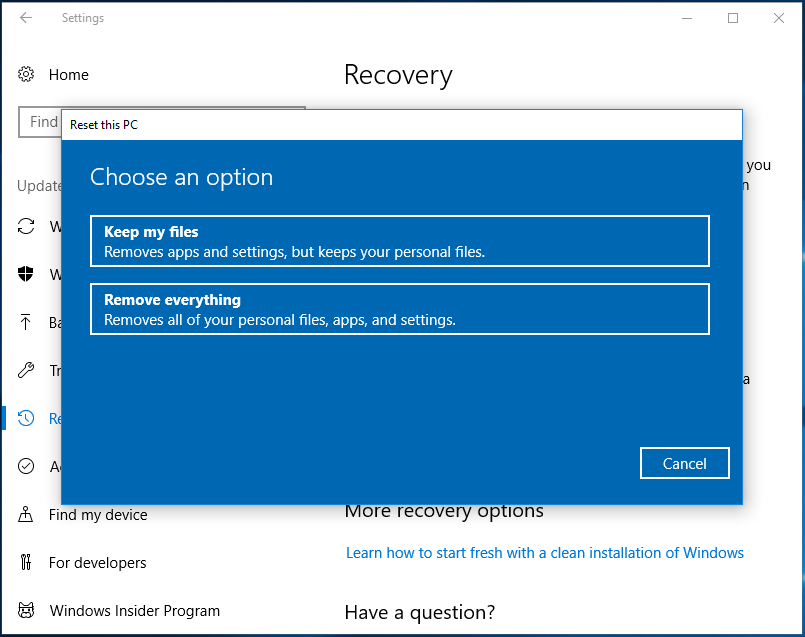
Step 3: In the Reset this PC window, choose Keep my files or Remove everything. Here, I select Keep my files.
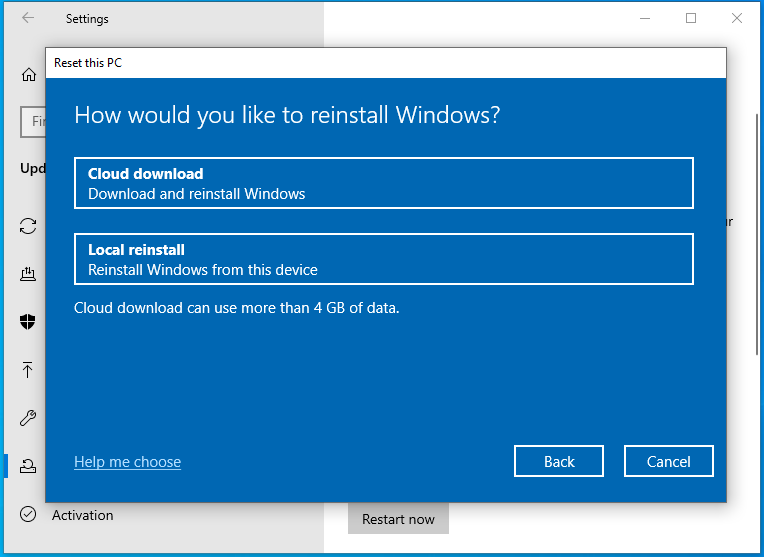
Step 4: Pick a way to reinstall Windows: Cloud download or local reinstall.
Step 5: Follow the on-screen instructions to complete the reinstallation.
#2: Use Windows Installation Media
How to create Windows installation media and reinstall Windows with it? Here’s the tutorial for you.
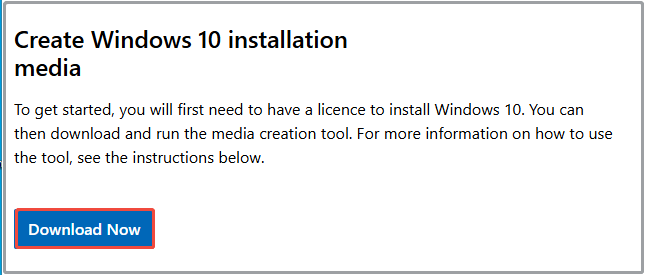
Step 1: Go to the official website of Windows and click Download Now to download Windows Media Creation Tool.
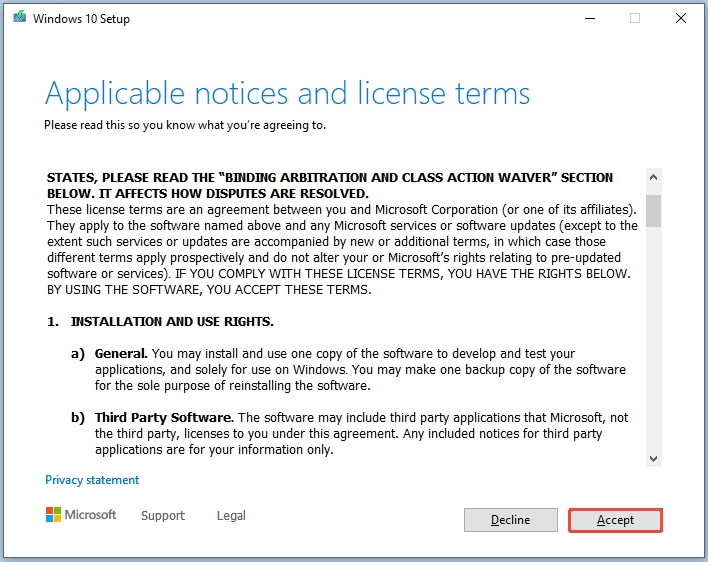
Step 2: Double-click the downloaded file to run the tool. Read the license terms and click Accept to agree with it.
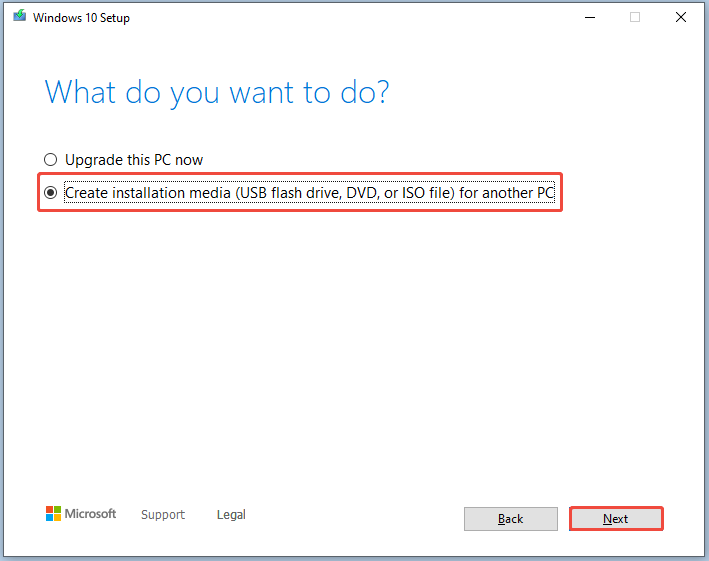
Step 3: Tick the Create installation media (USB flash drive, DVD, or ISO file) for another PC option. Then click Next.
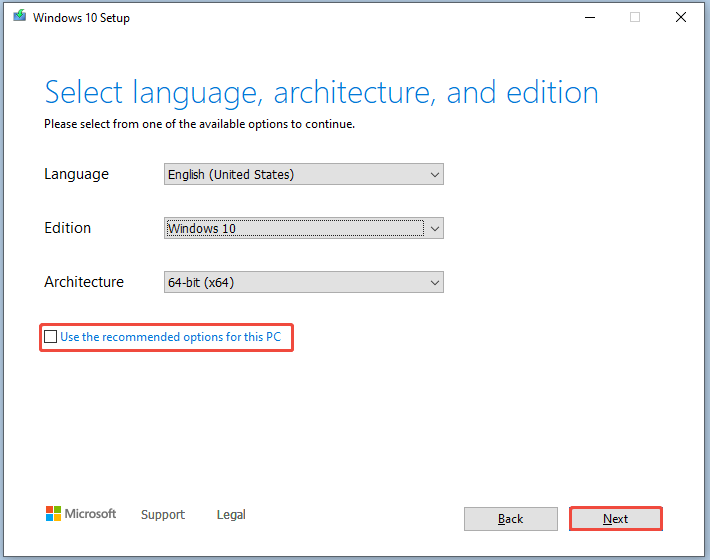
Step 4: Uncheck Use the recommended options for this PC and configure language, edition, and architecture based on your needs. After that, tick the Next button.
Step 5: Select ISO file and hit Next.
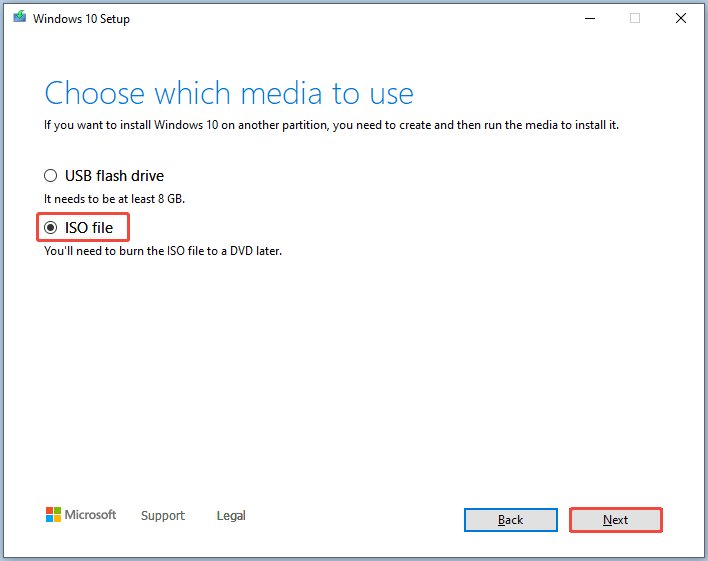
Step 6: Pick a location for the downloaded ISO file, type a name for the file, and click Save.
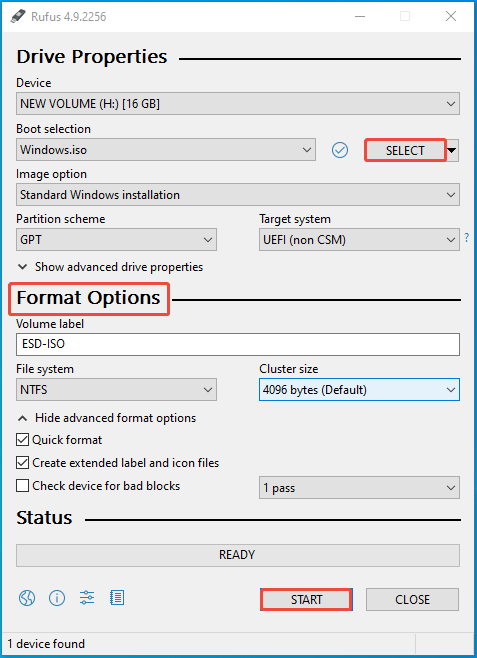
Step 7: Wait for the finish of the download process. Then, get a piece of USB bootable software installed. Here, I downloaded Rufus from its official website.
Step 8: Connect an empty USB to the computer, double-click the Rufus setup file, and follow prompts to run it.
Step 9: After the USB drive is detected, select the downloaded ISO, configure settings, and start the creation. Then wait until the process ends.
- Click SELECT to choose the downloaded ISO file.
- Pick image option and partition scheme.
- Based on your needs, choose format options like volume label, file system, cluster size, etc.
- Tap on START.
Step 10: After the bootable USB drive is created, plug it into the computer to reinstall Windows. Restart the computer and hold the BIOS key while the PC starts to enter BIOS.
Step 11: Set the bootable USB as the first boot and press F10 > Enter to save changes and exit BIOS. After that, the computer will boot from the USB.
Step 12: Follow the on-screen instructions to complete the setup process.
Once done, restart the computer. Then you can run the PC like new.
How to Clean the Computer Physically
Dust buildup drops down airflow, resulting in temperature surge and potentially damaging components like the CPU and graphics card.
Hence, regular physical cleanup is important and necessary. To make the fan and heatsink work properly, you should regularly clean the dust and debris on both external and internal components of the computer.
Ensure that they are in good condition and work properly. If the computer can dissipate heat effectively, you won’t experience overheating and other related issues.
In a word, cleaning PC components helps you avoid overheating, maintain peak performance, and extend the lifespan of hardware.
How to clean up your computer physically? You need to use a dry, lint-free cloth or compressed air to wipe the surface or internal components of the computer.
For a detailed breakdown, move forward and explore the details.
Make Some Preparations Before Proceeding
Before cleaning the computer physically, you need to prepare a series of materials. They are listed as follows.
- Microfiber cloths
- Cotton swabs
- Compressed air can
- Isopropyl alcohol (99%)
- Anti-static wrist strap
- Screwdrivers
- Dust mask
- Thermal paste
For the sake of security, you should perform the following operations.
- Power off the computer completely
- Disconnect all peripherals
- Unplug all cables and power cords
- Place the computer in a well-ventilated place
- Wear the dust mask
- Ground yourself with an anti-static wrist strap
If you are ready, follow the corresponding instructions to clean your PC components.
#1: Vents and Ports Cleanup
Dust, fingerprints, and other debris can pile up on the external components like vents and ports, which make their way inside at last. So, you’d better clean these parts first.
How to clean them?
Wipe down the case with a slightly damp microfiber cloth and then use compressed air to clean vents and ports. If the case has dust filters, you should be careful. Besides, clean fan frills thoroughly.
You can use a cotton swab with isopropyl alcohol for stubborn dirt in ports. It’s recommended to clean vents and ports every few months.
#2: CPU and Heatsink Cleanup
To clean internal components like fans and heatsinks, you need to remove the computer case with professional screwdrivers first.
Tip: As internal components are sensitive and dedicated, you should clean them with care. If you operate improperly, you will damage the component.
Then use compressed air to blow out loose dust on the following components. If necessary, use a cloth to further clean the component.
- Fans (Hold fans while cleaning to stop over-spinning)
- Heatsinks
- RAM slots
- Graphics card
- Power supply
- Motherboard
#3: Monitor Cleanup
Unlike other components, monitor doesn’t affect the running of the computer. It is just used for displaying content. However, it still needs to be cleaned. A clean monitor can reduce eye strain and offers a better view experience.
How to clean the monitor?
Use a soft and lint-free microfiber cloth to wipe the screen gently. This will remove dust and smudges. For stubborn stains, slightly dampen the cloth with distilled water and then clean the monitor.
#4: Keyboard and Mouse Cleanup
Keyboard and mouse are essential peripherals on the computer. You should also clean them to have a better use experience.
Steps for Cleaning the Keyboard
- Unplug or turn off the keyboard.
- Use compressed air to blow dust between keys.
- Clean with cotton swabs dipped in isopropyl alcohol.
- Wipe down keycaps with a microfiber cloth.
Steps for Cleaning the Mouse
- Unplug the mouse.
- Wipe exterior with a slightly damp cloth.
- Wipe the sensor area with a dry cotton swab.
- Clear any debris from tracking surfaces.
How Often Should You Clean the Computer
Though cleaning the computer brings many benefits, it’s not recommended to clean it excessively.
How often should you clean the computer?
Under normal circumstances, the frequency of PC cleanup mainly includes monthly, quarterly, and annual. Here, I list tasks that should be performed monthly, quarterly, and yearly correspondingly.
However, sometimes you need to clean the PC more frequently than usual. Factors that affect the cleaning frequency are listed below.
Monthly Tasks
- Wipe monitor and case exterior.
- Clean keyboard and mouse.
- Clear browser cache and temporary files.
Quarterly Tasks
- Check and clean all fans.
- Clean internal dust on the computer.
- Perform disk cleanup.
- Run a full system scan.
Yearly Tasks
- Check and replace all worn cables.
- Clean all PC components in deep.
- Replace thermal paste if necessary.
- Complete system optimization.
The above clean frequency is recommended in normal cases. The frequency might be different due to the following factors.
- Usage: Heavy users like gamers need more frequent cleanup.
- Environment: More frequent cleanup is required if the computer runs in dusty or smoky environments.
- Pets: If you have pets, especially those that shed, you should clean up the computer more frequently.
How to Keep Computer Clean Longer
To reduce the cost and time taken to clean the computer, you should take some measures to make the computer maintain clean longer. In other words, you should take some protective actions and have good habits.
Here are some practical tips for you.
- Use dust filters on intake fans
- Place the computer off the floor
- Ensure good airflow around the computer
- Clean computer on a schedule
- Avoid eating or drinking next to the computer
- Keep pets away from the computer
Wrap Things Up
From this post, you can learn all details about PC cleanup, including its benefits, possible issues, and types. Besides, it also tells what computer cleanup means and how to clean up your computer digitally and physically.
Based on that, it recommends the frequency to clean up the computer in normal cases and summarizes the factors that impact the cleaning frequency. In a word, this post offers you a full computer cleanup guide.
With this tutorial, you can clean the computer to enhance its performance or maintain its condition. If you have any difficulty when using MiniTool software, contact us by sending an email to [email protected]. We will get back to you as soon as possible.
User Comments :