Windows built-in tools typically cannot move partition to end of disk. This guide explains how to move a partition, including a recovery partition, to the end/beginning of a disk using a free partition manager. It also covers alternative methods when direct movement is not possible.
These are the methods to move a partition to the end of a disk:
Quick Answer:
| Method | Applicable case |
| Move the partition using a free partition manager | Adjacent unallocated space is available. |
| Extend the partition using a partition manager | You want to extend a partition but another partition exists between the target partition and the unallocated space. |
| Delete the partition | The partition contains no important data or has been backed up. |
| Delete and recreate the recovery partition | You want to relocate the recovery partition without using third-party software. |
This MiniTool post applies to common scenarios where you may want to move a partition to the end or beginning of a disk:
- Extend a partition: Unallocated space is separated from the target partition by another partition, such as a recovery partition.
- Reorganize disk layout: Partitions are not arranged in the desired order.
- Create contiguous unallocated space: Free space is separated into different disk locations.
Can Windows Built-in Tools Move a Partition?
No. Windows built-in tools cannot directly move a partition to the end or beginning of a disk.
When you try to extend a partition but the unallocated space is not adjacent to it, Windows does not allow you to move the blocking partition to another disk location.
However, you can use a partition manager such as MiniTool Partition Wizard to move a partition without deleting data.
How to Move Partition to End/Beginning of Disk
Applicable case: Unallocated space is adjacent to the partition you want to move.
Professional partition managers such as MiniTool Partition Wizard support moving partitions to the left or right side of adjacent unallocated space.
MiniTool Partition Wizard FreeClick to Download100%Clean & Safe
Here is how to move a partition to the end of the disk:
Layout Before Moving the Partition:

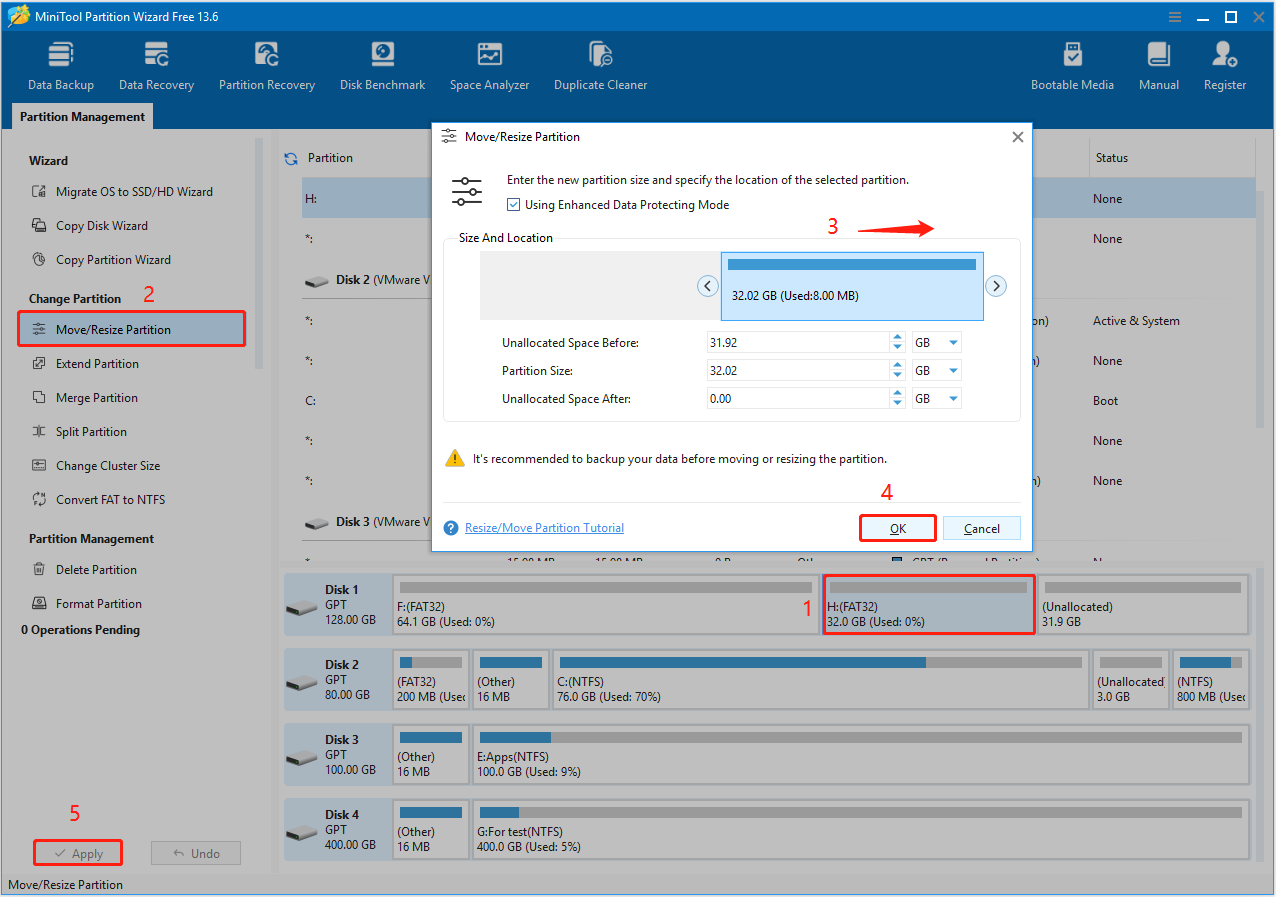
Use the Move/Resize feature in MiniTool Partition Wizard to move the drive H: to the end of the disk:
Step 1. Select the partition you want to move and click Move/Resize Partition.
Step 2. Drag the slider to the far right and click OK.
Step 3. Click Apply.
Layout After Moving the Partition:

This layout places unallocated space next to the target partition, allowing further extension.
The same steps apply when moving a partition to the beginning of the disk.

What if You Cannot Move the Partition
Sometimes moving a partition is not possible because the unallocated space is not adjacent to the target partition. In these situations, alternative methods may work better.
Method 1. Extend the Partition Directly
Applicable case: Unallocated space is not contiguous with the partition you want to extend.
MiniTool Partition Wizard supports extending partitions using non-contiguous unallocated space or free space from another partition. With the Extend Partition feature, you do not need to move a blocking partition.
Step 1. Select the partition you want to extend and click Extend Partition.
Step 2. Expand the Take Free Space from menu and choose the unallocated space. Then drag the slider to specify the space size and confirm.
Step 3. Preview the partition and click Apply.
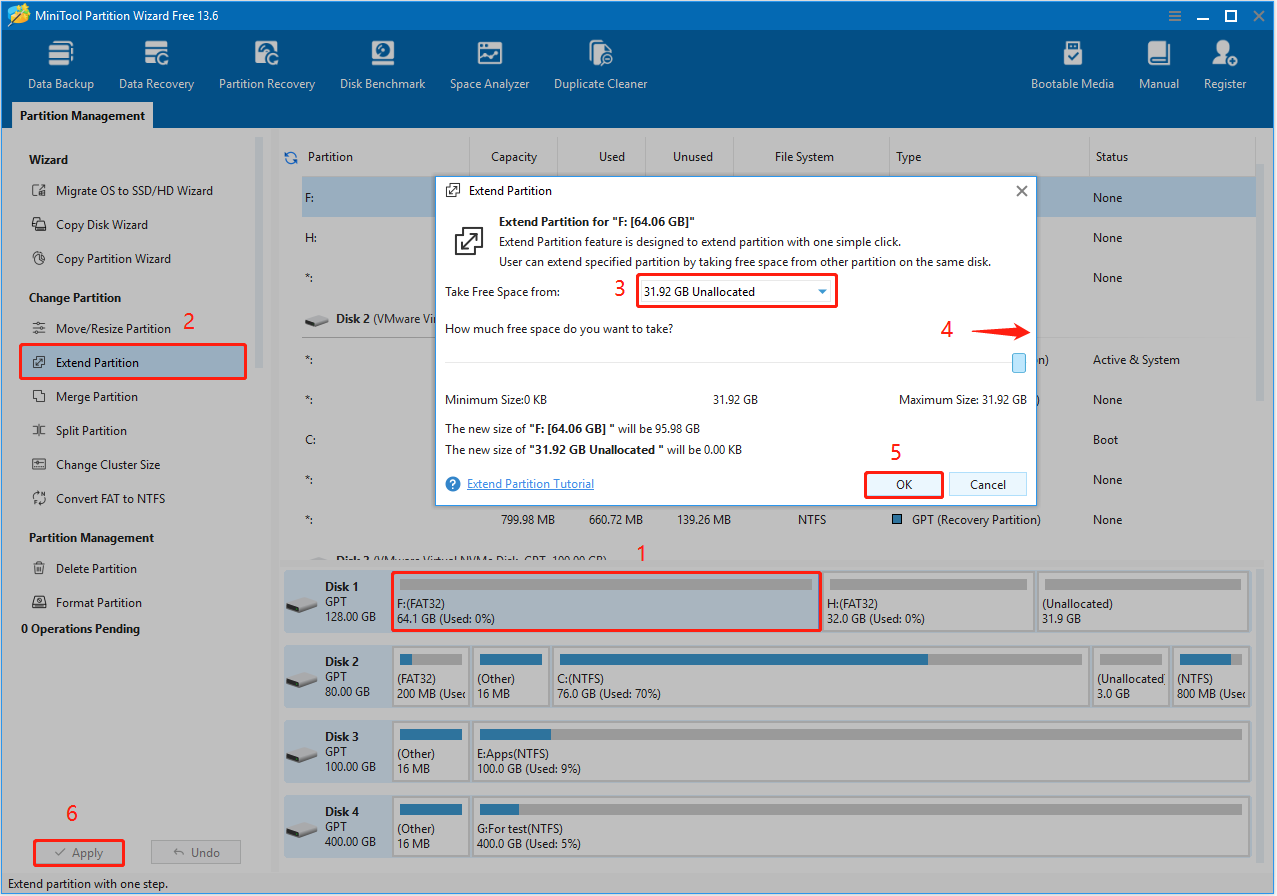
Layout After Extending the Partition:

Method 2. Delete the Partition
Applicable case: You do not want to use third-party software.
When there are no important files on the partition that prevents expansion, consider deleting it directly. You can then merge the unallocated space into an existing partition or recreate the partition after extending the original partition.
In Disk Management, right-click the partition and choose Delete Volume.
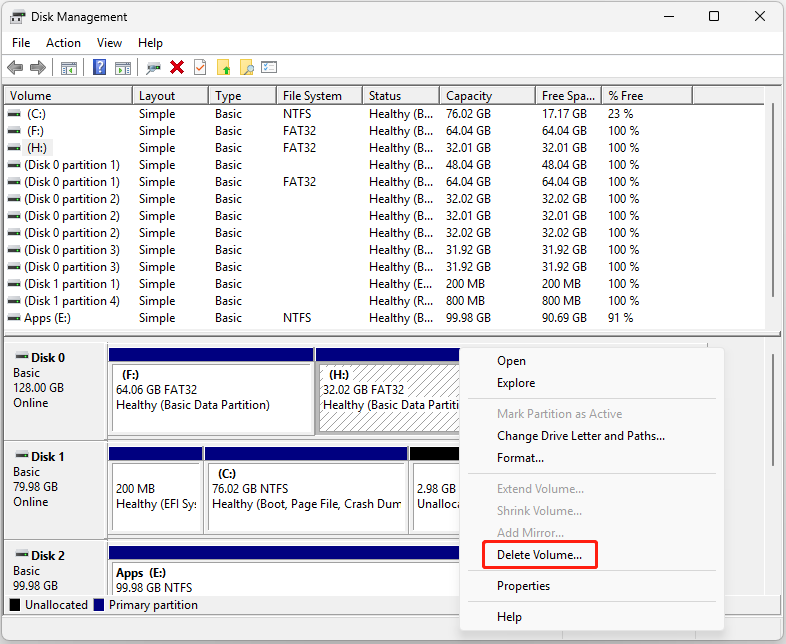
Layout After Deleting the Partition:

Special Case: Move Recovery Partition to End of Disk
Moving the recovery partition is more complex than moving a standard data partition. The Delete Volume option is unavailable, and deleting the recovery partition is not recommended because it may affect Windows recovery features.
To move a recovery partition to the end of a disk, you can use the Move/Resize feature in MiniTool Partition Wizard or remove and recreate the partition using DiskPart.
Method 1. Move Using a Partition Tool
Applicable case: Unallocated space is adjacent to the recovery partition.
Layout Before Moving the Partition:

Follow the same steps as above: select the recovery partition and click Move/Resize Partition. Then drag the slider to the far right and confirm.
Layout After Moving the Partition:

Method 2. Delete and Recreate Using DiskPart
Applicable case: Unallocated space is not adjacent to the recovery partition.
If the Move/Resize feature is not available, you can use DiskPart instead. You need to first delete the recovery partition and then recreate it after extending the partition.
How to remove recovery partition to the end of a disk using DiskPart:
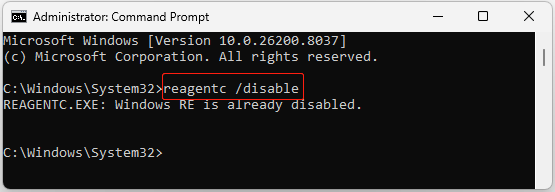
Step 1. Disable the recovery partition
Run Command Prompt as an administrator. Then type reagentc /disable and press Enter to disable Windows RE.
Step 2. Delete the recovery partition
Execute the following commands one by one:
- diskpart
- list disk
- select disk 1 (replace 1 with the system disk number)
- list partition
- select partition 4 (replace 4 with the number of the recovery partition)
- delete partition override

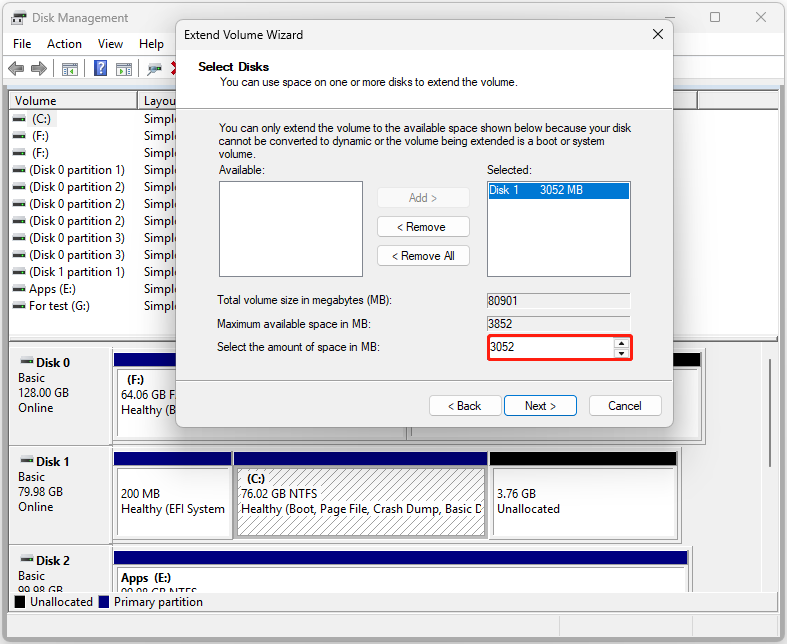
Step 3. Extend the partition
Now the recovery partition becomes unallocated space, and you can extend the C drive. During the process, leave about 800 MB unallocated (depending on the original size of your recovery partition) to reserve space for re-enabling the recovery partition.
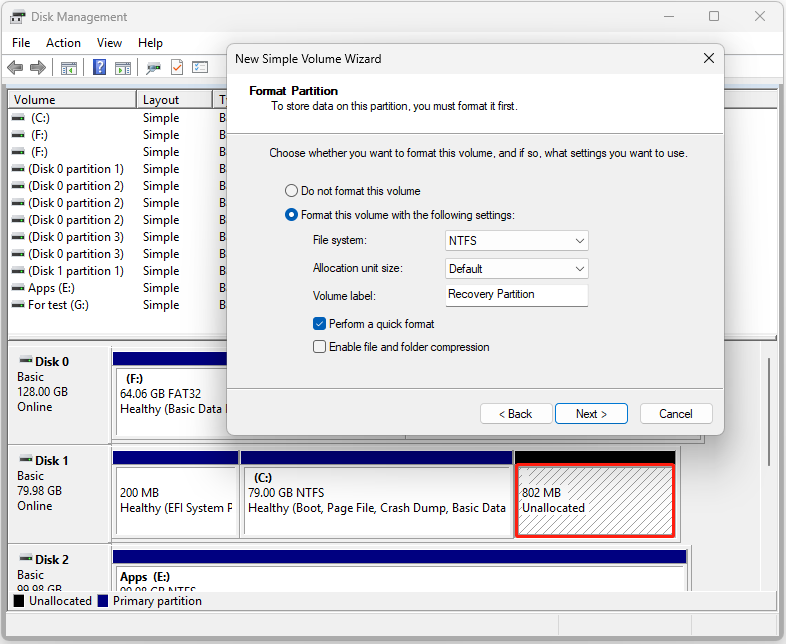
Step 4. Create the recovery partition
Right-click the 800 MB of unallocated space and select New Simple Volume. Then follow the on-screen instructions to create the recovery partition.
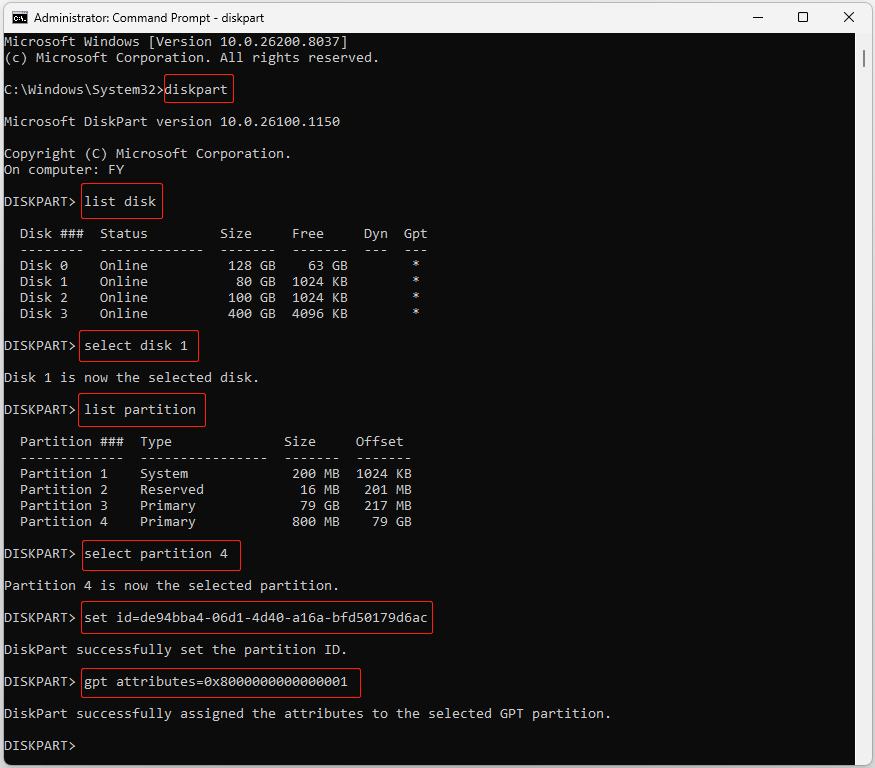
Step 5. Set the partition ID
Open CMD as an administrator and execute the following commands:
- diskpart
- list disk
- select disk 1 (replace 1 with the system disk number)
- list partition
- select partition 4 (replace 4 with the number of the recovery partition)
For a GPT disk, run set id=de94bba4-06d1-4d40-a16a-bfd50179d6ac to designate the partition as a recovery partition. Then run gpt attributes=0x8000000000000001 to hide the partition.
For an MBR disk, run set id=27.
Step 6. Enable the recovery partition
Finally, run reagentc /enable to enable the recovery partition.
Here is what my recovery partition looks like after being re-enabled:

Bottom Line
Now you know how to move partition to end of disk. You can use free partition management software, extend partitions without moving, and recreate the recovery partition when direct movement is not possible.
Choose the method based on your disk layout and whether adjacent unallocated space is available.
If you have any questions about MiniTool products, please contact the support team at [email protected].
About The Author

Position: Columnist
Shirley holds a bachelor’s degree in English and has been an editor at the MiniTool Team for many years. She specializes in IT-related content, with a focus on data recovery, file backup, disk management, and other technical topics. She is committed to delivering clear, accurate, and practical solutions to help users resolve common computer issues.
User Comments :