Is the storage space enough on your Samsung Galaxy Book 4 Pro? If you don’t have enough storage space and need to upgrade Samsung Galaxy Book 4 Pro SSD, this post is what you need. Here, MiniTool offers a step-by-step Samsung Galaxy Book 4 Pro SSD upgrade guide.
Why Upgrade Samsung Galaxy Book 4 Pro SSD?
In the fast-paced world of technology, the Samsung Galaxy Book 4 Pro has become a powerful and stylish laptop that meets the needs of professionals, students, and tech enthusiasts.
However, as digital lives grow and the demands on devices increase, the need for more storage space and faster data access speeds has become inevitable. Upgrading the Samsung Galaxy Book 4 Pro’s SSD can make a huge difference, significantly improving its performance and usefulness.
Here is a user report from the Reddit forum:
Upgradeable SSD Samsung Galaxy Book 4 Pro (14")? I got my Samsung Galaxy Book 4 Pro 14", and so far, I am satisfied with the performance, etc. Just wondering, is the SSD upgradable? I am thinking of upgrading my SSD to a higher storage since I used lots of programming software that takes up some space.https://www.reddit.com/r/GalaxyBook/comments/1fdk80x/upgradeable_ssd_samsung_galaxy_book_4_pro_14/
When considering doing the Samsung Galaxy Book 4 Pro SSD upgrade, there are some benefits as shown below:
# 1. Performance Improvement
The most immediate benefit of upgrading the SSD in your Galaxy Book 4 Pro is a significant performance boost. Modern SSDs read and write much faster than traditional mechanical HDDs.
When booting up your laptop, an upgraded SSD can reduce boot times from potentially a minute or more to just a few seconds. This fast access to the operating system and applications allows you to get to work or play right away without waiting.
# 2. Storage Expansion
As you accumulate more and more digital content, the raw storage capacity of your laptop may soon be insufficient. The Samsung Galaxy Book 4 Pro usually comes with a range of SSDs with different starting capacities, but if you find yourself frequently deleting files to free up space, it may be time to upgrade.

How to Choose a Suitable SSD for Samsung Galaxy Book 4 Pro?
Before you start the Samsung Galaxy Book 4 Pro SSD upgrade, you need to choose a proper a suitable SSD for your laptop first. Here are the main aspects that you need to notice:
# 1. Form Factor
Most Samsung Galaxy Book 4 Pro models use M.2 SSDs. M.2 is a small interface that is popular in modern laptops for its compact size and high-speed performance. When choosing an SSD, make sure it has an M.2 form factor that is compatible with your laptop model.
The Galaxy Book 4 Pro’s M.2 slot is designed to fit a specific size of M.2 SSD, usually a 2280 or 2230 size. The numbers 2280 and 2230 refer to the physical size of the SSD, with 22 representing the width (mm) and 80 or 30 representing the length. Be sure to check your laptop specs or user manual to determine the correct size.
# 2. Interface
There are two main types of interfaces for M.2 SSDs: SATA and NVMe (PCIe). An NVMe SSD is a better choice for the Galaxy Book 4 Pro because it is much faster compared to SATA SSDs.
# 3. Capacity
The SSD capacity you choose depends on your personal needs. If you mainly use your laptop for basic tasks like web browsing, email, and word processing, a 512GB or 1TB SSD may be enough. However, if you use it for large video editing or storing a lot of HD games, a 2TB SSD will be a better choice.
# 4. Brand & Warranty
When it comes to SSDs, it is crucial to choose a well-known brand. Well-known brands like Samsung, Kingston, Crucial, and Western Digital all produce high-quality, reliable SSDs. Also, look for SSDs that have a warranty of at least 3 years.

How to Perform the Samsung Galaxy Book 4 Pro SSD Upgrade?
Once you have chosen a suitable SSD for Samsung Galaxy Book 4 Pro, you can start the Samsung Galaxy Book 4 Pro SSD upgrade process. The process is not difficult, and it just needs three stages: initialize the new SSD, upgrade Samsung Galaxy Book 4 Pro SSD, and replace the old SSD with a new SSD.
Before you do this, you need to prepare some basic tools.
- A small Phillips screwdriver to remove the screws that secure the back cover of the laptop and the SSD.
- A plastic disassembly tool or a guitar pick to pry off the back cover without damaging the laptop shell.
- A USB to M.2 adapter to connect the new SSD to the laptop as an external drive.
Now, let’s begin performing the Samsung Galaxy Book 4 Pro SSD replacement.
Stage 1. Initialize the New SSD
Since the new SSD is brand new, it needs to be initialized to MBR or GPT before it can be used. You can do this in Windows Disk Management. The steps are as follows:
- Connect the new SSD to your laptop via the USB to M.2 adapter.
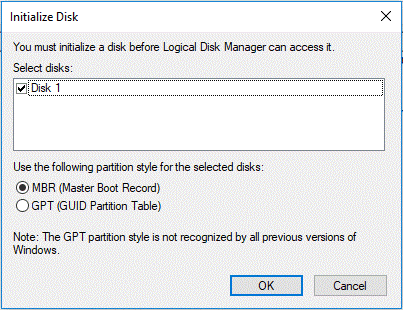
- Press the Win + R key to open the Run dialog box. Then, input diskmgmt.msc and click on OK to open Disk Management.
- In the Disk Management window, right-click on the new disk and select Initialize Disk.
- In the pop-up window, select MBR or GPT according to your needs and click OK. Then, follow the on-screen instructions to finish the operation.
After initializing the disk, you can keep the new disk connected to your computer and then go to Stage 2 to do the Samsung Galaxy Book 4 Pro SSD replacement.
Stage 2. Upgrade Samsung Galaxy Book 4 Pro SSD
Generally speaking, when you upgrade Samsung Galaxy Book 4 Pro SSD, you have two options.
- SSD upgrade without OS reinstallation: Clone your entire computer to the new SSD and then replace the SSD.
- SSD upgrade with OS reinstallation: Back up important data to an external hard drive, replace the SSD, and clean install Windows on your computer.
Here, we will show you how to upgrade Samsung Galaxy Book 4 Pro SSD without OS reinstallation. Clone your existing SSD to your new drive so you can transfer all your data, including your operating system, apps, and user settings, without having to reinstall everything from scratch.
To do that, MiniTool Partition Wizard can help you. It provides the Migrate OS to SSD/HD feature to help you migrate OS to SSD without reinstalling OS. It can also help you format SD card FAT32, change cluster size, resize/move a partition, clone HDD to SSD, partition hard drives, recover data from hard drives, etc. Here is the guide:
MiniTool Partition Wizard DemoClick to Download100%Clean & Safe
Step 1: Launch MiniTool Partition Wizard to enter its main interface.
Step 2: Select Migrate OS to SSD/HD Wizard from the left action panel. In the pop-up window, choose Option A and then click Next. It will clone the entire disk to the new SSD.
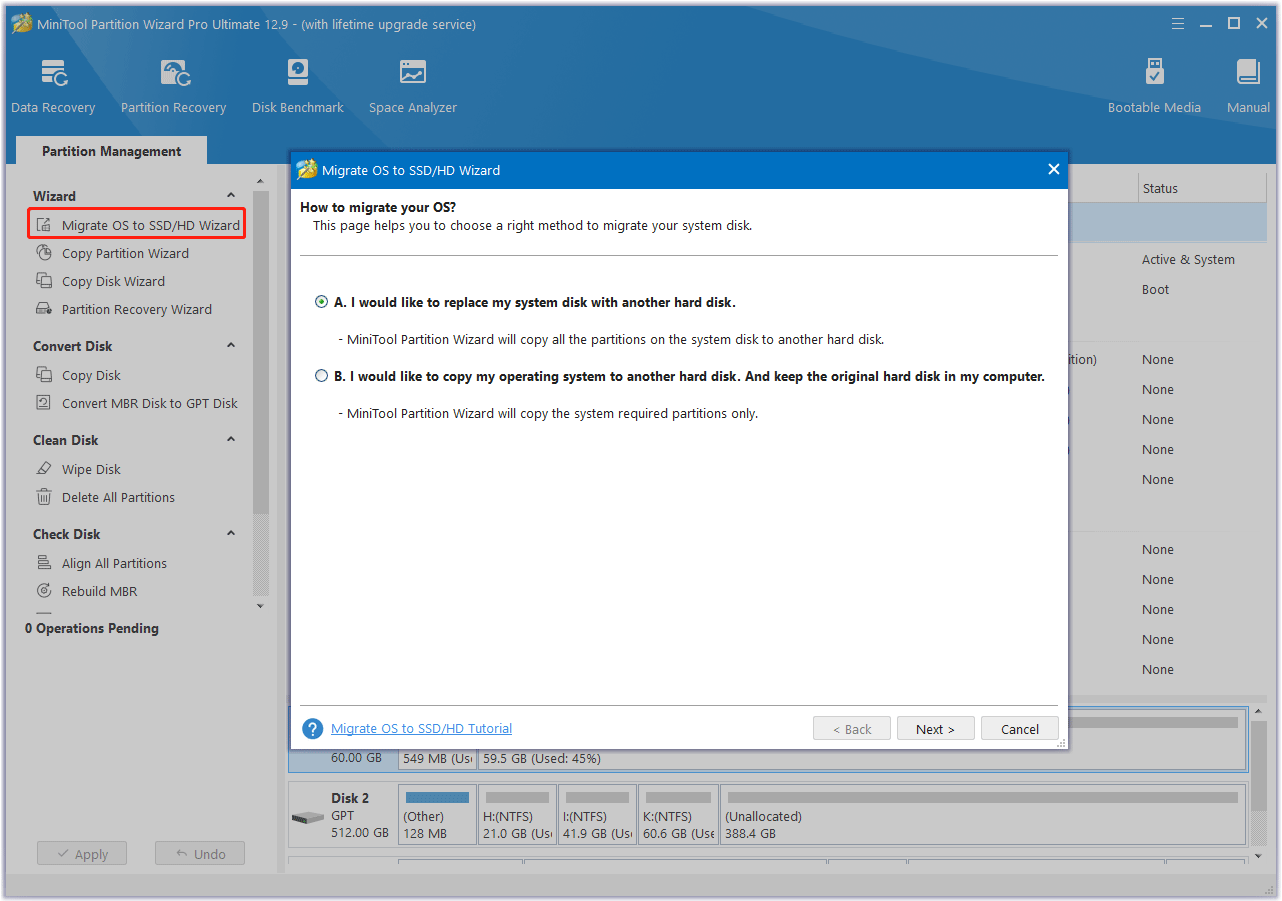
Step 3: In the next window, select the new SSD as the destination disk and click Next. A warning window will pop up. Read it and click Yes to continue.
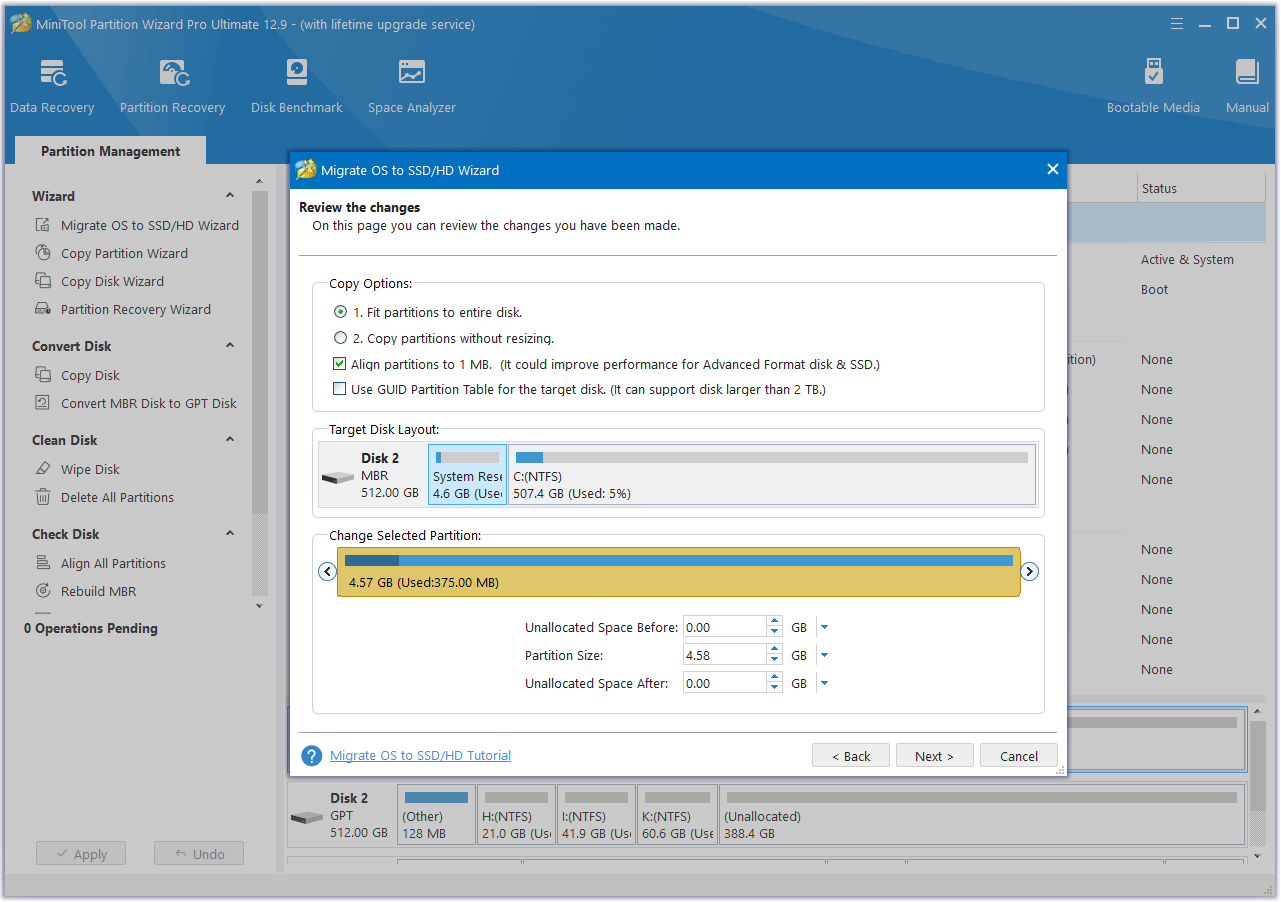
Step 4: After that, choose the desired copy options and change the Disk Layout. Then, click Next.
- Fit partitions to entire disk: All the partitions on the original disk will be extended by an equal proportion to fill the entire hard drive.
- Copy partitions without resizing: All the partitions on the original disk are copied into the hard drive without changes in size or location.
- Align partitions to 1 MB: It is recommended for improving the read and write performance of the SSD.
- Use GUID partition table for the target disk: This option only appears when your original disk is an MBR disk, which can only use 2TB disk space at most.
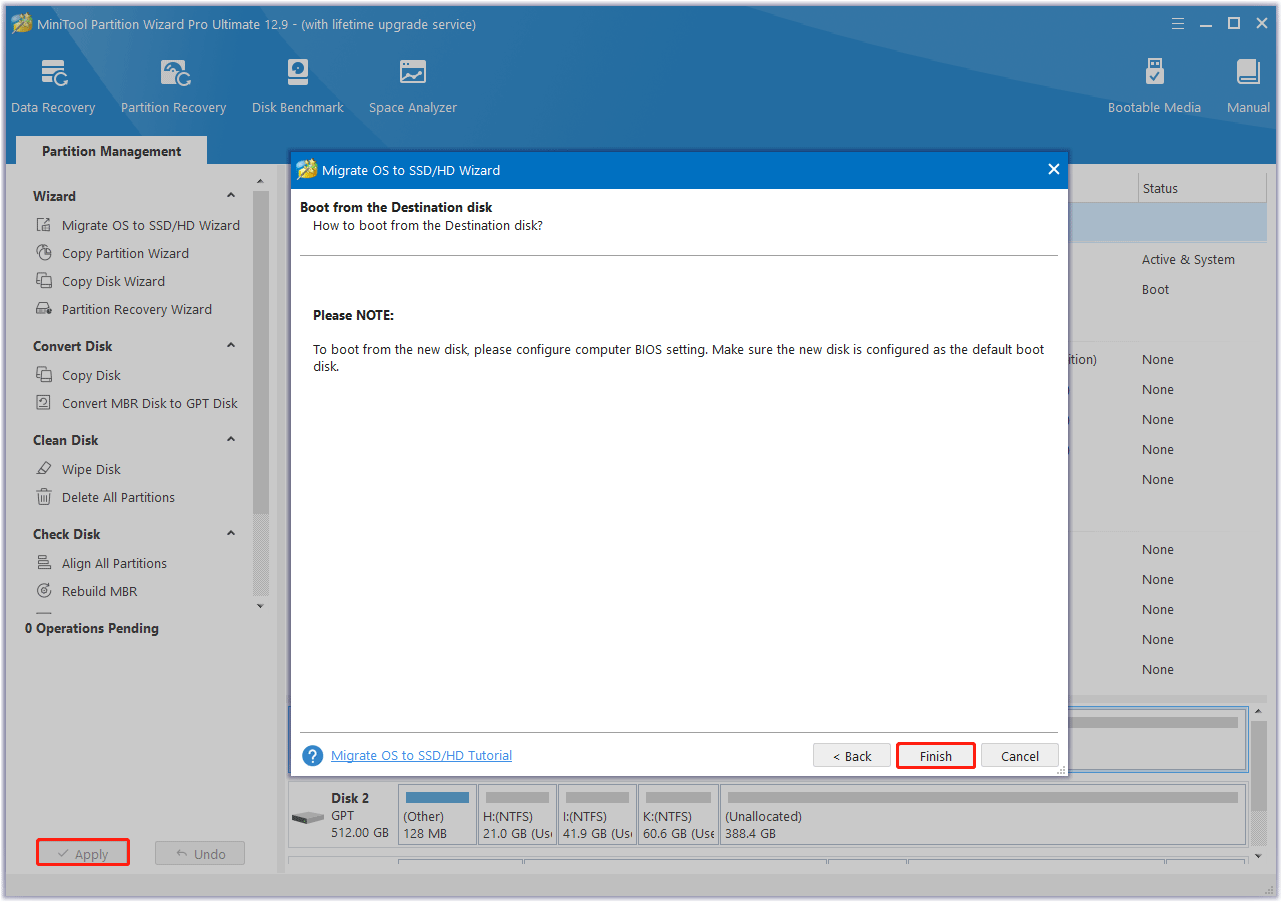
Step 5: Read the NOTE information and then click Finish. Then, click Apply to start executing the OS migration operation.
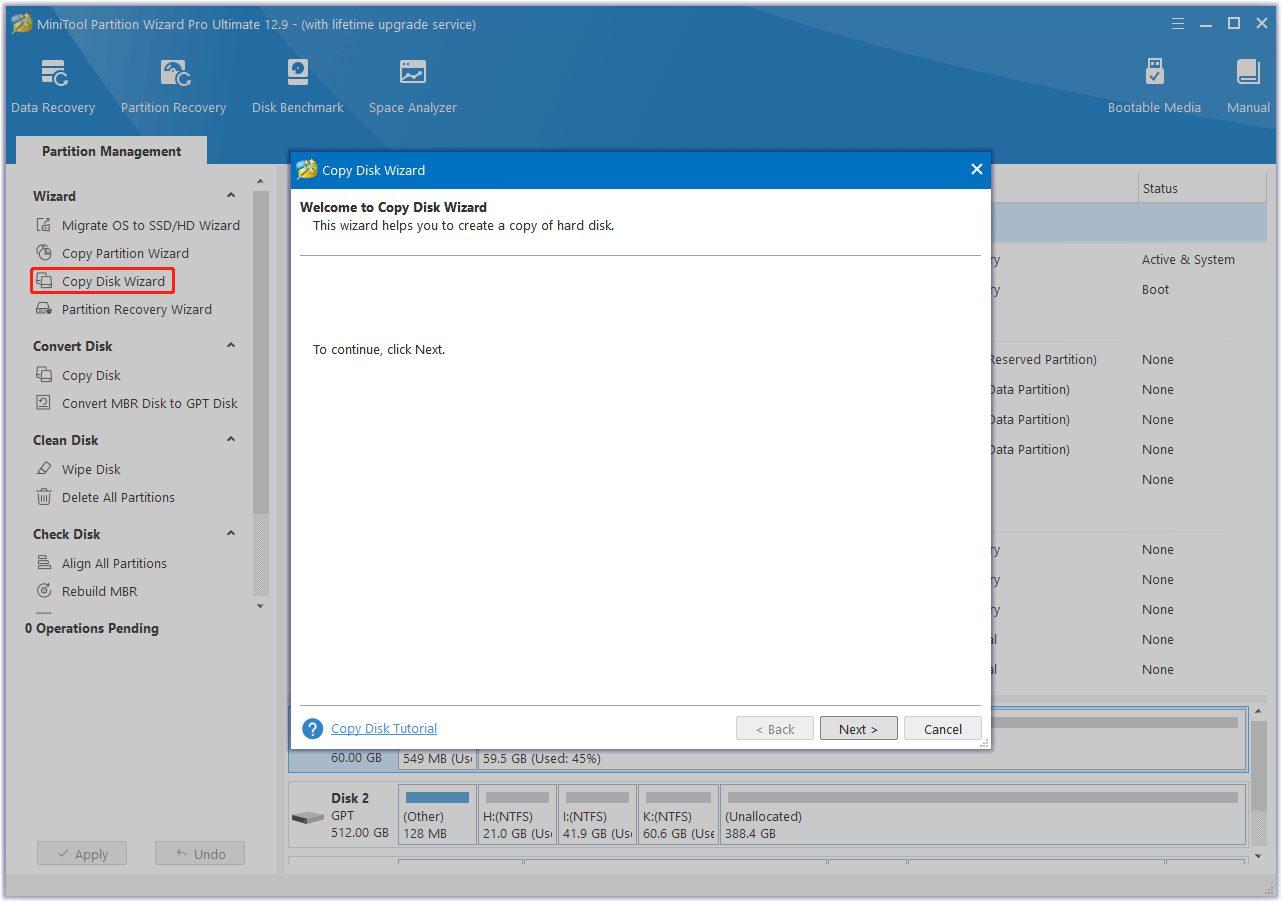
In addition to the Migrate OS to SSD/HD feature, the Copy Disk feature can also help you migrate all the partitions and data of old SSD data to the new SSD. Here’s the guide:
- Launch MiniTool Partition Wizard to enter its main interface.
- Select Copy Disk Wizard from the left action panel. Then click on Next to continue.
- In the next window, choose the original disk to copy and click on Next.
- After that, select the new SSD as the destination disk and click on Next. If you are warned that all the data on the disk will be destroyed, click on Yes to confirm.
- In the Review the changes window, choose the preferred copy options. Also, you can configure the target disk layout according to your needs. Once done, click on Next.
- Finally, click on Finish and Apply to complete the pending operation.
Stage 3. Replace the Old SSD with the New SSD
After cloning the SSD successfully, you can open your laptop’s back cover and then replace the old SSD with the new SSD. Here are detailed steps:
Step 1. Power off and disconnect.
Completely turn off your Samsung Galaxy Book 4 Pro and unplug it from the power source. Remove any external devices, such as a USB drive, mouse, or keyboard.
Step 2. Remove the back cover.
Flip the laptop over and locate the screws that secure the back cover. Carefully remove the screws using a small Phillips screwdriver, then use a plastic removal tool or guitar pick to gently pry the back cover off.
Step 3. Find your existing SSD.
With the back cover removed, you can access the laptop’s internal components. The SSD is usually located near the center of the motherboard and is secured by a single screw.
Step 4. Remove your old SSD.
Use a small screwdriver to remove the screws that secure the old SSD. Once the screws are removed, lift up the SSD and pull it out of the M.2 slot.
Step 5. Install the new SSD.
Align the new SSD with the M.2 slot and insert it into the slot, then press gently until it clicks into place. Secure the new SSD with the screws removed from the old SSD.
Step 6. Reassemble the laptop.
Place the back cover back on the laptop and align the screw holes. Insert the screws and tighten them using a screwdriver.
What to Do After Upgrading Samsung Galaxy Book 4 Pro SSD?
After completing the Samsung Galaxy Book 4 Pro SSD, you should do the following steps.
Step 1. Power on and Boot
After reassembling your laptop, turn on the power. You will find that your laptop should boot normally with all your data and settings intact.
Step 2. Install Drivers and Updates
Once your laptop is up and running, make sure to install the latest drivers for the SSD and other hardware components. You can usually find these drivers on the manufacturer’s website. Also, check for and install any Windows updates to ensure that your system is running smoothly and securely.
Step 3. Test SSD Performance
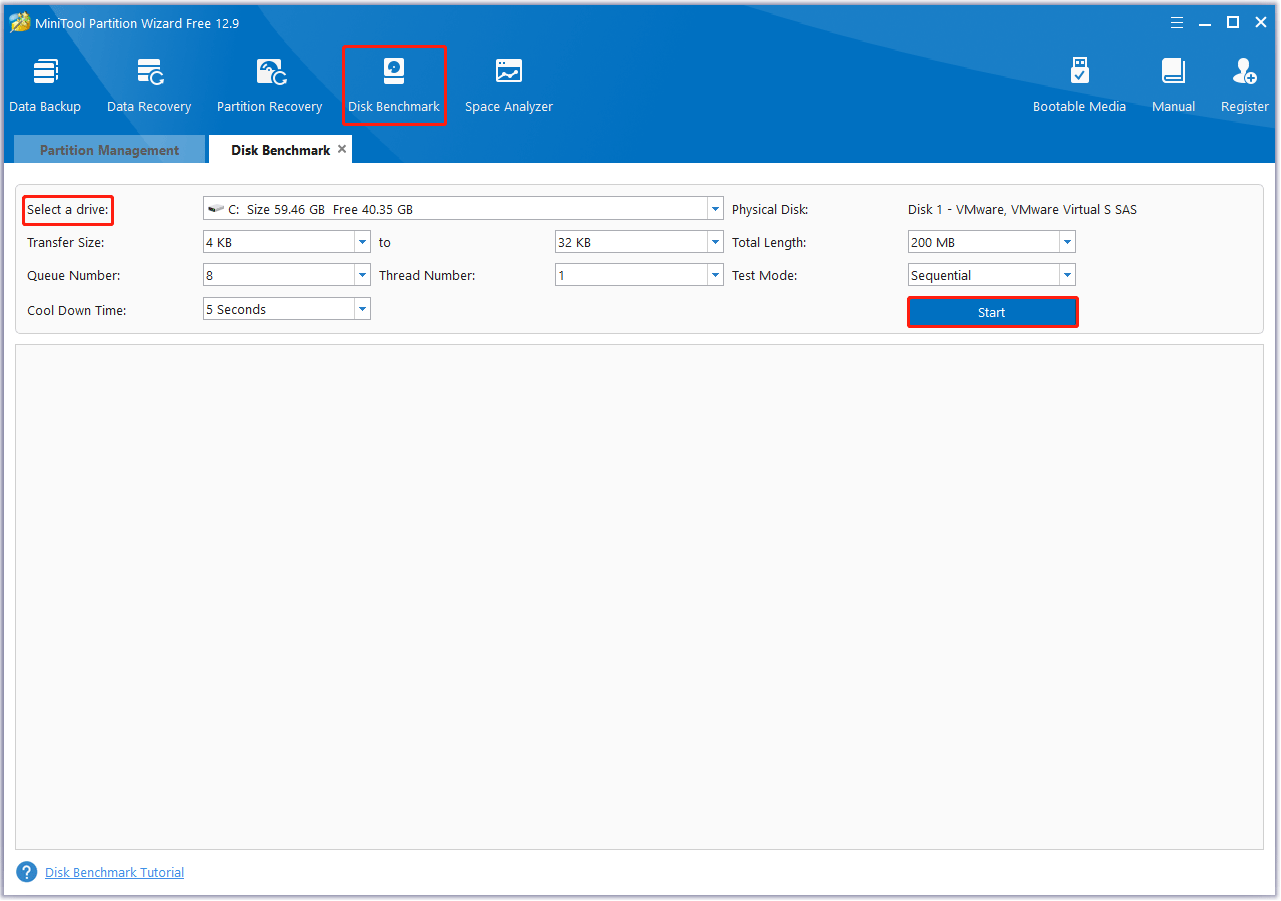
You can use the benchmark software – MiniTool Partition Wizard to test the read and write speeds of your new SSD.
MiniTool Partition Wizard FreeClick to Download100%Clean & Safe
Step 1: Launch MiniTool Partition Wizard to enter the main interface.
Step 2: Click on Disk Benchmark from the top toolbar, and then select the new SSD from the drop-down menu and specify its parameters based on your needs. After that, click on the Start button.
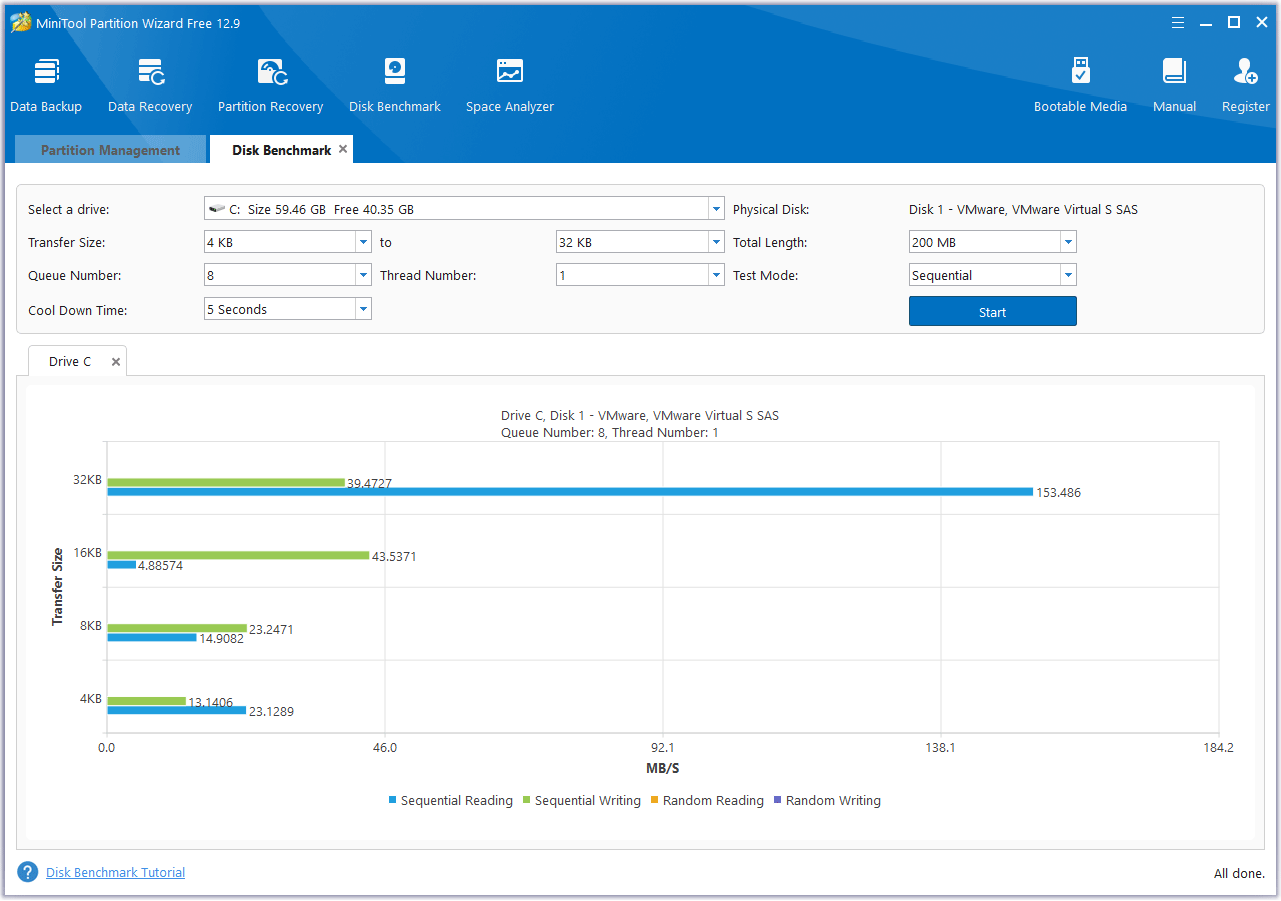
Step 3: Wait for some time to complete this disk benchmark. Once it ends, from this test result, you will know some important information, including transfer size, random/sequential read, and write speed.

Bottom Line
All in all, upgrading the SSD in your Samsung Galaxy Book 4 Pro is a relatively simple process. By choosing the right SSD, preparing for the upgrade, and following the installation steps carefully, you can significantly improve the performance and storage capacity of your laptop.
If you encounter certain issues while using MiniTool Partition Wizard, you can send us an email via [email protected] to get a quick reply.
About The Author

Position: Columnist
Vega enjoys helping people with computer problems, including disk management, data recovery, and more. She is constantly expanding her knowledge in related fields. And she will continue to bring more easy-to-understand professional articles to help people solve various problems on the PC.
User Comments :