How to perform the Tuya camera card format? For a similar need, you’re in the right place. MiniTool provides a guide on choosing and formatting a Tuya card and troubleshooting related issues.
Overview of Tuya Camera
The Tuya camera is a type of security camera that can be controlled and monitored through the Tuya Smart app. After connecting this camera to your home’s Wi-Fi network, it allows you to use your smartphone or tablet to remotely change settings, see live video, and get notifications.
You can use it for various purposes, such as monitoring your home, keeping an eye on pets, or checking in on elderly family members. Here are the main benefits of using Tuya Smart cameras:
- Effortless Compatibility with Smart Devices: Tuya cameras connect smoothly with various smart devices, forming a cohesive ecosystem.
- Accessible App Design: The Tuya app is user-friendly, assisting users through setup easily and providing simple access to live video, configurations, and cloud storage from any location globally.
- Enhanced Security Capabilities: Tuya provides strong protection through encrypted data transfer and secure cloud storage, guaranteeing that your footage stays secure even if the camera is breached.
- User-Friendly and Versatile: Tuya’s platform is easy to navigate and adaptable, serving both experienced users and newcomers.
How to Choose a Card for Tuya Camera
How to choose a card for Tuya camera? When you choose a memory card for Tuya camera, you need to consider these factors:
Writing Speed: You also need to consider the writing speed of the card. If your card’s writing speed is lower than 20MB/s, the video saved in the Micro SD card will be stuck and unclear.
Storage Capacity: Tuya camera only supports 8GB to 128 GB cards, based on the camera model. Therefore, you need to check your Tuya camera model and find out what size your Tuya camera supports.
Card Type: Tuya camera only supports TF card/MicroSD cards.
![[Full Guide] How to Choose and Format Trail Camera SD Card?](https://images.minitool.com/minitool.com/images/uploads/2025/03/trail-camera-sd-card-format-thumbnail.png)
How to Format Tuya Camera Card
Tuya Smart Cameras primarily support the FAT32 file system on their cards. Therefore, after choosing a proper memory card for the Tuya camera, you may consider formatting the Tuya camera card to FAT32 to prepare for recording. No worries. This section offers two useful methods to help you perform the Tuya camera card format.
Method 1. Use MiniTool Partition Wizard
To format a Tuya camera card on a Windows computer via a card reader, I highly recommend MiniTool Partition Wizard for you because it is an expert and free SD card formatter that can format the card to FAT32, exFAT, NTFS, Ext2/3/4 with ease.
What’s more, MiniTool Partition Wizard offers a wide range of features to effectively manage your partitions and disks. For instance, you can use it to convert MBR to GPT, rebuild MBR, partition hard drive, check disk for errors, perform hard drive data recovery, etc.
Here’s how to use MiniTool Partition Wizard’s Format Partition feature to perform Tuya camera card format:
Step 1. Connect the card to your PC via a card reader.
Step 2. Click the Download button to download the MiniTool Partition Wizard installation package. Run the .exe file and follow the on-screen instructions to install it on your PC. Then, launch this app to enter the main interface.
MiniTool Partition Wizard FreeClick to Download100%Clean & Safe
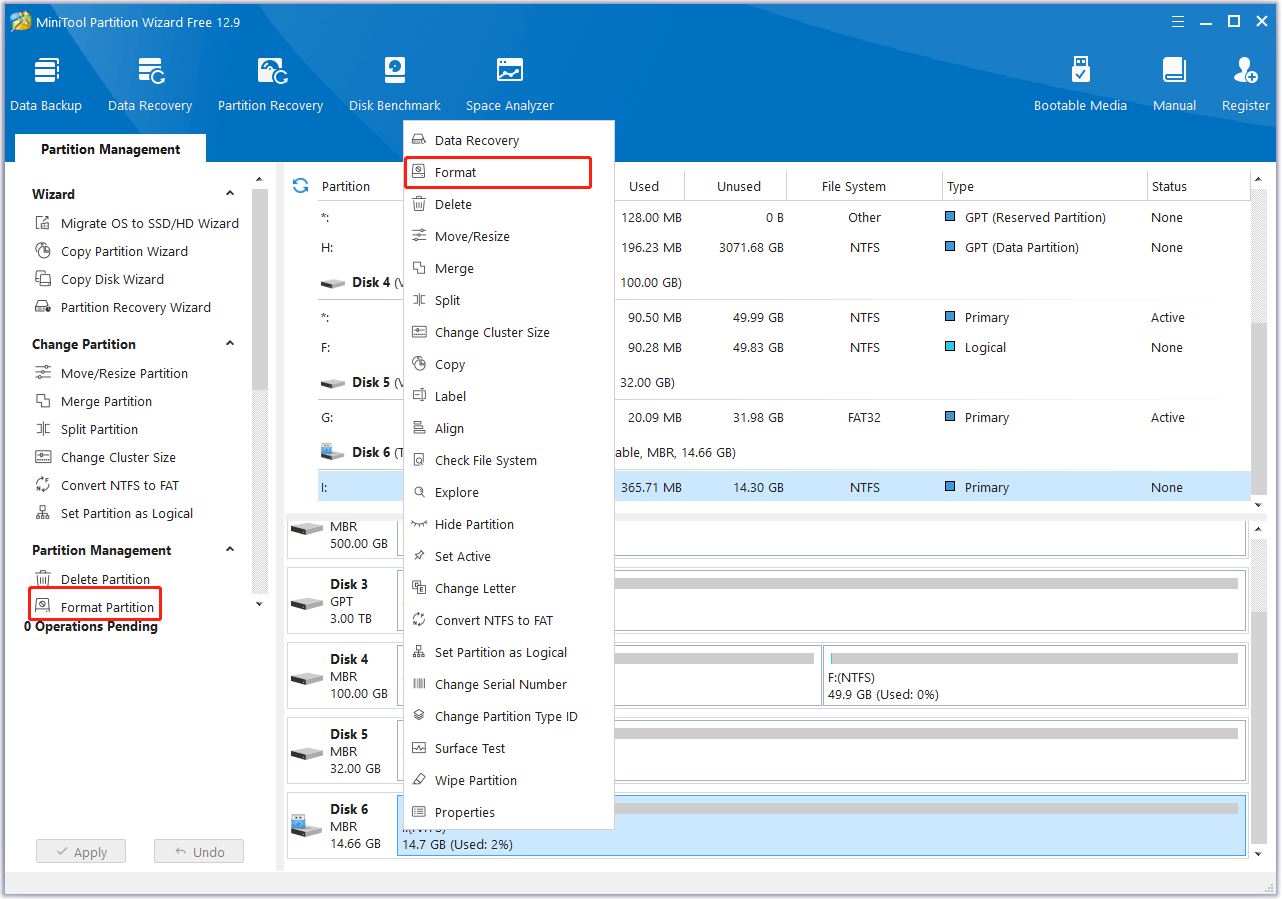
Step 3. Choose the card from the disk map, right-click it, and select Format from the pop-up menu. You can also select Format Partition from the left panel.
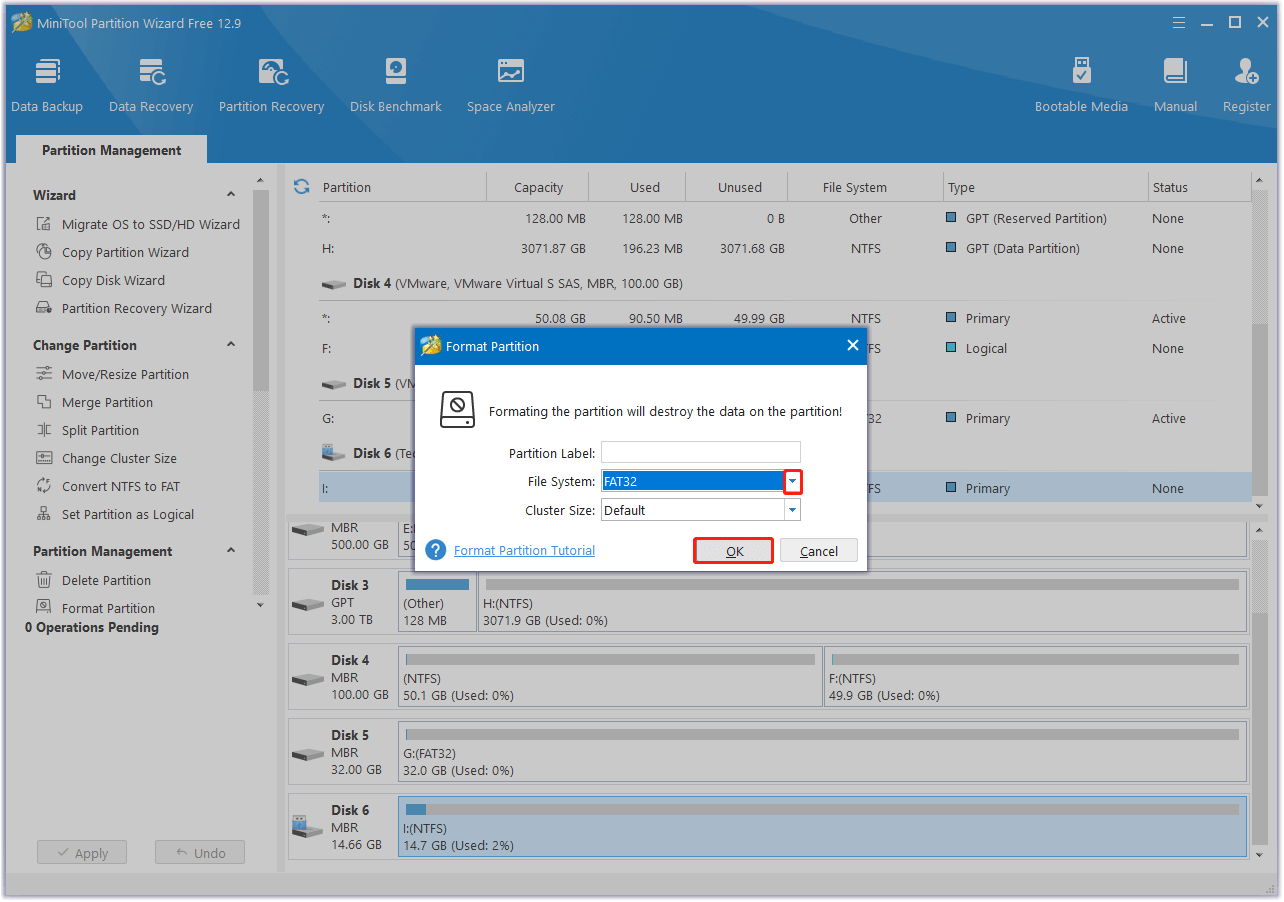
Step 4. In the Format Partition window, click the down arrow of File System to select FAT32 from the drop-down menu, set Partition Label and Cluster Size for the card. Then, click OK to continue.
Step 5. In the main interface, click Apply and Yes sequentially to execute all the pending operations.
Method 2. Format Tuya Camera Card via App
You can also use the Tuya app to perform the Tuya camera card format. But before you do that, you need to prepare for the Tuya smart camera setup with your mobile phone. Here are the detailed steps:
- Power on your camera and make sure it’s in pairing mode. At this time, you can see the LED indicator blinking rapidly, meaning it’s ready to connect.
- Open the Tuya Smart app on your mobile device and tap on the “+” icon to add a device.
- Next, select the “Security Camera” category.
- Choose the QR Code mode from the options.
- Hold your phone’s screen up to the camera lens so it can scan the code. When the scan is successful, the camera will make a sound.
- Once connected, give your device a name and assign it to a room.
Once you connect your mobile phone with the Tuya camera, you can follow the steps to use the Tuya app to format the card:
- Launch the Smart App on your phone.
- Select the camera that you want to format its card.
- Tap on the three dots in the top right corner.
- Tap on Storage Settings.
- Then, tap on Format.
- Once done, you can format the Tuya camera card successfully.
Common Tuya Camera Issues and Fixes
However, people may encounter various issues while using the Tuya camera as well. In this section, I summarize some common issues and fixes. If you are experiencing any issues here, you can follow the guide listed below to fix the issue on your own.
Tuya Camera Won’t Connect
The “Tuya camera won’t connect” issue can be triggered by Wi-Fi interference, wrong credentials, or a simple oversight. If you encounter the same issue when using the Tuya camera, don’t worry. To fix the issue, you can try the following ways:
- Check your Wi-Fi network: If your Tuya camera is out of the range of your Wi-Fi network or you type the wrong Wi-Fi password, you can encounter the Tuya camera won’t connect issue easily. To solve that, you just need to move your Tuya camera closer to the router (or use a Wi-Fi extender) and re-enter the right Wi-Fi password.
- Make your Tuya camera connect to the right network: You should connect your camera to a 2.4GHz network instead of a 5GHz network. Note that only the device manual clearly states that devices that support 5GHz wireless networks can connect to 5GHz wireless networks.
- Reset your camera: Find the Reset button on the back of the Tuya camera, hold it for about 10-15 seconds to reset the camera.
- Use the mobile hotspot: You can also try disconnecting the Wi-Fi connection, connect the Tuya camera to a mobile hotspot as a temporary network, and check if the issue is fixed. If it is, your router may be the culprit of the issue. Then, you need to check and fix it.
Tuya Camera Keeps Going Offline
The “Tuya camera keeps going offline” is also one of the most common issues. When you encounter this issue, you can try the following solutions:
- Check the power supply of the Tuya camera: Ensure you plug in all the cables securely and are receiving adequate power.
- Ensure your Wi-Fi signal is stable: You can move your router closer to the Tuya camera or use a Wi-Fi extender.
- Check if the Tuya camera firmware is updated: The latest updates can fix many basic bugs.
Tuya Smart Camera Not Recording
The “Tuya smart camera not recording” issue can mainly be caused by storage settings, an improperly inserted SD card, or an incorrect camera configuration. In this case, you can try these fixes to solve it:
- Verify storage settings: Incorrectly set camera storage options can lead to problems. To resolve this, access the Tuya Smart app, go to your camera settings, and check that recording is turned on.
- Examine the TF/Micro SD card: If the SD card is loose or not formatted, it may stop the camera from recording. Ensure it is securely inserted and properly formatted.
- Activate cloud storage: For cameras with cloud storage capabilities, and if you are subscribed, confirm that cloud recording is enabled in the app settings.
- Update firmware: Occasionally, issues with recording can be fixed through a firmware update. Look for any updates available in the app and install them as necessary.
Tuya Camera Not Recognizing the Card
If you encounter the “Tuya camera not recognizing the card” issue, you can try these ways to fix the issue:
- Check whether your card is compatible with your camera.
- Check whether you’re using a high-quality MicroSD card from a reputable security camera manufacturer.
- Check whether the card is Class 10 or above.
- Check whether the card has a storage capacity between 8 GB and 128 GB.
- Check if the format of the MicroSD card is FAT 32.
- Try using the camera’s settings menu to format the memory card.
- Try removing the card from the camera and inserting it again to check if the issue has been resolved.
- Connect the support of the Tuya camera or card manufacturer to troubleshoot the issue.
In Conclusion
How to choose a card for Tuya camera? How to perform Tuya camera card format? After reading this post, you may already know the answer. This post introduces a comprehensive guide about choosing a Tuya card, formatting the chosen card, and fixing the related issues.
What’s more, if you have any suggestions or encounter issues while using MiniTool Partition Wizard, you can contact us by emailing [email protected]. We will send back the replies as soon as possible.
Tuya Camera SD Card Format FAQs
Note: For some camera models, you can also press the small reset button located on the back or bottom of your camera (if available) to reset your Tuya camera.
1. Open the Tuya app on your mobile phone.
2. Log in to your account with the right credentials.
3. Tap on the camera that you would like to reset in the app.
4. In the camera’s settings page, tap on More at the top right corner of the screen.
5. Then, select the Basic Info option.
6. Tap on the Reset Device option.
7. Tap on OK to proceed with the reset, and then the camera will start the reset process.
8. Tap on OK again to confirm the reset.
9. Once done, you can reset your Tuya camera successfully.
1. Open the Tuya app.
2. Find the camera that you want to view the playback.
3. Click it to enter the device’s video preview page.
4. Then, click the Playback button.
5. Select the date and time to view the recordings for that period.
If the camera videos are on Cloud Storage, you can do the following steps:
1. Open the app.
2. Click on the camera device for which you want to view the stored videos.
3. Find Cloud Storage in the bottom function area to enter.
1. Power on your device by connecting it to a power source.
2. Launch the App and tap the “+” icon in the upper right corner of the home screen to add your device.
3. On the net-pairing page, choose the product type.
About The Author

Position: Columnist
Charlotte is a technology columnist with a strong focus on the Windows operating system, specializing in disk management, backup, and data recovery. She is passionate about analyzing computer errors, identifying root causes, and delivering practical solutions. In her free time, she stays updated on the latest developments in computer systems and hardware while continuously learning new technologies to broaden her expertise. Her writing style is clear and easy to understand, making complex technical topics accessible even to users with limited computer knowledge.
User Comments :