Checking Files System on C
It is very common to encounter some problems when booting your computer. Checking your file system on C is one of the troublesome issues you might face and it can even lead to system crashes sometimes. Here is the complete information you might receive:
Checking files system on C:
The type of the file system is NTFS.
Volume label is LOCALDISK.
One of your disks needs to be checked for consistency. You may cancel the disk check, but it is strongly recommended that you continue.
Windows will now check the disk.
To stop disk checking, press any key within xx seconds.
Note: C: refers to the main hard disk partition that contains the Windows operating system. If the system you are running is installed in D drive, you will receive checking file system on D.
This autodisk check process will be initiated when your computer was not shut down correctly or if something went wrong at the last shutdown. Most of the time, it might be a routine to check the consistency of the hard drive, so you don’t need to worry about it. However, if checking file system on C the type of the file system is NTFS appears whenever the computer boots, you are supposed to figure out the reasons. Here, we have collected several potential reasons for you.
Cause 1: Incorrect Shutdown
If your Windows device shuts down suddenly due to some unexpected factors such as power outage, equipment failure and more, the checking file system on C screen will crop up after restarting it. At the same time, you might also receive this error when removing a USB flash drive improperly, for example, unplugging the USB drive directly while it is saving data without hitting the Safely Remove button.
Cause 2: Corrupted File System
Another possible reason for checking file system on C is file system corruption. If this is the case, the file, directory and disk structure will also be corrupted and unreadable.
Cause 3: Bad Sectors
Maybe there are some bad sectors on the hard disk hence leading to the occurrence of checking file system on C. A bad sector refers to an area of the storage device that is damaged permanently. Once the sector is corrupted, all the data on it may lose and it is unable to store data anymore.
How to Fix Checking Files System on C on Windows 7/8/10/11?
In view of different conditions, we will show you the corresponding solutions to get rid of checking file system on C.
Shut Down Your Computer Properly
Here are some tips on how to shut down your computer properly:
- Don’t press the physical power button directly to turn off your computer.
- Avoid running too many programs at the same time, or else it might arouse an accidental shutdown or system crash.
- Make sure to terminate all the running programs before powering off.
- Remove your USB drive until it completes the task by hitting Safe Remove.
Check File System Errors
Microsoft provides you with an inbuilt disk check utility to help you find and fix the file system errors. Even if some errors are hard to handle, it will show you detailed error information.
Step 1. Press Win + E at the same time to evoke File Explorer.
Step 2. Click on This PC and right-click on Local Disk (C:) to select Properties in the drop-down menu.
Step 3. Under the Tools tab, tap on Check. (In Windows 7, hit Check now.)
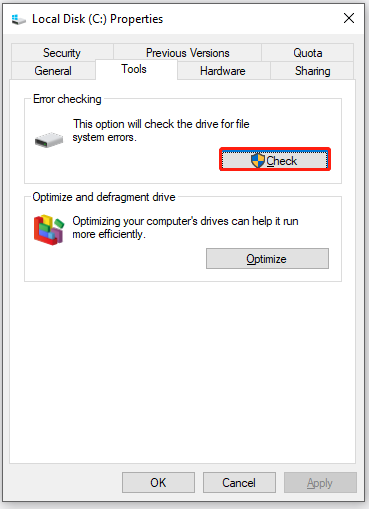
Step 4. Click on Scan drive to start the scanning. (In Windows 7, check the Fix the system errors automatically option and press Start.)
Tip: Most file system errors can be fixed by this method. For more solutions on file system errors, you can see this guide - File System Error - Solutions to Deal with it Quickly.
Find and Fix Bad Sectors
If there are bad sectors on the hard drive, you may be also stuck in Checking file system on C when the computer boots up. In this condition, CHKDSK will help you out. This is an inbuilt tool in Windows which enables you to check & fix disk for errors such as bad sectors, cross-linked files, lost clusters, and directory problems. Here’s how to get rid of checking file system on C NTFS with it:
Tip: Before performing disk checking and repairing, we sincerely advise you to create a backup for your data with MiniTool ShadowMaker to secure the important files and folders.
MiniTool ShadowMaker TrialClick to Download100%Clean & Safe
Step 1. Type cmd in the search bar to locate Command Prompt and right-click on it to choose Run as administrator.
Step 2. Type chkdsk /f/c: and hit Enter. The /f parameter means to find and fix any errors on the hard disk.
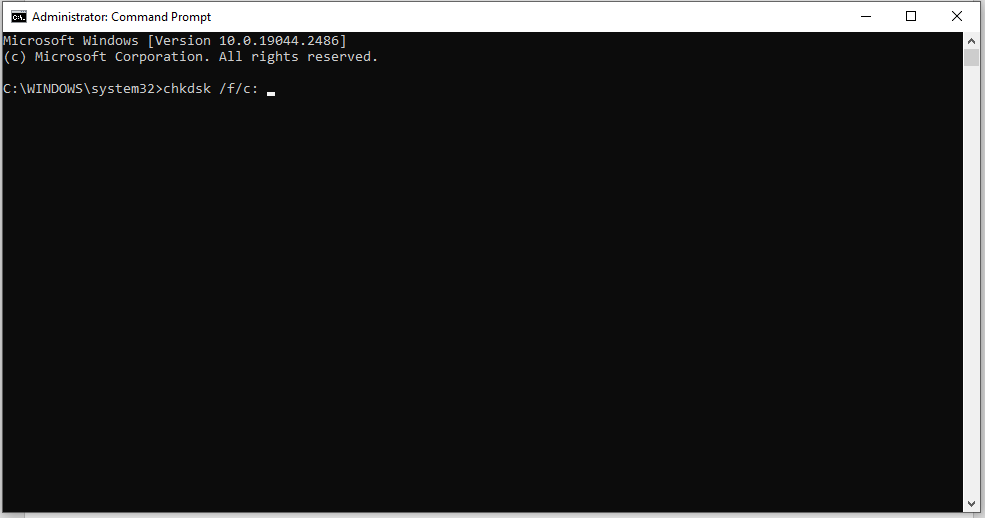
Step 3. After the process is complete, type chkdsk C: /r and hit Enter. The /r parameter can help you to detect & locate the bad sectors on the target disk, and even attempt to recover the readable information from the bad sectors.
Step 4. Now, reboot your computer to see if checking file system on C disappears.
Stop Autodisk Check Manaully
After fixing file system errors and bad sectors on your computer, you may not receive checking file system on C again. If you are afraid to get this error message, you can disable autodisk check manually. There are 3 ways for you to choose from: via Registry Editor, Control Panel, and Command Prompt.
# Way 1: Modify the Registry
First, you can stop the autocheck on C drive by modifying the registry on Registry Editor.
Warning: You had better create a backup for the registry database before making any changes to Registry Editor. By doing so, you can easily restore the registry from the backup when something goes wrong.
Step 1. Press the Win key + R to launch the Run dialog.
Step 2. Type regedit and hit the Enter key to open Registry Editor. If prompted by User Account Control, click on Yes to grant the permission.
Step 3. Move to the following path and expand the entries on the left-hand pane:
HKEY_LOCAL_MACHINE\SYSTEM\CurrentControlSet\Control\Session Manager
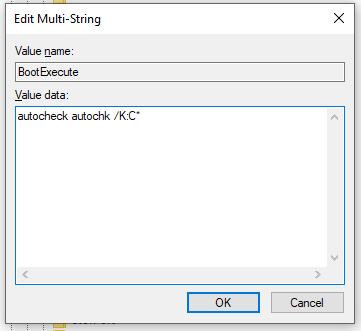
Step 4. Find BootExecute in the right-hand panel and right-click on it to choose Modify in the drop-down menu.
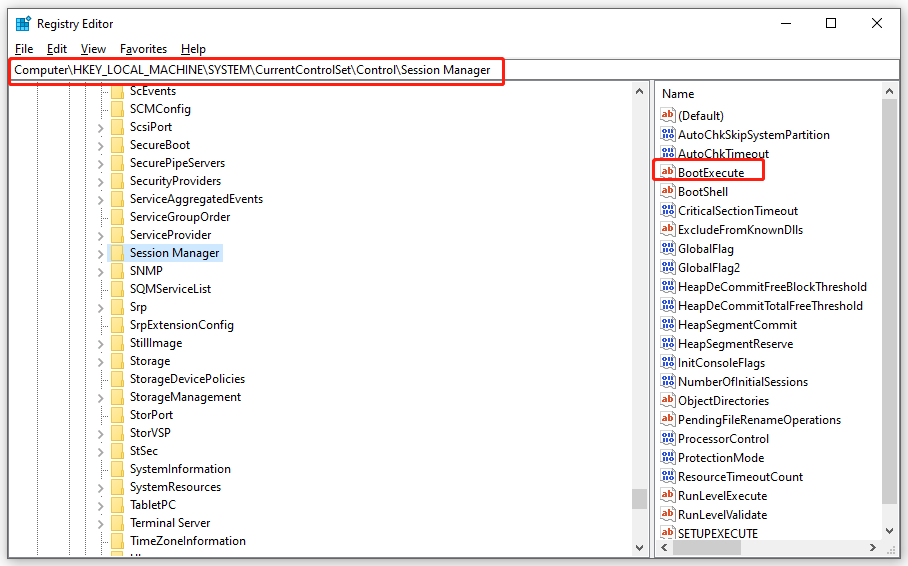
Step 5. Under Value data, type /K:C before * to disable checking file system on C and press OK to confirm this action.
Tip:
- * indicates that every drive is checked for consistency.
- The /K:C parameter can help you to disable the automatic file check on C drive when Windows starts.
Step 6. Quit Registry Editor.
# Way 2: Disable Autochk via Administrative Tools
Another option is to disable Autochk from the scheduled tasks list. Here’s how to disable checking file system on C via Task Scheduler.
Step 1. Hit the Start icon and go to Control Panel.
Step 2. Click on System and Security and then scroll down to hit Administrative Tools.
Step 3. Find Task Scheduler and double-click on it. Expand the following folders: Task Scheduler Library > Microsoft > Windows.
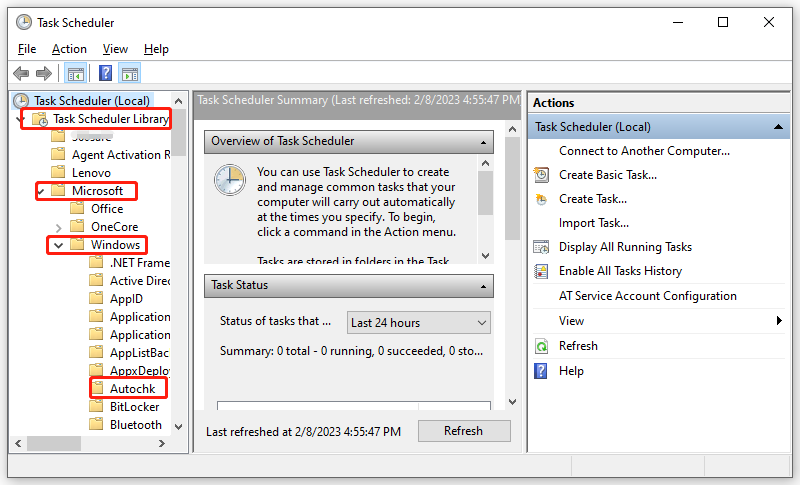
Step 4. Find Autochk and double-click on it to choose Disable from the right-hand pane.
Tip: What if your Task Scheduler is not working? Go to this guide - 7 Tips to Fix Task Scheduler Not Running/Working Windows 10 and all your worries will be gone.
# Way 3: Run CHKNTFS in Command Prompt
CHKNTFS, also known as check NTFS, is a windows command line that displays or modifies automatic disk checking when the computer is started. Here’s how to remove checking file system on C via it:
Step 1. Run Command Prompt as an administrator.
Step 2. Type chkntfs /x c: and hit Enter.
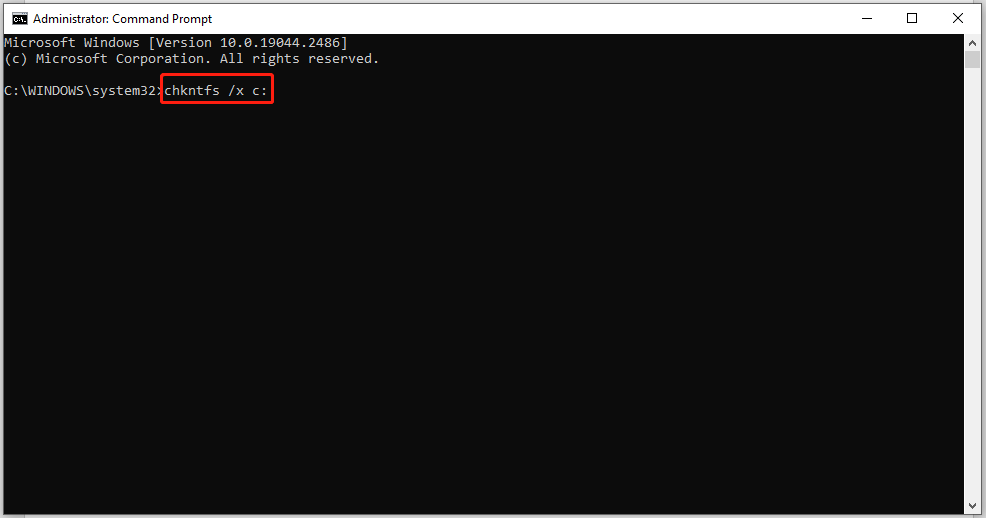
Tip: The /x parameter means that one or more partitions will be excluded from checking when your computer boots up.
Suggestion: Back up Your C Drive Before Proceeding
Now, your computer can boot up without checking files system on C. As you can see, it is hard to find the specific reason why your computer goes wrong most of the time, let alone the corresponding workarounds. Therefore, it is essential to create a backup of your system so that if anything goes wrong during the process, you can use the backup to restore the system back to the work state. Here, we propose to back up your system with a piece of reliable backup software – MiniTool ShadowMaker.
This free tool is designed to provide data protection and disaster recovery solutions for Windows devices. It supports backing up your important files/folders, selected partitions, operating systems, and even the whole disk on Windows 7/8/10/11 and Windows Server 2008/2012/2016/2019/2022. What’s more, MiniTool ShadowMaker is user-friendly and you can just back up your data just within a few steps. Here’s how to back up your C drive with its one-click system backup solution:
Step 1. Download, install and launch this program.
MiniTool ShadowMaker TrialClick to Download100%Clean & Safe
Step 2. Click on Keep Trial and go to the Backup page.
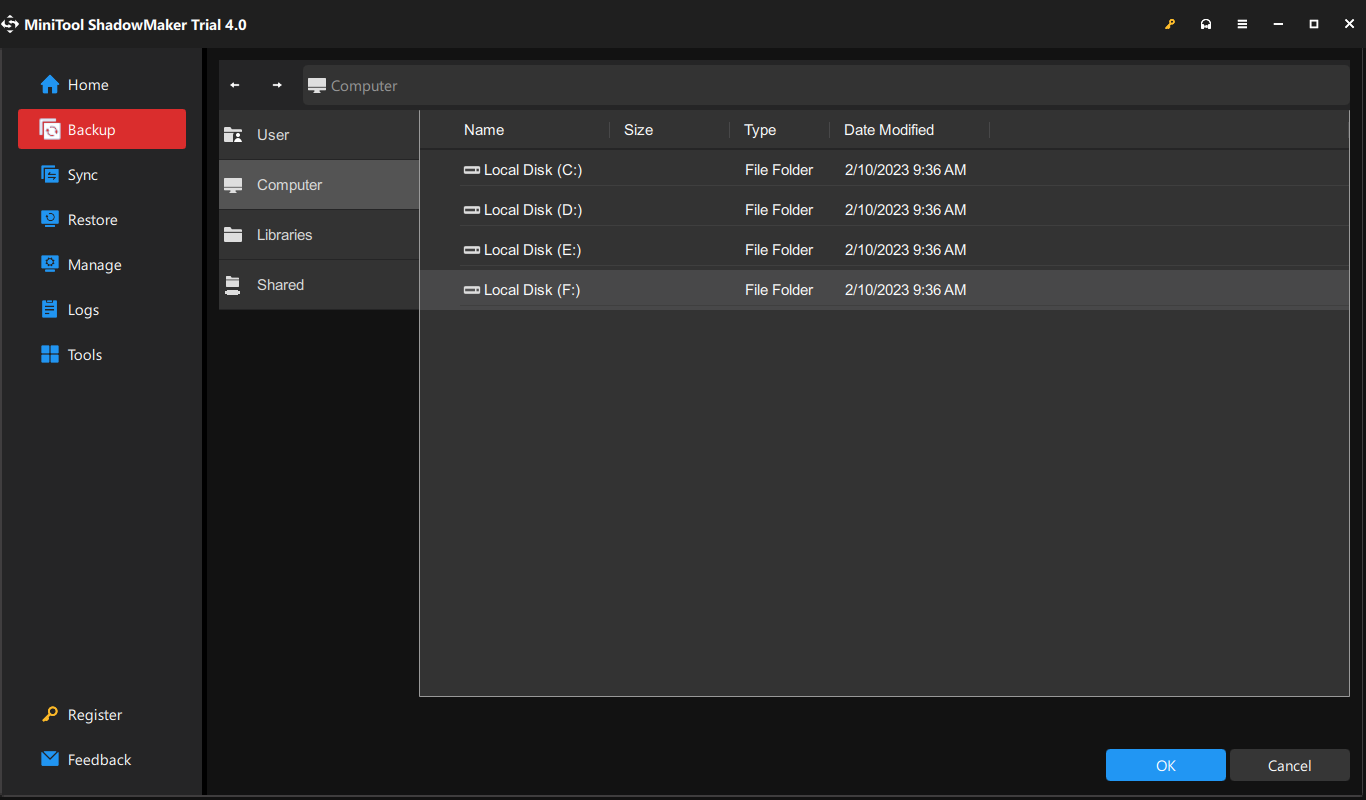
Step 3. In SOURCE, you can see the system required partitions are selected by default. Therefore, you only need to choose a storage path for your backup image in DESTINATION.
Step 4. Either hit Back Up Now to start the backup or press Back Up Later to delay the process. Once you choose Back Up Later, you can start the delayed task in the Manage page.
Then, you need to create a bootable drive with MiniTool ShadowMaker:
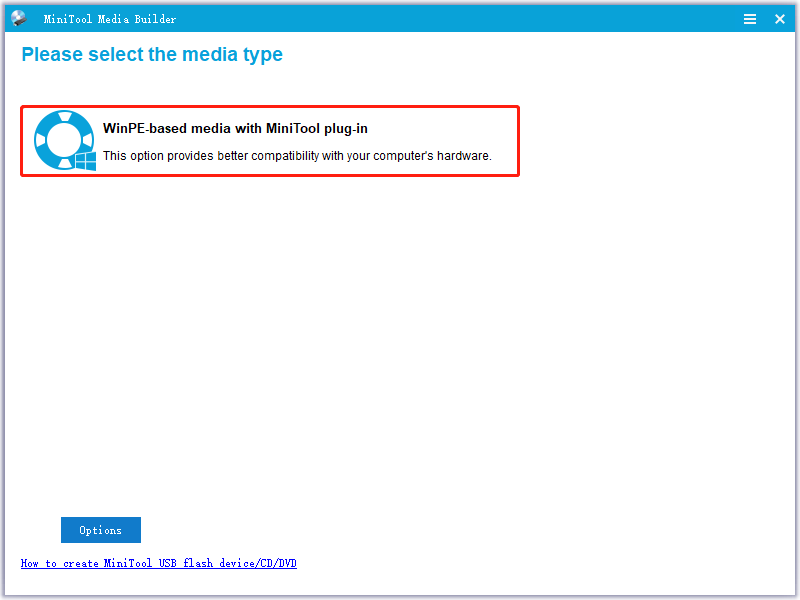
Step 1. Go to the Tools page and hit Media Builder.
Step 2. Click WinPE-based media with MiniTool plug-in and choose USB Flash Disk. When your computer fails to boot, you can boot it from this USB drive and perform a system recovery.
We Need Your Voice
By now, you must stop checking files system on C successfully with the solutions mentioned in this article. More importantly, you still have a risk of encountering the same issue again or making some mistakes during the troubleshooting process, resulting in data loss, hard drive failure or system crash.
In consequence, it is necessary to back up your system with MiniTool ShadowMaker to secure your system. For further queries about our product or the solutions in this article, welcome to leave your ideas in the comment zone or contact us via [email protected].
Checking Files System on C FAQ
Launch File Explorer > hit This PC > right-click on the drive you want to check > choose Properties > check the file system under the General tab.
Fix 1: Check Sectors for Your Hard Drive via MiniTool Partition Wizard.
Fix 2: Run Disk Check
Fix 3: Run SFC
Fix 4: Run A Virus or Malware Scan
Fix 5: Perform System Restore
Way 1: Change the Registry
Way 2: Use Control Panel
Way 3: Run CHKNTFS
User Comments :