
"The drive is not a valid backup location" can occur when backing up your system to a USB drive using Backup and Restore. This guide explains why the error occurs in Windows 11 and 10 and provides effective solutions.
Quick Answer
“The drive is not a valid backup location” is an error message in Windows 11/10 that appears when backing up the system to a USB drive. Backup and Restore rejects a USB flash drive as a destination for a system image.
To solve this issue:
- Use a supported backup tool
- Use an external hard drive instead of the USB drive
- Share the USB drive as a network drive
The Drive Is Not a Valid Backup Location Windows 11/10
Windows includes a built-in backup tool, Backup and Restore (Windows 7), which allows you to create a system image.
After choosing a USB storage device as the storage path, a message says “This drive cannot be used to store a system image because it is not formatted with NTFS“. Then, the drive is formatted to NTFS. But another error appears “The drive is not a valid backup location“.
Why Isn’t USB a Valid Backup Location
The error usually appears due to a limitation of Backup and Restore (Windows 7). It doesn’t support USB flash drives or thumb drives as the storage location for a system image, even if the drive uses NTFS.
However, backing up files to a USB drive is supported. An external hard drive or network location can be a better choice for system image backups.
How to Fix The Drive Is Not a Valid Backup Location Windows 11/10
Choose the Right Fix
Check the table below to find the solution that best fits your situation quickly.
| Situation | Recommended Method | Difficulty |
| Want to back up Windows directly to a USB drive | Use backup software | Easy |
| Have an external hard drive available | Use the external drive instead of a USB drive | Easy |
| Must use a USB flash drive with Backup and Restore | Share the USB drive as a network location | Advanced |
Solution 1: Use Backup Software to Create a System Image on USB
If you still want to create a system image to your USB drive, consider using a reliable backup tool such as MiniTool ShadowMaker. As an alternative, it provides a simple way to back up your system to a USB drive.
It supports multiple storage locations, including external hard drives, flash storage devices, thumb drives, pen drives, NAS devices, and network locations.
Additionally, you can run it to create differential, incremental, and automatic backups for better PC protection.
MiniTool ShadowMaker TrialClick to Download100%Clean & Safe
Steps to back up Windows 11/10 to a USB drive:
Step 1: Insert the USB drive into your computer and launch MiniTool ShadowMaker.
Step 2: Go to Backup, and you can find that system drives are selected automatically as the backup source.
Step 3: Choose DESTINATION and select the USB drive as the target location.
Step 4: Click Back Up Now to begin the backup task.
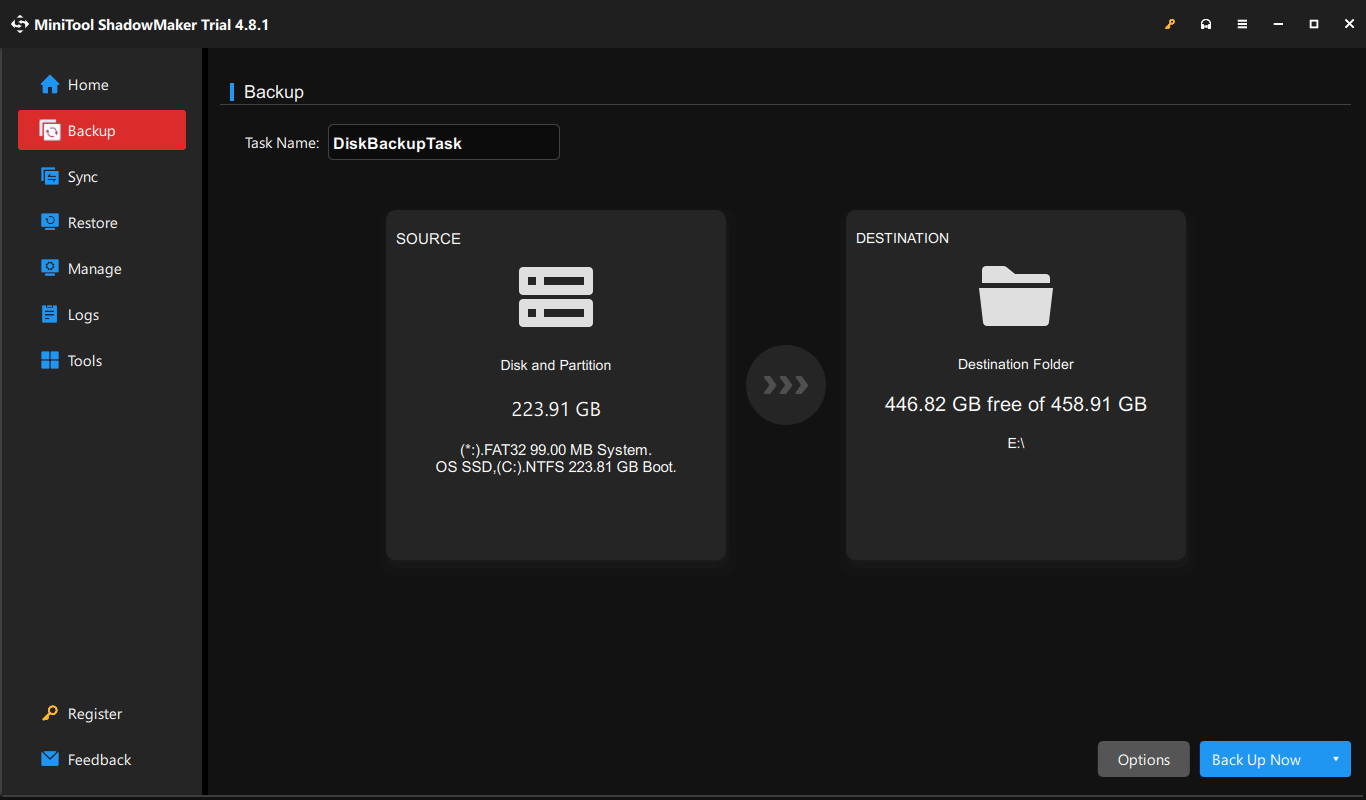
Within simple steps, you can easily and effectively create a system image on USB drive and without encountering the backup location error “the drive is not a valid backup location” in Windows 11/10.
In case of system issues, the created system image can be used to refresh your PC. Generally speaking, the system image recovery is quite easy as long as you get a bootable edition using MiniTool Media Builder.
Solution 2: Use an External Drive as the Backup Location
To fix “the drive is not a valid backup location”, the direct way is to use an external hard drive rather than a USB drive.
According to Microsoft, Windows supports external hard drives, DVDs, or network locations for creating a system image.
See how to back up Windows to an external drive:
Step 1: Go to Control Panel > Backup and Restore or Backup and Restore (Windows 7) > Create a system image.
Step 2: Choose the connected external HDD or SSD to save the system image.
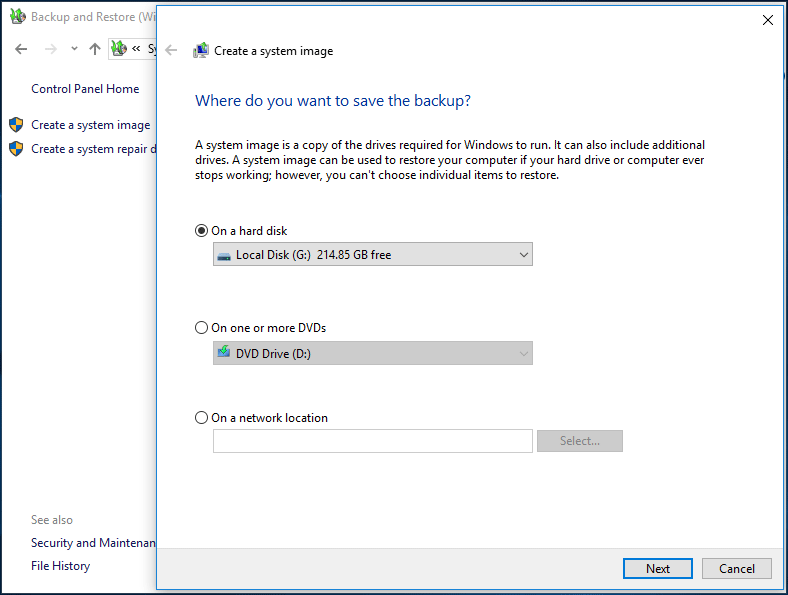
Step 3: In the pop-out window, you see the drives required for Windows to run are selected by default.
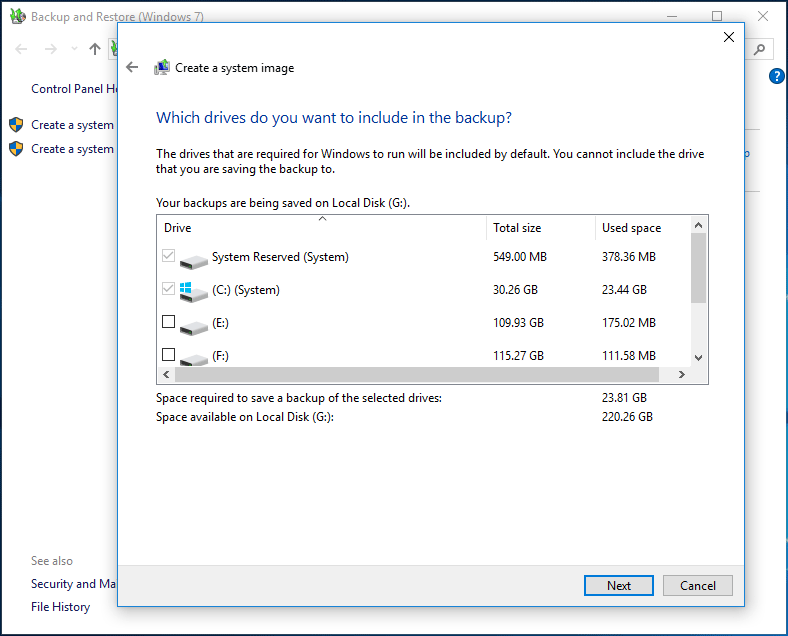
Step 4: Confirm your backup settings: backup location and backup drives. Then, click the Start backup button. This operation will take a few minutes, thus, wait patiently.
Sometimes Windows Backup fails to create a system image, for instance, it is stuck at 97%, 57% or 12%, create system image failed not enough disk space ( 0x80780119), etc.
When encountering one of these cases, it is troublesome to fix issues. Therefore, we strongly recommend using the third-party backup software – MiniTool ShadowMaker. Just follow the steps mentioned in solution 1 for system image creation.
Solution 3: Share USB as Network Drive and Continue the Backup
If you still want to use Windows Backup and Restore to create a system image on USB drive rather than an external hard drive, this solution is recommended. You can create a directory on a USB drive, share the drive as a network drive and continue the system image creation.
Step 1: Connect your USB flash drive to a computer.
Step 2: Format your USB drive to NTFS file system using Windows Disk Management or a third-party tool – MiniTool Partition Wizard.
Step 3: Share the USB stick as a network drive:
- Create a directory on your USB devices: open the USB partition, right-click the blank place to choose Folder from the New drop-down menu.
- Right-click the directory and choose Share with and Specific people.
- Share this directory to yourself from the list of users and click the Share button,
- Decide to turn on network discovery and file sharing for a private network or all public networks.
- Then, the folder you have created is shared. Click Done to continue.
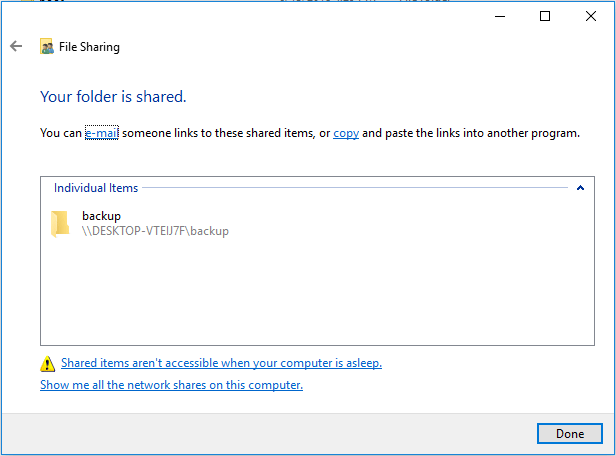
Step 4: Right-click the directory to choose Properties, and click the Advanced Sharing button under Sharing tab.
Step 5: In the pop-up small window, click Permissions to set all permissions to Full Control.
Step 6: Open Windows Backup and Restore (Windows 7) to choose Create a system image.
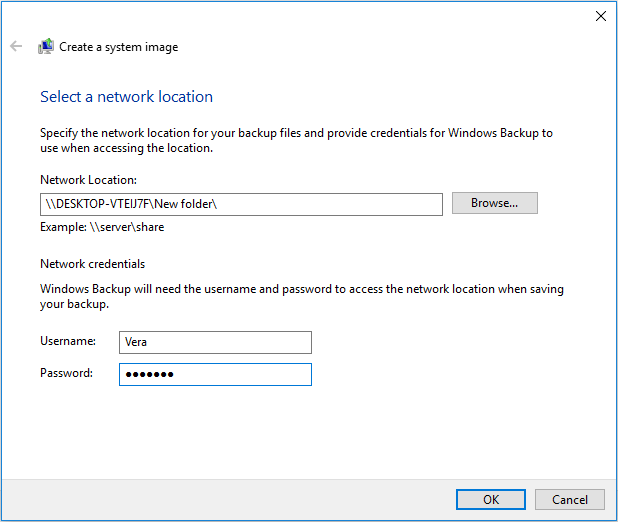
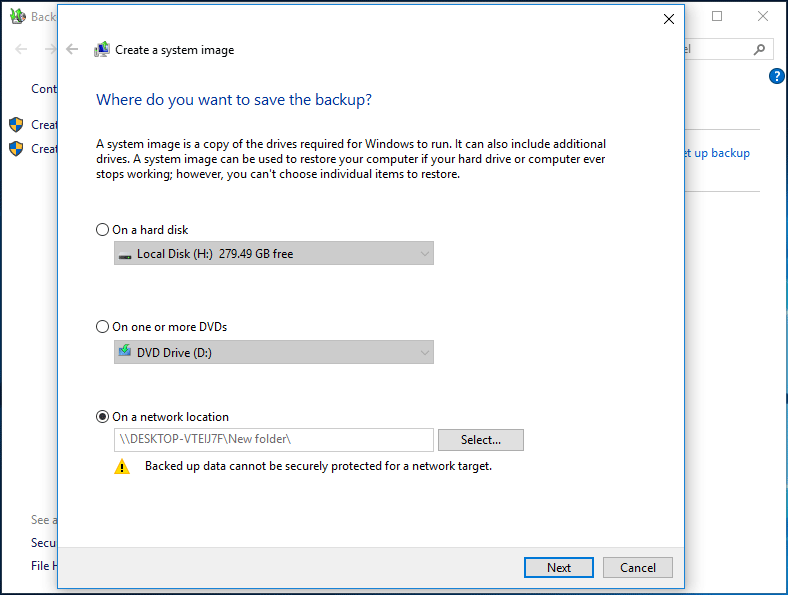
Step 7: Select the network drive as your backup location:
- Browse your computer and choose a network location.
- Enter the computer’s login credentials and click OK.
Step 8: Then, all the system drives are included in the backup.
Step 9: Confirm the backup settings. At last, start the backup.
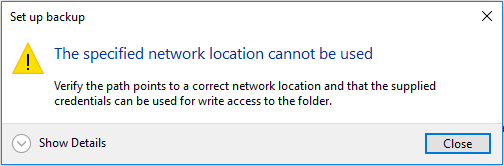
This method should work most of the time and you won’t encounter the error that says “the drive is not a valid backup location”.
Drive Is Not a Valid Backup Location in Windows 11/10: 3 SolutionsClick to Tweet
MiniTool ShadowMaker VS Windows Backup and Restore
In the sections above, we mention the all-around backup and recovery software – MiniTool ShadowMaker. Some of you may be wondering about the differences between this program and Windows snap-in backup tool.
Refer to the following table for a quick overview.
| Feature | MiniTool ShadowMaker | Windows Backup and Restore |
| Backup type | Disk/partition/system/file | File/system |
| Incremental & differential options | Yes | No |
| Scheduled backup | Yes | Limited |
| Storage location for system images | USB drives, external hard drives, NAS, and network locations | External hard drives, DVDs, and network locations |
Final Words
Reading until now, you must have successfully learned how to fix the error “the drive is not a valid backup location”. Now it’s your time to try out the above solutions.
If you have other workarounds for when the USB drive is not a valid backup location in Windows 10/11, tell us the troubleshooting steps in the following comment zone. As for any questions related to MiniTool ShadowMaker, please contact [email protected].
Drive Not Valid Backup Location FAQ
1. Windows treats USB drives as removable media.
2. System images require heavy writes that can cause cheap flash drives to throttle or fail.
3. In WinPE, standard USB flash storage drivers may not be loaded or accessible during image recovery.
About The Author

Position: Columnist
Vera has been working at the MiniTool Team for over 10 years as a technical editor and content writer. She mainly focuses on disk and partition management, data recovery, Windows backup and restore, and PC troubleshooting. Through in-depth software testing and hands-on experience, she has helped users solve a wide range of computer problems and better protect their data on Windows devices.
User Comments :