Backing up Windows 11 to an external hard drive is one of the simplest ways to protect your data and operating system. This step-by-step guide explains when to create a backup and how to back up Windows 11 using dedicated backup software and built-in Windows tools.
Quick Answer: How to Backup Computer to External Hard Drive Windows 11
When it comes to “Windows 11 backup to external drive”, the best practice is to create both a file backup and a system image backup for comprehensive protection.
Follow these steps:
1. Connect an external HDD or SSD to your computer.
2. Choose a backup method:
- Professional backup software such as MiniTool ShadowMaker for automatic and full disk imaging backups.
- Backup and Restore (Windows 7) for a system image backup.
- File History for personal files in the library.
3. Choose the backup source and select the external drive as the backup destination.
4. Run the backup.
When Should You Back Up Windows 11
Creating Windows 11 backups is essential for routine data protection and before major system changes such as upgrades, reinstallations, or hardware replacements.
This can effectively help prevent data loss from accidental deletion, system crashes, virus attacks, and drive failures, and simplify recovery when needed.
Common scenarios include:
- Before a system update or BIOS/firmware update.
- Before changing a motherboard.
- Before upgrading an SSD to an HDD.
- Before reinstalling Windows or factory resetting a PC.
- Before editing the Windows Registry or changing core system configurations.
- Backup for daily data protection.

What to Prepare Before Windows 11 Backup to External Drive
A successful backup requires a well-prepared system and an external drive. Insufficient storage, wrong drive types, or system detection errors can cause incomplete or failed backups.
To keep your data safe without interruptions, check these essential areas before proceeding.
External HDD vs SSD
External HDDs and SSDs can both be used to back up Windows 11, and the table below can help you choose the right option.
| Feature | External HDD | External SSD |
| Cost | Lower | Higher |
| Speed | Slower | Faster |
| Durability | Good | Better |
| Capacity | Excellent | Good |
| Best for | Long-term storage | Frequent backups |

Backup Preparation Checklist
Before backing up files and the system to an external hard drive, ensure everything is ready:
- Connect the external SSD or HDD to the computer and make sure the drive can be recognized.
- There is enough free space on the drive.
- Keep your laptop plugged into power to prevent interruption.
- Close programs that may be actively modifying files, such as Word, Excel, and video/photo editing software.
- Disconnect unnecessary USB devices.
How to Backup Windows 11 to External Hard Drive
Owning a backup copy of important files or creating a system image is always good. Keeping copies in a secure place is important in case something goes wrong with the originals.
If you get ready for Windows backup, follow the ways below now.
| Method | Backup type | Automatic backup | Difficulty |
| File History | File | Yes | Easy |
| Backup and Restore (Windows 7) | File/system | Yes | Medium |
| MiniTool ShadowMaker | File/system/partition/disk | Yes | Easy |
Here is a quick video guide:
Method 1: Back up Files in Windows 11 with File History
File History is a built-in backup tool in Windows 10 and Windows 11. With it, you can easily back up your folders including Music, Documents, Downloads, Pictures, Videos, Desktop, Contacts, OneDrive, etc.
See how to backup files on Windows 11 with File History:
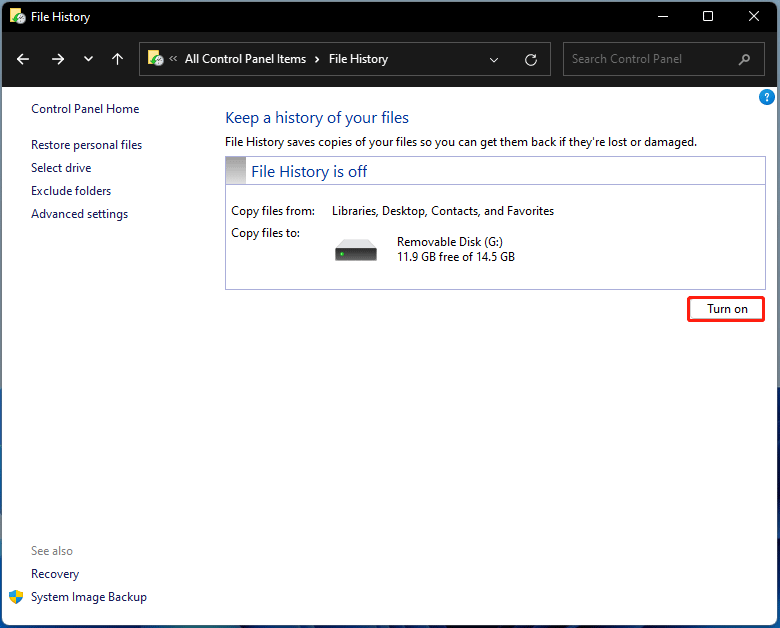
Step 1: Type Control Panel in the search box and press Enter.
Step 2: Set View by to Large icons and choose File History.
Step 3: Click Turn on and File History will start saving copies of your files so that you can restore them if they are damaged or lost.
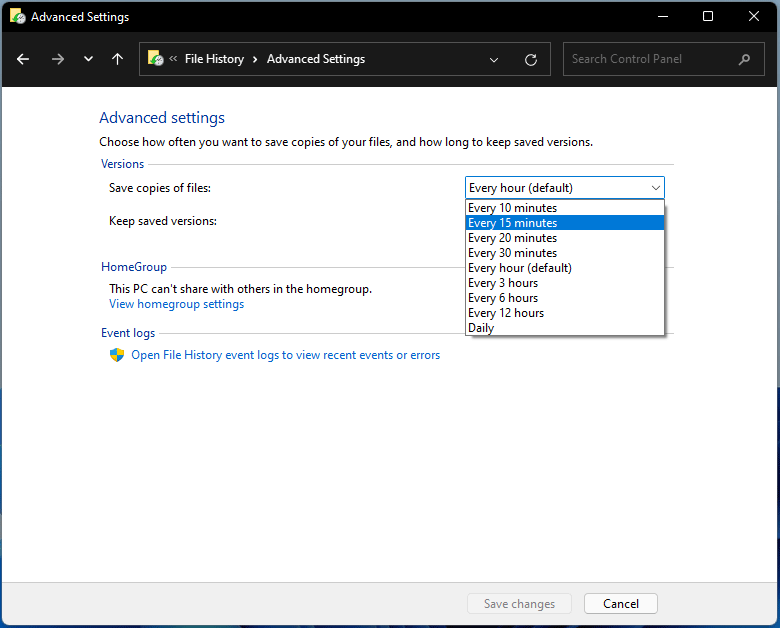
Windows 11 File History allows you to back up files automatically. By default, it can help you to back up files every hour. If you want to customize the setting, go to Advanced settings > Save copies of files and then select the frequency option. Finally, click Save changes.
Pros and Cons
| Pros | Cons |
| 1. Built into Windows. 2. Supports automatic backups. 3. Easy to configure. | 1. Only backs up files in the user folder. 2. Requires an external drive to remain constantly connected to your PC. |
Method 2: Backup Windows 11 to External Hard Drive via Backup and Restore
In Windows, there is another backup tool called Backup and Restore (Windows 7). With it, you can easily create a system image in Windows 11. In addition, files on your hard drive can be also backed up by this tool. Also, it supports automatic backup.
See how to back up Windows 11 to an external drive with Backup and Restore:
Step 1: Type control panel into the search box and click the result to open this tool.
Step 2: List all the items by large icons and then click the Backup and Restore (Windows 7) link to open this built-in Windows 11 backup tool.
System Image Backup Windows 11
A system image is very important in case the system fails to boot. If you have created one, you can easily restore the system to a normal state. Besides, if you install Windows 11 and it always has glitches and bugs, but the rollback option is not available after 10 days, the system image can help you go back to Windows 10 from Windows 11.
The following is how to create a Windows 11 image backup for the system.
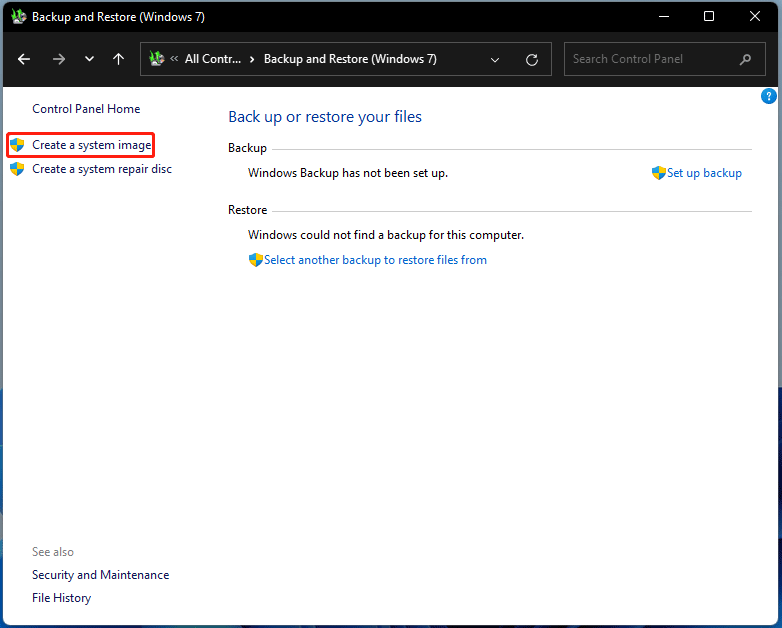
Step 1: In the Backup and Restore (Windows 7) interface, click Create a system image to continue.
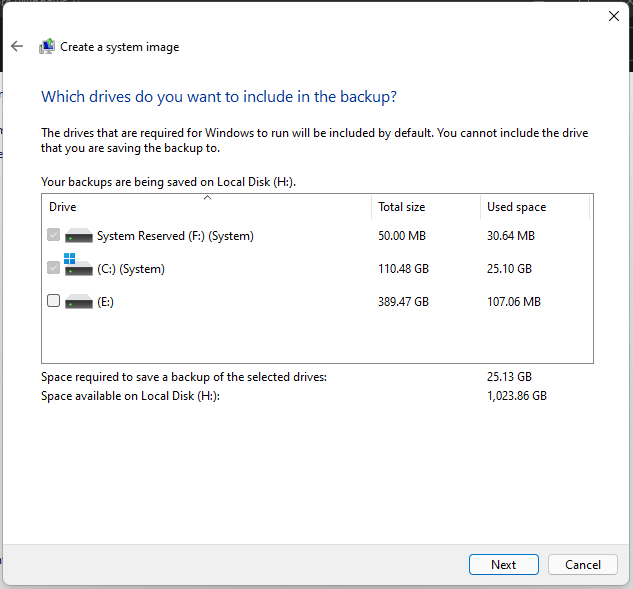
Step 2: Decide where to save the backup. To create a Windows 11 system image, you can choose an external hard drive, DVD, or a network location.
Step 3: Choose drives to include in the backup. By default, system-related partitions are selected. Just click Next to go on.
Step 4: Confirm your backup settings and then click Start backup. Then, Windows is starting the backup.
Back up Files in Windows 11 via Set up Backup
Backup and Restore (Windows 7) offers you a feature called Set up backup that allows you to back up files stored on the hard drives connected to your computer. Here is how to backup files on Windows 11 with this feature.
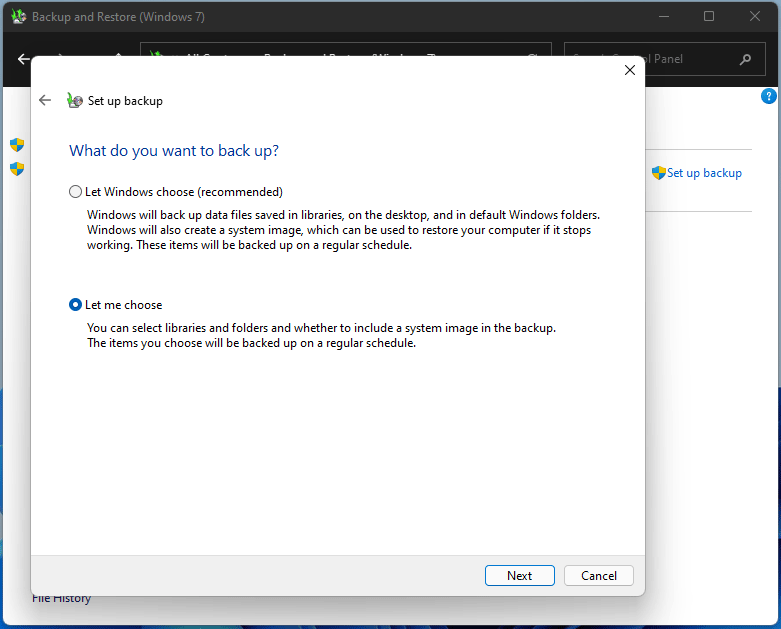
Step 1: Click Set up backup from the Backup and Restore (Windows 7) page.
Step 2: Choose the drive that you want to save the files to and click Next.
Step 3: Decide what you want to back up. If you check Let Windows choose, Windows will back up files in libraries, on the desktop, and in default Windows folders. Besides, a system image will be created. If you choose Let me choose, you can customize files that you want to back up and don’t create a system image. Here, we choose the second one.
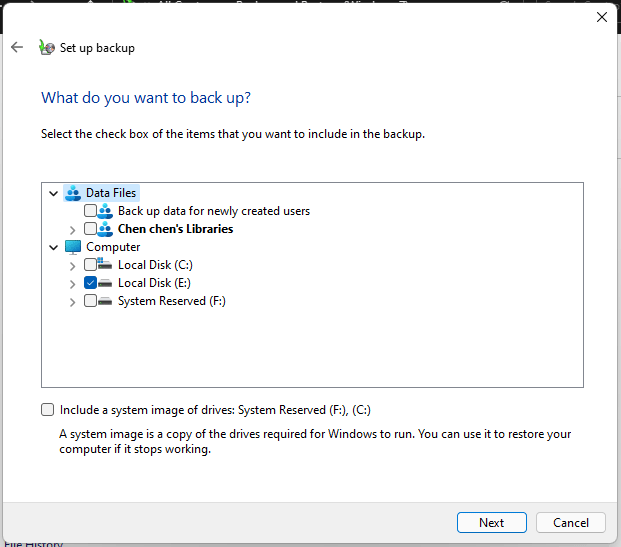
Step 4: Select the check box of the items you want to include in the backup. If you don’t want to create a system image of Windows 11, uncheck the box of Include a system image of drives.
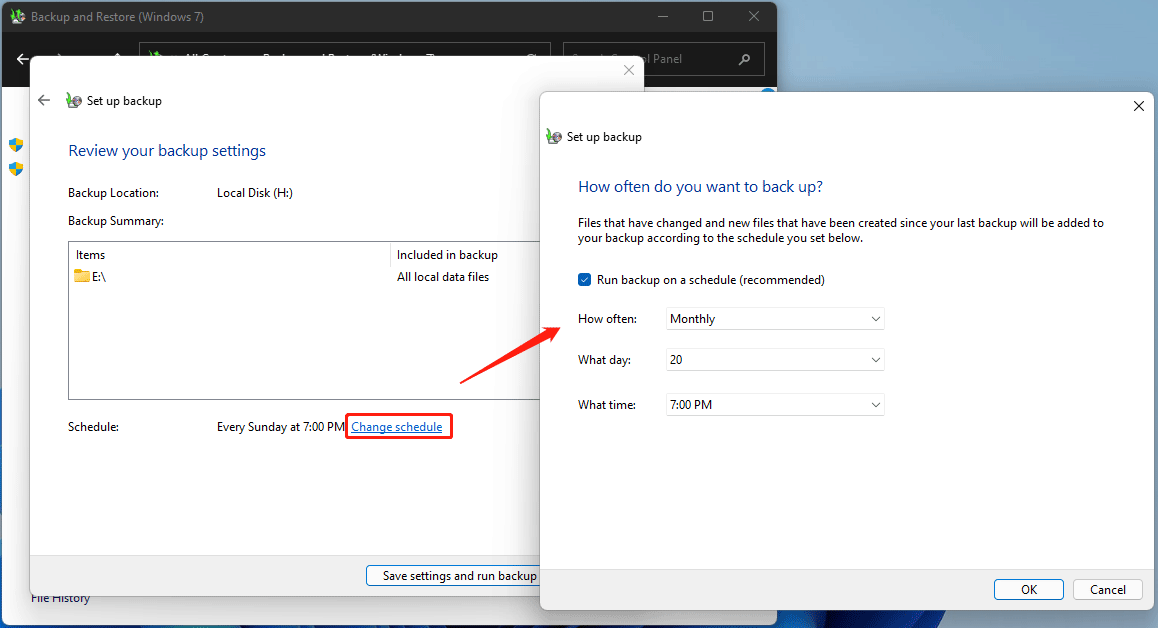
Step 5: Review your backup settings and then click the Save settings and run backup button.
This Windows backup tool helps back up your computer on a regular schedule. It has a default value. But you can customize the backup frequency by clicking Change schedule. Then, changed or new files since your last backup will be added to your backup according to the schedule you set.
After backup, you can manage backup space, change settings, restore Windows 11 backups, and more.
Pros and Cons
| Pros | Cons |
| 1. Free and native. 2. Offers full system protection. 3. Supports automatic backups. | 1. Lacks advanced features. 2. No built-in cloud backup support. |
Method 3: Back up Windows 11 with MiniTool ShadowMaker
MiniTool ShadowMaker, a professional and free Windows 11 backup software, can be used to make a computer backup within simple steps, including files, folders, systems, disks, and partitions.
It supports incremental backup & differential backup, and automatic backup (four options – daily, weekly, monthly, and on event). To manage backup disk space, you can easily delete old backup versions by customizing the backup scheme.
Compared to Windows 11 Backup and Restore, this backup software can offer various options and back up your PC in a flexible way. To know more information, refer to this post – Windows 10 vs Windows 11 Backup & Restore vs MiniTool ShadowMaker.
Now, click the following button to get MiniTool ShadowMaker Trial Edition and free try it within 30 days.
MiniTool ShadowMaker TrialClick to Download100%Clean & Safe
See how to backup computer to external hard drive Windows 11:
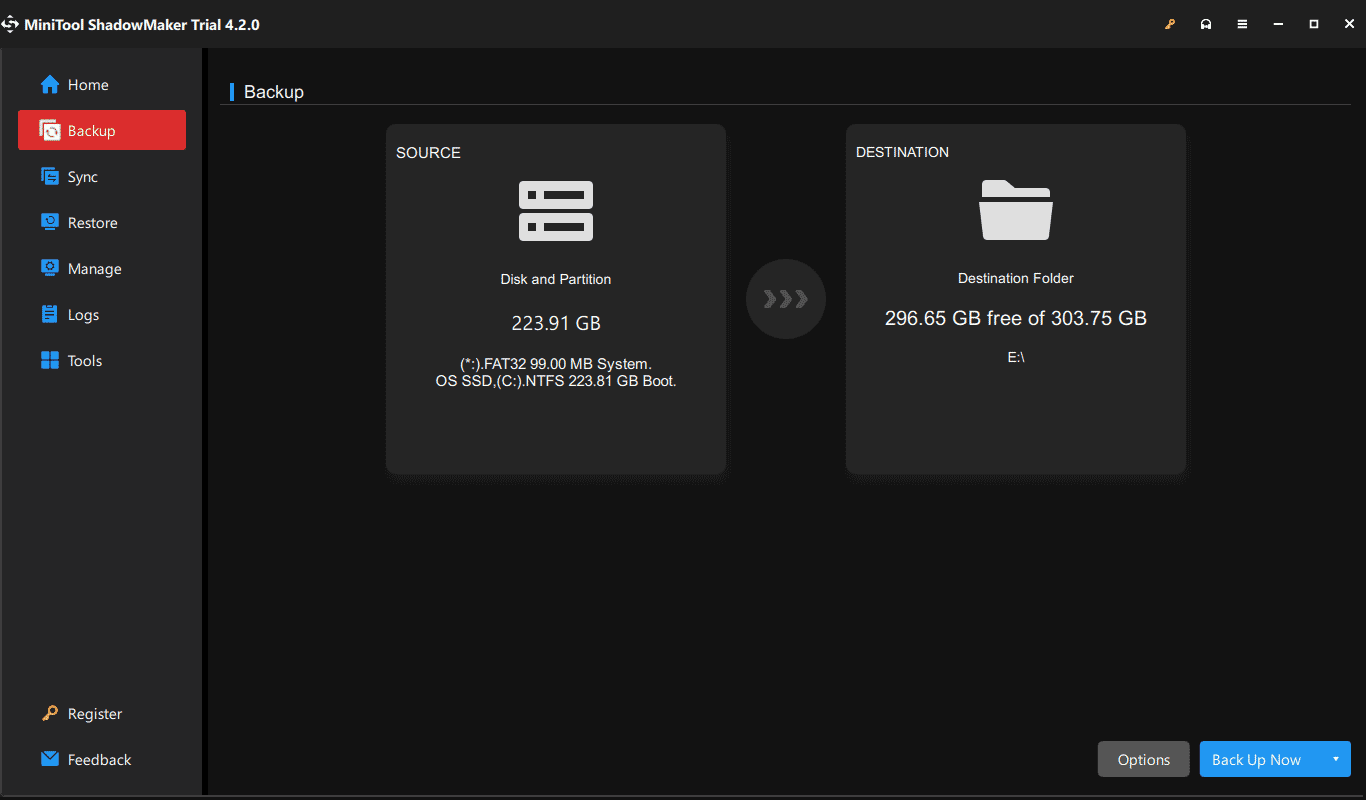
Step 1: Launch this backup software for Windows 11/10/8.1/8/7 and connect your external drive to the PC.
Step 2: Click Keep Trial to enter the main interface.
Step 3: Navigate to Backup, you can find this tool backs up system partitions by default. To back up files, go to Source > Folders and Files and choose items.
Step 4: Click Destination and choose an external hard drive or USB drive as a path. Also, you can back up the PC to NAS.
Step 5: Click Back Up Now to start backup right now.
Pros and Cons
| Pros | Cons |
| 1. Clean and beginner-friendly interface. 2. Supports system, disk, partition, and file backup. 3. Offers incremental, differential, and automatic backcup options. 4. Includes media builder to create bootable media for recovery when Windows fails to boot. | 1. Requires upgrading to a paid edition to access advanced features. 2. No cloud backup support. |
How to Restore Windows 11 from an External Hard Drive
The recovery process depends on the backup type you created.
Restore files from File History
- Open File History.
- Choose Restore personal files.
- Select the backup version, click the gear icon, and choose Restore or Restore to.
Restore a system image created by Backup and Restore
- Boot the system to Windows Recovery Environment.
- Navigate to Troubleshoot > Advanced Options > System Image Recovery.
- Connect the external drive and choose the system image.
- Begin the recovery process.
Restore files or the system with MiniTool ShadowMaker
- Launch MiniTool ShadowMaker.
- Go to the Manage tab, choose the backup task.
- Click Restore.
- Follow the on-screen instructions to finish the recovery.
Bottom Line
Now, you know how to backup Windows 11 files and system after reading this long article. Three backup tools from Microsoft and one Windows 11 backup software – MiniTool ShadowMaker are introduced here. Just choose one for Windows 11 backup based on your needs.
If you have any idea on how to back up Windows 11 or you have any issues when using MiniTool software, send an email to [email protected].
How to Backup Windows 11 FAQ
About The Author

Position: Columnist
Vera has been working at the MiniTool Team for over 10 years as a technical editor and content writer. She mainly focuses on disk and partition management, data recovery, Windows backup and restore, and PC troubleshooting. Through in-depth software testing and hands-on experience, she has helped users solve a wide range of computer problems and better protect their data on Windows devices.
User Comments :