
A PNY SSD, such as PNY CS900, CS1031, or XLR8, may not appear in This PC, File Explorer, or Disk Management. Learn why your drive is not showing up and how to fix the issue in Windows 11/10 with 6 effective solutions.
Quick Answer
A PNY SSD (the CS900, CS1031, CS2241, XLR8, or any model) may not appear in Windows 10/11 due to connection issues, outdated drivers, an uninitialized state, or incorrect BIOS storage settings.
To fix it:
- Check physical connections
- Check BIOS/UEFI settings
- Update PNY SSD driver
- Initialize the drive
- Assign a drive letter
- Format the SSD
PNY SSD Not Showing up Windows 11/10
Your PNY SSD may sometimes not appear in This PC, File Explorer, or Disk Management, despite being connected to the computer.
Once that occurs, you will fail to add files and other data to your PNY SSD. What’s worse, the existing data on it might also be inaccessible. Therefore, you should deal with this issue quickly to make the SSD accessible again.
Before taking more advanced measures, you should puzzle out potential causes of PNY SSD not detected, recognized, or showing up on computer. Here, we have listed some common reasons below:
- Loose physical connections
- Setting the SATA mode to RAID rather than AHCI
- Drive appearing as “Unallocated space”, “RAW”, or “Unknown, Not Initialized” in Disk Management
- Missing drive letter
- Outdated SSD drivers
- Unsupported file system
Where Is Your PNY SSD Missing
Check where your PNY SSD is not showing up first. This can help determine the possible cause and find the right fix.
| Location | Possible Cause | Quick Fix |
| Not detected in BIOS | Loose cables, dead port, or bad M.2 seating | Reseat the M.2 SSD or swap the SATA data and power cables |
| Recognized by Disk Management but not visible in File Explorer | Missing a drive letter or drive not formatted | Assign a drive letter or format the SSD |
| Not showing up in Disk Management | A loose physical connection or outdated storage driver | Reseat the PNY SSD and update the driver |
How to Fix PNY SSD Not Showing up Windows 10/11?
Fix 1: Check the SSD Connection
A loose connection can prevent your PNY SSD from being detected in BIOS and Disk Management. Check the hardware connection first:
Step 1: Shut down your PC and disconnect the power.
Step 2: For a SATA SSD, check the SATA data and power cables, and try reconnecting them or using another port. For an M.2 SSD, reseat it properly.
Fix 2: Check the BIOS/UEFI Storage Settings
Incorrect BIOS/UEFI settings can block the SSD from being recognized by Windows 11/10.
Check the storage settings:
Step 1: Restart your computer and press F2, Del, Esc, or another manufacturer’s key to enter the BIOS/UEFI menu.
Step 2: Go to the Storage Configuration or SATA Mode menu.
Step 3: Choose AHCI instead of RAID or IDE.
Step 4: Locate the disabled port or slot and switch its setting from Disabled to Enabled or Auto.
Fix 3: Update PNY SSD Driver
Outdated or faulty SSD drivers can prevent the system from recognizing and communicating with the SSD, resulting in PNY SSD not showing up on Windows 10/11. Therefore, you must update the SSD drivers in time. Follow the given steps to get them updated.
Step 1. Press Win + X and then select Device Manager from the quick menu.
Step 2. Expand the Disk drives category to show all your disks and right-click on your PNY SSD to select Update driver.
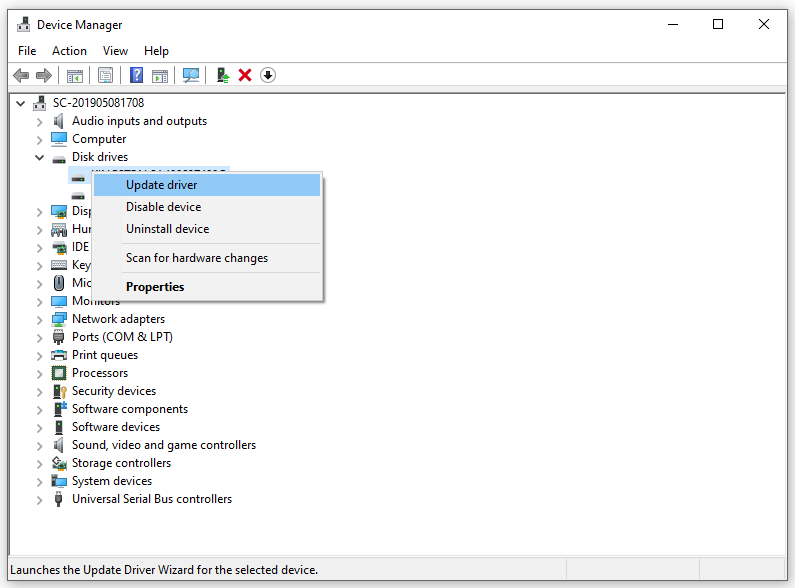
Step 3. Click on Search automatically for drivers and follow the instructions on the screen to find & install any updates available.
Fix 4: Initialize PNY SSD
If you are installing a new PNY SSD on your computer, it’s important to initialize it before starting to use it. The PNY SSD you get will not be recognized by File Explorer or Disk Management until it has been initialized. To initialize the PNY SSD, there are two methods for you:
Way 1: via Disk Management
Step 1. Type Disk Management in the search bar and hit Enter.
Step 2. Locate your PNY SSD drive and right-click on the uninitialized drive and choose Initialize Disk.
Step 3. Select the partition style for the PNY SSD according to your system requirement and hit OK to start the process.
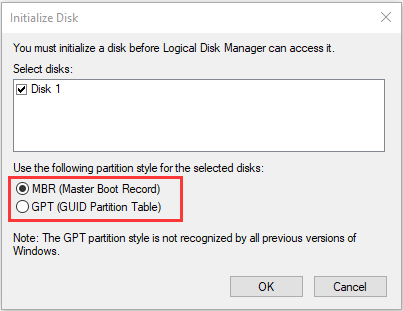

After completion, PNY SSD not recognized might be gone and you need to create a new volume in Disk Management. Then, you can see the new partition you created in File Explorer.
See this guide: What Is Simple Volume and How to Create It (Complete Guide)
Way 2: via Diskpart
Step 1. Press Win + R to open the Run box.
Step 2. Type cmd and press Ctrl + Shift + Enter to launch Command Prompt with administrative rights.
Step 3. In the command window, type diskpart and hit Enter.
Step 4. Input list disk and hit Enter to list all the installed disks on your computer.
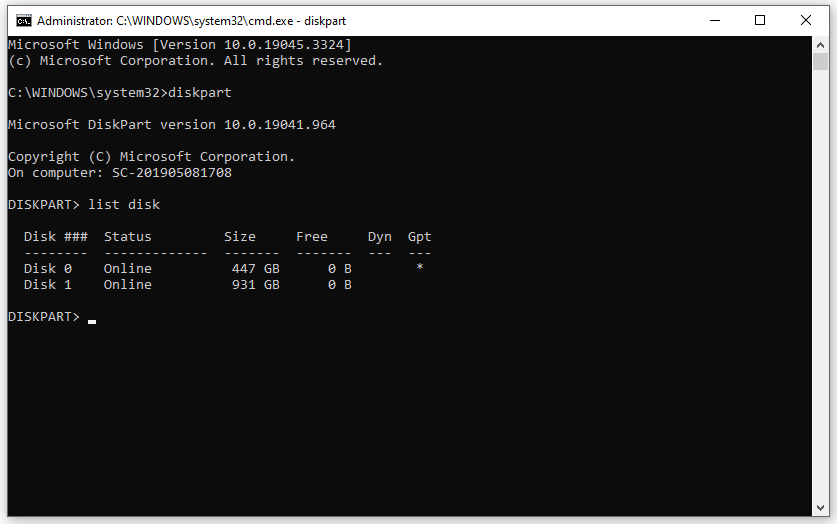
Step 5. Type select disk # and hit Enter. # refers to the number of the disk to be initialized, so you should replace it with your corresponding one.
Step 6. Type clean and hit Enter to remove any and all the partitions from the target drive.

Fix 5: Assign a Drive Letter
A conflicting or missing drive letter might also be the cause for PNY SSD not showing up. Windows uses the drive letter to identify and access drives. Once there is something wrong with the assigned drive letter, you will not see the SSD in File Explorer.
If this is the case, you need to assign or change the drive letter for your PNY SSD.
Step 1. Type Computer Management in the search bar and hit Enter.
Step 2. In the left-hand pane, expand Storage and then hit Disk Management.
Step 3. Now, you can see all the SSD partitions. Select the target partition and right-click on it to choose Change Drive Letter and Paths from the drop-down menu.
Step 4. Click on Add if the partition was not previously assigned a driver letter. If there is an existing drive letter, hit Change.
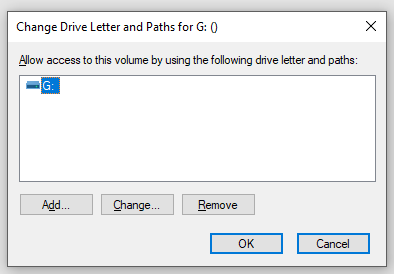
Step 5. Select a new drive letter from the drop-down menu and hit OK to save the changes.
Fix 6: Format Your PNY SSD
Chances are that there is something wrong with your file system. The current file system might not be supported by Windows, for example, the volume of your PNY SSD is shown as unallocated, RAW, or free. To fix file system issues, you can consider formatting the PNY SSD.
# Move 1: Back up Your Data with MiniTool ShadowMaker
Since formatting your SSD will erase all the data on the drive, you should perform the operation with caution. Also, it’s important to back up any important files on this drive before taking further action. Here, a Windows backup software – MiniTool ShadowMaker is the top choice for you.
This freeware is dedicated to providing data backup solutions for Windows devices. It only takes a few clicks to back up your files, folders, systems, disks, and partitions. With a backup copy in hand, you can restore your data easily.
Step 1. Launch MiniTool ShadowMaker and go to the Backup page.
MiniTool ShadowMaker TrialClick to Download100%Clean & Safe
Step 2. In this page, you can select the backup source and backup destination.
Backup source – go to SOURECE > Folders and Files to check the files you need to back up.
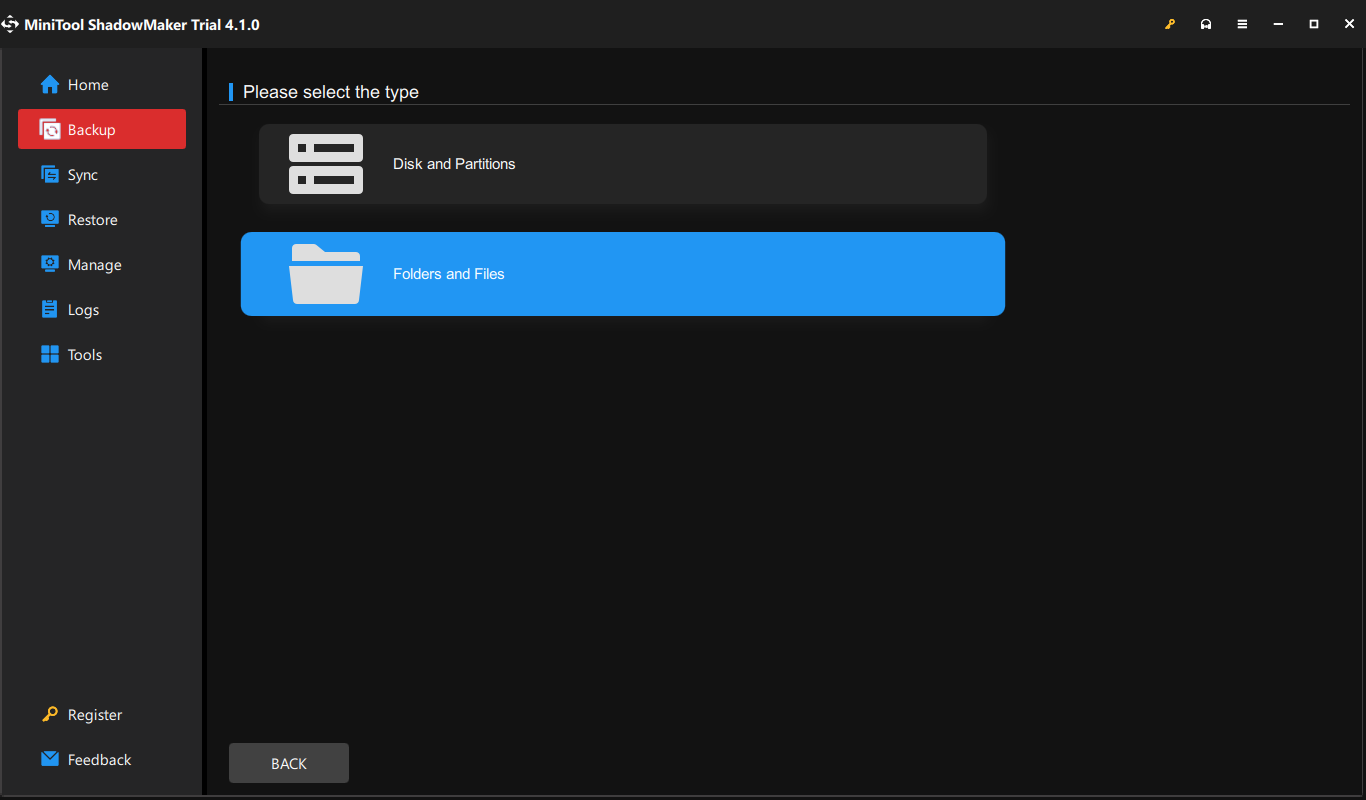
Backup destination – go to DESTINATION. (Selecting an external hard drive or USB drive is more recommended.)
Step 3. Click on Back Up Now to start the process at once.
# Move 2: Format the PNY SSD via Disk Management
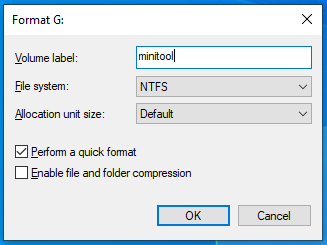
Step 1. Open Disk Management and right-click on your PNY SSD to choose Format.
Step 2. Then, you need to label the partition, choose the file system, and specify the allocation unit size. Tick Perform a quick format and hit OK.
Step 3. Click on OK again to confirm the action when you are prompted by a warning message below:
Formatting this volume will erase all data on it. Back up any data you want to keep before formatting. Do you want to continue?
Recover Data from a PNY SSD That Is Not Showing up on PC
If your PNY SSD is still not showing up and data remains inaccessible, data recovery may be necessary. You can recover these files easily with the help of the best data recovery software – MiniTool Power Data Recovery.
This free tool is known for providing solutions to recover data from different types of storage devices such as internal hard drives, external hard drives, SD cards, USB flash drives, and so on. When you run into PNY SSD not showing up, it is a good option for you to recover the data on the SSD. Let’s see how it works:
Step 1. Download and install MiniTool Power Data Recovery Free Edition. Launch it and enter the main interface.
MiniTool Power Data Recovery FreeClick to Download100%Clean & Safe
Step 2. If you can see the problematic SSD, you will be able to recover files from it. Hover the SSD and hit Scan to start scanning the drive.
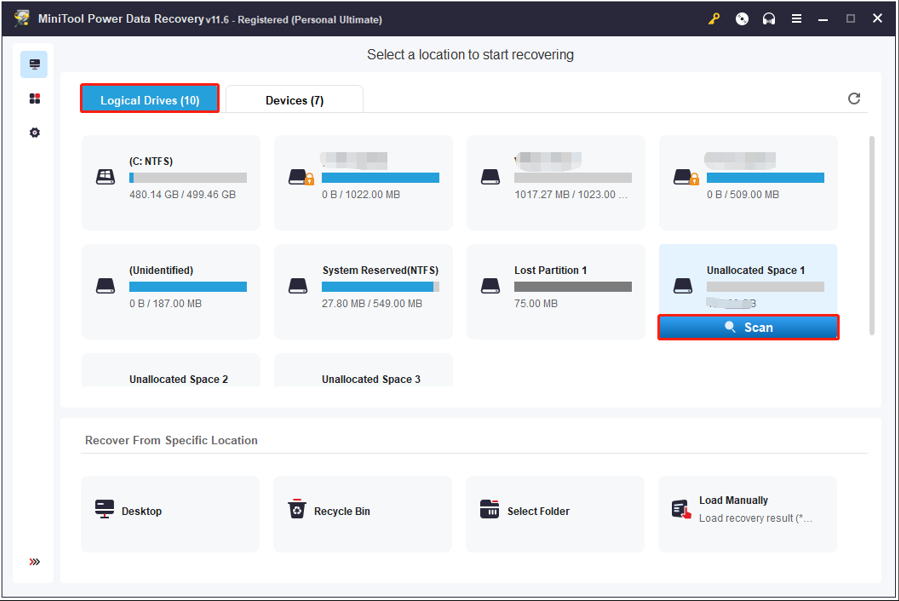
Step 3. After the scanning completes, you can see three paths of scanned files – Delete Files, Existing Files, and Lost Files. You can open each path to tick the files you want to recover.
Step 4. Click on Save from the lower right corner and choose a safe path to store these files.
We Need Your Voice
Although PNY SSDs are durable storage devices that are widely used in Windows 10/11, you are also likely to fall victim to some SSD issues like PNY SSD not showing up, not detected, not recognized, and more. This post has walked you through how to fix such issues step by step. Meanwhile, you can also try the solutions above if your SSDs of other brands are not detected by your computer.
For any suggestions or queries about MiniTool products, please feel free to contact us directly via [email protected]. Thanks for your reading!
PNY SSD Not Showing up FAQ
About The Author

Position: Columnist
Vera has been working at the MiniTool Team for over 10 years as a technical editor and content writer. She mainly focuses on disk and partition management, data recovery, Windows backup and restore, and PC troubleshooting. Through in-depth software testing and hands-on experience, she has helped users solve a wide range of computer problems and better protect their data on Windows devices.
User Comments :