This post of MiniTool offers a full guide to initialize SSD, including using Disk Management, Diskpart, or MiniTool Partition Wizard. Additionally, it offers several methods to fix some initialization issues.
What Is Disk Initialization
Initializing a disk refers to the process of preparing a new HDD or SSD for use. It can create a partition table like MBR or GPT, allowing the system to recognize and manage it.
For a new drive, this makes it usable. If the drive already has data, initialization erases everything, leaving the space marked as unallocated.
When to Initialize SSD
An SSD must be initialized in the following situations:
- New drive installation: Windows will not automatically display a newly installed SSD in File Explorer. You need to initialize and create partitions on it, and then it appears.
- Unknown – Not Initialized Error: A new, correctly installed drive shows as “Not Initialized” in the Disk Management tool.
- Switching Operating Systems: Switching operating systems (e.g., Windows to Linux/macOS) or performing a disk wipe requires drive reinitialization.
How to Initialize SSD Windows 11/10/8/7
To initialize SSD in a Windows PC, there are three methods:
- Initialize SSD via Disk Management
- Initialize SSD via Diskpart
- Initialize SSD via MiniTool Partition Wizard
Here’s the detailed breakdown.
Method 1. Initialize SSD via Disk Management
Disk Management is a built-in Windows utility that is used to manage hard drives, partitions, and volumes. It allows you to initialize new disks, format drives, assign drive letters, and shrink/extend partitions.
Here’s how to use it to initialize new SSD:
Step 1. Press Win + R to open Run, type diskmgmt.msc, and press Enter.
Step 2. The Initialize Disk window pops up. If you don’t see the window, please do the following steps to evoke it:
- Right-click the SSD that you need to initialize.
- Select Initialize Disk from the drop-down menu.
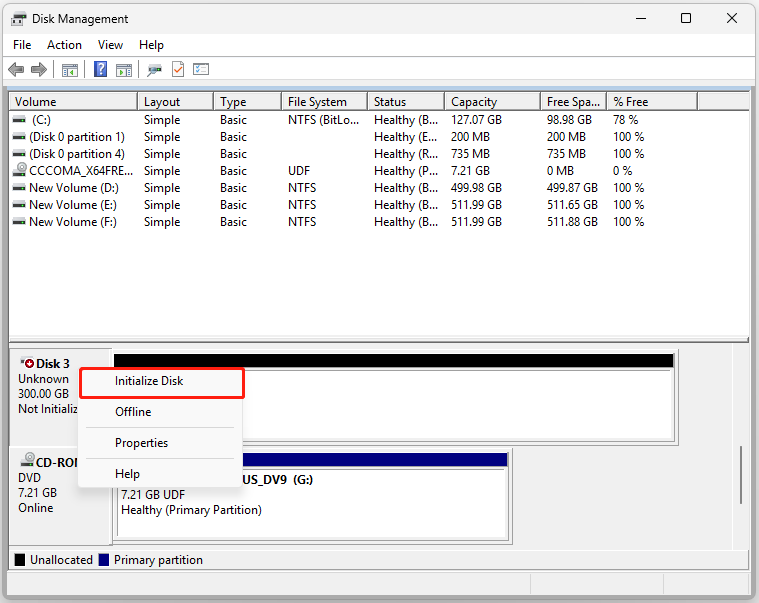
Step 3. Make sure the target disk is selected under the Select disks section, choose a partition style according to your needs, and then click OK to proceed.
- MBR (Master Boot Record)
- GPT (GUID Partition Table)

Step 4. After that, you’ve initialized the selected SSD successfully.
Method 2. Initialize SSD via Diskpart
Diskpart is a Windows command-line tool for advanced disk management. It offers some advanced features beyond the standard GUI, enabling you to wipe drives and change partition styles (GPT/MBR). Additionally, it can help you initialize new SSD. Here’s how to do that:
Step 1. Press Win + S to open Search, type cmd, and press Enter.
Step 2. In the Command Prompt window, type diskpart and press Enter.
Step 3. Input the following commands to initialize the SSD, and remember to press Enter after each command:
- list disk (This command will list all the installed disks on your computer.)
- select disk * (This command is used to select the target disk. Replace * with the number of the disk you chose. )
- clean (This command refers to removing all partitions or volume formatting from the selected disk.)
- convert gpt or convert mbr (This command will convert the selected SSD to GPT or MBR.)
- create partition primary (This command creates a partition using the available unallocated space.)
- format fs=ntfs quick (This command will quickly format a selected drive or partition to the NTFS file system.)
- assign (This command is used to assign a drive letter.)

Step 4. Now, the selected SSD has already been initialized and a new primary partition is created.
Method 3. Initialize SSD via MiniTool Partition Wizard
MiniTool Partition Wizard is a free partition manager that offers various features to help you manage disks and partitions on your computer. The key features include initializing SSDs, creating/deleting partitions, and making conversions among different file formats.
Here’s how to perform SSD initialization via this software:
Step 1. Download and install MiniTool Partition Wizard. Then, launch it to enter the main interface.
MiniTool Partition Wizard FreeClick to Download100%Clean & Safe
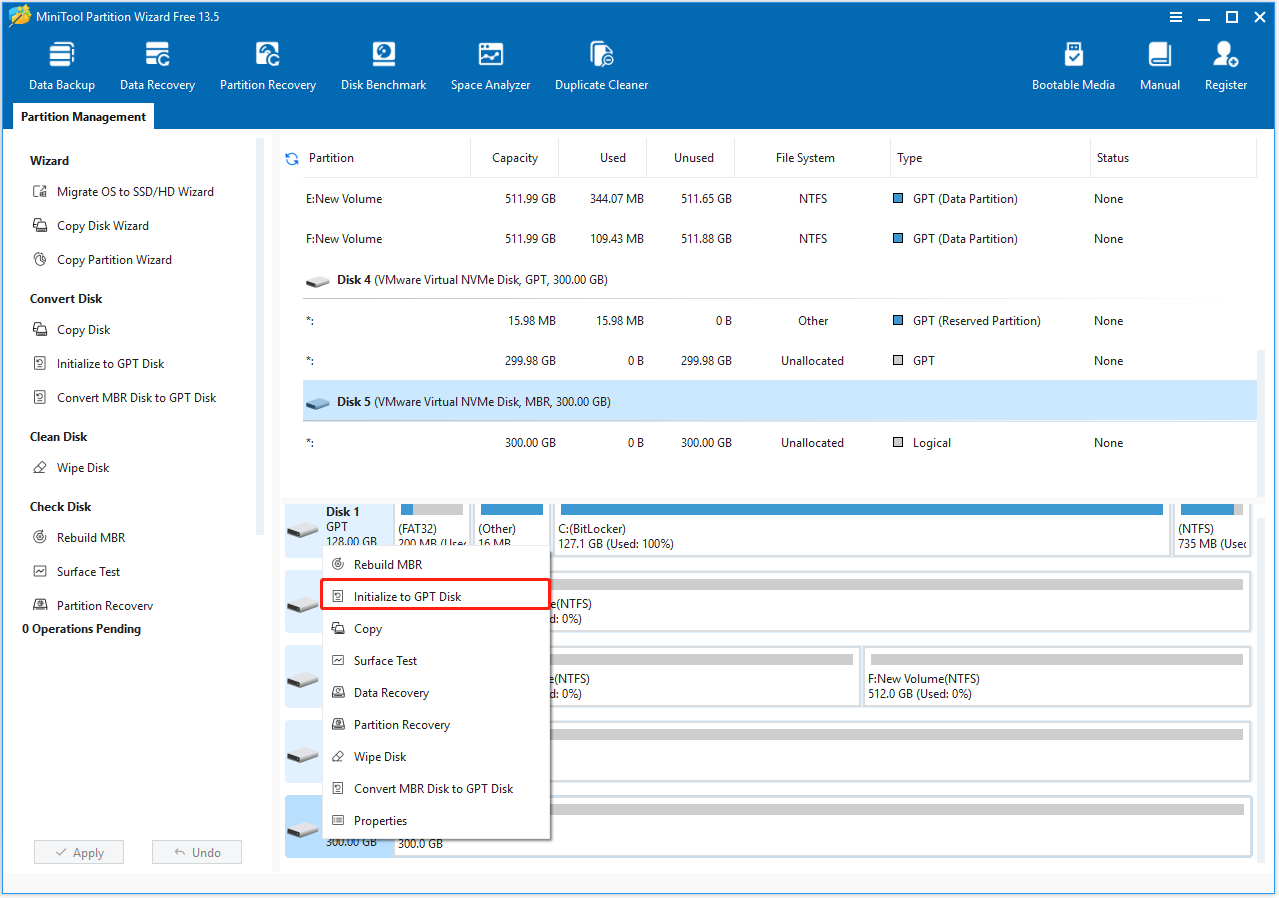
Step 2. Locate the SSD labeled as Unallocated.
Step 3. Right-click it and choose the Initialize to GPT Disk option. If the SSD is GPT, choose Initialize to MBR Disk. Now, the changes can be previewed in the right panel.
Step 4. Right-click the unallocated space, select Create, and configure your partition settings (Drive Letter, File System, Cluster Size, and Size And Location).
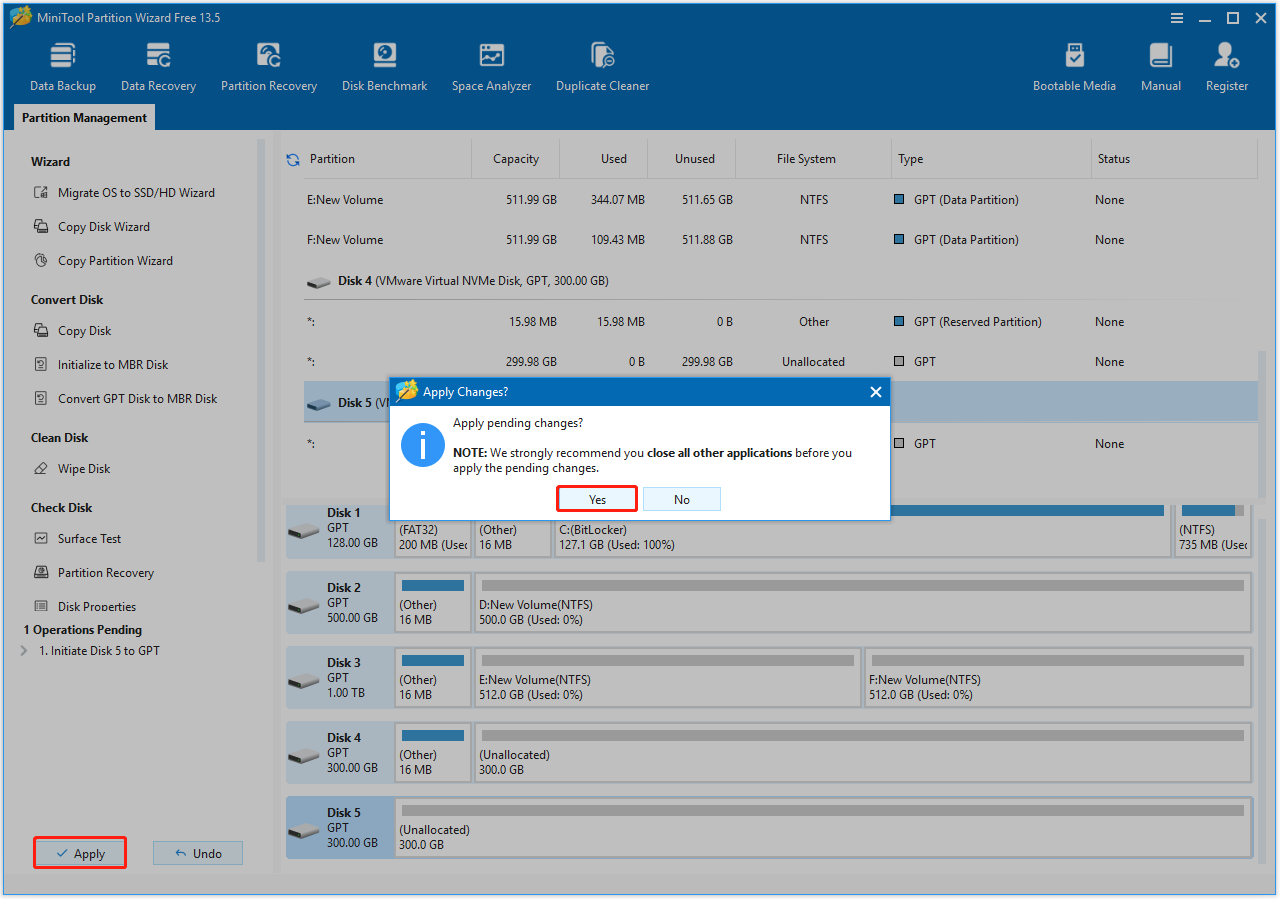
Step 5. Click Apply at the bottom left corner and then Yes in the prompted window to execute all the pending operations.
Once the process is completed, you’ve initialized the SSD and created a partition successfully. Now, the SSD will appear in File Explorer.
What Will Happen After Initializing SSD
Initializing a new SSD sets up its partition table (MBR or GPT) so the operating system can recognize it. While this makes the drive visible to the system, you must still format it before it can store files.
Here is what typically happens during and after initializing an SSD:
- Partition style selection: When initializing an SSD, it is necessary to select either GUID Partition Table (GPT) (recommended for modern systems) or Master Boot Record (MBR).
- System recognition: After the SSD initialization, it can be recognized by the OS and show Online with Unallocated space in Disk Management.
- Ready for format: If you want to show the SSD in File Explorer, you need to create partitions on it and format it to the file system you need.
- Data erasure (if re-initialized): If you initialize a drive that was already in use, it will likely overwrite the partition structure and delete partition information & saved data.
Common Initialization Issues and Solutions
While initializing an SSD is typically straightforward, hardware or software issues can occasionally interfere with the process. Below are the two most common initialization issues:
- Disk Unknown, Not Initialized
- Initialize Disk option grayed out
Disk Unknown, Not Initialized
The Disk Unknown Not Initialized error is one of the SSD initialization failure issues. When you fail to initialize the SSD, it displays two statuses in Disk Management:
- Disk shows Unknown, Not Initialized, with unallocated space
- Disk shows Unknown, Not Initialized, with no disk space
In these two cases, you cannot access the SSD. After searching for this issue on the internet, we find that the failure can mainly be caused by:
- Corrupted MBR/partition table: The drive’s partition information is damaged.
- Driver issues: There are incompatible or outdated drivers.
- Physical failure: The SSD has bad sectors or a failed controller.
- Missing or lost partition: There are missing or lost partitions on the target SSD.
- File system corruption: The file system of the SSD is corrupted.
- Virus infection: There is a virus or malware infection on your computer.
Restart PC and Reinitialize in Disk Management
A restart is the easiest method to troubleshoot various issues, including the Disk Unknown Not Initialized error. Therefore, try restarting your computer and then initialize SSD in Disk Management again to fix the error.
If this method does not work, continue and try other methods.
Check Hardware
For an M.2 SSD, reseat the SSD and ensure it is installed in the M.2 slot properly. If the initialization issue occurs on a SATA SSD, connect the cable again or swap both the data and power cables.
If you encounter the issue with an external SSD, switch to a different USB port and try a different cable. It is ideal to connect the SSD to a direct port on the motherboard rather than a hub.
Update/Reinstall Drivers
Outdated disk drivers may also make you unable to initialize SSD. Try updating drivers with these steps:
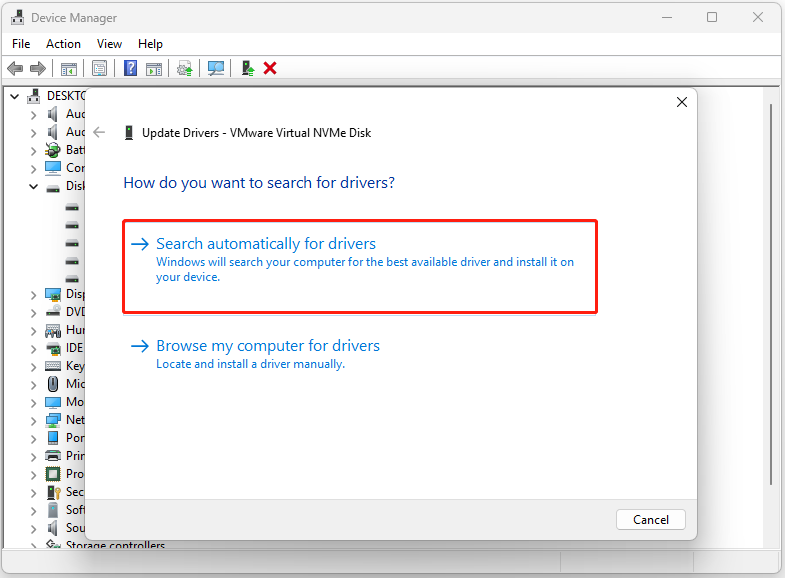
Step 1. Press Win + X to open the Quick Link menu and select Device Manager.
Step 2. Expand the Disk drives category, right-click the SSD driver, and select Update driver.
Step 3. In the prompted Update Drivers window, select Search automatically for drivers.
Step 4. Follow the on-screen instructions to complete the process.
Step 5. Repeat the above steps to update all outdated drivers. Once completed, check if the issue is fixed.
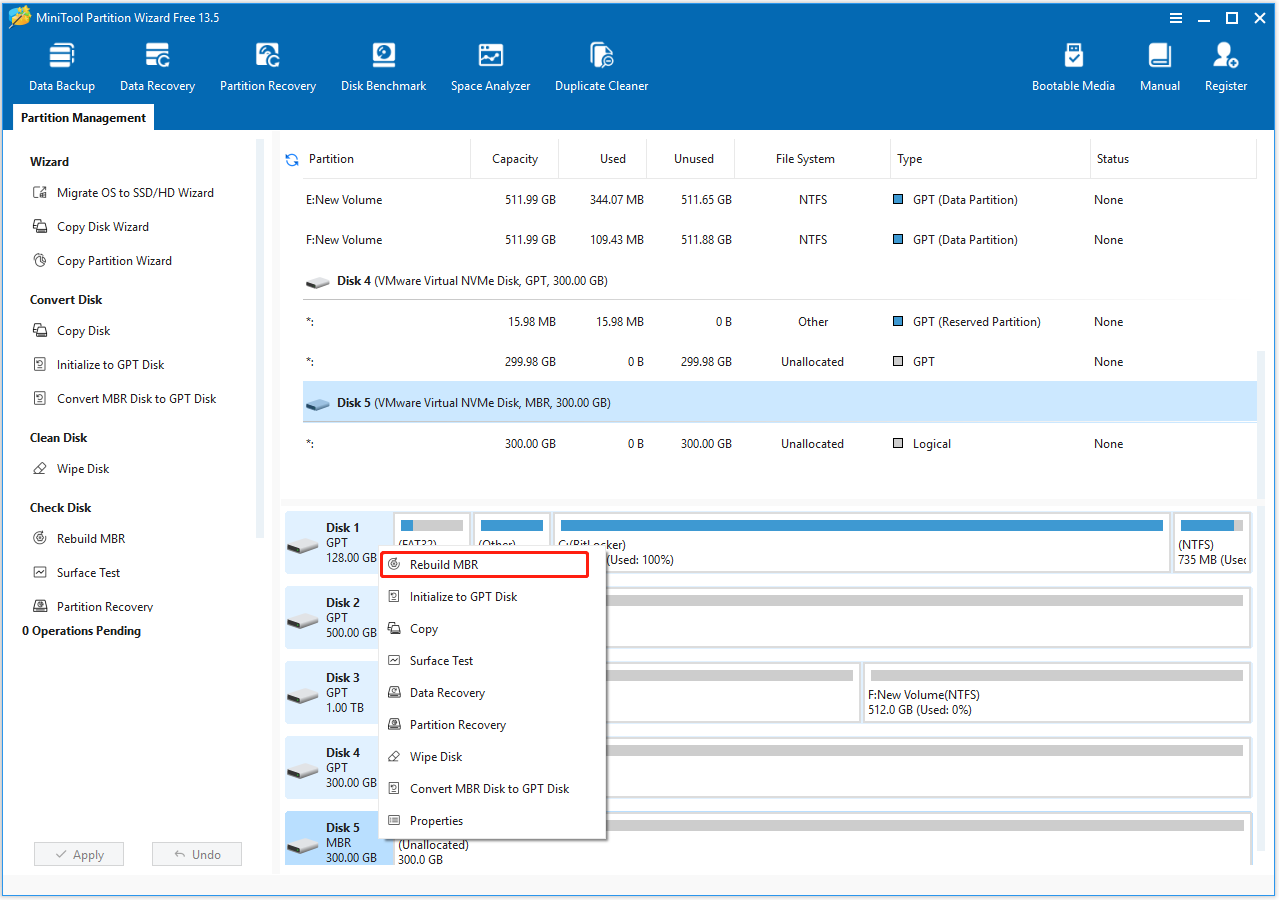
Fix MBR Corruption
MBR corruption/damage can also trigger the SSD initialization issues as well. To fix it, try MiniTool Partition Wizard’s Rebuild MBR feature. Here’s the guide:
- Launch this software.
- Right-click the target SSD in the right panel.
- Select Rebuild MBR.
- Click Appy and Yes sequentially to confirm.
Check Bad Sector
Bad sectors on SSD may also make you unable to initialize it. Use MiniTool Partition Wizard’s Surface Test to scan bad sectors with the following steps:
- Choose the target SSD in MiniTool Partition Wizard.
- Select Surface Test from the left panel.
- Click Start Now.
- Once completed, bad sectors will show in red.
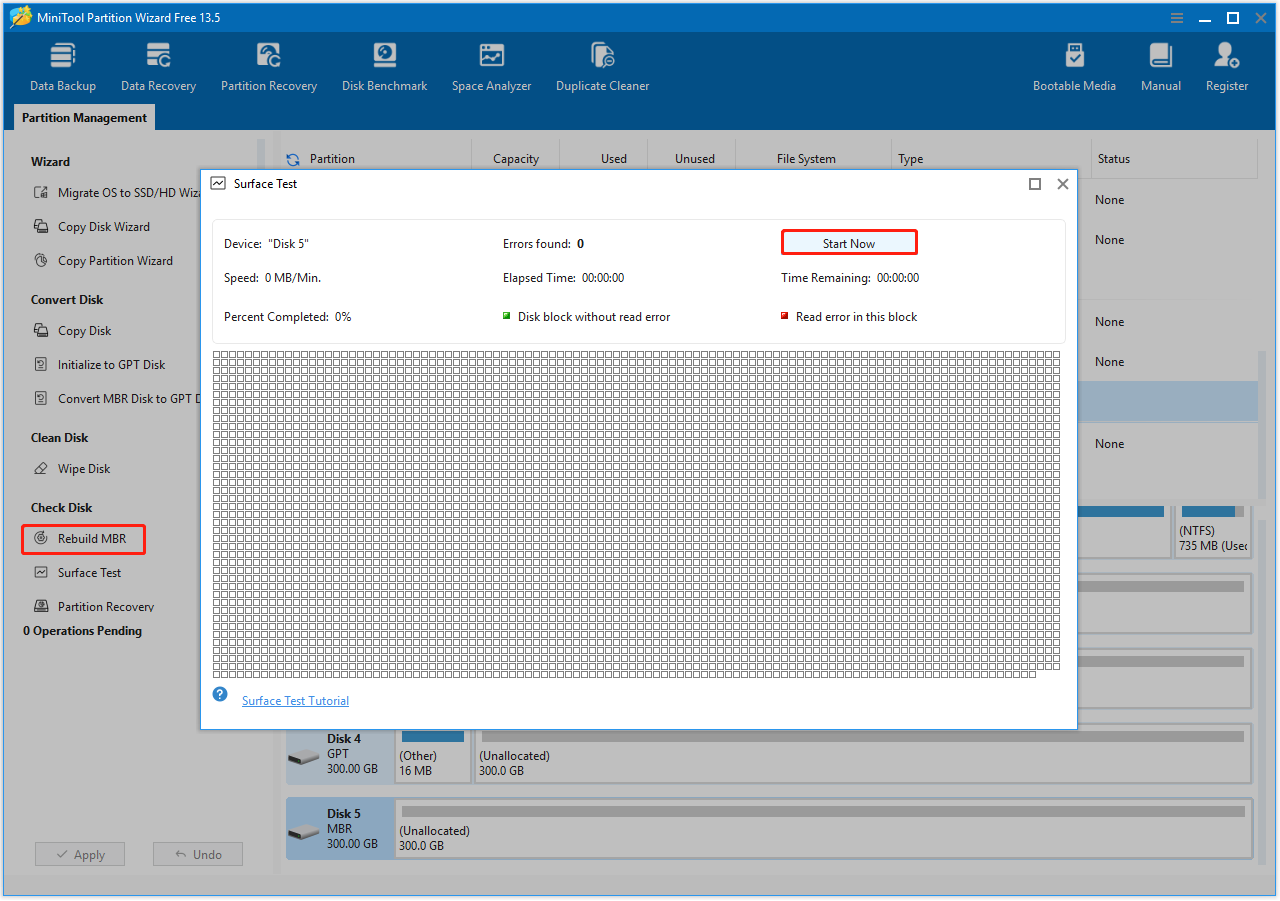
If there are too many bad sectors on the SSD, run Command Prompt as administrator. Perform the chkdsk E: /f /r command to prevent Windows from writing data to the bad sectors.
Scan for Viruses
A virus or malware infection may also trigger an initialization issue. Perform a virus scan via Windows Defender to fix this issue with the following steps:
- Press Win + S to open Search, type windows defender and press Enter.
- Select Virus & threat protection, and click Scan options.
- Choose a scan method you prefer from: Quick scan, Full scan, Custom scan, and Microsoft Defender Offline scan.
- Click Scan now.
- Once the scanning process is completed, go to the Protection history page.
- Choose one found threat, click Actions, and select Remove. Repeat the step for other found threats.
Try Other Tips
If none of the above methods can help you fix the issue, try the following tips:
- Check if the disk is offline
- Recover lost partition
- Use Diskpart/MiniTool Partition Wizard to initialize SSD
Initialize Disk Option Grayed Out
If the Initialize Disk option is grayed out in Disk Management, SSD is unable to initialize. To troubleshoot the issue, try the following methods.
- Restart and check Disk Management again
- Check physical connection
- Update/reinstall disk drivers
- Run an antivirus scan
- Initialize in safe mode
- Check BIOS/CMOS
- Check Permissions (VHD)
- Use MiniTool Partition Wizard/Diskpart to initialize SSD
Bottom Line
Now, you probably already know how to initialize your SSD and troubleshoot the SSD initialization not working issue. With your SSD properly set up, you’ll benefit from faster speeds, improved storage efficiency, and a smoother computing experience.
If you encounter issues or have any suggestions while using the MiniTool software, please contact us by sending an email to [email protected].
Initialize SSD FAQ
About The Author

Position: Columnist
Charlotte is a technology columnist with a strong focus on the Windows operating system, specializing in disk management, backup, and data recovery. She is passionate about analyzing computer errors, identifying root causes, and delivering practical solutions. In her free time, she stays updated on the latest developments in computer systems and hardware while continuously learning new technologies to broaden her expertise. Her writing style is clear and easy to understand, making complex technical topics accessible even to users with limited computer knowledge.
User Comments :