Error “The User Profile Service failed the logon” or “The User Profile Service failed the sign-in” indicates your user profile has a problem. To fix it in Windows 11/10/7, follow MiniTool’s instructions, such as booting to Safe Mode, editing the Registry, checking the service, creating a new account, etc.
About “User Profile Service Failed the Logon/Sign-in”
It is frustrating to encounter issues while signing in to the Windows computer. Often, you may be blocked from accessing the system by one of the error messages:
- “The User Profile Service service failed the logon. User profile cannot be loaded.”
- “The User Profile Service service failed the sign-in. User profile cannot be loaded.”
Typically, the former appears in Windows 7 and Windows 10, while the latter occurs in Windows 11 and Windows 10.
This error indicates a problem with the user profile, for example, corruption. It can affect the local and domain accounts. Reportedly, you may experience such an issue after updates, a factory reset, partition changes, or user profile creation.
Why User Profile Cannot Be Loaded
What causes the User Profile Service to fail the logon/sign-in? Just learn the possible factors below now to help you troubleshoot.
- Corrupted User Profile: A damaged user profile, especially the NTUSER.DAT file, prevents the system from loading.
- Lack of permissions: The user account may not have the necessary permissions for the profile.
- Issues with Registry: In the Windows Registry, there may be some errors or problems related to user profiles.
- User Profile Service issues: The service itself may not run properly, resulting in login failure.
- Deleted profile: The user profile may have been deleted previously, but the registry still contains the corresponding entries. Then, the OS attempts to load that user profile, triggering the error.
The good news is that you can try several solutions to fix the profile loading issue and successfully sign into Windows.
How to Fix “The User Profile Service Failed the Sign-in/Logon” Windows 11/10/7
What do you do when your user profile cannot be loaded? To address this issue, try to restart your computer, check the service status, repair registry entries, etc.
Fix 1: Restart the Computer
In some situations, a simple restart can solve some issues, including this error. Just have a try.
If the login screen isn’t responsive, press Ctrl + Alt + Delete. This can trigger the screen to appear. Then, hit the Power button and click Restart.
If this cannot work, hold the Power button on your computer to force a shutdown. Next, click Power to restart the system.
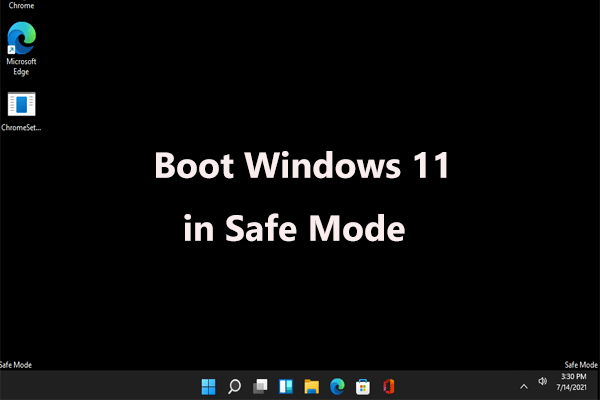
Further Tip: Boot into Safe Mode
When encountering “The User Profile Service failed the sign-in/logon”, Windows 7/10/11 cannot boot normally. So, we highly recommend that you run the PC in Safe Mode and then perform some fixes.
How to enter Windows Safe Mode?
In Windows 7
- Restart the computer.
- Press F8 on your keyboard repeatedly before seeing the Windows logo.
- Under Advanced Boot Options, use the arrow key to select Safe Mode with Networking.
- Press Enter to access it.
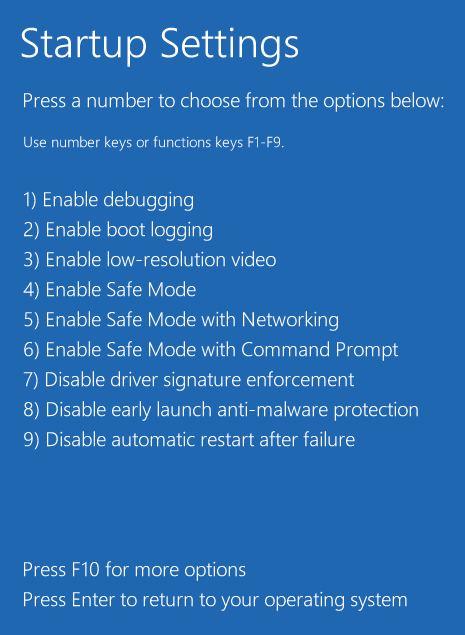
In Windows 11/10
- Restart the system and force a shutdown when you see the Windows logo.
- Repeat the above step 2 or 3 times to enter the Automatic Repair interface.
- Hit Advanced options > Troubleshoot > Advanced options > Startup Settings > Restart.
- Press F5 to enable Safe Mode with networking.
Next, take measures to resolve the login error.
Fix 2: Check Profile Service Status
In certain cases, the User Profile Service itself is disabled by a third-party app. Now, go to check the status of this service and then enable it.
Here is how to do that in Windows 11/10/7:
Step 1: Press Win + R at the same time to launch the Run command.
Step 2: Type services.msc and click OK to open Services.
Step 3: Scroll down to find User Profile Service. Right-click on it and choose Properties.
Step 4: Set its Startup type to Automatic.
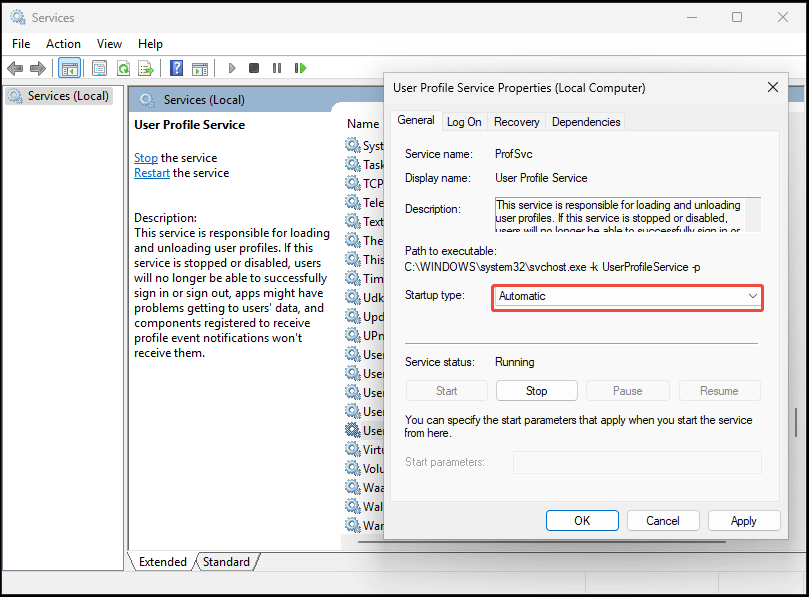
Step 5: Save the change by clicking Apply > OK.
Alternatively, you can enable the service via CMD.
- Open Command Prompt as an administrator.
- Type in sc config ProfSvc start= auto and press Enter.
- Then, execute this command sc start ProfSvc.
- Next, restart the computer.
Check if you still receive the error “User Profile Service failed the logon/sign-in”.
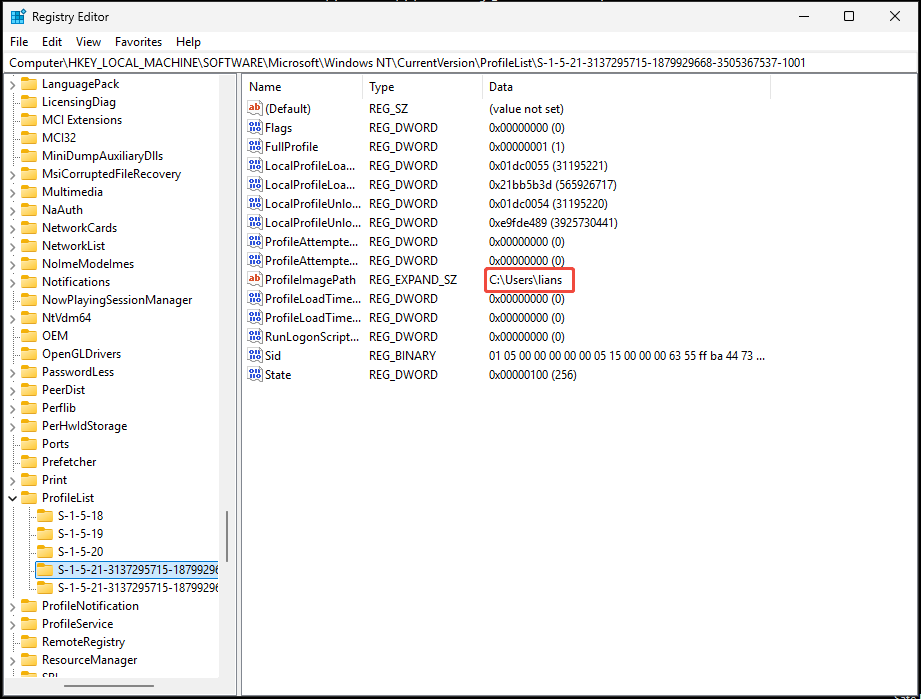
Fix 3: Change Registry Entries
The Windows User Profile cannot be loaded if the profile in the registry points to an invalid or non-existent directory. To fix it, follow these instructions to edit registry entries.
Step 1: Open Registry Editor by typing regedit in Run and pressing Enter.
Step 2: Navigate to this path:
HKEY_LOCAL_MACHINE\SOFTWARE\Microsoft\Windows NT\CurrentVersion\ProfileList
Step 3: You can see folders that begin with S-1-5 (SID key) followed by a long number. Check the ProfileImagePath entry in each folder to find the one that matches your user profile.
Step 4: Depending on the actual case, perform the following operations.
Case 1: You have two SIDs with the same name, and one of them ends with the .bak extension.
- Right-click the folder without .bak, click Rename, and then add .ba at the end.
- Rename the folder with .bak to remove .bak.
- Finally, rename the first SID folder from .ba to .bak.

Case 2: You have a single SID folder with .bak.
In this case, rename it to remove .bak.
Step 5: Choose the SID folder without .bak, and double-click on RefCount on the right side. Then,set its value data to 0.
Step 6: Also, set the value data of the State key to 0.
Step 7: Restart the Windows 11/10/7 system.
Fix 4: Replace the NTUSER.DAT File
The NTUSER.DAT file is a crucial component of the Windows operating system. Each user profile has its NTUSER.DAT file. It stores the profile settings, customizations, and other profile-related information.
By default, you can find it from the path: C:\Users\Username. However, if it is missing or corrupted, “The User Profile Service failed the logon/sign-in” occurs.
To solve your issue, replace this file via these steps.
Step 1: Open File Explorer by pressing Win + E.
Step 2: Click View > Show > Hidden items in Windows 11. Or click View and check the box of Hidden items in Windows 10.
Step 3: Navigate to C:\Users and open the Default folder. Then, right-click the NTUSER.DAT file and name it NTUSER.DAT.old.
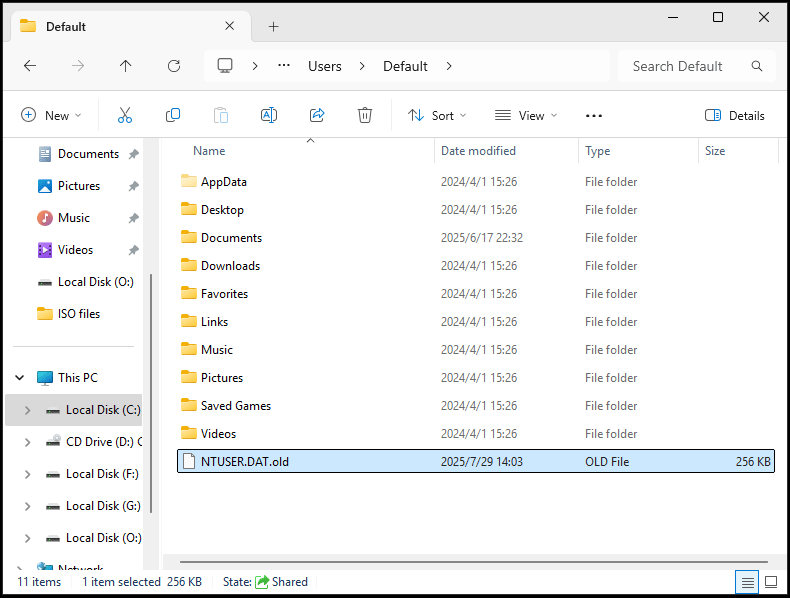
Step 4: Go back to Users, open another user profile, and copy its NTUSER.DAT file.
Step 5: In Default, paste the copied file.
Step 6: Restart the system and check if the login error persists.
Fix 5: Run a System Restore
To resolve the error “User Profile Service failed the sign-in or logon”, performing a system restore is a viable solution. If you ever created one or more restore points before the error, follow these steps below.
Step 1: In Safe Mode, press Win + R, type rstrui.exe in Run, and click OK.
Step 2: Click Next. Then, check the date and time to choose a proper restore point from the list.
Step 3: Hit Finish and then follow the prompts to run a system restore.
Fix 6: Run SFC
Sometimes the user profile cannot be loaded due to corrupted system files. Thankfully, Windows offers two tools called System File Checker (SFC) and Deployment Image Servicing and Management (DISM) to repair the corruption in system files.
Step 1: Type CMD to Search and hit Run as administrator from the right pane.
Step 2: In the Command Prompt window, type sfc /scannow and press Enter.
Wait a few minutes until the verification process completes.
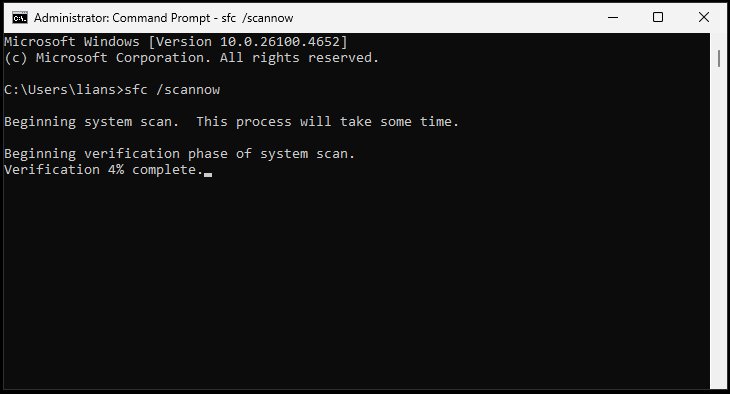
Try to restart Windows 11/10/7 and see if you still get “the User Profile Service failed the logon/sign-in”. If yes, try to run DISM in Safe Mode.
Step 1: Also launch Command Prompt as an administrator.
Step 2: Execute these commands in turn:
- dism /online /cleanup-image /scanhealth
- dism /online /cleanup-image /checkhealth
- dism /online /cleanup-image /restorehealth
Step 3: Restart the computer.
Fix 7: Reset the Default Profile Permissions
Improperly configured profile permissions are a common reason for “User Profile Service failed the sign-in/logon”. By resetting the Default profile permissions, you can effectively address this issue.
Step 1: Access C:\Users\Default, right-click on this folder, and choose Properties.
Step 2: Under Security, hit Advanced, and make sure the computer has the following permissions:
- Owner: SYSTEM
- SYSTEM: Full control
- Administrators: Full control
- Users: Read & execute
- Everyone: Read & execute
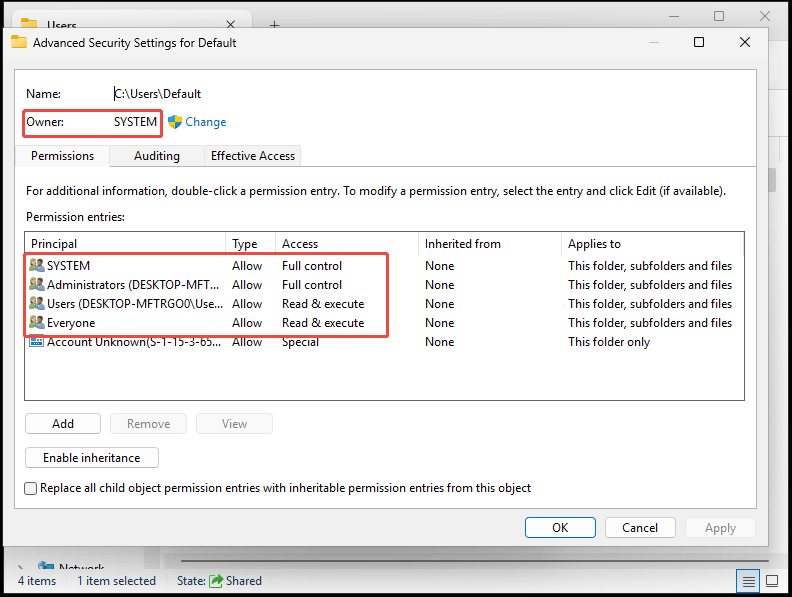
Step 3: If not, check the box of Replace all child object permission entries with inheritable permission entries from this object. Then, click OK.
Fix 8: Create a New User Account
This can be the last resort if all the above methods fail to solve the error “User Profile Service failed the logon/sign-in”. So, try to create a new user account by following these steps.
Step 1: Run Command Prompt with admin permissions.
Step 2: Run the command net user /add username.
Step 3: Then, execute the command net localgroup administrators username /add.
Step 4: Type shutdown -r -t 0 and press Enter.

Step 5: On the login screen, choose the newly created account to sign in.
Step 6: Windows will prompt you to set up the new account. Just do it.
Step 7: Then, copy the old data from the corrupted user profile to the new account.
Top Recommendation: Back Up System
After fixing “the User Profile Service failed the logon/sign-in”, it is recommended to create a system image on a USB drive or external hard drive. This is because system issues like this error can lead to unnecessary downtime.
With a system backup in hand, you can restore the system to a normal state quickly in case of system crashes. This significantly reduces the downtime.
In terms of system backup, we suggest running MiniTool ShadowMaker. This free backup software focuses on creating a system image for Windows 11/10/8/7 and backing up important files/folders.
Importantly, it allows you to schedule a plan for automatic backups and back up only the changed data. Besides, it also offers other advanced features, such as deleting old backup versions, encrypting backups, restoring Windows to dissimilar hardware, etc.
In conclusion, such backup software plays an important role in safeguarding data and restoring the PC to a previous state. Have a try!
MiniTool ShadowMaker TrialClick to Download100%Clean & Safe
Step 1: Connect a USB or external drive to your computer.
Step 2: Open MiniTool ShadowMaker Trial Edition.
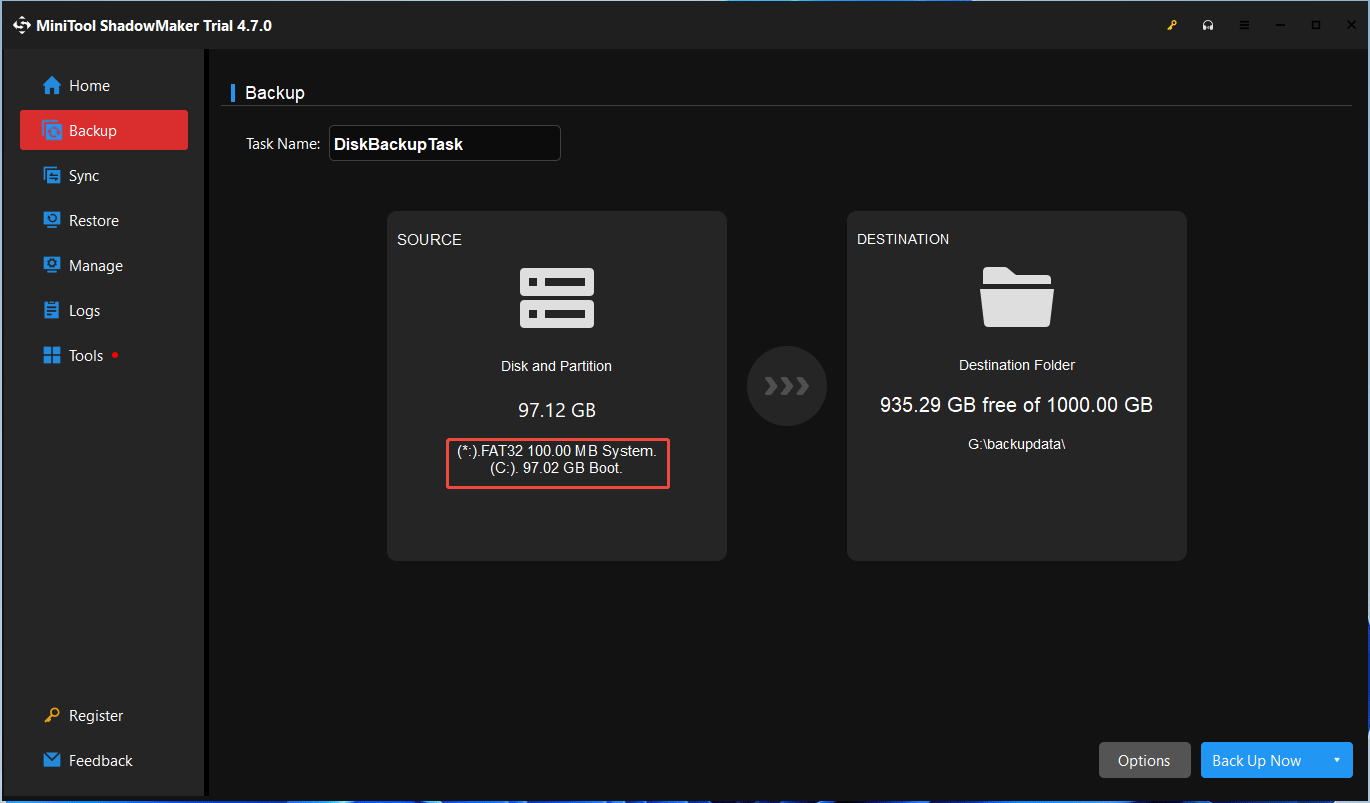
Step 3: Under Backup, system partitions have been selected in SOURCE. You only need to hit DESTINATION to choose the USB/external drive to save the system image.
Step 4: Start the system backup by clicking Back Up Now.
Step 5: After the backup, go to Tools > Media Builder to create a bootable USB drive. Once system issues happen, you can perform a system image recovery.
Bottom Line
Encountering “the User Profile Service failed the sign-in/logon” is annoying. But you can effectively solve this issue by following the above troubleshooting steps. Now, try restarting your computer, performing a system restore, enabling the User Profile Service, editing the registry, etc.
The User Profile Service Failed the Logon FAQ
Fix 1: Create a new user profile
Fix 2: Edit registry entries
Fix 3: Run SFC/DISM
Fix 4: Install the latest updates
Fix 5: Reset the PC
About The Author

Position: Columnist
Vera has been working at the MiniTool Team for over 10 years as a technical editor and content writer. She mainly focuses on disk and partition management, data recovery, Windows backup and restore, and PC troubleshooting. Through in-depth software testing and hands-on experience, she has helped users solve a wide range of computer problems and better protect their data on Windows devices.
User Comments :