After installing the Windows 10/11 update, your computer may become stuck in a boot loop with the “undoing changes made to your computer” error message. This post from MiniTool tells you how to fix the issue.
Many Windows 11/10 users report that they receive the “undoing changes made to your computer” error message. The error indicates that the machine failed to install the updates and is trying to revert the changes. The error message appears for a variety of reasons and the following lists them.
- Failure to install newer Windows updates.
- Shortage of free space on the computer’s hard disks.
- Glitches or faults within the Windows Update Service.
- Software conflicts.
- Incompatibility with the connected hardware or issues within it.
- Presence of bugs or glitches within the system files.
- Corrupt data and files.
- Outdated drivers.
- Incorrect system configurations.
It will not take longer than one hour to undo changes made to your computer. Typically, the message disappears on its own after 30 minutes. If you are stuck on the update screen with the “undoing changes made to your computer” error message, the below methods will help you fix the issue.
How to Fix Undoing Changes Made to Your Computer
If your computer is stuck at the “Undoing changes made to your computer” error, you need to wait for a few hours before trying the below advanced solutions. If there is no progress even after 2-3 hours, press and hold the power key and shut down your PC. You also need to turn off your Wi-Fi connection or ethernet connection.
Fix 1: Enter Safe Mode to Uninstall the Recent Update
You can enter Safe Mode to uninstall the recent update Since some fixes mentioned below depend upon entering safe mode, you must start with this fix. Here’s how to start your PC in safe mode:
1. Shut down your computer. Power it on and turn it off when the Windows logo appears.
2. Repeat this three times and the PC will enter the Automatic Repair screen.
3. Click Advanced options to enter WinRE.
4. Go to Troubleshoot > Advanced options > Startup Settings.
5. Then, press 4 or F4 to choose the Enable Safe Mode option.
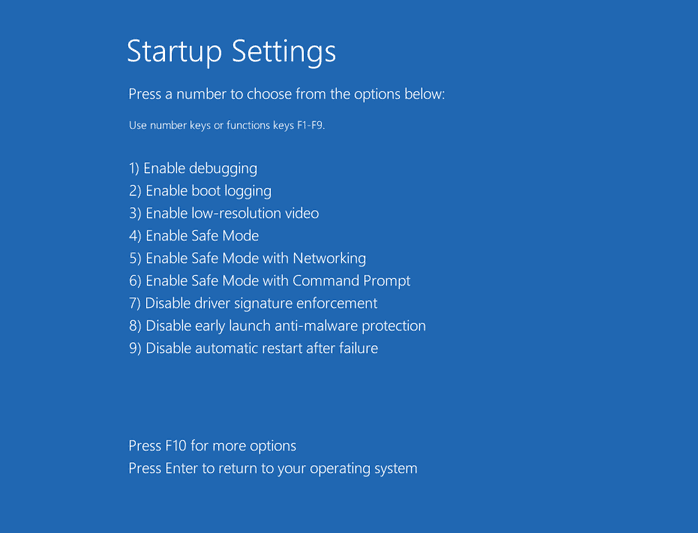
Then, you can start to uninstall the latest update.
1. Type control panel in the Search box to open it.
2. Go to Programs > Uninstall a program > View installed updates.
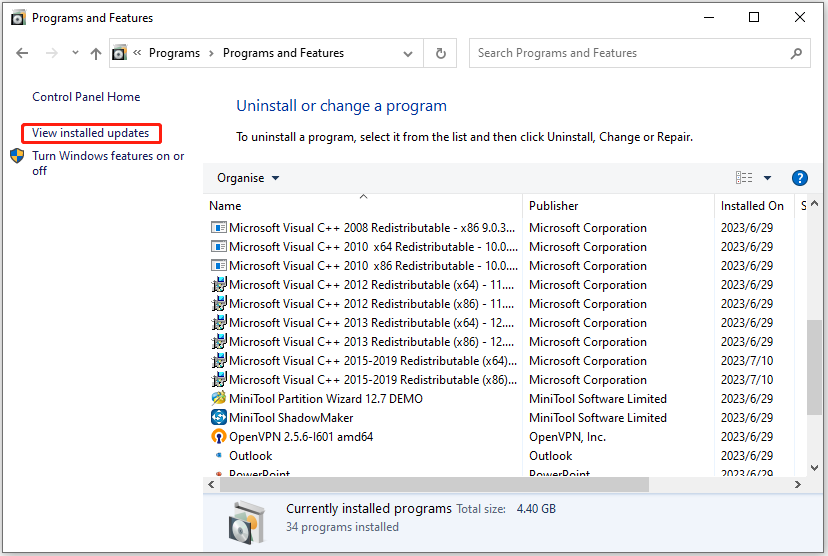
3. Then, find the latest update and right-click it to choose Uninstall. Then, follow the on-screen instructions to finish it.
Fix 2: Enable Metered Connection
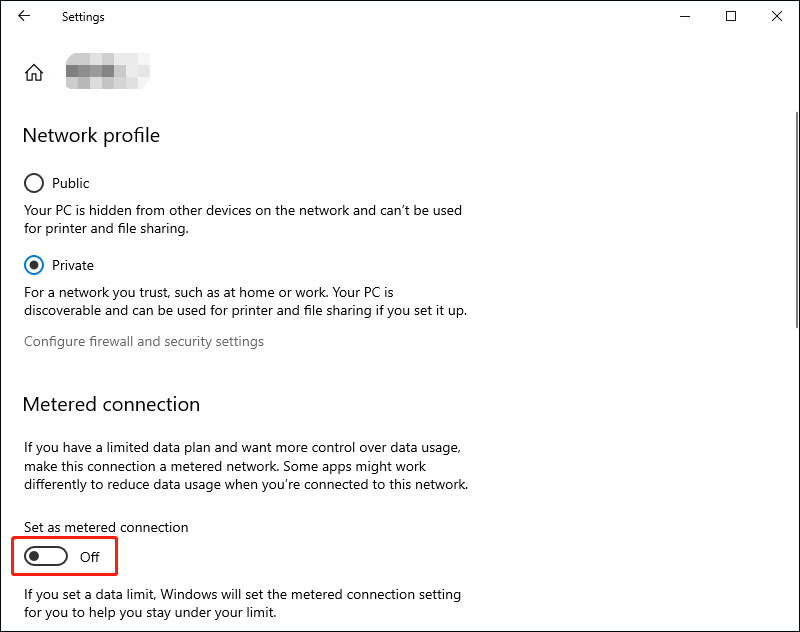
You can enable the metered connections to fix the undoing changes made to your computer issue on Windows 11 issue. Here is how to do that:
1. Press the Windows + I keys together to open the Settings app.
2. Go to Network & Internet > Ethernet.
3. Find your network and double-click it. Scroll down to find Metered connection and turn on the Set as metered connection button.
Fix 3: Run SFC and DISM
Another common cause for the “undoing changes made to your computer” issue is related to your system files. To scan and repair your system files, you can try running an SFC (System File Checker) or DISM (Deployment Image Servicing and Management) scan. Here is how to do that:
1. Type cmd in the Search box, and choose Run as administrator.
2. Type sfc /scannow and press the Enter key to continue. This process may take you much time to scan, please wait patiently.

3. If the SFC scan doesn’t work, you can try running the command below and press the Enter key after each one.
- Dism /Online /Cleanup-Image /CheckHealth
- Dism /Online /Cleanup-Image /ScanHealth
- Dism /Online /Cleanup-Image /RestoreHealth
Once done, reboot your PC and check if the undoing changes made to your computer issue gets fixed.
Fix 4: Run Windows Update Troubleshooter
Windows Update Troubleshooter is a practical built-in tool that enables you to detect and fix errors related to corrupted updates or other Windows updates issues. So, you can try running the troubleshooter to fix the “undoing changes made to your computer”. Here’s a tutorial.
1. Press Windows + I to open the Settings application.
2. Go to Update & Security > Troubleshoot.
3. Click Additional troubleshooters to expand all troubleshooters.
4. Find the Windows Update section and click Run the troubleshooter.
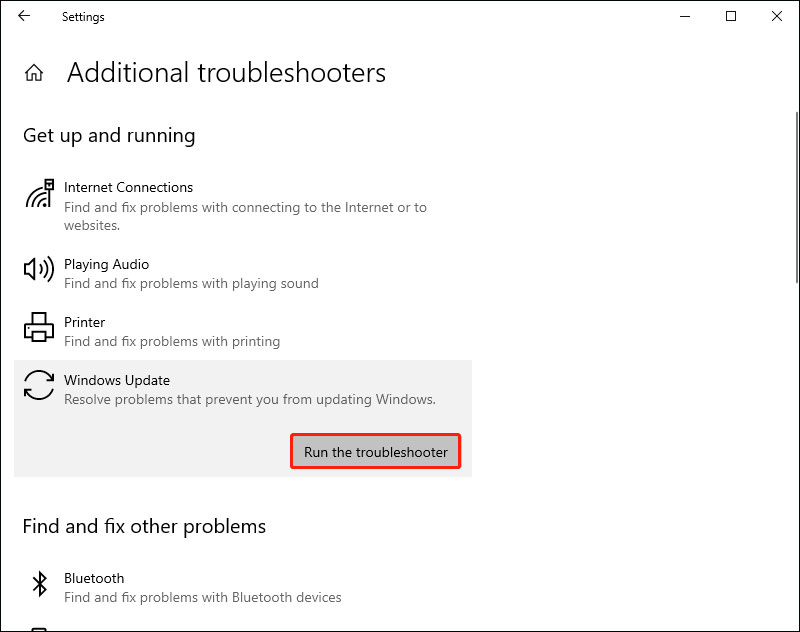
5. Now, this troubleshooter will scan issues associated with the Windows Update components. If any fixes are identified, click Apply this fix and follow the on-screen instructions to complete the repair.
Fix 5: Check the Event Viewer
Checking the system log in Event Viewer is helpful to find the culprit of the “undoing changes made to your computer ” error in Windows 11/10.
1. Type event viewer in the Search box and click Open.
2. Expand Windows Logs and choose System.
3. Check the errors that occurred simultaneously with the blue screen and fix the error according to the information.
Fix 6: Update Drivers
You have to ensure that you are using the latest version of the graphics driver. You will meet the “undoing changes made to your computer” issue if you have incompatible, corrupt, missing, or outdated drivers. To solve the issue, you need to update the driver.
1. Type Device Manager in the Search box to open it.
2. Double-click Display adapters to expand it. Then right-click your graphics card driver and choose Update driver.
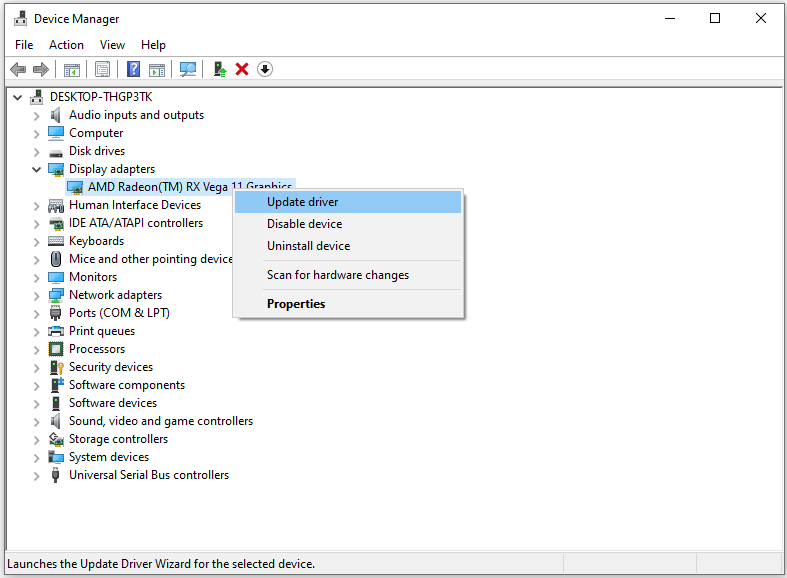
3. You will be asked how you want to search for drivers in the pop-up window. You should choose Search automatically for updated driver software and then follow the instructions to complete the process.
Fix 7: Perform a System Restore
You can try to perform a system restore to remove the “undoing changes made to your computer on Windows 10” issue. You need to notice that only if you have created a system restore point, you can try this method. Follow the guide below to do that.
1. Type create a recovery drive in the Search box and open it. Then, you can see the system protection tab in the system properties.
2. Then, click system restore. Now select the restore point to which you want to restore your system.
3. Click the Scan for affected programs button. Then, click Next to continue.
4. Once done, click Finish. It will restore your system to its previous state.
Fix 8: Rename SoftwareDistribution Folder
The next method for you is to rename the SoftwareDistribution folder. Here is how to do that:
1. Type Command Prompt in the Search box, then choose Run as administrator.
2. Now type the following commands to stop Windows Update Services and then press Enter after each one:
- net stop wuauserv
- net stop cryptSvc
- net stop bits
- net stop msiserver
3. Next, type the following command to rename SoftwareDistribution Folder and then press Enter:
ren C:\Windows\SoftwareDistribution SoftwareDistribution.old
4. Finally, type the following commands to start Windows Update Services and press Enter after each one:
- net start wuauserv
- net start cryptSvc
- net start bits
- net start msiserver
Reboot your PC and check if the “undoing changes made to your computer” issue has gone.
Fix 9: Disable Windows Defender Temporarily
Some antivirus programs can cause problems. Therefore, you can try temporarily disabling the antivirus software through the following steps. Here. I take Windows Defender as an example.
1. Type Settings in the Search box to open the Settings application.
2. Choose Privacy & Security and navigate to Windows Security. Then, click Open Windows Security.
3. Choose Virus & threat protection. Then, click Manage settings under the Virus & threat protection settings part.
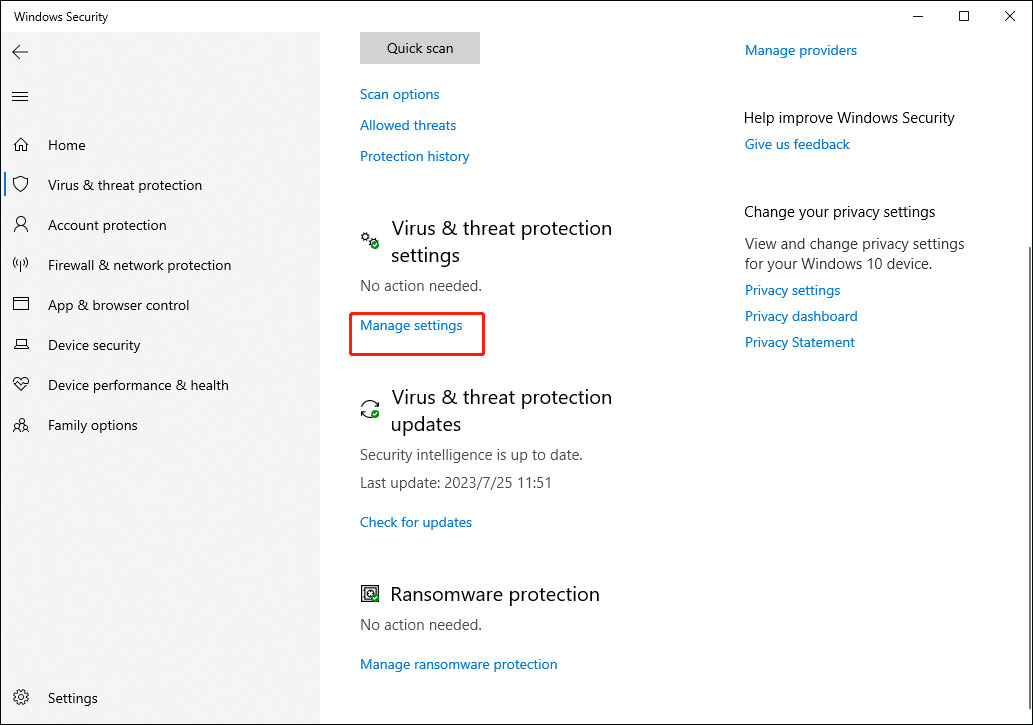
4. Turn the switch from Off to On under the Real-time protection section.
Fix 10: Reset This PC
If the above solutions are not working, you can try to reset your Windows 11/10. Since a factory reset will remove everything including documents, pictures, and installed applications, it’s recommended to back up the data to an external hard drive in advance.
MiniTool ShadowMaker TrialClick to Download100%Clean & Safe
1. Press the Windows + I keys together to open Settings.
2. Go to Recovery. Under the Reset This PC part, click the Get Started option.
3. On the Reset this PC page, you can choose Keep my files or Remove everything.
If you choose Remove everything, you don’t need to enter the admin password after resetting. Otherwise, if you choose Keep my files, you need to provide the admin password.
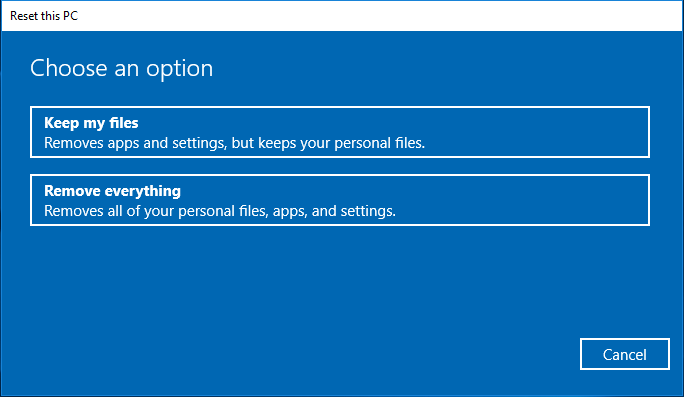
4. Next, choose Cloud download or Local reinstall based on your needs.
5. Then, you need to choose Just remove my files or Full clean the drive.
6. Finally, click Reset. Your PC will immediately start resetting itself to factory settings. Just keep your Gateway laptop on and wait for the reset to complete.
Back up the System After Fixing the Issue
After fixing the issue, it is recommended to create a system image so your data gets well protected and your computer can be restored to the previous working state lest accidents happen.
To back up the operating system, we recommend the PC backup software – MiniTool ShadowMaker. It is a professional backup tool that can back up the operating system, files and folders, partitions, and disks.
Download MiniTool ShadowMaker Trial from the following button.
MiniTool ShadowMaker TrialClick to Download100%Clean & Safe
1. Install the backup software and launch it. Click Keep Trial to continue.
2. By default, the operating system is selected as the source and the backup destination is selected automatically. You can change the backup destination by yourself.
3. Perform the backup actions by clicking the Back Up Now button. Or click Back Up Later to delay the backup action. Then the backup task can be seen on the Manage page.
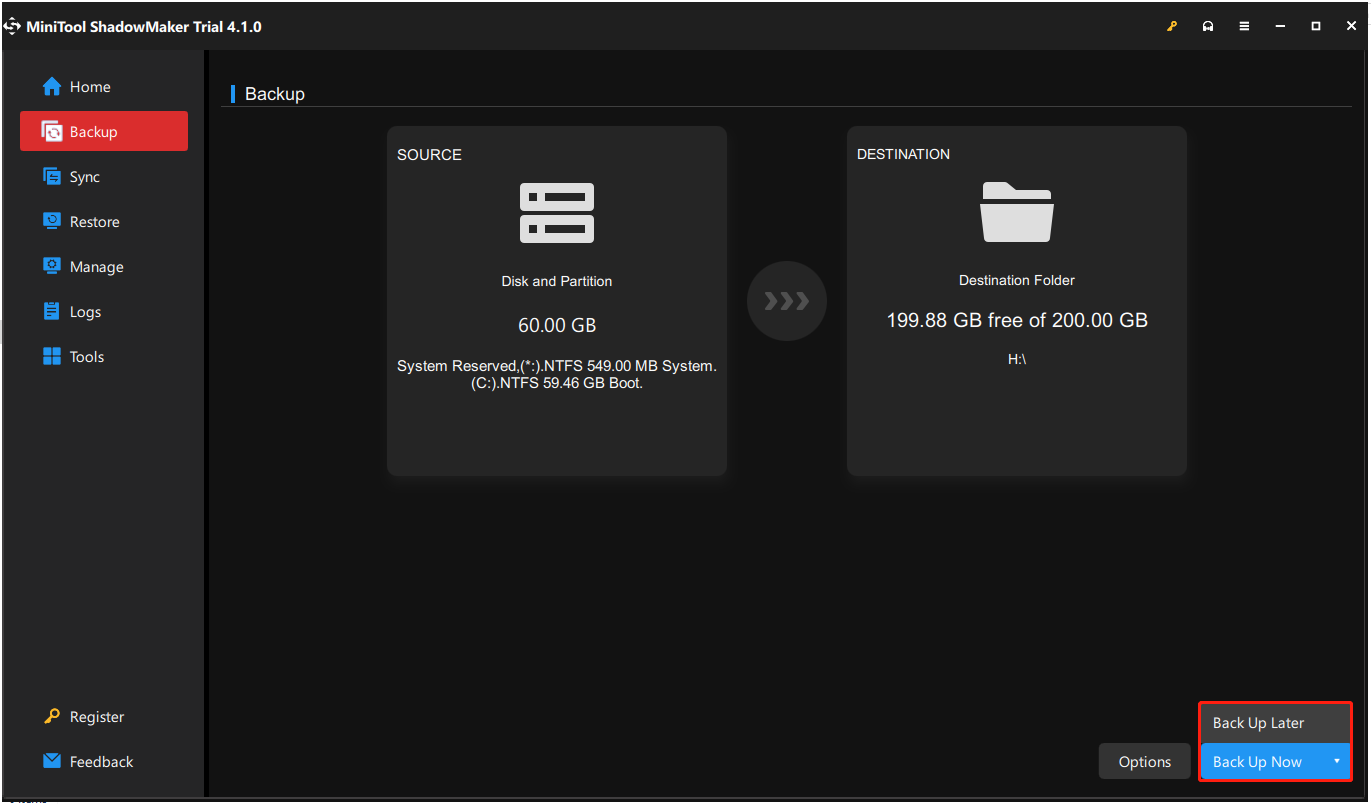
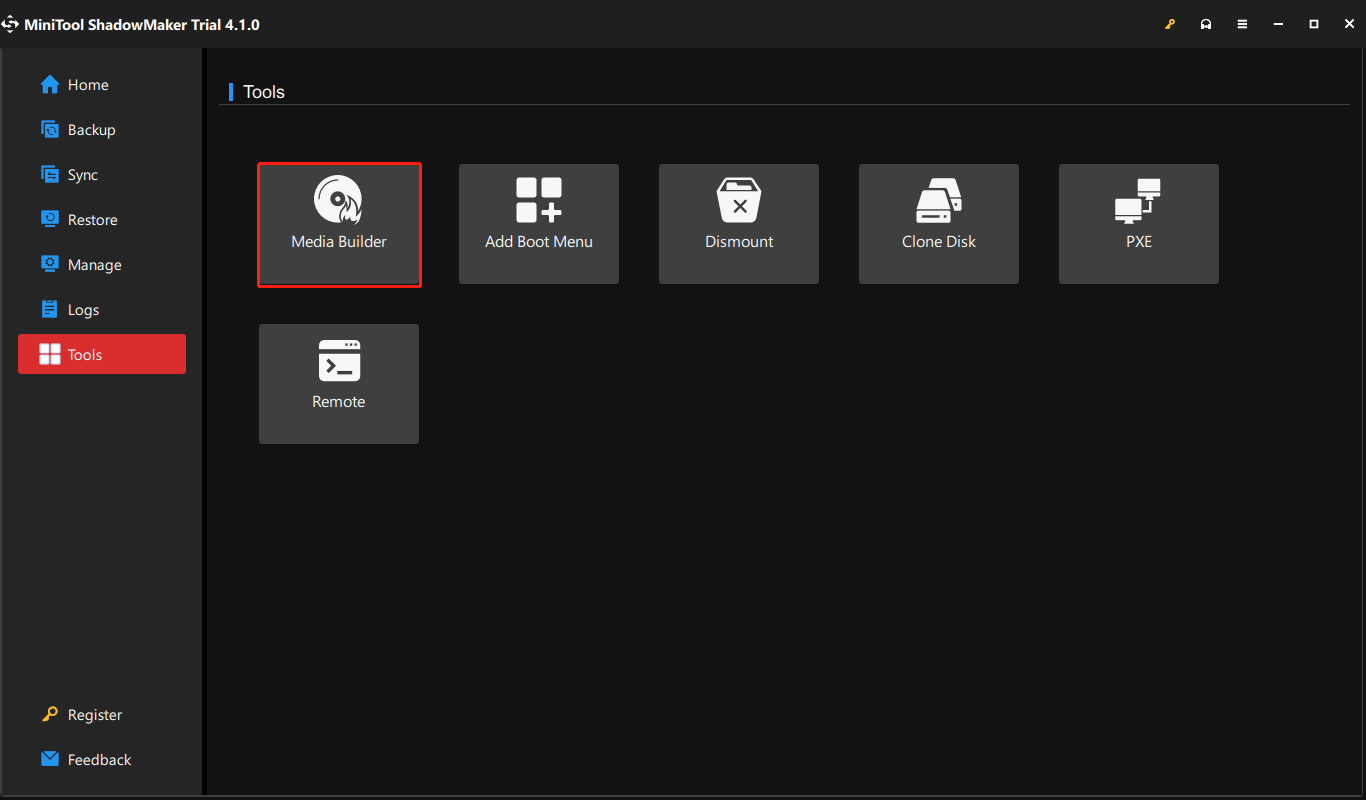
4. After the backup has finished, go to the Tools tab and click the Media Builder button to create a bootable disc or a USB flash drive so you can boot your computer from it to enter MiniTool Recovery Environment and perform some recovery actions.
Bottom Line
In conclusion, this article focuses on how to fix the “undoing changes made to your computer” issue. In addition, if you have any problem with MiniTool ShadowMaker, you can feel free to contact us via [email protected].

User Comments :