Users are allowed to upgrade Windows Server 2016 to 2019 to get a better user experience. However, during this process, how to make sure your data is intact and secured? This post on the MiniTool Website will give you an ultimate guide for Windows Server upgrades and additional tips for data security.
Do You Need to Upgrade Windows Server 2016 to 2019?
If you are still struggling with whether or not to upgrade Windows Server 2016 to 2019, we recommend you do that. Windows Server 2019 can provide more services than Windows Server 2016 and boasts many advantages that are worth trying. The features it offers include:
- Increased number of users and devices
- Virtualization enhancements
- Better protection for your data and system
- High scalability with superior performance
- Seamless integration with the cloud
- Simplified server management
- Increased efficiency and productivity
- Azure Stack HCI is supported with the Azure-like cloud environment available
- CPU and memory usage is monitored in real-time
With its better design and advanced features, we recommend you start the Windows Server upgrade from 2016 to 2019. Luckily, you can directly perform this upgrade via the easy steps we introduced later, but there is something you need to notice here.
What Should You Know Before Windows Server 2016 Upgrade to 2019?
Before you upgrade Windows Server 2016 to Windows Server 2019, you need to make sure you are qualified to finish this task. To do this task, there are some requirements.
1. System Requirements
The requirements of Windows Server 2019 are quite similar to Windows 10 because Windows Server 2016 was the first server OS to be built on the Windows 10 kernel.
- Processor – 1.4 GHz 64-bit processor; NX and DEP support; with secondary address translation (EPT or NPT) supported
- RAM – 512 MB
- Disk Space – at least 32 GB for a fresh installation; at least 60 GB of free disk space for an in-place upgrade
- Network – Gigabit (10/100/1000 based) Ethernet adapter and compliant with PCI Express Architecture Specification
- Optical Storage – DVD drive (when installing the operating system from DVD media)
- Video – Super VGA (1024 x 768) or higher resolution
- Input Devices – Keyboard and mouse
- Internet – Broadband access
You can compare these indicators to your qualifications and adjust the deviation for your device.
2. Windows Server doesn’t have the option of in-place upgrade but Server 2019 has Cluster OS Rolling Upgrade, which allows users to upgrade the OS of your Server from Server 2012 R2 and Server 2016 without stopping easily.
However, during this process, you still need to notice that the upgrade will fail with very minimal chances. Apart from the basic requirements you need to check, the following tips and tricks require your attention.
- Prepare an installation media ready for use and make sure the source of Windows Server 2019 installation files is reliable; You can perform the upgrade from DVD, from a mounted ISO, or from files extracted from an ISO image.
- Make sure you have a valid product key and the activation method is available. Don’t discard the product box casually and the product key will be on a label of the card inside the product box. Since it is a long string of numbers, you should be careful when inputting them.
- Make sure you have enough time to wait for the upgrade to finish. When the upgrade starts, don’t casually abort the process. Your data can get lost for the move. You can set a target time frame for the upgrade, which can give you the estimated time you need to wait for the upgrade to be complete.
- Avoid the scheduled maintenance window. Just don’t apply the in-place upgrade during the same period as the maintenance window.
- Complete the latest updates to your Windows Server 2016.
- Ensure that you have backed up your data so that a quick recovery is useful when data loss happens.
After checking these tips, now you can start the next part to make the Windows Server 2016 upgrade to 2019 without losing data.
How to Upgrade Windows Server 2016 to 2019?
Part 1: Protect Your Data
The first step in a safe Windows Server upgrade from 2016 to 2019 is to back up data. To make a full-fledged protection plan, you can create a system image so that you can quickly restore your system once something bad happens. Just in case, we advise you to save this image on an external hard drive.
System backup is easy to perform if you use this recommended backup software – MiniTool ShadowMaker. As Server backup software, it allows users to backup files & folders, partitions & disks, and your system.
Besides, many users would like to use automatic backup options with different backup schemes to save their time and disk space.
With high flexibility and compatibility, MiniTool ShadowMaker is available to install on most systems, including Windows 11/10/8.1/8/7 all editions, and Windows Server 2008/2012/2016/2019/2022.
Please download this software and install it on your Windows Server 2016 for this 30-day free trial.
MiniTool ShadowMaker TrialClick to Download100%Clean & Safe
Step 1: Launch the program and click Keep Trial to enter MiniTool ShadowMaker.
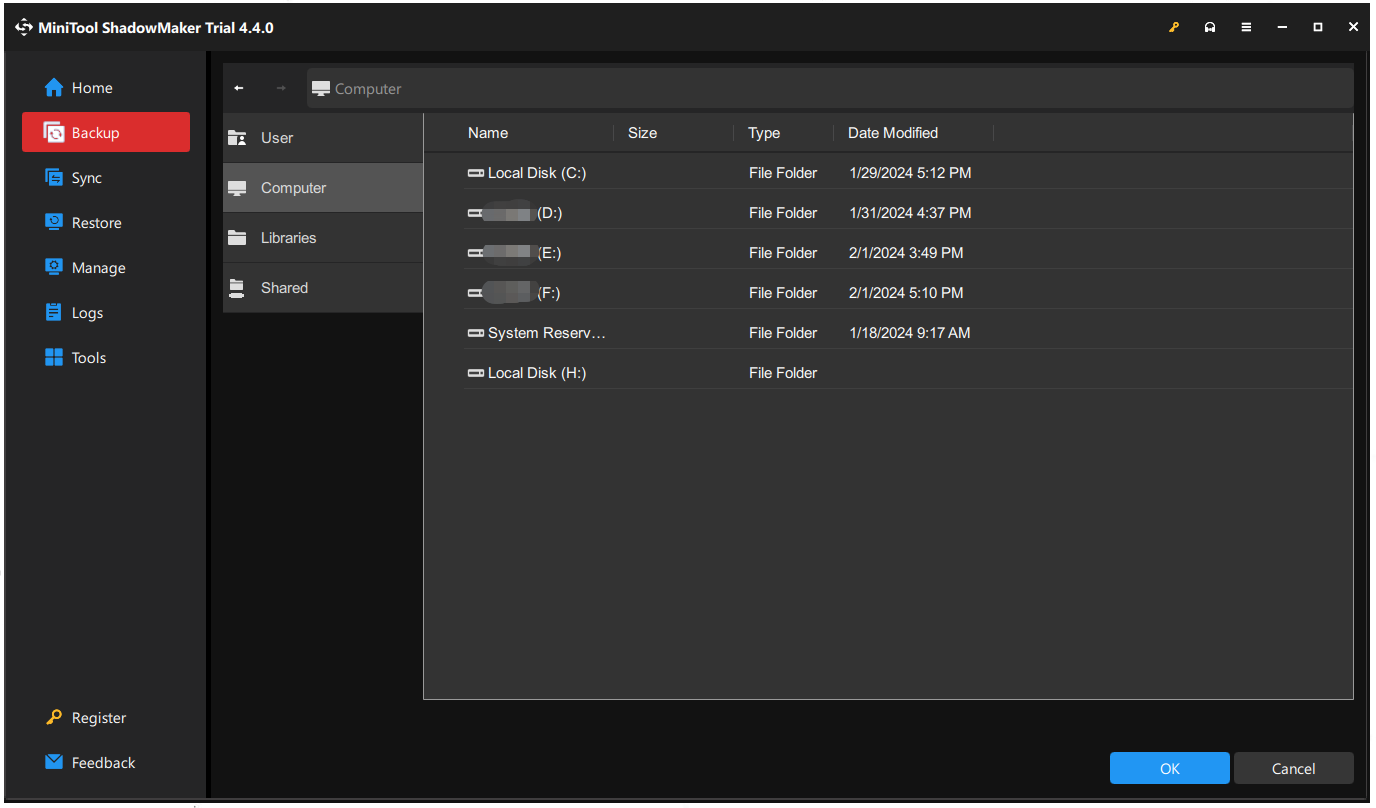
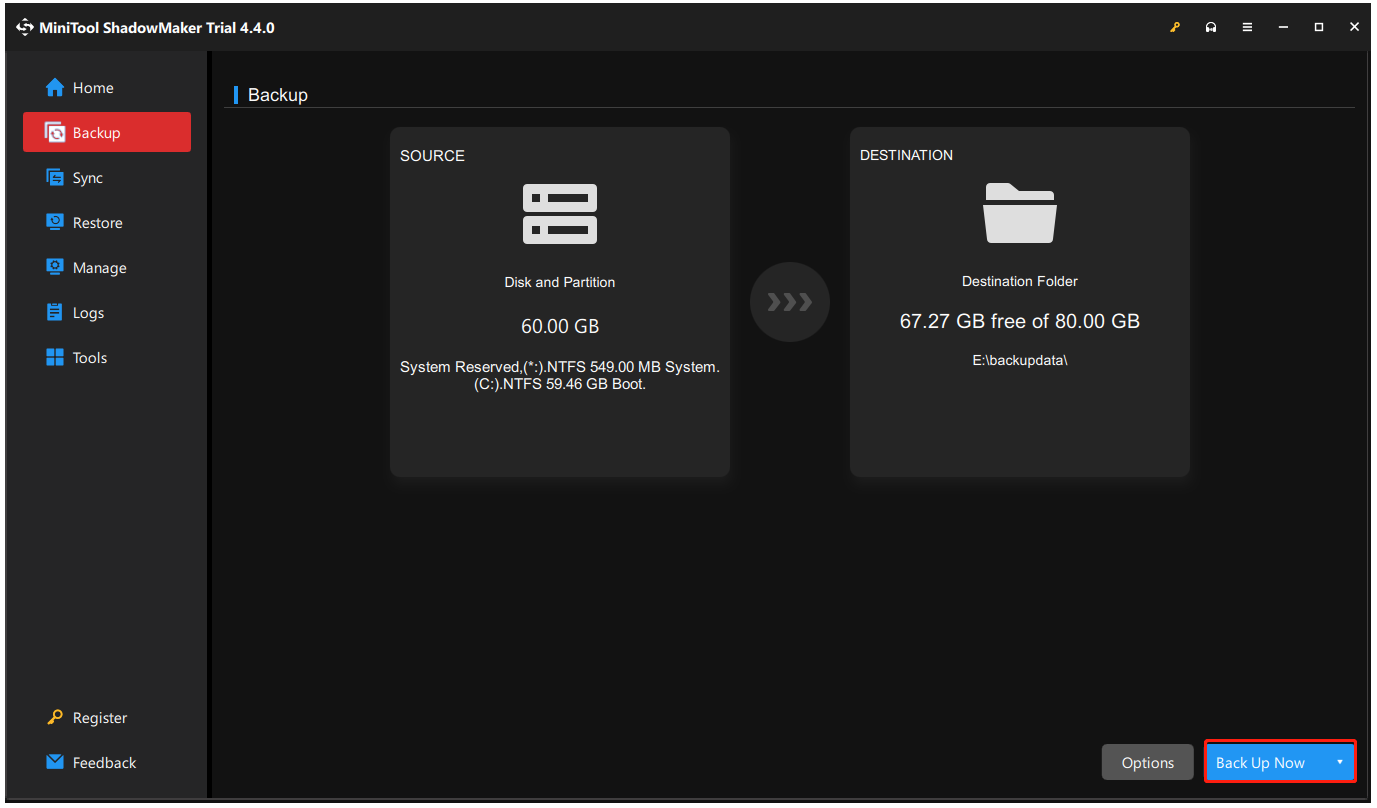
Step 2: Go to the Backup tab and you can see all the partitions related to the system have been selected in the SOURCE section by default so you don’t need to change that.
Step 3: Click the DESTINATION section where you can choose internal/external hard drives, USB drives, or shared folders as your destination. Please locate your external hard drive and click OK to confirm the choice.
Step 4: When you have checked all the needed options, you can click Back Up Now to start the backup task immediately.
Alternatively, choose Back Up Later from the arrow menu and check this task in the Manage tab.
Part 2: Upgrade Windows Server 2016 to Windows Server 2019
Here, you come to the second step which is the Windows Server 2016 upgrade to 2019. After you get your data protected and make sure of the qualifications, the upgrade process will become smoother and quicker. Here is a detailed guide for every step required in your upgrade.
Step 1: Make sure you have connected or installed the Windows Server 2019 installation media, and you need to log in to the server as an administrator.
Step 2: Locate the Windows Server 2019 setup media and run the setup.exe file. If you see a prompt to ask for your confirmation, please click Yes to confirm the setup process.
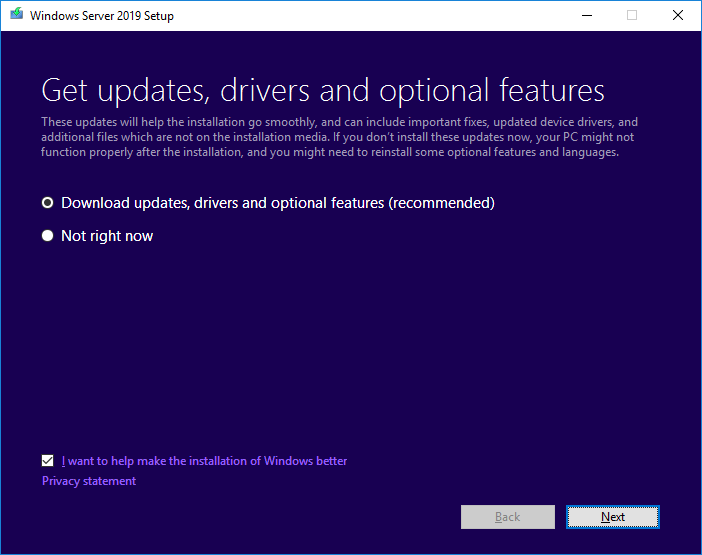
Step 3: When the Windows Server 2019 Setup window appears, please check the option of Download updates, drivers, and optional features (recommended) and click Next to continue the steps.
Step 4: Now, your PC will start checking the device configuration and this process will take some moment. When the configuration is finished, click Next to go on.
Step 5: Then you will be prompted to enter your product key. According to its instructions on the screen, make sure you input the right codes and click Next for the next steps.
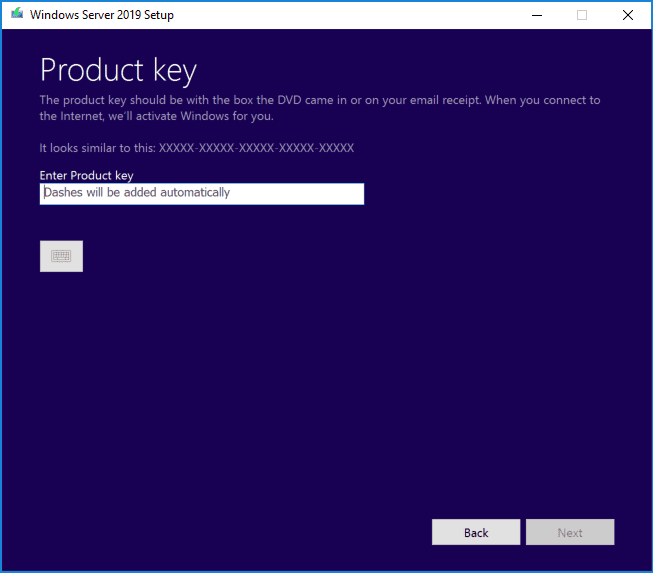
If you don’t know where to find your product key, you can check your official Microsoft account where the key will be digitally stored if you have purchased the system from the Microsoft Store. Of course, the product box and email receipt are also the key to finding your product key.
Step 6: In this procedure, it’s time to select the image of the edition you want to install. The upgrade will recognize the system you are coming from and give you the correct options for upgrade. You can choose the edition and click Next.
Step 7: Then you will receive a piece of applicable notices and license terms from Microsoft. Sometimes, depending on the distribution channel of Windows Server media, the information may vary among users. Clicking Accept will prompt you to the following procedure.
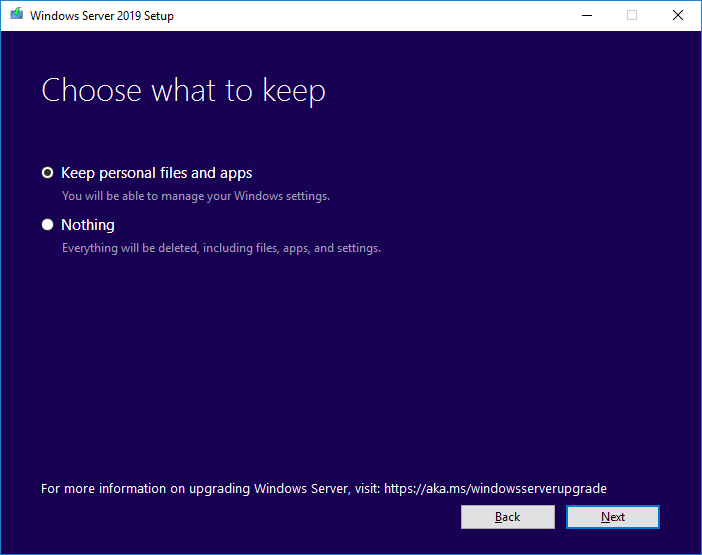
Step 8: In the Choose what to keep window, there are two options you can choose – Keep personal files and apps and Nothing. When you choose Nothing, all your data, apps, and settings will be erased, so think twice before you select this one. Then click Next.
Step 9: Another analysis will start and when it is completed, you will be prompted to confirm your image and upgrade selection. Please click Install to start the upgrade process and your server will automatically restart after the installation finishes.
Bonus Tip: Windows Server 2019 Essentials vs Standard vs Datacenter
In step 6 in the prior part where you need to choose an edition of your Windows Server 2019, some users will be provided with three options – Essential, Standard, and Datacenter. If you don’t know how to choose, there is a brief introduction to them.
- Windows Server 2019 Essentials – This edition, with limited memory, offers easy-to-use and affordable server services for small businesses with up to 25 employees and 50 devices for use.
- Windows Server 2019 Standard – This edition has a relatively higher price compared to the Essential edition and better flexibility with more than 25 users being allowed. It also allows more than 1 server to separate server roles.
- Windows Server 2019 Datacenter – This edition is the most complete edition with the new Datacenter-specific features, which is better suited for large-scale virtualization.
If you need more details about Windows Server 2019 Essentials vs Standard vs Datacenter, this article will be useful: Windows Server 2019 Essentials vs Standard vs Datacenter.
Bottom Line:
To upgrade Windows Server 2016 to 2019, you need to do some preparations and the most important is to make sure your data is secured. This full guide has made every single step clear and you can follow them one by one to finish the task.
Furthermore, don’t omit the step for backup because it can make a big difference once some operations slip up. MiniTool ShadowMaker can make the process easier and more functions and features can satisfy your demands.
MiniTool ShadowMaker TrialClick to Download100%Clean & Safe
If you have any problem when using this software, you can contact our professional support team for help via [email protected].
Upgrade Windows Server 2016 to 2019 FAQ
Related post: How to Install, Set up, and Configure Windows Server 2022?
User Comments :