Update: The official Windows 11 is already available since October 5, 2021.
About Storage Spaces
Storage Spaces is a kind of technology in Microsoft Windows and Windows Server operating systems (OSes) that protect data from drive failures. Conceptually, it is similar to Redundant Arrays of Independent Disks (RAID) but implemented in software.
Related article: Windows 10 Storage Spaces vs RAID: Difference and Data Protection
What Is Storage Pool in Windows 11?
Windows Storage Pool is a type of computer hard drive technology that groups two or more hard disks together. Then, you can make use of the disk space within the storage pool to create one or more Storage Spaces. Only when you create Storage Spaces based on the storage pool, can you use its capacity. That is to say, you can’t directly use the space in a storage pool but through Storage Spaces.
Those typically save extra copies of data. Thus, if one of the drives fails, you still have an intact copy of the data. If the disk space is running out for the storage pool, you can add more drives to it.
The following are the most common ways to apply Storage Spaces.
- On a Windows PC
- On a stand-alone server with all storage in a single server. Learn more >>
- On a clustered server using Storage Spaces Direct with local, direct-attached storage in each cluster node. Learn more >>
- On a clustered server with one or more shared Serial Attached SCSI (SAS) storage enclosures holding all drives. Learn more >>
How to Create a Storage Pool (Together with Storage Spaces) in Windows 11?
To create storage pools or Storage Spaces in Windows 11, first of all, you need to connect extra hard disks to your computer. Usually, in addition to the system drive, at least two extra disks are recommended, either internal or external hard drives, or solid-state drives (SSDs).
THE QUALIFIED TYPES OF THE EXTRA DISKS ARE VARIOUS INCLUDING USB, SATA, AND SAS HARD DRIVES. BESIDES, THERE SHOULD BE NO DATA AND NO VOLUME ON THE EXTRA DISKS, BETTER BE UNFORMATTED OR RAW DISKS. OTHERWISE, THEY WILL PROBABLY BE UNAVAILABLE FOR CREATING A STORAGE POOL.
Then, you can start to create your storage pool with storage spaces with one of the below two methods.
#1 Create Storage Spaces with Windows Settings
Firstly, you are able to create a storage pool and Storage Spaces through Settings in Windows 11.
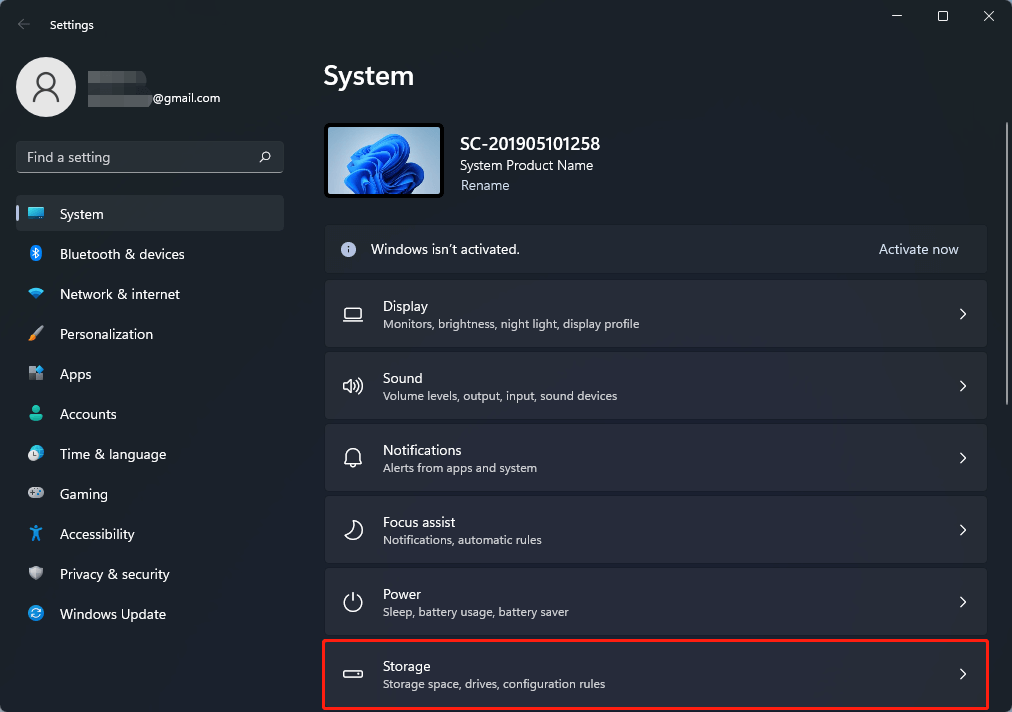
1. Go to Windows 11 Settings, in the default System tab, scroll down in the right area, find the Storage option and select it.
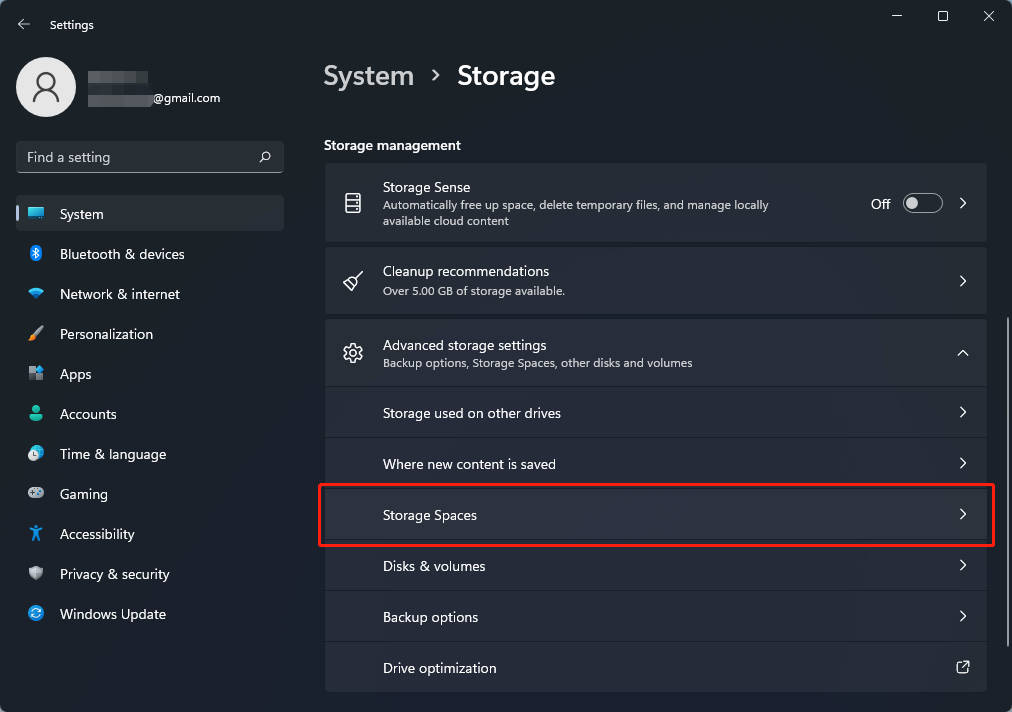
2. Next, on the Storage page, scroll down, find Advanced storage settings, unfold it, and choose Storage Spaces.
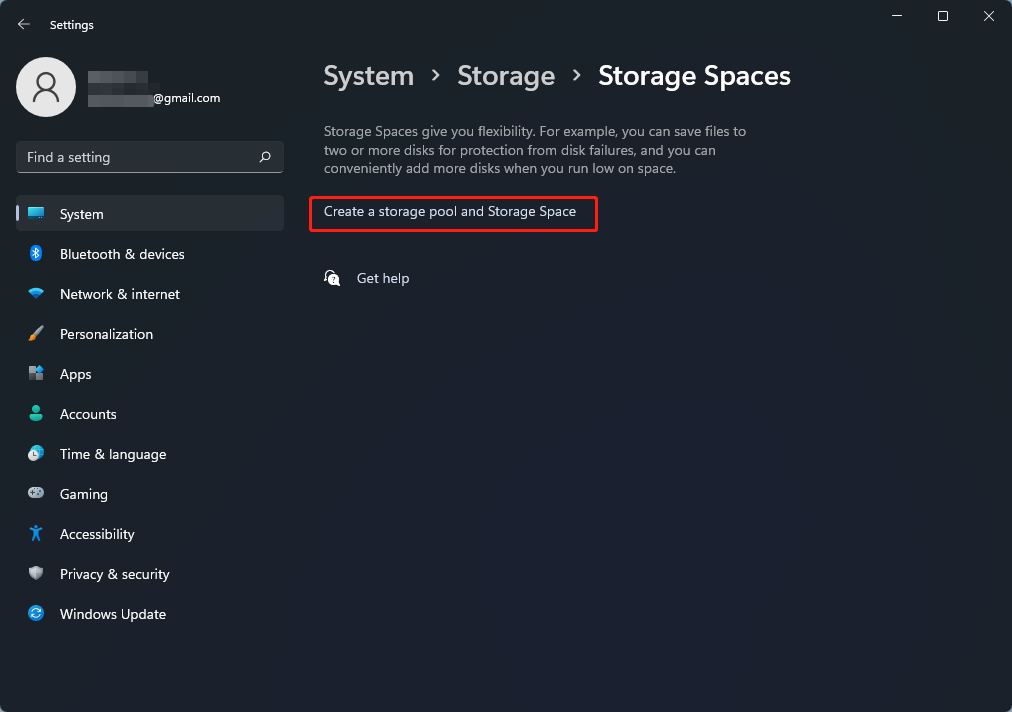
3. On the next screen, click the Create a storage pool and Storage Spaces.
4. Then, it will ask for your permission to open SpaceAgent.exe. Just allow it to run by clicking the Yes
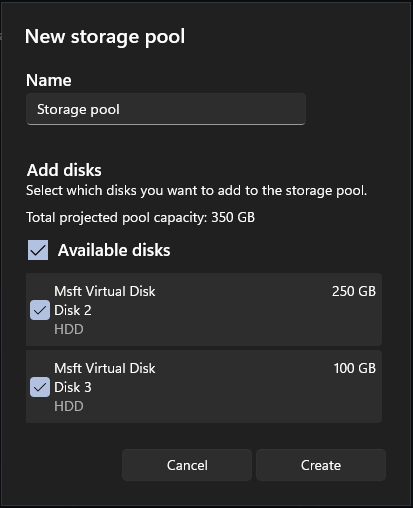
5. In this step, you can specify the name and hard disks of the new storage pool.
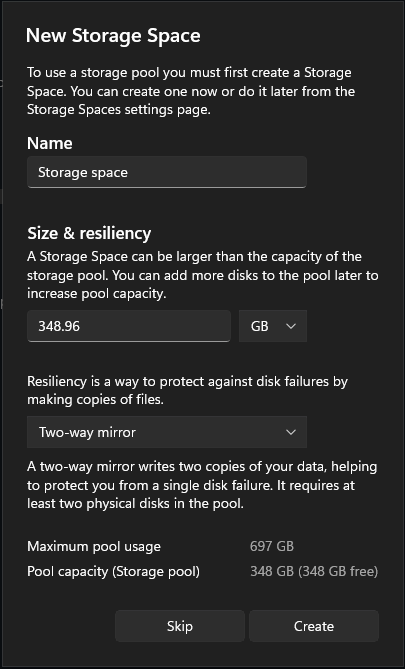
6. Next, create a new storage space for the new storage pool. The parameters you can personalize here are:
- Name: the name of the storage space.
- Size: A storage space can be larger than the capacity of the storage pool. You can add more drives to the pool later to increase pool capacity.
- Resiliency: Resiliency is a way to protect against disk failures by making copies of files.
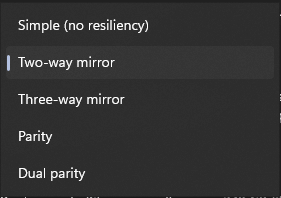
Besides, you can also decide the type of resiliency.
- Simple (no resiliency): A simple storage space writes one copy of your data and doesn’t protect you from drive failures. It requires at least one drive.
- Two-way mirror (default): A two-way mirror storage space writes two copies of your data, helping to protect you from a single drive failure. It requires at least two drives.
- Three-way mirror: A three-way mirror storage space writes three copies of your data, helping to protect you from two simultaneous drive failures. It requires at least five drives.
- Parity: A parity storage space writes your data with parity information, helping to protect you from a single drive failure. It requires at least three drives.
- Dual parity: A dual parity storage space writes your data with parity information on two disks, helping to protect you from two drive failures. It requires at least five disks in the pool.
To use a storage pool, you must first create a storage space. You can create one now or do it later from the Storage Spaces settings page. If don’t want to create one now, just click the Skip button. Otherwise, just special the parameters and click Create.
7. Create a new volume from the new Storage Space. You are permitted to customize the volume label, drive letter, file system, folder path to mount in (optional), as well as allocation unit size.
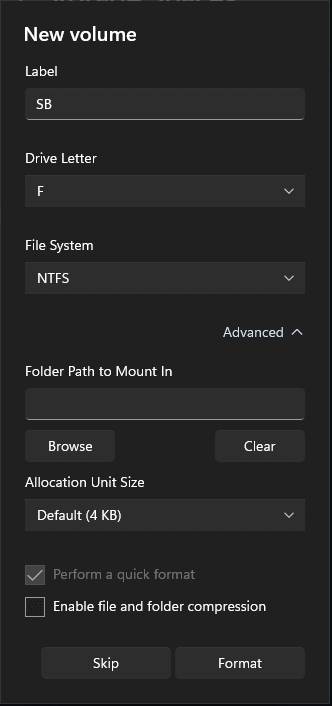
Moreover, you can Enable file and folder compression to save disk space. Finally, just click Format.
8. When you have successfully done all the operations above, you will see the details of your storage space on the Storage Spaces page.

There, you can continue to create a storage pool, create a storage space, or add more disk to the storage pool Windows 11. Besides, click on the storage space area and you will get two options: Explore and Properties.
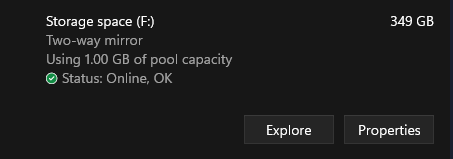
Click the Explore button and it will open the storage space in Windows Explorer. Choose Properties and you will get the following screen.
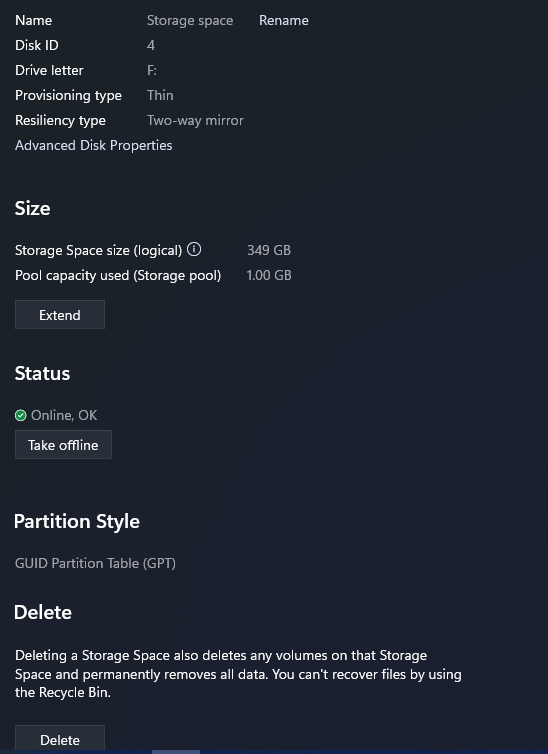
There, you can rename the storage space, view its advanced disk properties, extend its size, switch it between online and offline, as well as delete the storage space.
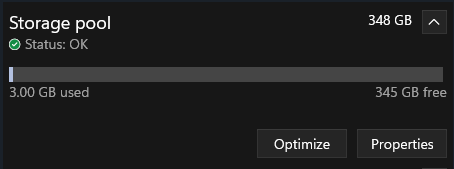
On the Storage Spaces main page, you can also click on the storage pool to access its options, Optimize and Properties.
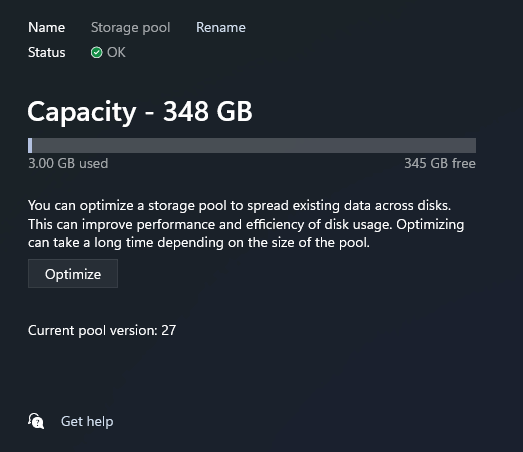
Select the Optimize option to optimize the storage pool to spread existing data across disks. This can improve the performance and efficiency of disk usage. Optimizing can take a long time depending on the size of the pool.
Click on the Properties button to view the parameters of the storage pool. There, you are allowed to rename and optimize the storage pool.
How to Delete a Storage Pool in Windows Settings?
You may wonder how to delete a storage pool if you don’t want it anymore. It seems no way since there isn’t any clue after reading the above content. No, there is!
To delete a storage pool, generally, you should first delete all the storage spaces within it. Then, delete all the hard disks consisting of the storage pool one by one. Finally, the storage pool will disappear automatically.
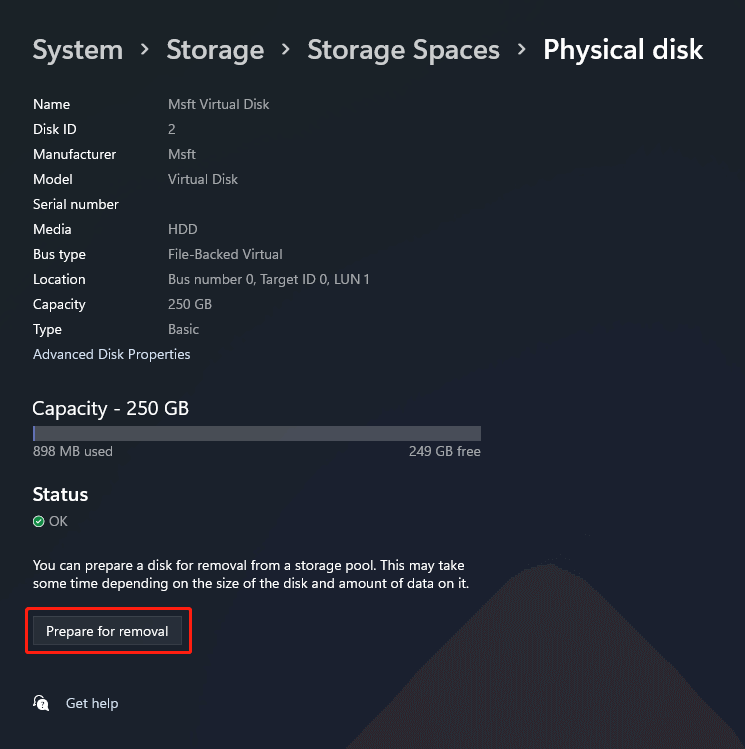
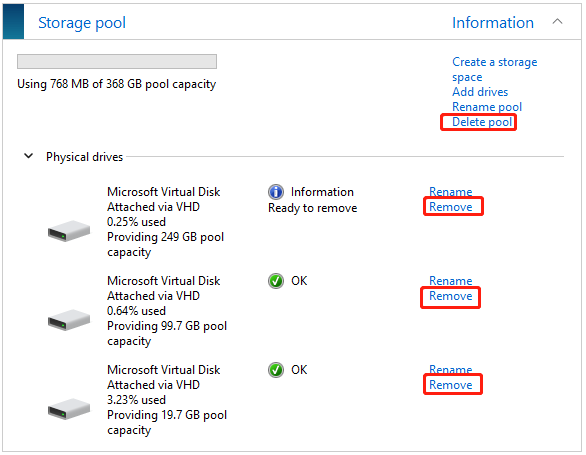
After deleting all storage spaces, click on one of the physical disks in the Storage Spaces page and click on the pop-up Properties button. Next, click the Prepare for removal button and then click the Remove button.
Just repeat the process to delete other physical disks. Finally, immediately after you delete the last physical disk, the storage pool will disappear.
#2 Create Storage Spaces via Control Panel
Besides Windows Settings, you can still create storage spaces and storage pools from Control Panel.
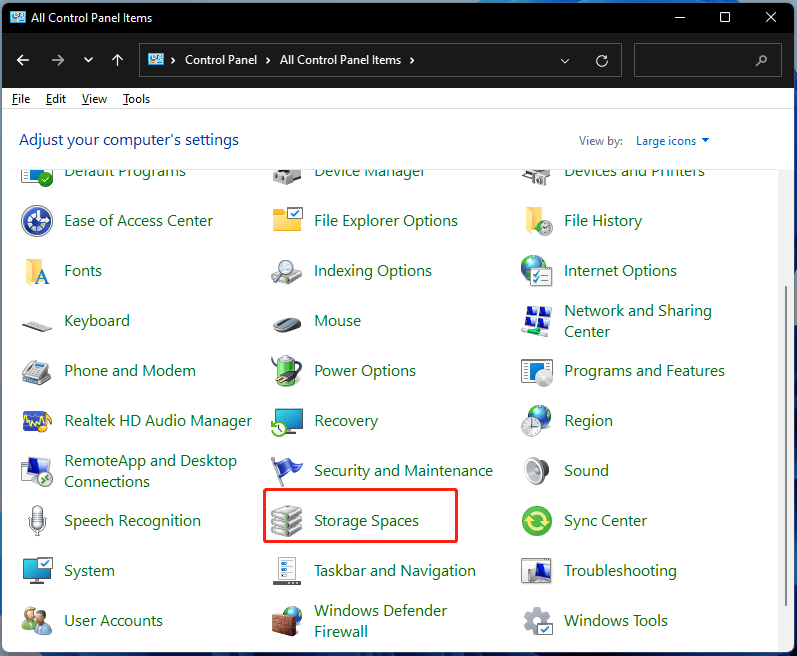
1. Open Windows 11 Control Panel, find Storage Spaces, and choose it.
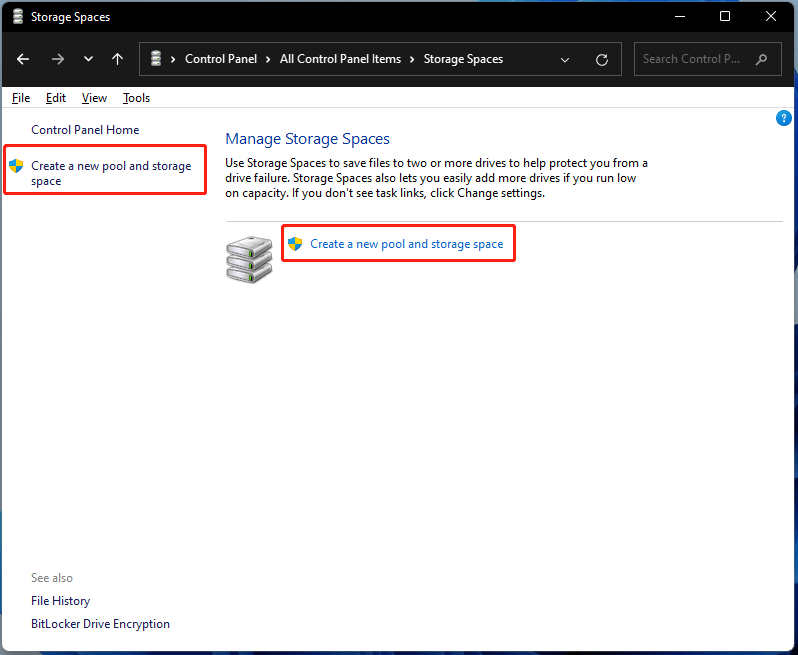
2. On the next screen, click on the Create a new pool and storage space option either in the left menu or in the right section.
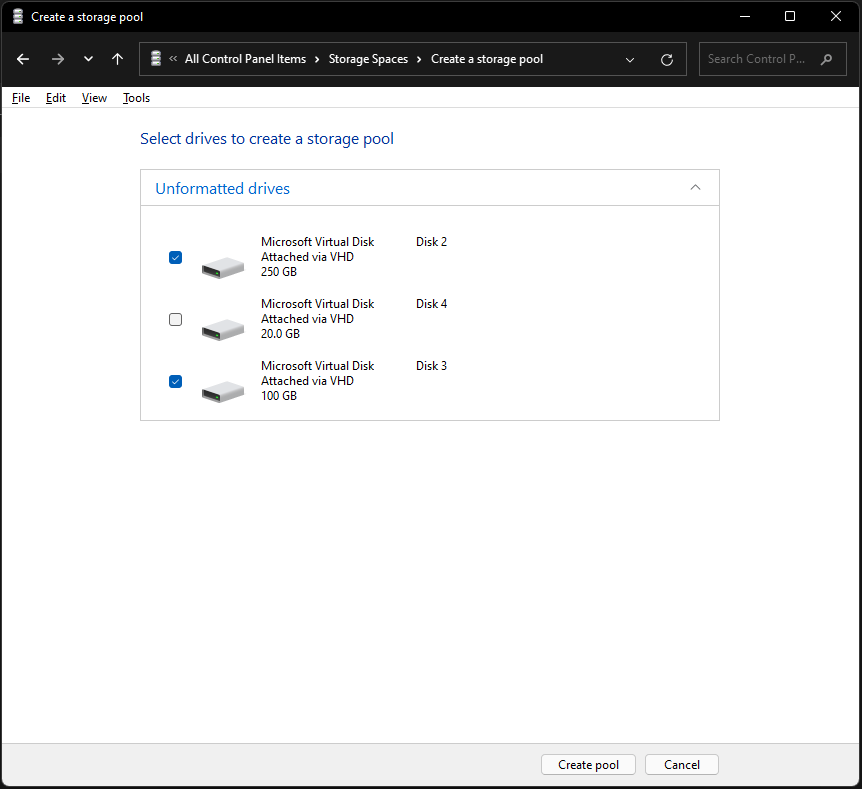
3. Next, select available drives (unallocated, unformatted, or raw drives) to create a storage pool.
4. Then, create a storage space for the new storage pool. Just specify the parameters of the storage space including name, drive letter, file system, resiliency type, and size. Finally, click Create storage space.
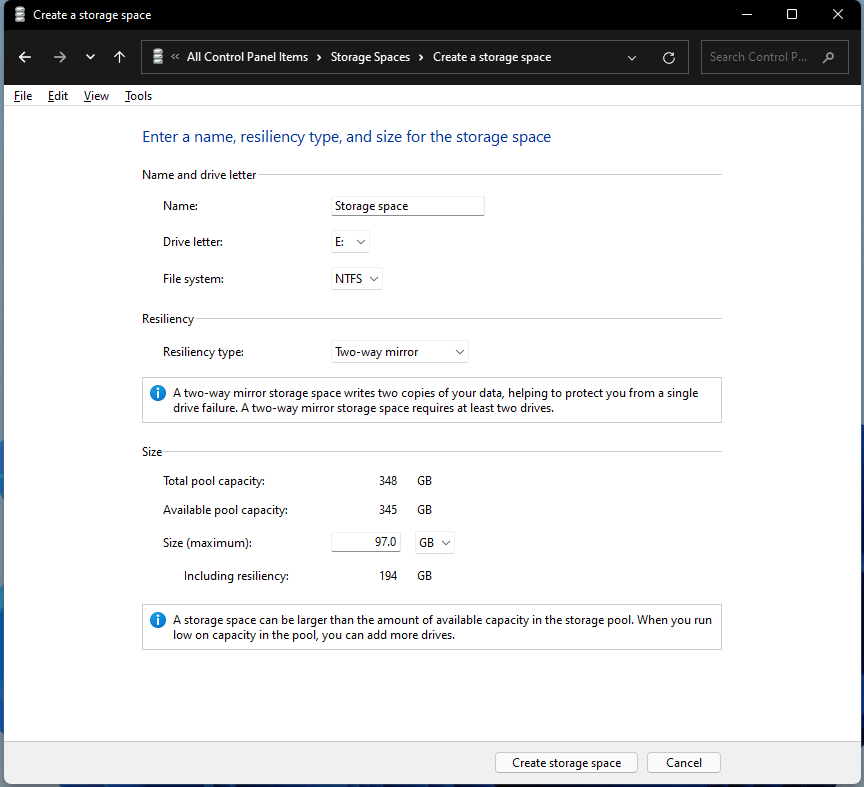
It is similar to creating storage space in Windows Settings. The only difference is that the Windows 11 Storage Spaces dual parity resiliency type here is missing.
5. Finally, you can view your storage pool together with storage space that has been successfully created! Just click on the Change settings button in the upper right to manage storage spaces Windows 11.

Here, you can continue to create a new pool and storage space from the left panel; create a storage space or add drives from the right part. Also, you can manage the created storage pool and storage space by renaming, optimizing drive usage, changing parameters, or deleting.
![[Solved] Can’t Add Drives to Storage Pool Error 0x00000032](https://images.minitool.com/minitool.com/images/uploads/2021/05/0x00000032-thumbnail.png)
How to Delete Storage Pool in Control Panel?
Also, you have to first delete all storage spaces within the target storage pool before you can delete the pool itself. When all storage spaces are removed, you can see an option called Delete pool appear behind the storage pool.
You don’t have to remove any physical disks of the storage pool, just click the Delete pool option and all the physical disks together with the storage pool will disappear.
How to Manage Storage Spaces with Third-Party Program?
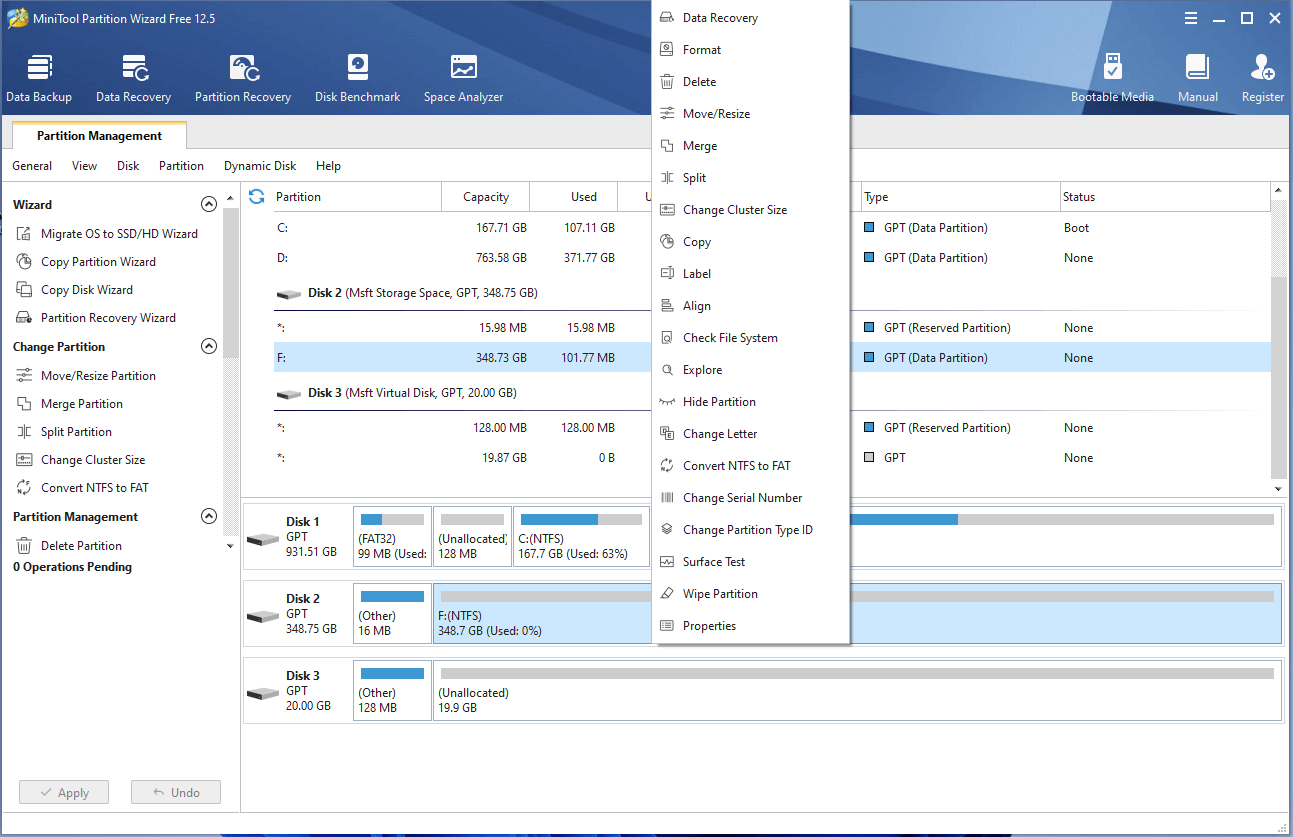
Besides the simple management of storage spaces within Settings or Control Panel, you can also rely on a powerful third-party app to do the work, such as MiniTool Partition Wizard, which enables you to extend/shrink, format, delete, merge/split, etc. the volume created from the storage space. It can also manage the whole storage pool by treating it as a single hard disk.
MiniTool Partition Wizard DemoClick to Download100%Clean & Safe
Windows 11 Storage Spaces vs Windows 10 Storage Spaces
Similarly, Storage Spaces in Windows 10 helps you protect your data from drive failure and extend storage over time as you add new disks to your machine. You can take advantage of Storage Spaces to gather more than one hard disk into a storage pool and use the capacity of the pool to create virtual drives named Storage Spaces.
In general, Storage Spaces and storage pools in Windows 11 are very similar to those in Windows 10. Especially, for Storage Spaces in Control Panel, there is no difference in both OSes. The biggest difference is Storage Spaces in Windows Settings.
You can learn how to use Storage Spaces in Windows 11 Settings above, as for Storage Spaces in Win10 Settings, there is only an entrance. Navigate to Settings > System > Storage > More storage settings > Manage Storage Spaces and you will be redirected to the Storage Spaces page in Control Panel.

Sync Files Anywhere in Case of Drive Failure
If you just want to keep another copy of your data to avoid data loss due to accidents, you don’t really need to create a storage pool and storage spaces, especially when you don’t have enough extra qualified hard disks.
Then, how to protect important files/folders without creating a storage pool windows 11? The solution is to rely on a professional and reliable file sync application like MiniTool ShadowMaker. Below is the guide to sync files to an external hard drive.
MiniTool ShadowMaker TrialClick to Download100%Clean & Safe
1. Download, install, and launch MiniTool ShadowMaker on your PC.
2. If it asks for purchasing, just click the Keep Trial option in the upper right to continue using it freely.
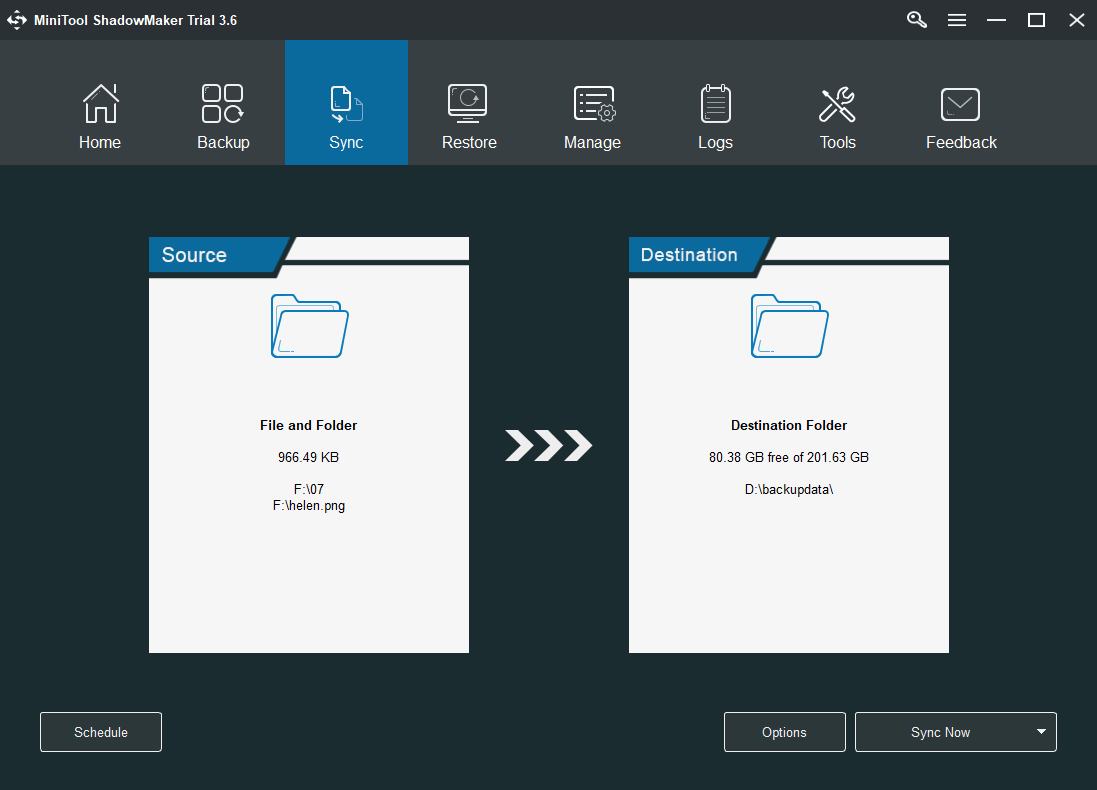
3. When it enters its main interface, select Sync in the top menu.
4. In the Sync tab, click the Source and Destination module to specify respectively.
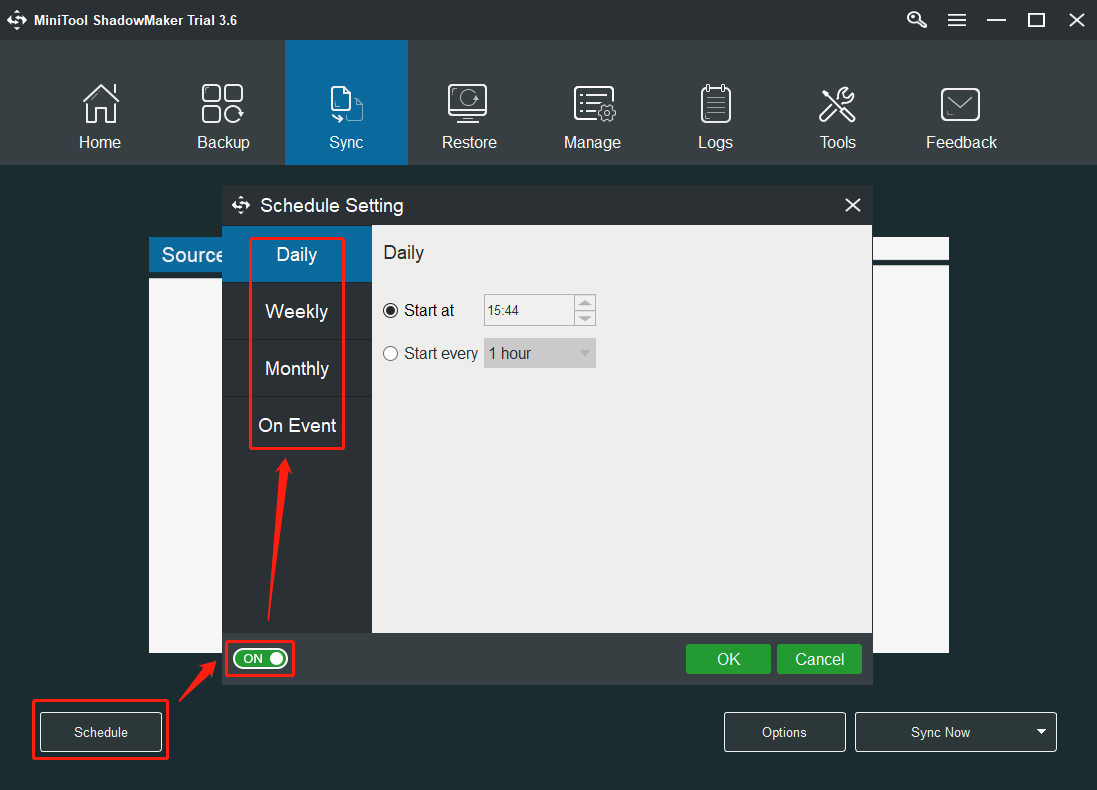
5. Click on the Schedule button in the bottom left, turn on schedule settings, and set up a proper schedule to automatically carry out this sync task in the future.
6. Finally, click on the Sync Now button to start the syncing process.
Besides synchronization, MiniTool ShadowMaker can also back up files/folders, partitions/volumes, system, and clone the entire hard disk to another drive. To enjoy more features of it, just click the below button and have a try!
MiniTool ShadowMaker TrialClick to Download100%Clean & Safe
In the end, storage pools and storage spaces are useful utilities for users to protect crucial data. Especially for advanced business users, you can build storage spaces and storage pools based on a stand-alone server or clustered server. If you are just a common Windows user, besides storage spaces, you can just rely on a simpler program to secure your data.
About The Author

Position: Columnist
Helen is a tech writer with over 10 years of experience. She specializes in creating easy-to-follow guides for video editing, media file conversion, and computer performance. Helen doesn't just write—she tests every software herself and listens to feedback from users and experts. Her goal is to make complex programs simple so that everyone can solve their tech problems with confidence.
User Comments :