The external hard disk is very useful when you want to copy files like videos, photos and some other important data from your computer since it has a large capacity. To back up data, the external hard disk could be your first choice.
But sometimes the situation that accidentally turned external hard drive to recovery disk and lose all data in it might occur.
Accidentally turned external hard drive to recovery disk will cause the external hard disk to lose all data. This usually happens due to lack of knowledge.
For example, you may want to create a recovery disk with an external drive and this is what in your mind: you think when you create a recovery disk, it will only take up a partition in your external drive and your data in the external drive will be safe.
But the truth is when you try to create a recovery drive, the external hard drive will become a FAT32 Recovery disk and lose all data. After this happening, how to recover data and fix the external drive becomes your first concern.

How to Recover Data after Accidentally Turned External Hard Drive to Recovery Disk
In fact, you can turn to a recovery company to restore lost data after external hard drive becomes recovery disk, only it is very expensive. Here with Power Data Recovery we recommend to you, you can get your data back without much money cost.
You can use the free data recovery software to recover data from HDD, SSD, USB and some other storage devices. Furthermore, it can save data lost due to formatting, deleting, partition loss and some other reasons.
MiniTool Power Data Recovery supports Windows 10/8.1/8/7, we suggest you use the trial edition to have a try. The trial edition of this tool can help you to scan the drive to check whether the software can find the data you want to recover. You should notice that it is not supported to save the scan results.
Click the button below to get the software.
MiniTool Power Data Recovery TrialClick to Download100%Clean & Safe
There are four data recovery modules: This PC, Removable Disk Drive, Hard Disk Drive, and CD/DVD Drive.
To restore data after accidentally turned external hard drive to recovery disk, which recovery module should be used? Among these four recovery modules, This PC is used to recover lost and deleted files from logically damaged, formatted, or RAW partitions.
So, we choose This PC mode to recover lost data from the external disk. Now just follow the step-by-step tutorial.
For your information: once you decide to recover the lost data, you need to note that do not write any new data to the external drive after data loss, or the lost data might be overwritten. That is to say, you may never get the lost data back.
Step 1: Launch this tool and enter This PC interface by default. Then select the external hard disk, after that, click Scan or double-click the external hard disk to continue.
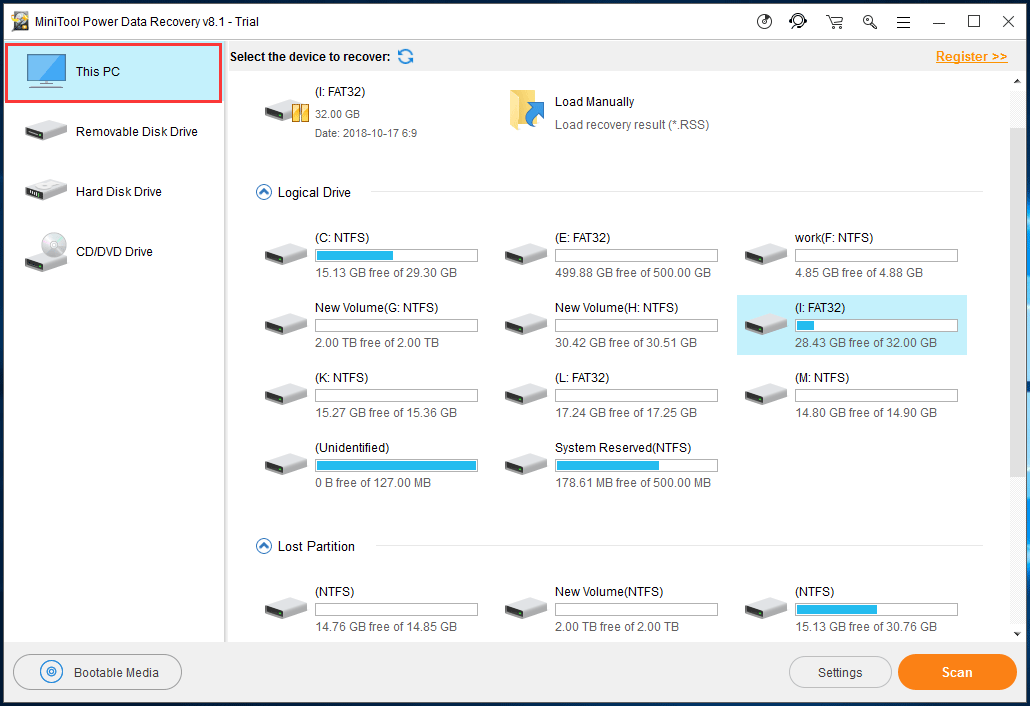
The scanning time depends on the capacity of your data in it. The more data it has, the longer it costs.
If you just want to recover some certain types of data, Settings feature of this tool can meet your needs. Click on the Settings button and then check the file types you want to recover from the pop-out window. After that, click on OK button to close this window.

Step 2: When the scan is finished, found partitions will be displayed in this interface. It contains all the found files. Then you need to select the files you want.
Please note that the tool will only display 10 partitions. If you can’t find the important data among these 10 partitions, load more partitions by clicking Show More Partitions to satisfy your demands.
Also, it is annoying that normally the external hard disk has a large capacity, as a result, the amount of data it contains might also be large. Then it will be a little difficult to find the certain files you want if there is no help.
Fortunately, this tool has set some features to help you find your needed files quickly. As you can see, there are a few buttons: Path, Type, Show Lost Files, Find, Filter, and Preview. These buttons can help you to lock the target quickly. Just click on them and follow the prompts to perform operations.
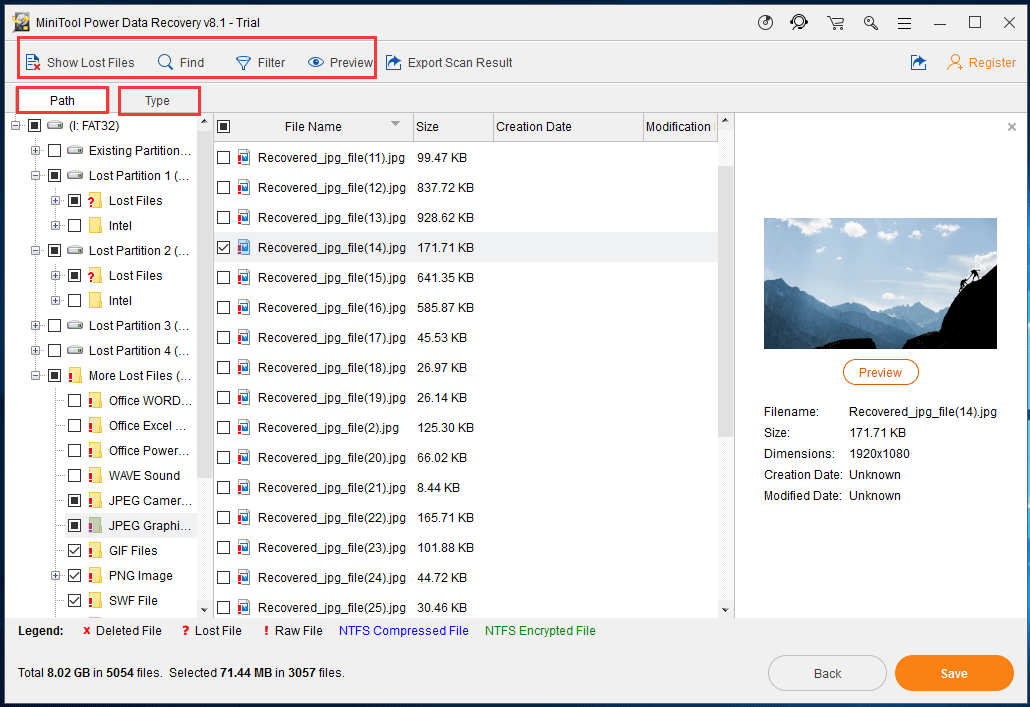
The function of Path button is to display the files you are looking for according to the specific path.
The function of Type is to show the files by type.
Also, you can use Show Lost Files button to let the program only display lost files for you.
If you remember the name of lost file or folder, Find would be a great choice to help you find the target files precisely.
Filter button is built to filter the found files by filename, size, date and so on.
The Preview button is used to preview a text or image file from the scan result. Only the file which is smaller than 20 MB is allowed to be previewed. You can use this feature to check the file you want.
Step 3: After selecting the target files, click Save to get lost files back. Remember: do not save it to the same path in case of overwriting.
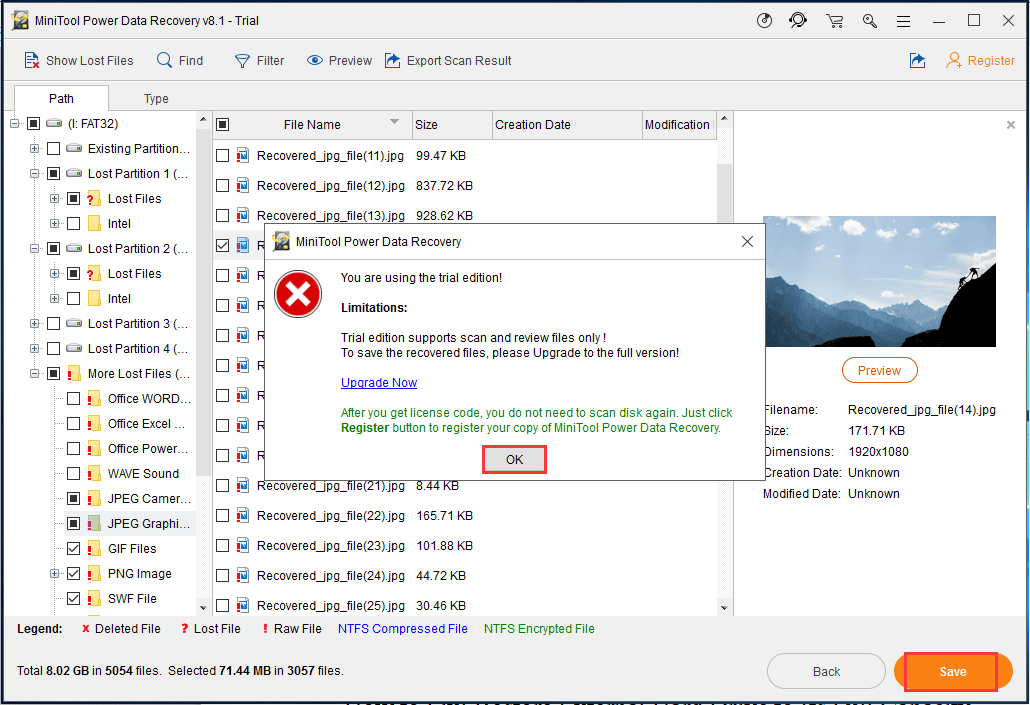
Please note that the trial edition is not supposed to save recovered data. If you want get these data back, please update it to an advanced edition.
After saving these found data successfully, you can go back to the specified storage path to check if the data is actually back to your computer. Of course, if they are here, remember to open the folder to make sure they can be read.
How to Fix: Restore External Hard Drive to Its Full Capacity
After recovering lost data from the external disk, the external hard drive only shows 32GB. it’s time to figure out how to restore external hard drive to its full capacity.
As mentioned above, creating a recovery drive with an external hard drive makes the external drive become a FAT32 Recovery disk and all data from external hard drive get lost. As a result, there will be an unallocated space.
However, you can’t create a partition on it before recovering data in case of overwriting.
Well after restoring all the data via Power Data Recovery, how to restore external hard drive to its full capacity? The basic thought is to delete the FAT32 partition and create a new partition to take up the unallocated space.
MiniTool Partition Wizard Free Edition is a partition manager for home and home office users. It is a partition manager which applies to Windows10/8/7, including powerful functions like deleting partition, creating partition, wiping partition and so on.
To restore external hard drive to its full capacity, you only need two easy functions of this tool: Delete Partition and Create Partition. Now just click the below button to get this program to have a try.
MiniTool Partition Wizard FreeClick to Download100%Clean & Safe
The step-by-step guide will be shown as follows. Before starting, you need to open the tool and launch it to its main interface by clicking Launch Application
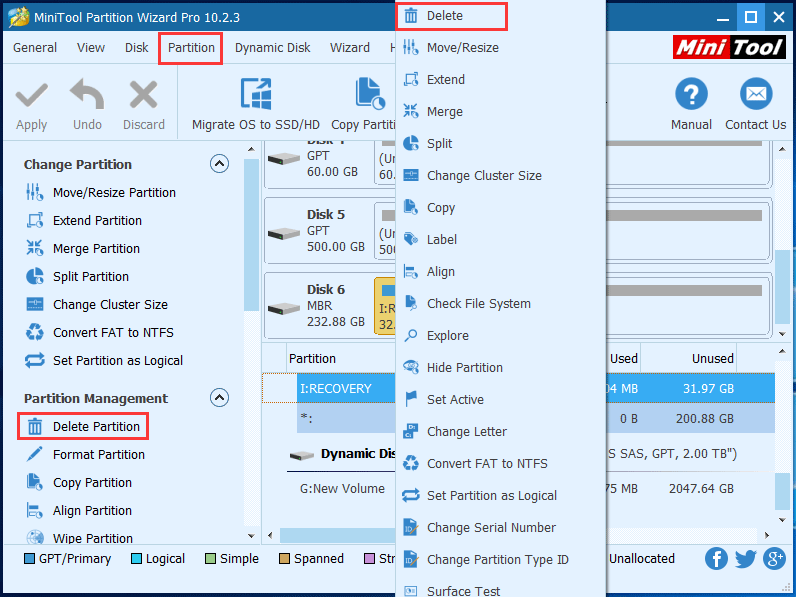
Step 1: choose a preferred way to delete the partition:
Select the partition which needs to be formatted and choose Delete Partition from the left action panel under Change Partition. Or you can choose Delete from the drop-down list after clicking Partition from the menu bar. What’s more, you can right-click on the target partition and then choose Delete from the pop-up menu.
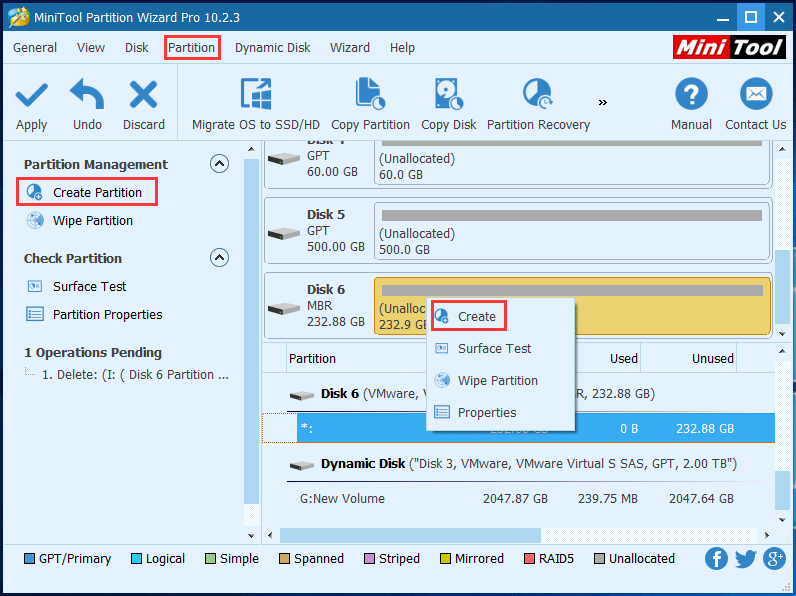
After this operation, an unallocated space shows on the external hard disk. Now it’s time to make the disk available again. It is also really easy. Just follow the below steps to have a try.
Step 2: choose Create Partition feature:
The way you choose this function is just the same as choosing Delete Partition feature which we have mentioned above.
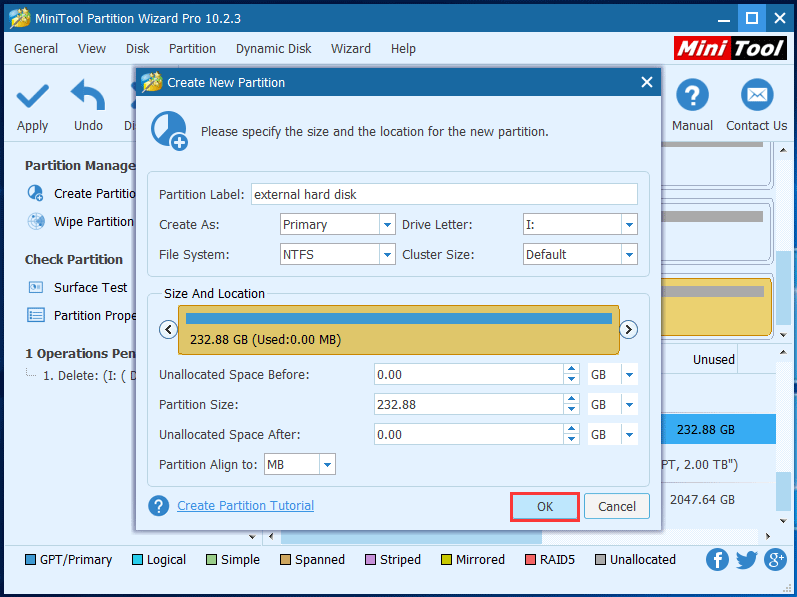
Step 3: set the parameters of the new partition:
After clicking Create Partition function, you need to set the parameters of the new partition in the jump-out window. It contains label, drive letter, partition type, file system, cluster size, size and location. After choosing all options, click OK to continue.
Here the demonstration sets the parameters of the new partition as below, you can use it as a reference.
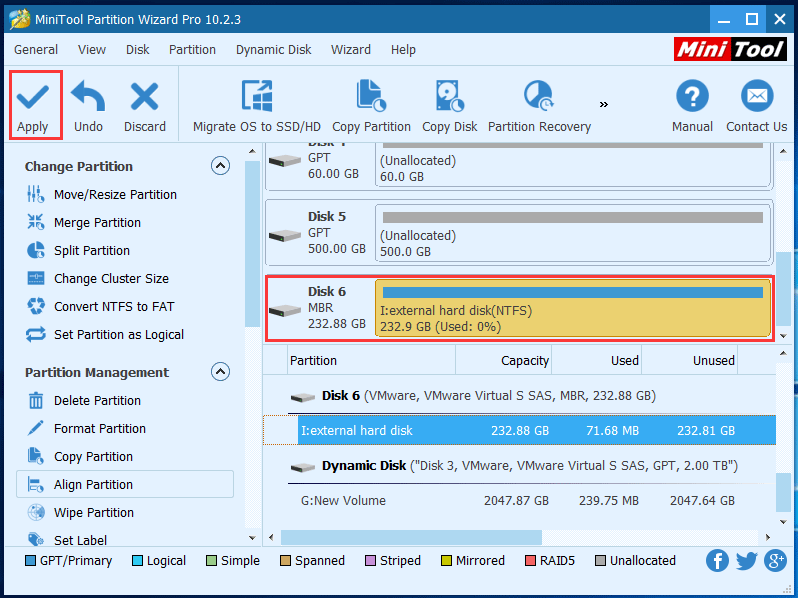
Step 4: Save the changes:
After all the operations, you can preview the changes in the main interface: the external hard disk seems available now. But this is not the end, to restore external hard drive to its full capacity successfully, please click the Apply button from the left upper corner to save all changes.
Now the process of restoring the external hard disk to its full capacity is completed, now your external hard disk can be used as usual.
Useful Tips on Accidentally Turned External Hard Drive to Recovery Disk Issue
Tip 1: Use an empty USB to create a recovery drive or remember to back up your important data.
To create a Windows recovery drive, a storage device is required. During the process, it will format the entire device to a FAT32 disk and all data from the device will be deleted. What’ more, creating a recovery disk requires at least 8GB.
Therefore, there is no need to use a large capacity device like external hard disk, and using an empty USB to create a recovery drive is a good choice.
Or you should remember to back up your data if you decide to use a USB with important data on it. MiniTool ShadowMaker is a free backup software which can provide professional backup solutions to protect your data.
Tip 2: Once your data is already lost because improper operations, do not overwrite the data.
If external hard drive becomes recovery disk issue has already happened and you have already lost your precious data, you can still use a data recovery program to recover the lost data as long as they are not overwritten by new data.
Thus, you’d better stop using the external hard drive as soon as possible when you found your files are missing coincidentally.
Conclusion
This article is mainly focusing on what to do if you accidentally turned external hard drive to recovery disk. As we have mentioned above, MiniTool Power Data Recovery could help you recover data from the external hard drive and then the free partition magic can fix the disk.
If you have any question when you are using this MiniTool data recovery program, you can leave a message below, or you can contact us by sending an email to [email protected]. If you have any useful solutions, you can also share with us.
About The Author

Position: Columnist
Stella has been working in MiniTool Software as an English Editor for more than 8 years. Her articles mainly cover the fields of data recovery including storage media data recovery, phone data recovery, and photo recovery, videos download, partition management, and video & audio format conversions.
User Comments :