Problem: Last week, I used my external hard drive (1TB) to create Windows installation media to do a clean install of Windows 10 on my laptop. However, after the installation, my hard drive was split into 32GB of ESD-USB and unallocated space and my files were deleted.

What happened to this hard drive? If you encounter the issue of “Windows Media Creation Tool deleted my files”, what should you do to recover deleted files?
Now keep reading to know what an ESD-USB drive is and how to effectively recover lost files from the ESD-USB 32GB drive as well as how to revert the ESD-USB drive to normal.
What Is an ESD-USB Drive
ESD is short for Electronic Software Delivery. ESD-USB is a special type of external storage device format that contains all the files needed to install Windows on other devices.
After creating Windows installation media using an external hard drive, this drive will only show 32GB in Windows Explorer and other partitions become unallocated, and saved data is lost.
When a drive is mistakenly converted to ESD-USB, you should:
First, stop using it immediately to avoid file overwriting. Second, recover lost data from the hard drive. Third, revert the ESD-USB drive to normal.
Part 1. Recover Files After Converting the External Drive to ESD-USB
To recover lost data on the ESD-USB easily, you can use MiniTool Power Data Recovery, a piece of professional and free data recovery software.
This all-in-one program offers wizard-like interfaces and easy operations which can help you complete data recovery in Windows 7/8/10/11 without any difficulty. What’s more, it is a read-only tool. In other words, you can use this program tool to recover lost data without bringing any damage to the original data.
Next, let’s see the detailed steps for data recovery.
Step-by-Step Guide to Recovering Lost Data After Converting the External Drive to ESD-USB
Before you do:
1. Download and install MiniTool Power Data Recovery.
MiniTool Power Data Recovery FreeClick to Download100%Clean & Safe
2. Connect your external drive to the computer.
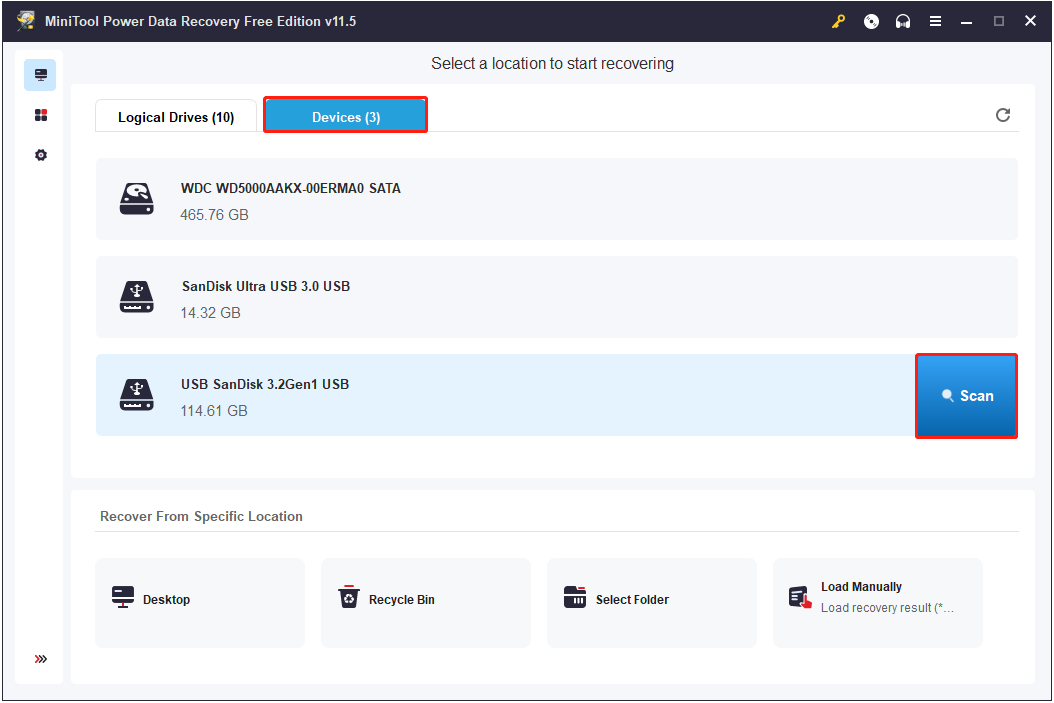
Step 1. Launch MiniTool Power Data Recovery to get its main interface. Move on to the Devices section, select the target USB drive, and then click the Scan button to start scanning for data on it (You can also double-click the target partition under the Logical Drives section to scan it).
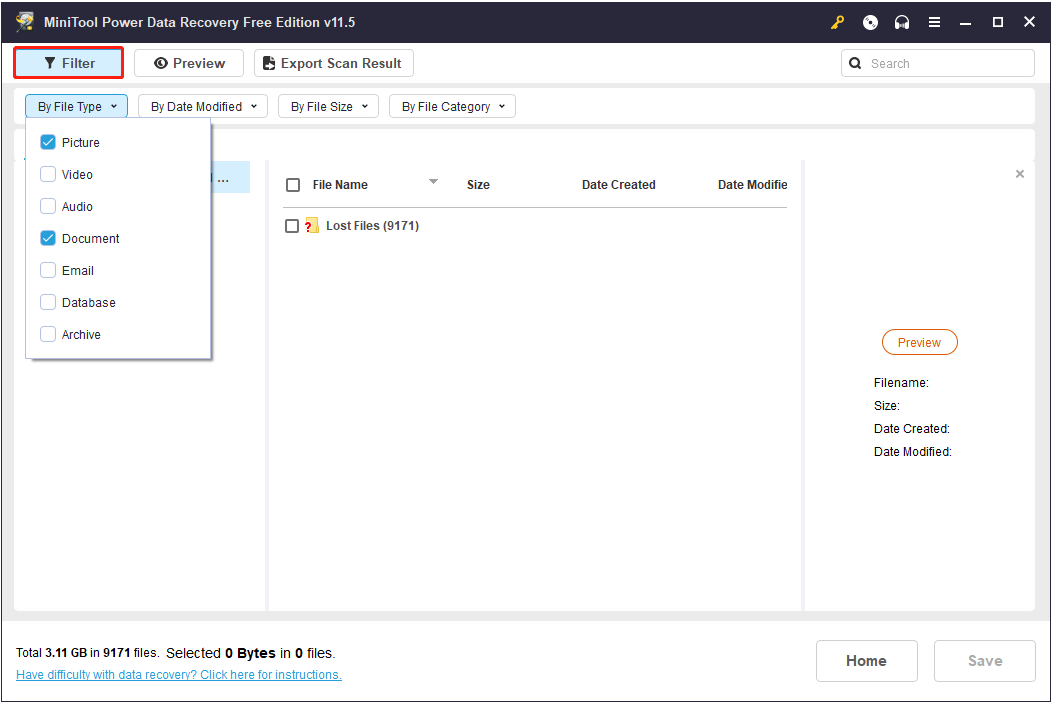
After scanning, MiniTool Power Data Recovery finds and lists a lot of files. Now you can turn to the Filter feature to filter unwanted files by file category, file type, file size, and date modified.
For instance, if you only want to see photos and documents, you can just choose Picture and Document as shown below.
Step 2. Preview and choose all needed files. Then click the Save button to store them in a safe place separate from the original path.
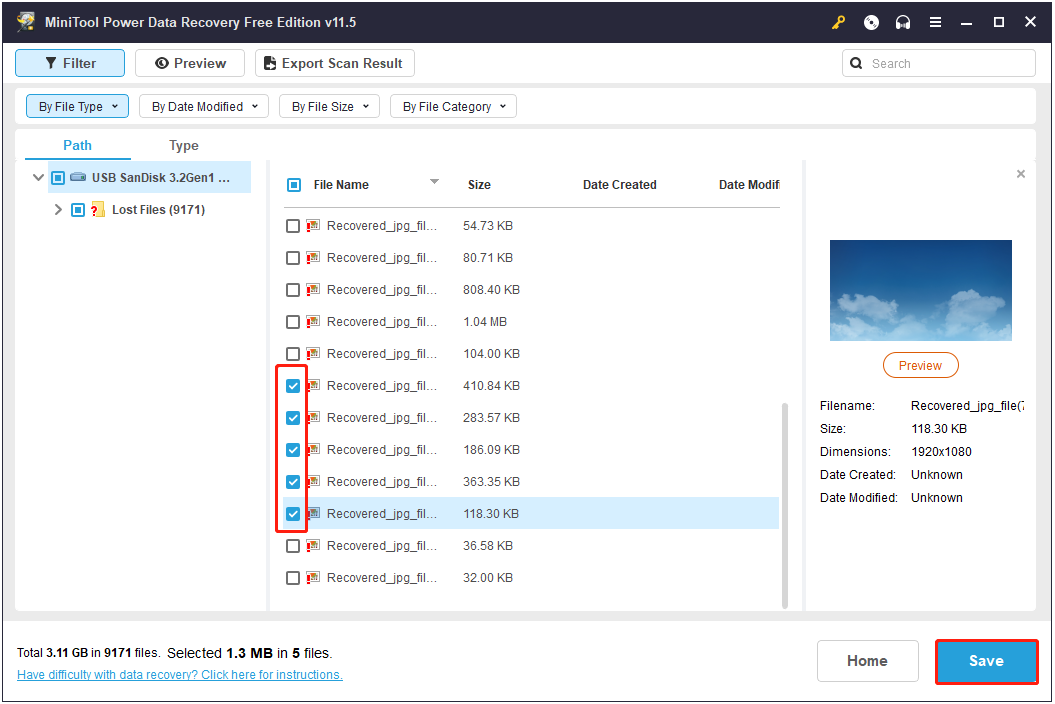
Tip: The free edition of MiniTool Power Data Recovery supports no more than 1 GB of data recovery. If you want to recover more data, you had better choose the full edition.
Here is a quick video guide to help you recover lost files:
After recovering lost data, let’s see how to fix this issue: accidentally converted the hard drive to ESD-USB.
Part 2. 3 Ways Revert the ESD-USB to Normal
Let’s begin with a true example from the Microsoft Community.
Accidentally converted the external hard drive to "ESD-USB" ever since I got my new computer. I have been having numerous problems with Windows 10. Finally, I decided to do a clean install of Windows 10 which involved installing the OS from an external drive. I did not know when downloading the pertinent installer onto the external drive it would format it into an ESD USB (I have no idea what that means).
In this situation, how to restore the external hard drive to its full capacity? Here you can follow the solutions below to achieve this goal.
Method 1: Run CHKDSK to Check and Fix Errors
If you connect the external drive to your computer and find that the drive doesn’t show up in the Disk Management window, you can click Action > Rescan Disks to rescan the disk.

After that, if the drive is still not displayed in Disk Management, you can run the CHKDSK command to check and repair the file system of this external drive.
Step 1. Run Command Prompt as administrator.
Step 2. In the new window, input the command: chkdsk X: /f (X is the external drive letter) and press the Enter key (For example, you can type chkdsk G: /f).
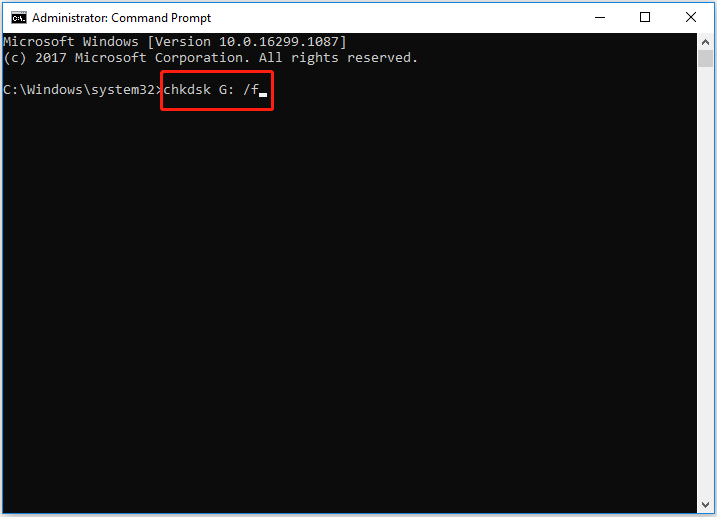
Step 3. Type exit and press Enter.
Now, you can check if you can see the full capacity of the external hard drive.
Method 2: Create a New Partition
In general, since you have recovered lost data from the external hard drive by using MiniTool Power Data Recovery, you can directly create a new partition.
Step 1. Right-click the Windows logo key and click Disk Management.
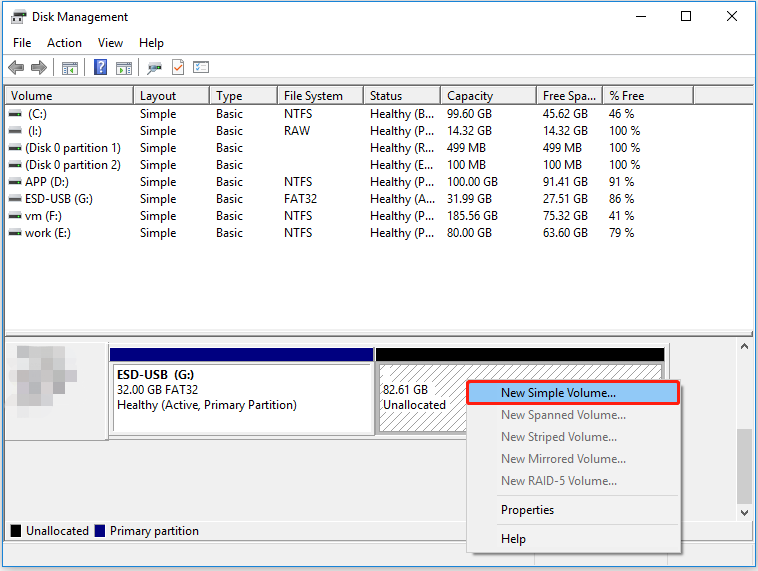
Step 2. Right-click the unallocated space of the external drive and then click New Simple Volume.
Step 3. Click on the Next button.
Step 4. Set up the volume size (how much space you want to use from the unallocated space to create the new partition with) and then click on the Next button.
Step 5. Select an available drive letter, and then click the Next button.
Step 6. Type a volume label and check the Perform a quick format box. Then click Next.
Step 7. Click Finish.
Tip: There's an easier way to create a new partition. By using MiniTool Partition Wizard, you can easily and quickly create a partition on Windows 10/8/7 as it offers powerful functions and simple interfaces.
Method 3: Format the External Hard Drive
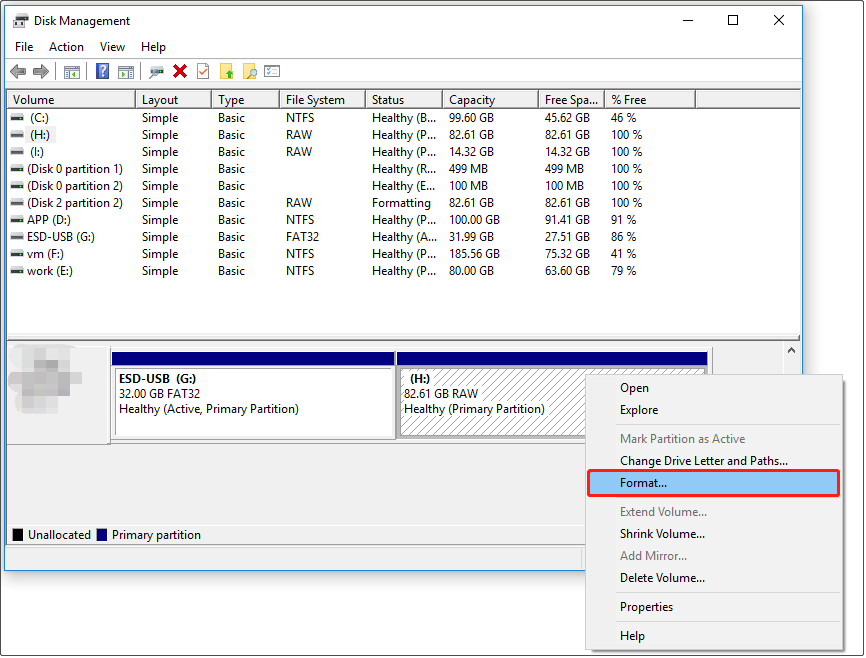
Sometimes, after converting the external hard drive to ESD-USB by mistake, you will find the drive shows up but is RAW (picture below).

In this case, the easiest way to restore the external hard drive to its full capacity and the normal condition is to format it. Here you can see three ways to do that.
Way 1. Format the External Hard Drive With Disk Management
Step 1. Open Disk Management.
Step 2. Find and right-click the target partition and choose Format.
Step 3. Select the files system to NTFS and check Perform a quick format. Then click OK.
Way 2. Format the External Hard Drive With CMD
Step 1. Press Windows + R key combinations.
Step 2. Type diskpart and press Enter.
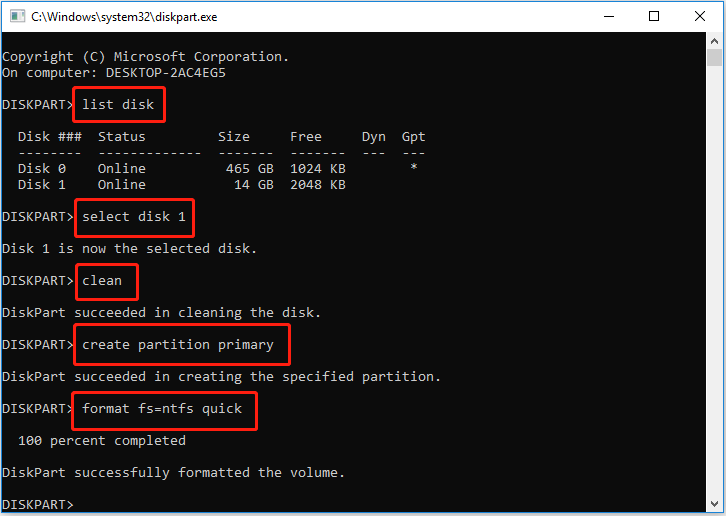
Step 3. Type the following command lines and press Enter each time:
- list disk
- select disk X (Replace the X with the actual disk number)
- clean
- create partition primary
- format fs=ntfs quick
Now you can open File Explorer to check whether the hard drive becomes normal.
Way 3. Format the External Hard Drive With Partition Manager
The third way to format a hard drive is to use a partition manager.
MiniTool Partition Wizard, a professional and free partition management tool is strongly recommended here since its wizard-like interfaces as well as easy operations can help you easily and quickly format drives.
You can download, install, and launch MiniTool Partition Wizard to have a try. Here you can refer to this article: How to Format a Hard Drive with Ease?
MiniTool Partition Wizard FreeClick to Download100%Clean & Safe
Useful Tips to Prevent (USB) Data Loss
Tip 1. Use a blank hard drive to create Windows installation media or bootable media.
It is recommended that you use a blank USB flash drive/external hard drive or a drive that does not contain important files to create the Windows installation media and bootable disk. Because both operations will erase the data on the hard disk.
Tip 2. Regularly back up important files.
As we all know, there are many situations of data loss, such as accidental deletion, system crash, data loss caused by Windows upgrade, and so on. Therefore, it is suggested that you back up your data regularly.
Here you can use MiniTool ShadowMaker, professional data backup software to help you protect your files. It supports backing up your files, folders, systems, disks, and partitions to internal/external hard drives, USB drives, and shared folders in Windows 7/8/10/11.
And this tool provides you with a 30-day free trial. Here you can download it to have a try.
MiniTool ShadowMaker TrialClick to Download100%Clean & Safe
For detailed steps to back up files using MiniTool ShadowMaker, you can refer to this post: How to Backup Files on Windows 10? Try These Top 4 Ways.
Bottom Line
After reading this post, you know what to do if your external HDD shrunk to 32GB ESD-USB. Just try the ways listed above to safely recover files after converting the external drive to ESD-USB to solve the “Windows Media Creation Tool deleted my files” issue.
Should you have any questions or suggestions about MiniTool tools, you can leave your comments in the comment zone or directly contact us via [email protected]. We will solve your issues as soon as possible.
User Comments :