In the digital age, external hard drives have become indispensable tools in our daily work and life. However, you may frequently encounter a frustrating issue during use—the external hard drive keeps disconnecting and reconnecting.
This not only affects work efficiency but can also lead to data loss or file corruption, especially when the connection is suddenly interrupted during read or write operations.
This article provides a series of practical solutions to help you restore a stable connection and ensure data security.
Issue: My External Hard Drive Keeps Disconnecting
Out of nowhere, my HDD has started disconnecting itself a few minutes after it is plugged, and requires me to manually turn the external drive on and off if I want to use it again.learn.microsoft.com
When an external hard drive frequently disconnects, Windows typically displays the following prompts or behaviors:
- A notification pops up saying “USB device not recognized”.
- The hard drive icon disappears in File Explorer.
- A notification appears indicating that the drive is not accessible.
- The drive letter disappears.
Why does the external hard drive keep disconnecting? Here are some common causes for this issue:
- Unstable USB connection: An external hard drive is connected to a computer via a USB interface. If the USB port itself is loose or damaged, the transmission may be unstable, causing the hard drive to disconnect frequently.
- Insufficient power supply: Some external hard drives require higher power levels. If powered solely by USB, it may not be sufficient to meet the hard drive’s operating requirements. This may cause the hard drive to shut down.
- System power-saving settings interference. To save energy, Windows systems may automatically shut down unused USB devices. While this can extend battery life, it may also cause frequent disconnections from external hard drives.
- Driver malfunction or obsolescence: If the hard drive or USB controller driver is corrupted, not installed correctly, or is an outdated version, the system may be unable to reliably recognize the hard drive.
- Hard drive failure: Failures in the hard drive’s internal read or write heads, circuit boards, or firmware, as well as bad sectors or a corrupted file system, can also cause device instability.
After knowing common error signals and possible causes, proceed with step-by-step troubleshooting.
How to Fix External Hard Drive Keeps Disconnecting
To resolve the problem of “external hard drive keeps disconnecting”, here are some effective methods.
Solution 1: Change a Different USB Port and Cable
When an external hard drive frequently disconnects, the first thing to do is check and replace the USB port and data cable. This can effectively rule out physical connection problems, thus saving time in subsequent diagnosis.
Loose ports, poor contact, or aging data cables can all cause power instability or data transmission interruptions, leading to hard drive disconnection.
It is recommended to use the USB ports on the back of the motherboard, as they are generally more stable than those on the front panel.
If this doesn’t work, try the advanced solutions.
Solution 2: Disable USB Selective Suspend Setting
The USB selective suspend function may sometimes suspend a USB device to save power when the system deems that the device has been inactive for a long time.
However, this power-saving mechanism may mistakenly power off external hard drives that are still in use, causing connection interruptions.
Disabling the USB selective suspend setting ensures continuous power to the USB port, thereby improving hard drive connection stability.
Step 1: Open additional power settings
Press Win + I to open Settings. Click System > Power & sleep > Additional power settings.
Step 2: Access advanced power settings
Under Preferred plans, switch to Power saver and click Change plan settings next to it. Then, click Change advanced power settings.
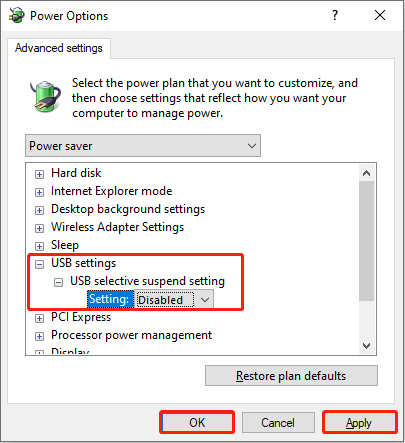
Step 3: Disable the USB selective suspend setting
In the box, expand USB settings > USB selective suspend setting. Click the Setting menu and select Disabled. Finally, click Apply > OK.
If this method fails, continue with the next one.
Solution 3: Turn off USB Power Saving
When USB power saving mode is enabled, the system may automatically shut down the USB port when the hard drive is idle. This operation may cause the hard drive to disconnect.
Disabling this option ensures a continuous power supply to the USB port, improving the stability and reliability of the hard drive connection.
Step 1: Access USB Root Hub properties
Press Win + X and choose Device Manager. Expand Universal Serial Bus controllers, right-click USB Root Hub, and select Properties.
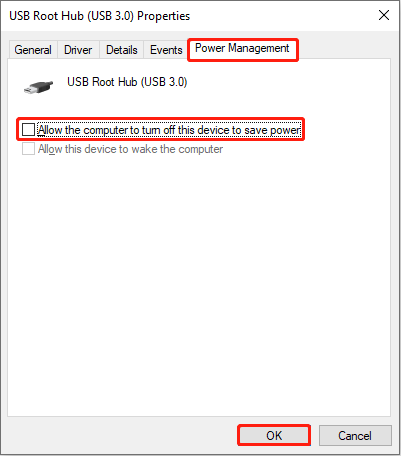
Step 2: Uncheck the power saving option
Switch to the Power Management tab, uncheck the box for Allow the computer to turn off this device to save power, and click OK.
If the issue still exists, proceed with the following approaches.
Solution 4: Set the Hard Disk Power-off Timer to 0
When an external hard drive keeps disconnecting, setting the hard disk power-off timer to 0 can help. This effectively prevents the system from automatically powering off the hard drive when it is idle.
Here is how to set the timer to 0:
Step 1: Open advanced power settings
Open Control Panel and click System and Security > Power Options. Tick Power saver and click Change plan settings. Then, click Change advanced power settings.
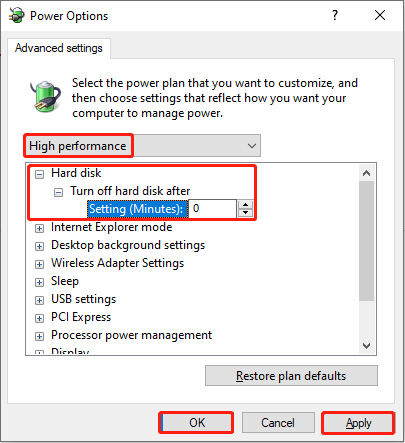
Step 2: Change the timer to 0
Click the Power saver box and select High performance. Expand Hard disk > Turn off hard disk after. Type 0 in the box and click Apply > OK.
If the issue persists, keep trying the methods below until it is fixed.
Solution 5: Check and Repair Hard Drive Errors
Besides power issues, file system corruption, bad sectors, or other disk failures can also cause connection issues.
The disk checking tools can identify and repair this issue, improving hard drive stability and data security.
Here is how to run the disk checking tool:
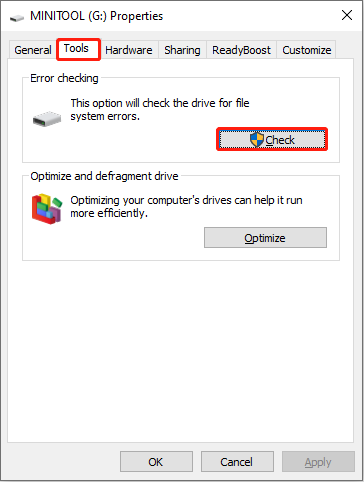
Step 1: Enter the drive’s properties page
Press Win + E keys to open File Explorer. Click This PC, right-click the drive, and select Properties.
Step 2: Scan and repair the drive
Go to the Tools tab and click Check. In the pop-up window, click Scan and repair drive. Wait for the scan to complete. If errors are found, the system will prompt you whether to repair them. Follow the instructions to complete the whole process.
If the problem remains, keep attempting the method below.
Solution 6: Update and Reinstall Drivers
Drivers act as a bridge between the operating system and the hardware. Outdated or corrupted drivers can cause the system to fail to recognize the hard drive stably, resulting in a disconnection.
Updating or reinstalling the driver can ensure smooth communication between the hard drive and the system, thus resolving this issue.
Step 1: Open the driver update interface
Right-click the Windows button and choose Device Manager. Expand Disk drives, right-click the target drive, and select Update driver.
Step 2: Start updating the driver
In the new window, choose Search automatically for drivers. This will detect and install the latest driver. Wait for the installation to complete and then restart your computer.
If no new driver is available, you can try reinstalling the device:
Step 1: In Device Manager, right-click the drive and select Uninstall device.
Step 2: In the prompt window, click Uninstall to confirm the change.
When the uninstallation ends, restart your computer, and Windows will automatically install the new driver.
After repairing the drive successfully, check if your data in it is complete. If not, use data recovery software to recover lost data.
Recover Data from External Hard Drive with Connection Issue
To recover data from your external hard drive, MiniTool Power Data Recovery is a good choice. Here are some of its advantages.
- Supports various data loss scenarios. It can handle data loss caused by accidental deletion, accidental formatting, partition loss, RAW state, system crashes, etc.
- Supports multiple Windows systems. This tool is compatible with Windows 11/10/8/8.1.
- Owns a user-friendly interface. Its graphical interface is clear, and the recovery steps are simple. Even a novice can easily get started.
- Provides versatile and efficient functions. The software offers flexible file filtering and preview capabilities to improve recovery efficiency.
- Offers free edition and full editions. The free edition allows you to recover 1 GB of files, suitable for lightweight recovery tasks. If that’s not enough, upgrade to a full edition, which supports unlimited recovery capacity.
Step 1: Download and install MiniTool Power Data Recovery
Click the green button to download and install MiniTool Power Data Recovery Free.
MiniTool Power Data Recovery FreeClick to Download100%Clean & Safe
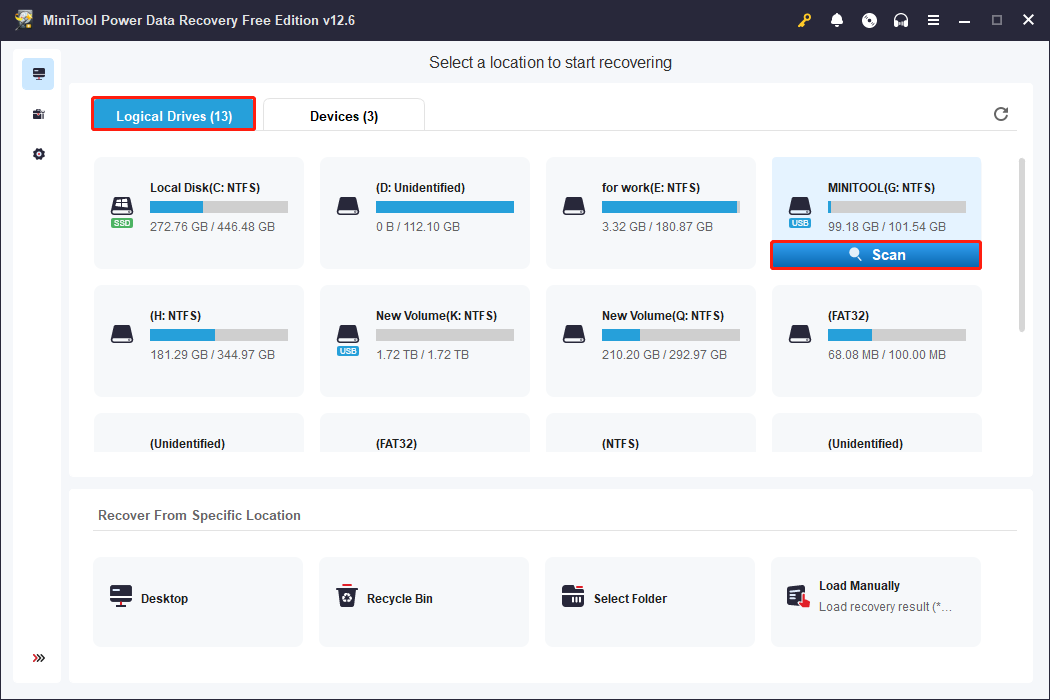
Step 2: Launch the software and scan your drive
Open MiniTool Power Data Recovery. Under Logical Drives, find the target drive, move your cursor to it, and click Scan. The software will begin scanning the partition; this process may take some time.
Step 3: Locate the required files using Path, Type, Filter, and Search
After the scan is complete, the software displays the files according to their original save paths under Path. Additionally, there are other features to help you locate the files.
Under Type, files are categorized by file type, such as documents, pictures, audio, videos, etc.
The Filter feature allows you to refine your search by file type, modification date, file size, and file category. This further narrows down your search scope.
Input a full or partial file name in the Search box and press Enter. The software will automatically identify and display matching items within the scan results.

Step 4: Preview the files before recovery
After finding the files, don’t rush to restore them. It is best to preview them to make sure they’re correct. The Preview feature allows you to view files such as pictures, documents, and videos before recovery.
Double-click a file to preview its content. Once the file is confirmed as required, proceed with the recovery operation.

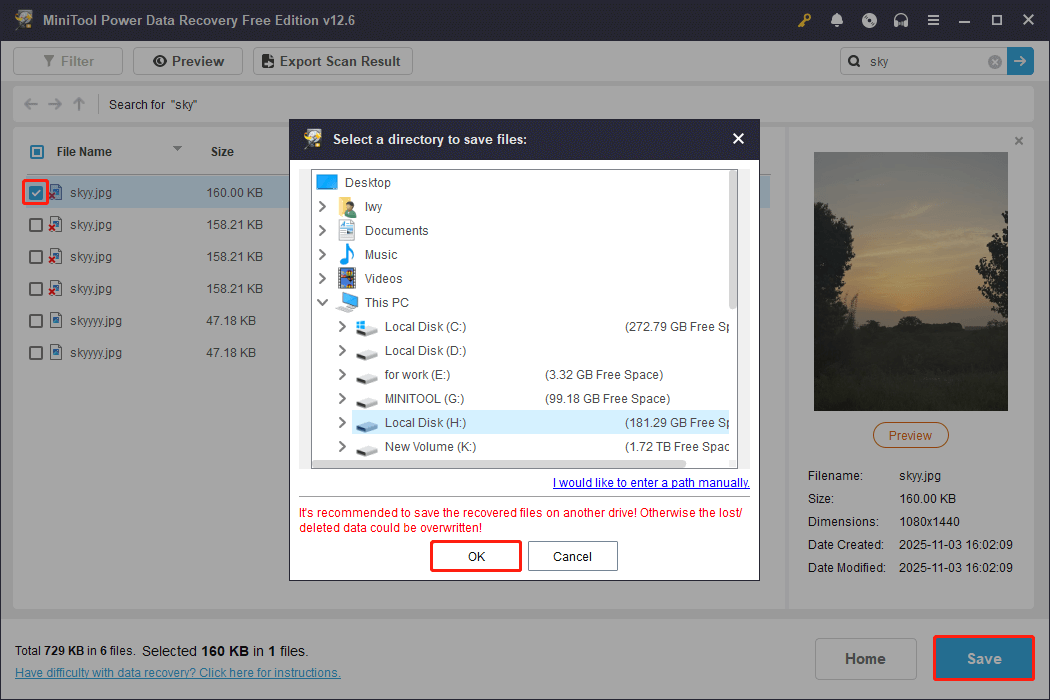
Step 5: Save files to a new and safe location
After identifying the target files, check them and click Save. Choose a safe path to store them. Finally, click OK to start the recovery.
After successfully recovering lost files, take some measures to protect your external hard drive in the future.
Tips on How to Protect Your External Hard Drive
To prevent external hard drive failure and data loss, here are some suggestions for you.
- Avoid physical damage. An external hard drive is susceptible to physical damage. It is recommended to use a shockproof and waterproof protective case and avoid using it in humid or high-temperature environments.
- Always eject the hard drive safely before removing it. After each use, eject the hard drive using the “Safely Remove Hardware” function to prevent data corruption or file loss.
- Avoid frequent power cycles. Frequent power switching or sudden power outages can interrupt hard drive read or write operations and damage the file system. Use a stable power supply and avoid shutting down the computer or unplugging the hard drive during data transfer.
- Scan your external hard drive for viruses. External hard drives are often used among multiple devices, making them easy targets for virus transmission. Performing frequent virus scans by using Windows Defender can help detect and isolate potential threats.
- Regularly back up your external hard drive. Even if the external hard drive is used for backups, important data should be regularly synced to the cloud or another hard drive.
Wrapping Things Up
If your external hard drive keeps disconnecting, follow these steps: switch to a different USB port, disable USB selective suspend, disable power-saving settings, set the power-off timer to 0, check file system errors, and update the disk driver.
If you unfortunately lose data during the repair process, use MiniTool Power Data Recovery to recover it.
MiniTool Power Data Recovery FreeClick to Download100%Clean & Safe
If anything about the MiniTool product is unclear, we’re here to help – just get in touch through [email protected].
About The Author

Position: Columnist
Chelsea graduated from university with a major in English. She has a strong interest in English writing. It is this passion for writing that led her to become an English editor. Her articles mainly focus on data recovery and other computer industry news. As an energetic and outgoing girl, Chelsea enjoys listening to music, singing, riding bikes, and eating in her spare time.
User Comments :