External hard drives are reliable file storage and backup devices. However, sometimes the hard drive is successfully connected to the computer, but the files do not show up.
This issue not only directly impacts your experience but also concerns data security. Read this article to get the common causes and solutions.
Why Are My Files Not Showing in External Hard Drive
Here are several common reasons why an external hard drive does not show files.
1. File hidden or attribute changed
Files may not appear in File Explorer because their attributes are set to hidden. Additionally, if a file is marked as a system file, it won’t appear in normal view; you’ll need to manually adjust display options.
2. File system errors or corruption
During use, external hard drives may experience file system corruption due to sudden power outages, unsafe removal, or disk errors. The corruption prevents the operating system from correctly indexing files, resulting in an empty file list.
3. Partition loss
If the partition is lost, the folder and file within will be deleted. The hard drive will appear as unallocated space in Disk Management.
4. Virus or malware infection
Some malicious programs may hide files in invisible directories, making them inaccessible. In more serious cases, viruses may directly delete files, causing them to disappear from your computer.
5. Driver or compatibility issues
If the external hard drive’s driver is outdated or incompatible, the system may be unable to correctly recognize the files.
6. Physical hard drive damage
The last possibility is hardware damage to the hard drive itself, such as bad sectors or circuit failure. This directly affects file reading capabilities, causing files to be unreadable.
Understanding the causes of a problem helps you take appropriate measures to solve it. The following part lists some effective methods.
Fix Files Not Showing in External Hard Drive Without Format
Here are some methods to fix “files not showing in external hard drive”. Before trying the advanced fixes, check the connection and the device information.
1. Check the connection
A loose data cable, insufficient power to the USB port, or a damaged cable can all cause the hard drive to be unrecognized, resulting in file disappearance.
Therefore, start by checking the connections. Disconnect the external hard drive and reconnect it, or connect it to another computer.
2. Check the device information
If the connection is fine, check the device information to confirm that the external hard drive is correctly recognized by the system.
Open Disk Management to check if the external hard drive appears in the device list and if it has partitions and a drive letter.
If the hard drive is not recognized, subsequent file repair operations cannot be performed.
If the basic checks do not work, try the advanced approaches below.
Approach 1: Show Hidden Files in File Explorer
When files are not showing in external hard drive, they may be hidden. In this case, enabling the Show hidden files feature can be helpful.
Step 1: Press Win + E to open File Explorer.
Step 2: Switch to the View tab and check the Hidden items option.
Then, the hidden files will be shown.

If this method fails, proceed with the next one.
Approach 2: Assign or Change the Drive Letter
The system cannot display files correctly when an external hard drive is not assigned a drive letter or has a duplicate drive letter.
Assigning or changing the drive letter allows the operating system to recognize and correctly access the hard drive’s data.
Step 1: Press Win + X and choose Disk Management.
Step 2: Find the disk, right-click it, and choose Change Drive Letter and Paths.
Step 3: Click Add or Change, and then choose an unused letter.
Step 4: Finally, click OK to apply the change.
When the drive letter is set, check if your external hard drive shows files.
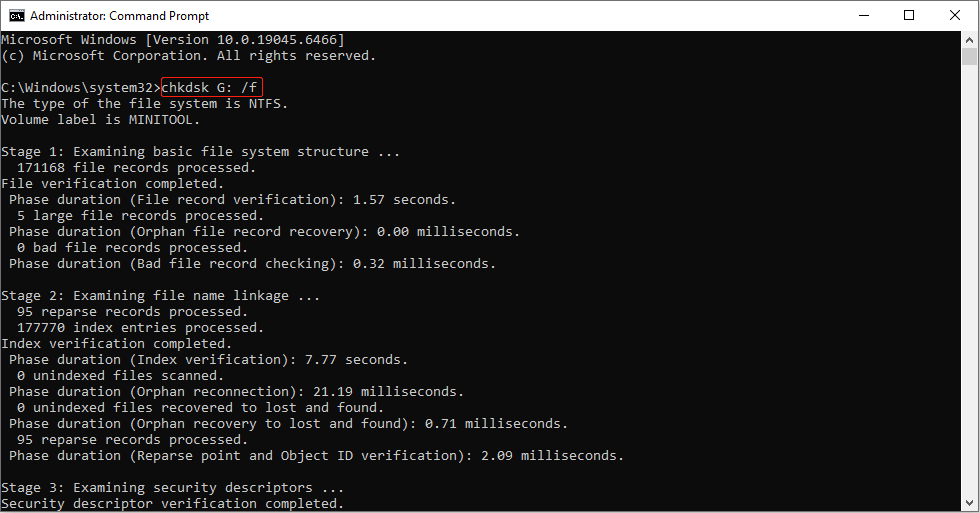
Approach 3: Run CHKDSK to Fix the External Hard Drive
When the file system of your disk is corrupted, the system may not be able to read files normally. Running the CHKDSK (Check Disk) command can diagnose and repair logical errors in the file system of external hard drives.
This allows the operating system to recognize and display the files again. Here are two options to do that.
Option 1: Use the Command Prompt
Step 1: Type Command Prompt in the Windows search box, right-click the best match, and choose Run as administrator.
Step 2: When asked by the UAC window, click Yes to continue.
Step 3: Type chkdsk G: /f and press Enter. Replace G with the drive letter of your hard drive.
Option 2: Use the error-checking tool
Step 1: Right-click the Windows button and choose File Explorer.
Step 2: In This PC, right-click your drive, and choose Properties.
Step 3: Go to the Tools tab, and click Check under the Error checking section.

Step 4: In the new window, select Scan and repair drive.
This will repair your drive. If you still cannot see the files, try the following fix.
Approach 4: Update Disk Drivers
An outdated or incompatible driver may cause the problem. Here is how to update your disk driver.
Step 1: Right-click the Windows button and choose Device Manager.
Step 2: Expand Disk drives, right-click your disk, and select Update driver.

Step 3: Select Search automatically for drivers to search for a new driver.
When the new available driver is detected, follow the instructions to install it.
Approach 5: Use TreeSize to Show the Files
Using TreeSize to display your files on an external hard drive is worth a try. This tool scans your drive at the file system level, helping identify files that are not indexed by File Explorer.
Install and open TreeSize, click Select Directory, and select your external hard drive. Then, TreeSize will automatically analyze the file structure of that hard drive.
It will then display the size and space usage of all files and folders in a tree diagram or list format.
Format Your External Hard Drive to Normal
If you have tried all the above methods but your external hard drive still does not show files, the last resort is formatting your disk.
The fact that an external hard drive cannot display files does not mean that the data has been lost. However, the formatting operation will reset the hard drive’s management structure and erase all data on it completely.
Therefore, rescuing your missing data in advance is necessary.
Phase 1: Rescue Files from Your External Hard Drive
MiniTool Power Data Recovery is a powerful data recovery tool to help you recover data from an external hard drive. Here are some of its advantages.
- Handles various data loss scenarios. It covers the vast majority of common causes of data loss on external hard drives. Whether it’s accidental deletion, formatting, partition loss, virus attacks, or inaccessibility, it can scan for and recover the files.
- Has a strong compatibility. This software supports recovering almost all file types and multiple storage devices. And it is compatible with Windows 11/10/8/8.1.
- Adopts read-only mode. During scan and recovery, MiniTool operates in read-only mode and does not write any data to your external hard drive. It minimizes the risk of overwriting original data during recovery, which is one of the main causes of permanent data loss.
This free file recovery software allows you to restore 1 GB of files for free. Now, start recovering your data.
Step 1: Download and install the software
Click the green button below to get MiniTool Power Data Recovery installed on your computer.
MiniTool Power Data Recovery FreeClick to Download100%Clean & Safe
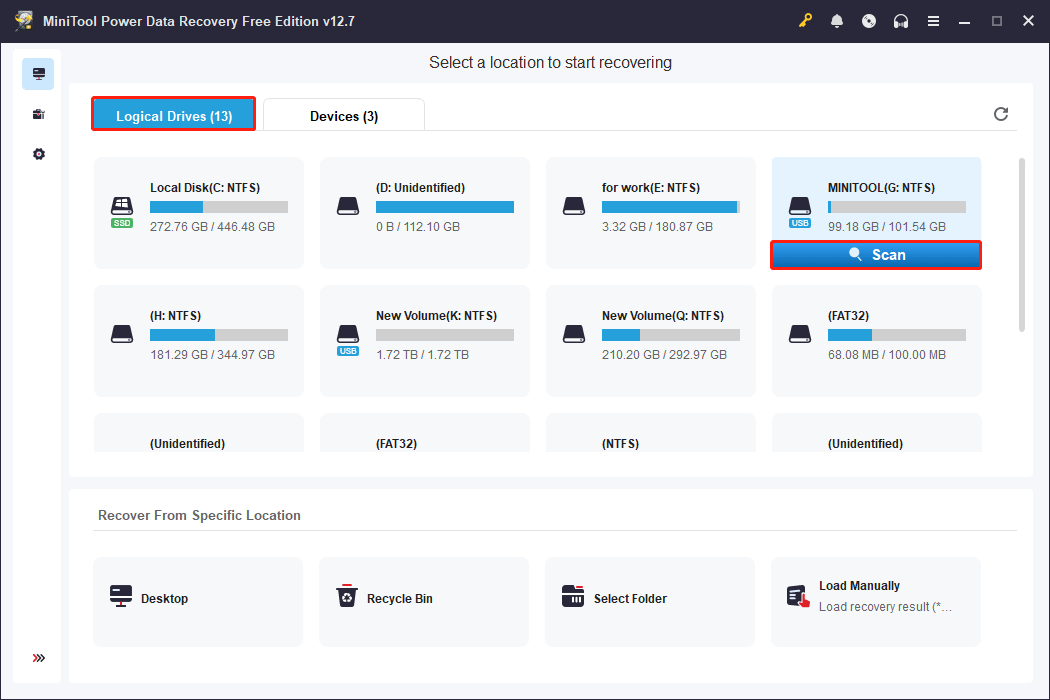
Step 2: Scan your external hard drive
Launch the software and enter the main interface. Under Logical Drives, find the target drive, move your cursor on it, and click Scan.
Alternatively, switch to the Devices tab, find the disk, and click Scan to scan the whole disk.
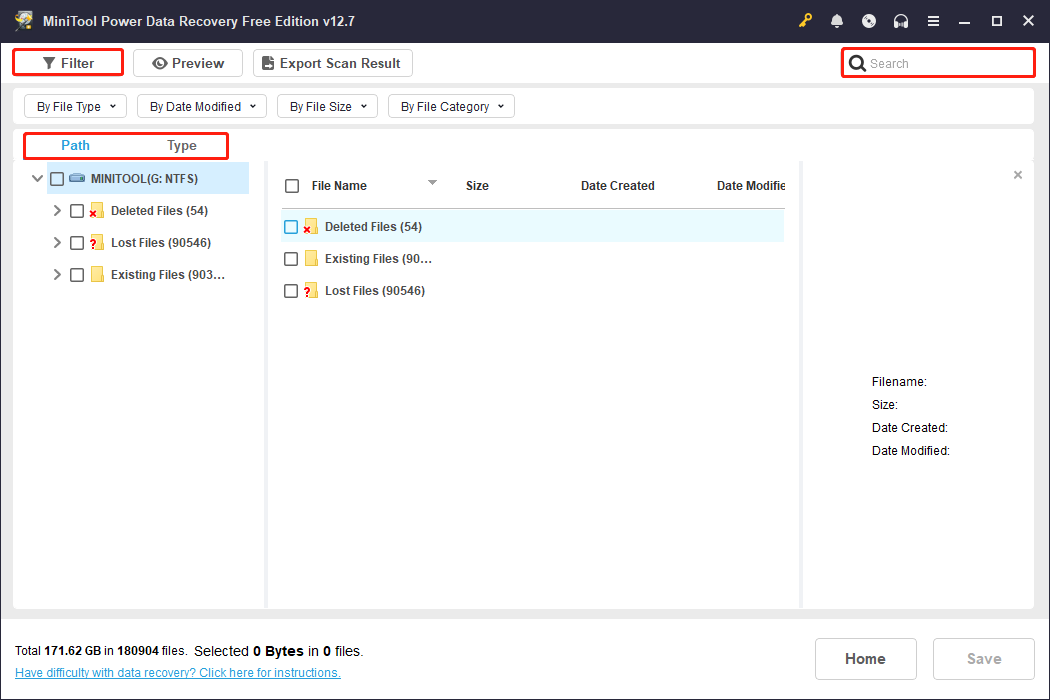
Step 3: Find the target files using Path, Type, Filter, and Search
When the scan process completes, your files will be listed under the Path tab with Deleted Files, Lost Files, and Existing Files. This allows you to find files according to the file structure.
Besides this, the Type, Filter, and Search features can help locate the target files.
Switch to the Type tab, and you will see all the file types and file formats. Find the needed files under the corresponding list.
Click the Filter button in the upper-left corner to display file type, modification date, file size, and file category. Set the criteria you want to narrow the scope.
In the upper-right corner, here is a Search box. Type a full or partial filename to filter the specific file.
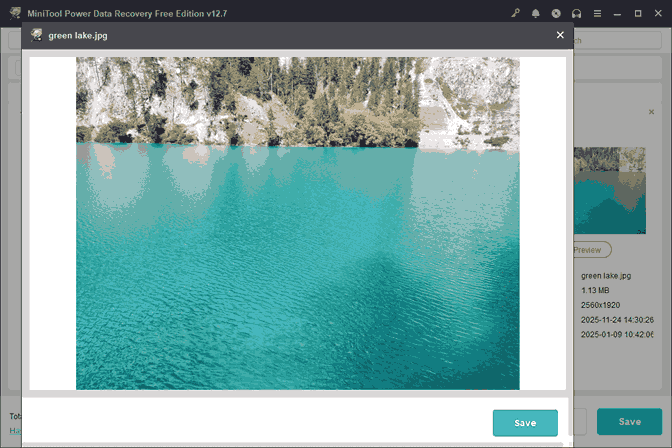
Step 4: Check the file content using the Preview feature
Now, preview your files by double-clicking them. This allows you to check if the files are correct and intact.
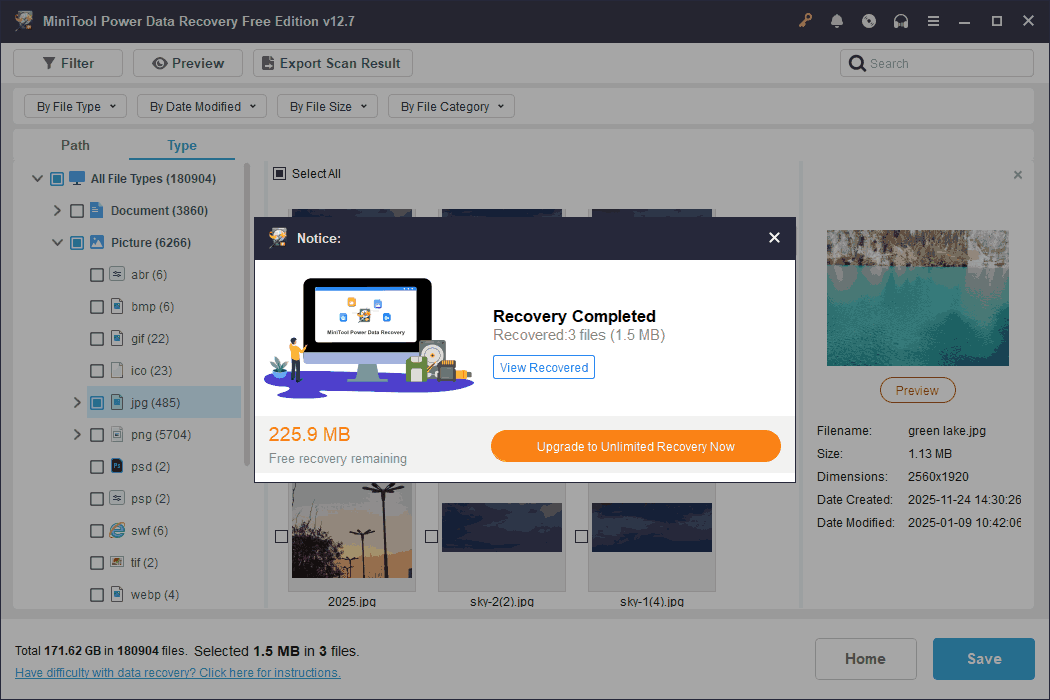
Step 5: Save the required files to a new and safe location
When the files are confirmed, check them all and click Save. There will be a window prompting you to choose a destination to store the recovered files. After selecting a new location, click OK to start recovery.
After the files are recovered successfully, the Recovery Completed window will pop up. It shows the size of the recovered files and the remaining free file recovery capacity.
Phase 2: Format Your External Hard Drive
When the data is recovered and secure, it’s time to format your external hard drive. Here is how to use Disk Management to perform a format.
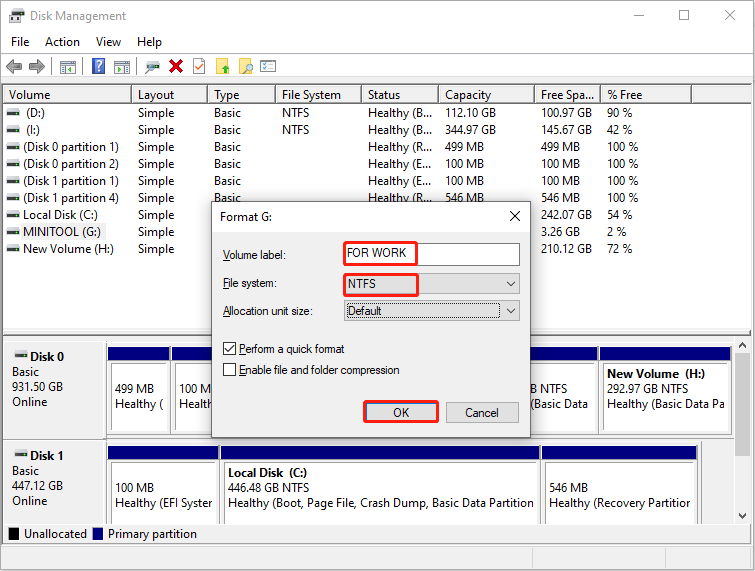
Step 1: Open Disk Management,right-click your disk, and choose Format.
Step 2: Set a new volume label and choose a file system.
Step 3: Make sure the Perform a quick format option is checked and click OK.
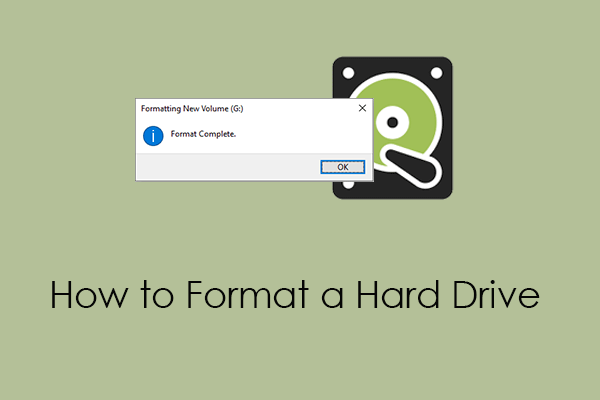
When the format process is done, move your files to the external hard drive and check if they are shown.
If you don’t want to experience this problem in the future, read on to get the prevention tips.
How to Protect Your External Hard Drive in the Future
To protect external hard drives and ensure data security, start with physical protection, proper operation, and good habits. Here are some effective recommendations:
1. Always “safely eject” the external hard drive
Before unplugging the USB cable, make sure to perform the “Safely Remove Hardware” function.
This ensures that all cached data is written to the hard drive and the read/write processes are completed. It effectively prevents data loss caused by file system corruption.
2. Do some physical protection
External hard drives have a delicate internal structure and are easily affected by drops, vibrations, or humid environments. Avoid high temperatures, humidity, or strong impacts during use. When carrying them, use a shockproof and waterproof hard drive enclosure to extend their lifespan.
3. Regularly back up your external hard drive
Regularly back up important files to the cloud or another hard drive. This can prevent serious consequences from a single point of failure. Backups are the last line of defense for data security.
Final Words
When the problem of files not showing in external hard drive happens, do some basic checks first, such as checking the connection and device information.
Then try the advanced troubleshooting, such as showing hidden files, changing the drive letter, running CHKDSK, updating drivers, or utilizing TreeSize. If none of them are useful, recover data and format the drive.
Should you encounter any MiniTool product-related issues, contact us through [email protected].
About The Author

Position: Columnist
Chelsea graduated from university with a major in English. She has a strong interest in English writing. It is this passion for writing that led her to become an English editor. Her articles mainly focus on data recovery and other computer industry news. As an energetic and outgoing girl, Chelsea enjoys listening to music, singing, riding bikes, and eating in her spare time.
User Comments :