In modern computer systems, the hard drive remains one of the core components for data storage.
Its mechanical structure and electronic control work in close coordination: the platters rotate at high speed, and the read/write heads perform precise operations.
However, have you ever encountered that the internal/external hard drive is spinning but not detected? If you are confused about this, continue reading this article.
Hard Drive Issue: Spinning but Not Detected
Hi there, for the past six months, I used a SATA to USB to connect my previous laptop’s hard drive to my new laptop. Everything was fine till yesterday when it suddenly disappeared from Disk Management. I uninstalled it from Device Manager in the hopes that after a restart, it would be picked up again, but it is just spinning and not detected. Is it a driver issue? Thanks.www.elevenforum.com
This problem not only involves hardware-level power and interface issues, but may also involve the compatibility of firmware and drivers.
This scenario often leads you to mistakenly believe that the hard drive is still healthy. However, in reality, it may indicate a potential malfunction or data access risk.
Common Causes for Hard Drive Spinning but Not Detected
To get a better understanding of this issue, learn about its possible causes.
- Physical damage: Drops or impacts may damage the read/write head or internal structure. Although the disk may still rotate, data cannot be read or written.
- Connection problems: The data cable is loose, the interface is damaged, or the power supply is insufficient. Although the motor can turn, the signal cannot be transmitted.
- Partition/file system corruption: If the hard drive’s partition or file system is corrupted, Windows cannot mount and display the drive even if it detects the hardware.
- Driver or system settings error: Windows may lack the corresponding driver, or a drive letter may not have been assigned.
- Hard drive firmware/PCB failure: Damage to the hard drive circuit board or firmware prevents it from communicating correctly with the host.
- Compatibility issues: Older hard drives may not be recognized by newer systems or with different interfaces (such as USB to SATA).
As the cause suggests, sometimes this problem is simply due to some basic errors. Therefore, do some basic troubleshooting first.

Immediate Troubleshooting Steps
Here are several immediate and basic checks for your hard drive.
Step 1: Check physical connections
When you can hear the hard drive’s motor spinning but the system doesn’t recognize it, one of the common causes is a faulty physical connection.
To troubleshoot, first turn off the power, unplug and re-plug the SATA/USB data cables, and ensure the power cable connector is not loose or damaged.
Step 2: Change to a different port/PC
If the hard drive is not recognized in its original interface or on the computer, try switching to a different SATA/USB port. Alternatively, connect it directly to another computer for testing. This will help rule out problems with the original interface or the host system.
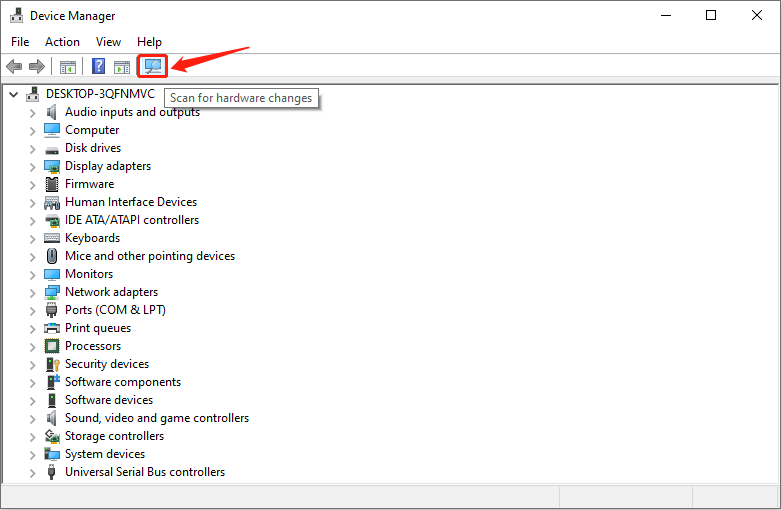
Step 3: Scan for hardware changes
If the hard drive is spinning but not recognized, it may be because the system missed the device during startup or the driver was not loaded in time.
Running “Scan for hardware changes” in Device Manager will force the system to re-detect and refresh currently connected hardware.
Here is how to do it: Press Win + X and choose Device Manager. Then, click the Scan for hardware changes icon.
If the above checks don’t work, then the problem lies within the hard drive itself. This raises a concerning question: Is the data on the hard drive safe in this situation? The answer is given in the next section.
Is Your Data Safe When Hard Drive Is Spinning but Not Detected
Data loss can be caused by a variety of reasons. In such a case, to ensure data security, test whether the data recovery software can recognize your hard drive before performing advanced repair. If it does, it is recommended to recover the data first.
Here, this powerful and professional data recovery tool, MiniTool Power Data Recovery, is worth a try. Learn about its features to use it better.
About MiniTool Power Data Recovery
MiniTool Power Data Recovery functions well in various aspects. Here is a detailed introduction.
- Wide storage media support. Besides recovering data from hard drives, it also supports various storage media such as USB flash drives, SD cards, and CDs/DVDs.
- Multiple data loss scenarios. This tool can handle complex situations such as accidental deletion, disk formatting, partition loss, system crashes, and virus attacks. Even if the Recycle Bin is emptied or the partition is damaged, there is still a chance to recover files.
- Wide file type coverage. It supports over 2000 file types, including documents, pictures, audios, videos, and more.
- Data security guarantee. MiniTool uses read-only mode, ensuring that the original data is not replaced or modified during the recovery process. This prevents secondary damage or overwriting and ensures data security.
- Simple user interface and straightforward operation. The software interface is clear and intuitive, and the operation is simple. Even if you have no technical background, it is easy to complete the recovery process.
This is the basic information about this data recovery software. Now, download and install it on your computer to recover files.
MiniTool Power Data Recovery FreeClick to Download100%Clean & Safe
Steps to Recover Data from a Problematic Drive
Here are the detailed steps to recover data from a problematic hard drive.
Step 1: Launch the software and scan the target drive
Open MiniTool Power Data Recovery and enter the main interface. Under Logical Drives, select the target partition and click Scan. Alternatively, switch to the Devices tab, select the whole disk, and click Scan.

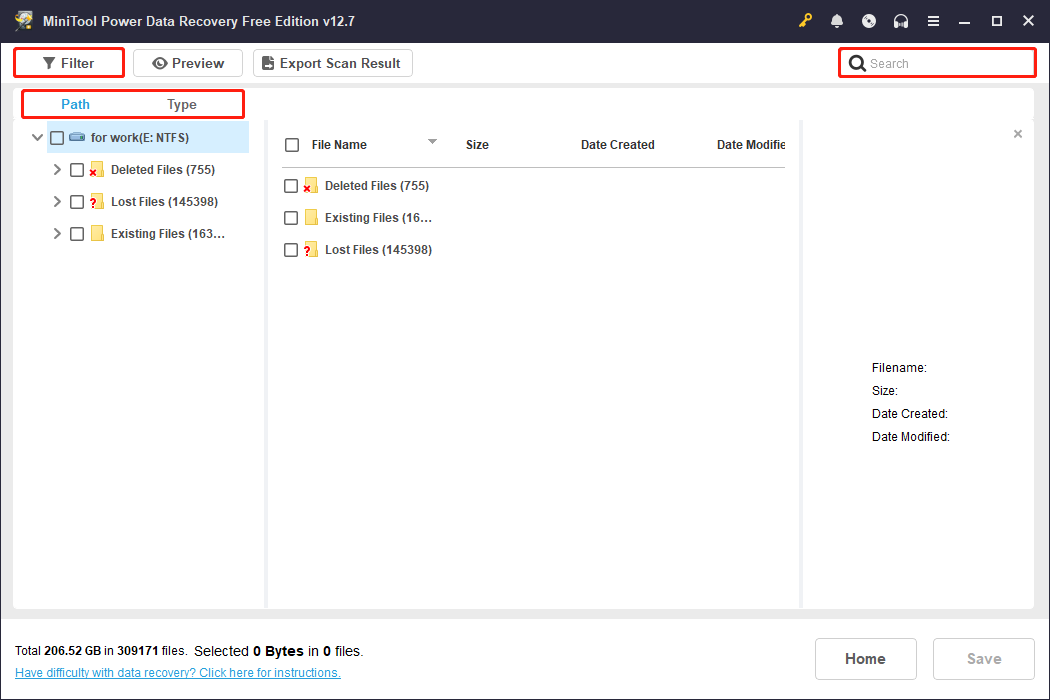
Step 2: Locate the required files and preview them
This scan process may take some time. Wait patiently for it to complete. When it ends, files will be listed under the Path tab by default, which allows you to find files by file structure.
Besides this, here are several features to help you find files more quickly.
- Type: It categorizes the scan results by file type. Expand All File Types, and all categories will be displayed, including documents, pictures, videos, audios, and more.
- Filter: The Filter feature offers several filtering criteria, including file type, modification date, file size, and file category. This can further narrow down the search.
- Search: Type the full or partial filename in the Search box and press Enter. The specific file will be filtered. It works well when you need to find a few files.
Once you’ve located the files, preview them before recovery. MiniTool’s Preview feature allows you to open and view the contents of files, such as pictures, videos, audios, or text files.
This confirms the files are the ones you need and are complete, avoiding unnecessary recovery operations. Double-click the file, and the preview window will pop up.

Step 3: Save the needed files to a new and safe location
When the files are confirmed, select them and click the Save button. There will be a window prompting you to choose a path to store the recovered files. Choose a safe one, and then click OK to start the recovery.

After the recovery finishes, the Recovery Completed window will show. It writes the size of the recovered files and the remaining free recovery capacity.
When the data is recovered, check the following advanced approaches to repair your hard drive.
How to Fix Hard Drive Spinning but Not Detected (Advanced Methods)
Here is how to fix if a hard drive is not detected. The methods involve assigning a drive letter, updating the driver, creating a new partition, and initializing the disk.
Method 1: Assign or Change the Drive Letter
When a hard drive is not assigned a drive letter, it will not be visible in File Explorer, even if it has been recognized by the system. Therefore, assigning or changing the drive letter is a necessary method to solve this problem.
Here is how to do it:
Step 1: Press Win + X and choose Disk Management.
Step 2: Right-click the target disk and select Change Drive Letter and Paths.
Step 3: Do the following operation based on your hard drive’s situation:
- Click the Add button to add a drive letter.
- Click the Change button to change to a new drive letter.

Step 4: In the new window, choose an unused letter from the Assign the following drive letter menu.
Step 5: Click OK to make the change take effect.
When the new drive letter is assigned, check your drive condition.
Method 2: Update the Driver
An outdated or corrupted hard drive driver prevents the drive from communicating properly, causing the detection problem.
In this case, updating the driver is necessary, which can fix compatibility issues and allow the hard drive to be recognized again and used normally.
Step 1: Open Device Manager, and then expand Disk drives.
Step 2: Right-click your drive and select Update driver.

Step 3: In the pop-up window, click Search automatically for drivers.
Once the new driver is detected, follow the on-screen instructions to complete the installation.
If this method fails, proceed with the next one.
Method 3: Create a New Partition
The absence of a valid partition or a corrupted partition table can prevent the operating system from mounting and using the hard drive. It results in the problem of the hard drive spinning but not detected.
By partitioning the disk, a new partition structure will be established on the disk. This allows the system to assign a drive letter and access it normally, thus resolving this issue.
Step 1: Open Disk Management, right-click the unallocated disk, and select New Simple Volume.
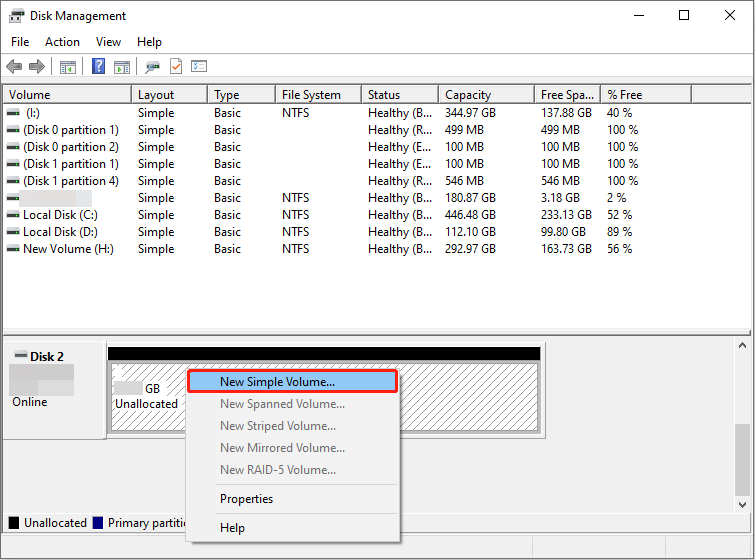
Step 2: In the New Simple Volume Wizard window, click Next to continue.
Step 3: Use the default drive letter or choose a new one, and then click Next.
Step 4: Choose a file system, type a volume label, and check the Perform a quick format option.
Step 5: Click Next > Finish to apply the change.
When the partition is created, check if your drive can be used normally.
Method 4: Initialize the Disk
This problem can also occur if the hard drive lacks a partition table or uses an ambiguous partition format. In this case, initialize the disk to create a partition table (such as MBR or GPT).
This enables the operating system to recognize and create additional partitions and drive letters. It helps resolve the situation where the hard drive is spinning but not detected.
Step 1: In Disk Management, right-click the target disk and choose Initialize Disk.
Step 2: Select the partition table, MBR or GPT, for your disk and click OK.
Step 3: After initialization, right-click the disk and select New Simple Volume, then follow the wizard to set the partition size, drive letter, and file system.
When the disk is initialized, check if this problem is fixed.
Bottom Line
When the problem of a hard drive spinning but not detected happens, check if it can be accessed by MiniTool Power Data Recovery first. If it does, recover your important data from it.
Then, try assigning a drive letter, updating the driver, creating a new partition, and initializing the disk to repair your hard drive.
For any problems regarding the MiniTool product, please let us know through [email protected].
About The Author

Position: Columnist
Chelsea graduated from university with a major in English. She has a strong interest in English writing. It is this passion for writing that led her to become an English editor. Her articles mainly focus on data recovery and other computer industry news. As an energetic and outgoing girl, Chelsea enjoys listening to music, singing, riding bikes, and eating in her spare time.
User Comments :