Have the files on your Acer computer been deleted due to human mistakes or other reasons? Do you have any idea how to recover deleted files from Acer laptop? If not, read this expert guide on MiniTool to learn detailed data recovery methods with specific instructions.
In the digital age, a considerable number of laptop users encountered data loss problems due to accidental deletion, hard drive damage, etc. Among them, Acer laptop users account for a large proportion. This is a real example:
I decided to delete some photos on my Acer laptop. I selected the photos that I wanted to delete and I pressed Shift + Delete so that I didn’t have to delete it again in the Recycle Bin. After I clicked the keys, the next thing I knew half of the apps and files on my desktop disappeared! PLEASE HELP ME RECOVER MY FILES.reddit.com
Have you ever encountered such a dilemma? In fact, the deleted or lost data can be recovered in most cases. I have put together a comprehensive guide for Acer laptop data recovery free. Regardless of the reason why your files were deleted, this article will provide you with clear directions. Keep reading to get detailed information.
How to Recover Deleted Files From Acer Laptop
Method 1. Check the Recycle Bin
If you often use your computers, you should be familiar with the Recycle Bin. It is a simple but practical function on the Windows system, mainly used to help you recover files temporarily deleted from local drives.
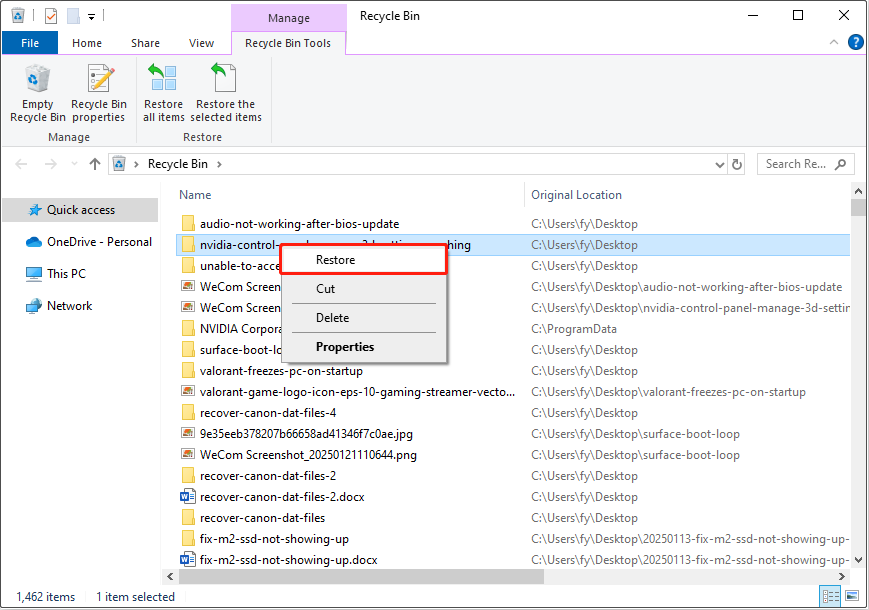
- On your desktop, double-click on the Recycle Bin icon to open it.
- Check if the required files are there. If yes, right-click on them and choose Restore. Then the selected files will be restored to their original locations.
Alternatively, you can directly drag and drop the targeted files to a preferred location.
Note that some scenarios where files are deleted cannot be recovered from the Recycle Bin:
- The files are deleted by using the Shift + Delete key combination.
- When the Recycle Bin capacity is full, subsequently deleted files will not be placed in the Recycle Bin.
- The size of the deleted files exceeds the capacity limit of the Recycle Bin.
- The files are deleted with the CMD command lines.
- The files are removed by third-party file cleaning tools.
- The files deleted from external storage devices such as USB drives, SD cards, and external hard drives will not go to the Recycle Bin.
- The files deleted from a network-shared folder or remote server do not go through the local Recycle Bin.
- The files deleted or lost due to hard disk damage or file system corruption will not be sent to the Recycle Bin.

Method 2. Restore Files From Backups
As you can see, there are many cases where files are not placed in the Recycle Bin. However, it does not mean the files are gone forever. If you have backed up your files, whether through File History, a cloud backup service, or third-party data backup software, you can restore deleted or lost files directly from the backup file.
- For OneDrive, Google Drive, or other cloud services, you need to sign in to your account and then download the necessary files from the cloud.
- For a professional data backup tool, run the software and use its built-in restore feature to restore the backup files.
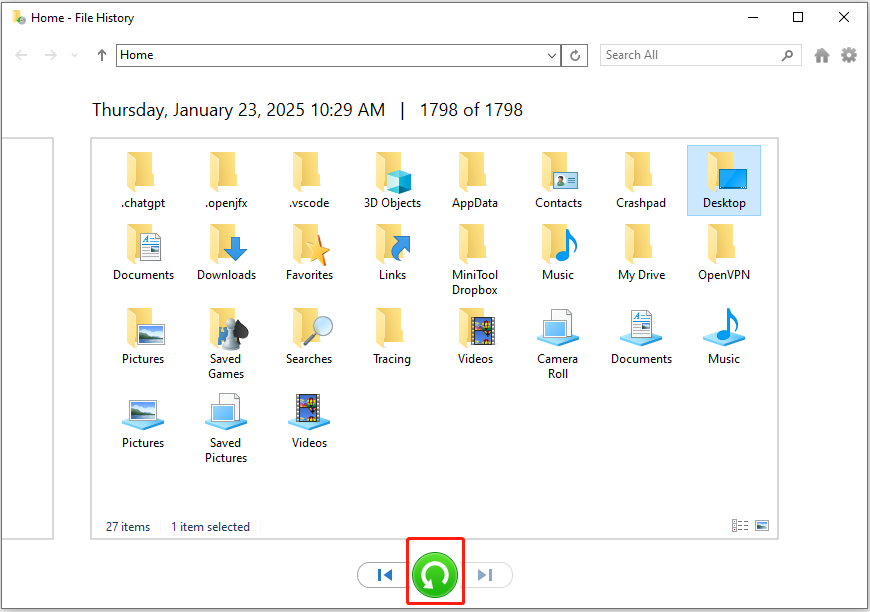
- For File History, go to Settings > Update & Security > Files backup > click More options under Back up using File History. Next, scroll down the page and click Restore files from a current backup. In the new window, select the files you want to restore and click the green Restore button.
Method 3. Use MiniTool Power Data Recovery
If your files are neither in the Recycle Bin nor backed up, you may think that the data is gone forever. But in fact, most deleted files are not truly erased from your computer; rather, only the disk space they occupied is marked as free and available to be overwritten. At this time, with the help of secure data recovery services, you still have a chance to recover these files.
Among the many data recovery tools on the market, MiniTool Power Data Recovery is the most recommended one. It perfectly applies to a variety of data loss scenarios, including file deletion with the Shift + Delete keyboard shortcut or command lines, data lost due to file system failures, and even when the disk becomes RAW or unallocated.
Moreover, a wide range of file types are supported for recovery, including documents, videos, images, audio, emails, database files, and other data. This free file recovery software also provides you with several options to perform quick desktop recovery, Recycle Bin recovery, and a specific folder recovery.
This tool boasts a user-friendly and intuitive interface. So, by following the detailed steps outlined below, you can effortlessly recover your files.
Step 1. Click the download button below to download and install MiniTool Power Data Recovery Free on your computer. This edition supports recovering 1 GB of files for free.
MiniTool Power Data Recovery FreeClick to Download100%Clean & Safe
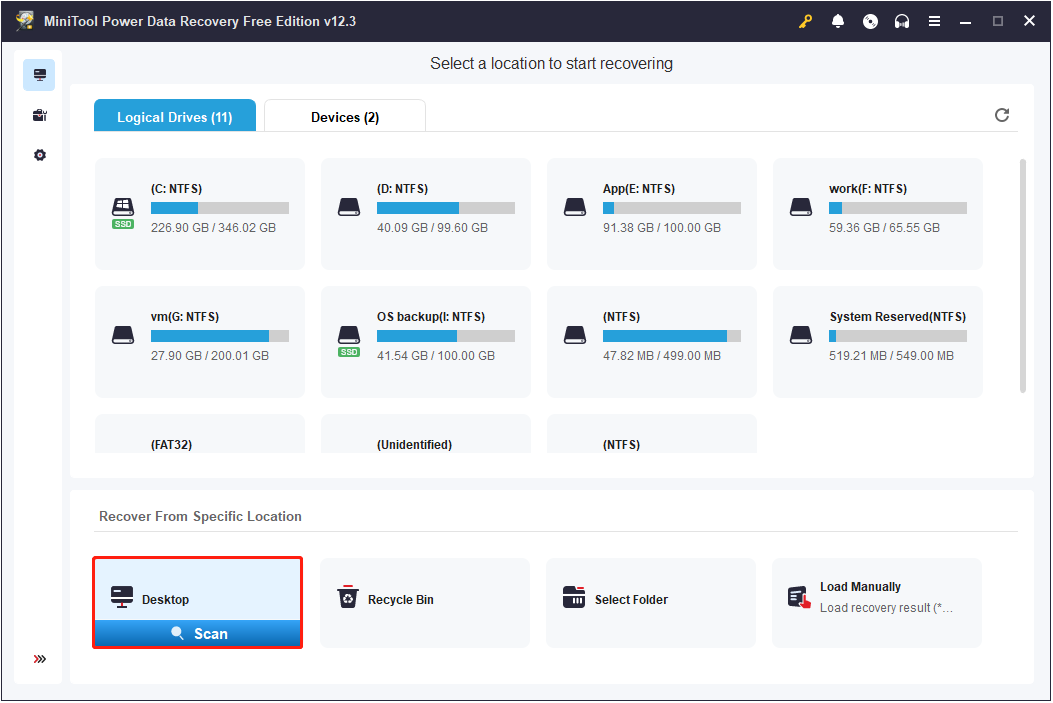
Step 2. Launch the Acer laptop data recovery software to enter its main interface. Here you will see three sections:
- Logical Drives: Under this tab, you will see all the partitions on your internal/external disks, including existing partitions, lost partitions, and unallocated space. Typically, these partitions are displayed with volume size, drive letter, file system, and other disk information.
- Devices: By switching to this tab, you will see all entire disks connected to your computer.
- Recover From Specific Location: This section provides you with three quick scan and recovery options, including the Desktop, the Recycle Bin, and a specific folder.
What you should do is select the drive, disk, or location from where you need to recover deleted files, and then click Scan to start scanning for deleted, lost, and existing data. Here I select the desktop to scan.
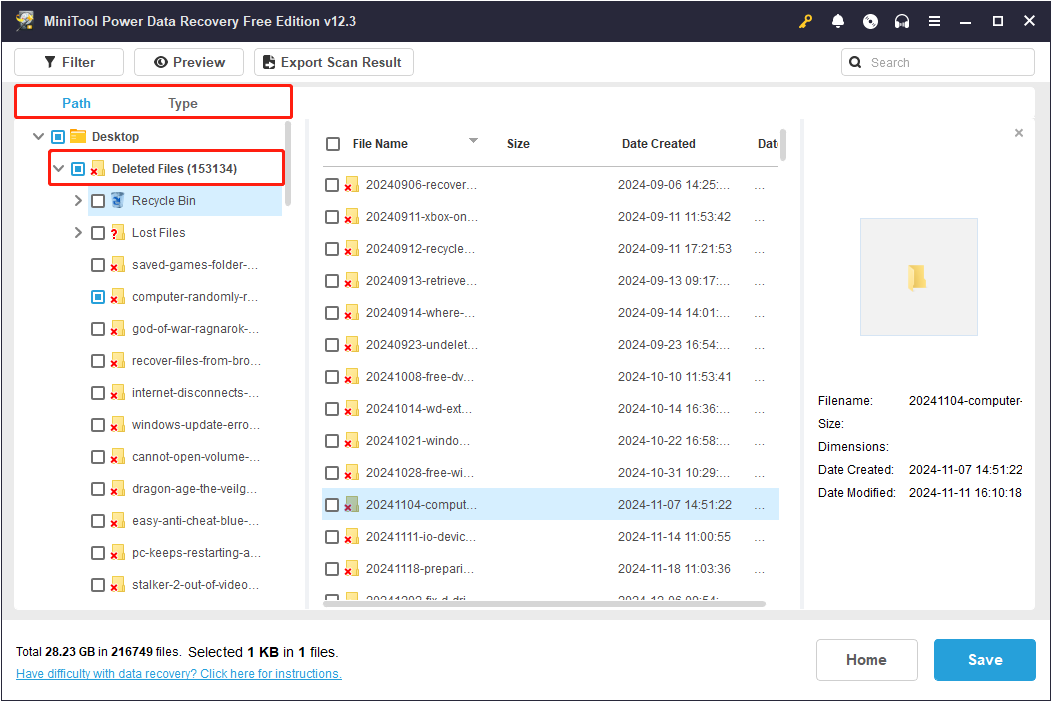
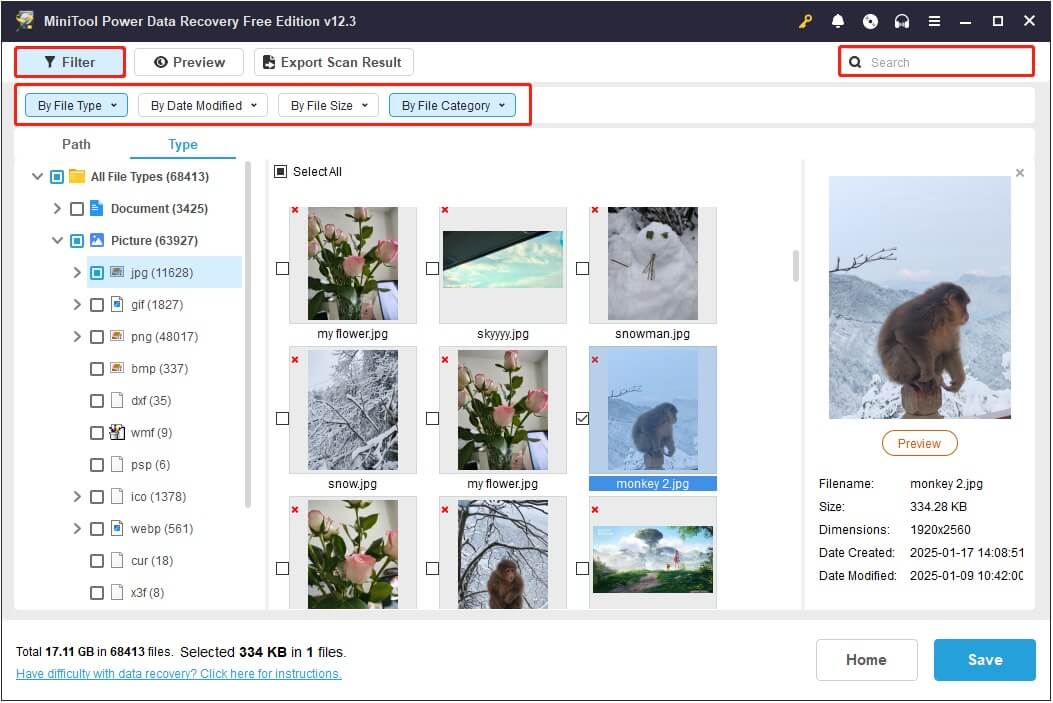
Step 3. After scanning, you can directly expand each folder under Path to find the files you want to recover. Typically, the deleted items are categorized under the Deleted Files folder. However, this is not always the case. Sometimes, file system failures and other reasons may cause the scan results to show other statuses.
Moreover, you can move to the Type category to view found files by file type and file format.
It is necessary to preview the targeted files for confirmation, and then tick the button in front of its file name to prepare for file recovery. To preview a file, you can simply double-click it.
If it is difficult to find the targeted files from a large number of items, you can make use of the Filter and Search features to narrow down the file range. The former feature provides you with several options to filter files by file type, file size, file modification date, and file category. The latter function allows you to search for a certain file by using a partial or complete file name.
Step 4. Finally, click the Save button, and then choose a safe file location to store the recovered files. Be aware that you should not save the recovered files to their original location in case of data overwriting.
Once the recovery is completed, you can go to the selected directory to verify that the files can be opened and are not corrupted. If you are prompted to upgrade the software to recover more files, it indicates that the 1 GB of free file restore capacity is used up. In this case, you should upgrade to a full edition to recover the remaining files. Here you may be interested in the MiniTool Power Data Recovery License Comparison.
An Important Tip: Back up Acer Laptop
File recovery provides a temporary solution to lost data, but a more permanent solution is to develop a habit of file backup. Acer laptops offer a variety of data backup options, including File History, Windows Backup and Restore, and so on. You can take advantage of these built-in features to protect your files.
Furthermore, if these built-in backup tools have some limitations for you, you can use the professional and free data backup tool, MiniTool ShadowMaker, to create file images or even system images. It provides efficient and automated backup solutions and supports comprehensive protection of files/folders, partitions/disks, and systems. Also, it has a user-friendly interface so that you can easily create a file backup with it.
Click the button below to download its trial edition, which allows you to use it for free within 30 days.
MiniTool ShadowMaker TrialClick to Download100%Clean & Safe
Step 1. Launch this backup tool, and hit Keep Trial to continue.
Step 2. After accessing its home page, go to the Backup section from the left menu bar.
Step 3. In the SOURCE section, click Folders and Files to select the files/folders you want to back up or click Disk and Partitions to select the partition/disk to back up. Next, select a safe location to store the backup files from the DESTINATION section.

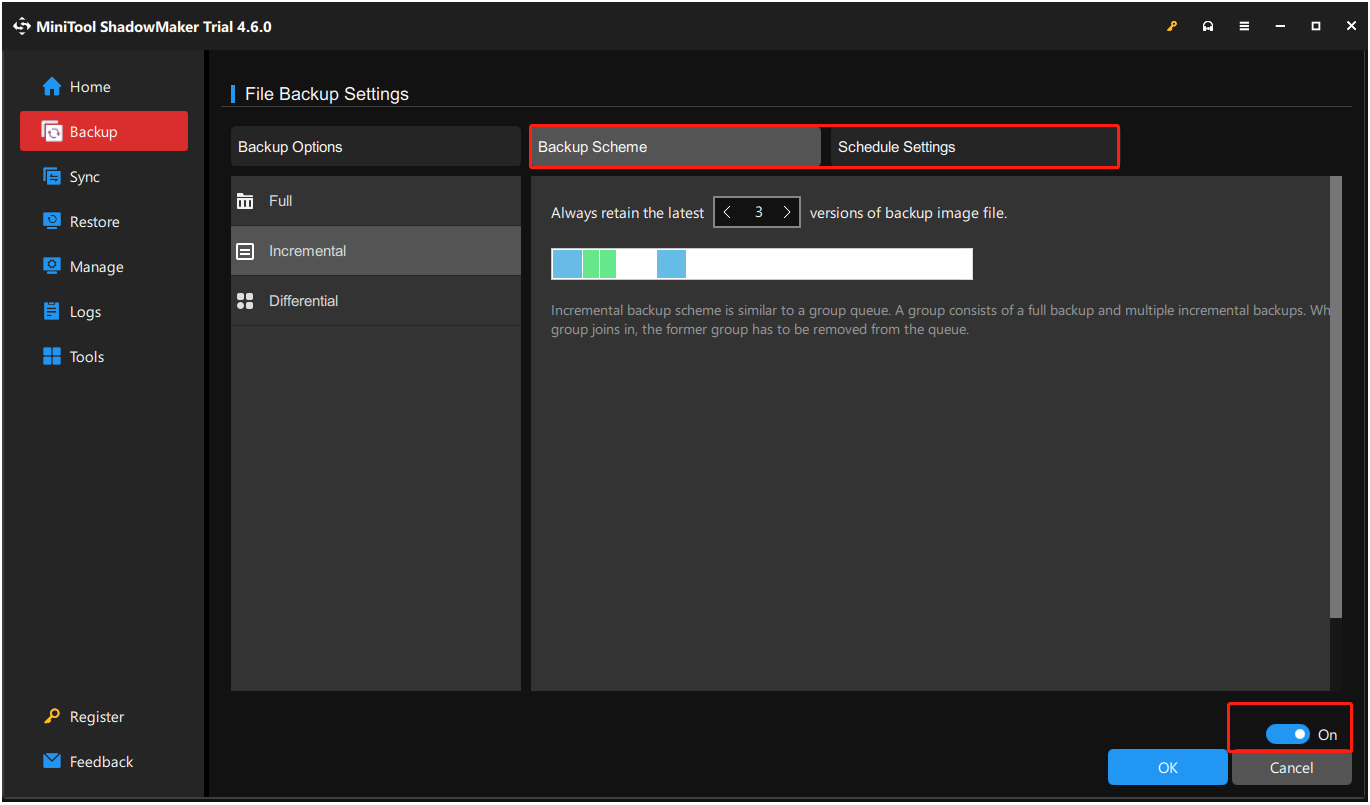
Step 4. Finally, click the Back Up Now button to start the backup process. The backup files will be stored in an image file. When you need to recover your files, open MiniTool ShadowMaker and go to the Restore tab to restore it.
Other Tips to Prevent Permanent Data Loss on Acer Laptop (and Other Computers)
If you do not want to back up files, you can take some other actions to reduce the risk of files being deleted or accidentally lost. Common reasons for file deletion include human factors, hard disk failure, virus attacks, system crashes, etc. Correspondingly, you can take the following preventive measures:
Tip 1. Enable File Deletion Confirmation Dialog
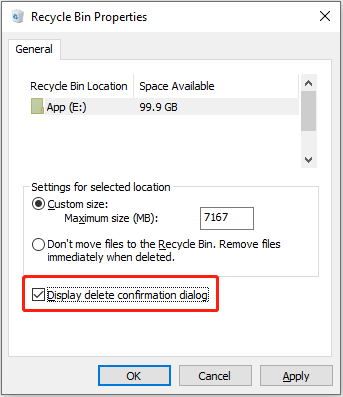
To prevent accidental deletion, you can enable the file deletion confirmation dialog, and then when you try to delete a file, you will be asked to confirm the action. To enable it, right-click the Recycle Bin icon and choose Properties. In the new window, tick the box of the Display delete confirmation dialog. Then click Apply > OK to save this change.
Tip 2. Keep Windows Defender Enabled
To prevent your computer from being attacked by viruses, you can turn on the real-time protection of Windows Defender. It instantly scans and detects potential threats when you run programs, open files, or browse the web. Once suspicious files are scanned, it will quarantine them.
Open Settings, and then click Update & Security > Windows Security > Virus & threat protection. Under Virus & threat protection settings, click Manage settings, and then turn on real-time protection.
Tip 3. Check Disk Health Regularly
You can check disk health status on a regular basis to prevent disk corruption or file damage. MiniTool released a partition manager – MiniTool Partition Wizard to check whether there are bad sectors or a corrupted file system on your hard drive.
The Surface Test feature of this tool can scan your disk for bad sectors and block them. The Check File System helps check for and repair file system errors. These two features are both free to use.
MiniTool Partition Wizard FreeClick to Download100%Clean & Safe
Other Tips
There are some other things you can pay attention to in your daily use of computers and disks:
- Try not to use Shift + Delete to delete files unless you are sure you will not use them anymore.
- Avoid running your Acer laptop, other computers, or disk at high load for long periods.
- Do not download suspicious software or files from unknown sources.
- Keep the Windows system up to date to avoid harm from known vulnerabilities.
- Set passwords for important files or drives.
To Sum Up
How to recover deleted files from Acer laptop? Check the Recycle Bin and backup files. If it does not work, use MiniTool Power Data Recovery to get your files back. Once the files are restored, take some precautionary measures to protect your data.
If you have any problems when using MiniTool products, please do not hesitate to contact the support team via [email protected].
About The Author

Position: Columnist
Shirley holds a bachelor’s degree in English and has been an editor at the MiniTool Team for many years. She specializes in IT-related content, with a focus on data recovery, file backup, disk management, and other technical topics. She is committed to delivering clear, accurate, and practical solutions to help users resolve common computer issues.
User Comments :