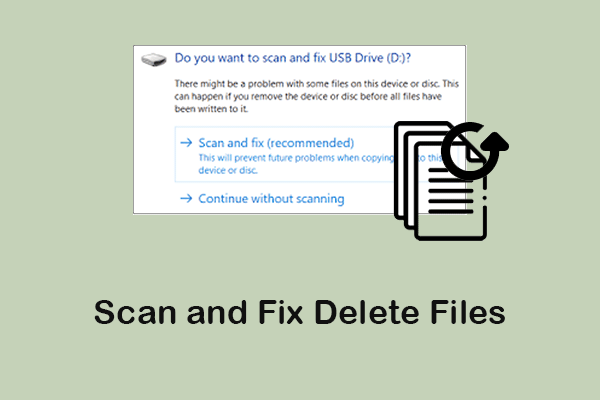
If you are looking for how to remove write protection on micro SD card, follow this MiniTool guide to modify registry values, scan for viruses, or run DiskPart. If the card becomes corrupted, data recovery software can help restore lost files.
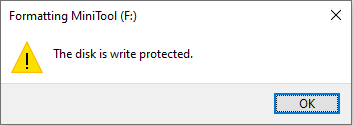
When your micro SD card is write protected, you cannot delete, modify, or add files. You may also be unable to format the disk, and the system will display the error message “This disk is write protected”.
What Does “Write Protected” Mean
Write protection prevents any modification to your SD card, and there are two common types:
- Physical protection: Controlled by a physical Lock switch on the SD card or card adapter.
- Software protection: Enabled by system settings such as DiskPart attributes or registry values.
Common Causes of Write Protection on a Micro SD Card
Write protection on a micro SD card can be triggered by both physical and software-related factors:
- Physical Lock switch: The Lock switch on the SD card or adapter is set to the Locked position.
- Read-only attribute: The system sets the disk as read-only, preventing any write operations.
- System restrictions: Windows registry settings may block write access.
- Malware or virus infection: Malicious programs may change the card’s attributes and make it read-only.
- Flash memory wear: Cards write data to blocks. When the number of usable blocks falls below a certain threshold, the SD card may automatically switch to read-only mode to prevent data loss.
- Block corruption: SD cards store data across multiple blocks for reliability. If both the primary and backup blocks become corrupted, the card may be write protected to avoid further damage.
If your micro SD card is write-protected, you can fix it quickly using these methods:
- Unlock the switch on the card or adapter
- Use DiskPart to clear read-only attributes
- Modify the WriteProtect registry value
- Run a full virus scan
Follow the step-by-step solutions below to fix the write protected SD card.
How to Remove Write Protection on Micro SD Card
Now, the following part teaches you how to remove write protection on micro SD card by virus scan, Registry Editor, and DiskPart.
Fix 1: Unlock the Micro SD Card
This method applies when your SD card or adapter is physically locked. Some SD cards or adapters have a small Lock switch on the side that prevents data from being modified.
To remove write protection from SD card, ensure that the switch is set to the Unlocked position.
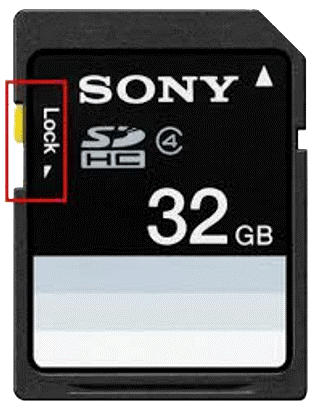
Image source: www.sony.com
Fix 2: Remove Write Protection with DiskPart
This workaround applies when the SD card is set to read-only by the operating system or due to logical disk errors.
DiskPart is a command-line tool that allows you to directly modify disk attributes. It can clear the read-only flag and restore normal access of your micro SD card.
Step 1: Open Command Prompt as an administrator. Click Yes in the UAC window.
Step 2: Enter diskpart in the Command Prompt window and press Enter.
Step 3: Type the following commands one by one and press Enter after each:
- list disk (It will list all disks on your computer)
- select disk 2 (replace 2 with the disk number of the micro SD card)
- attributes disk clear readonly
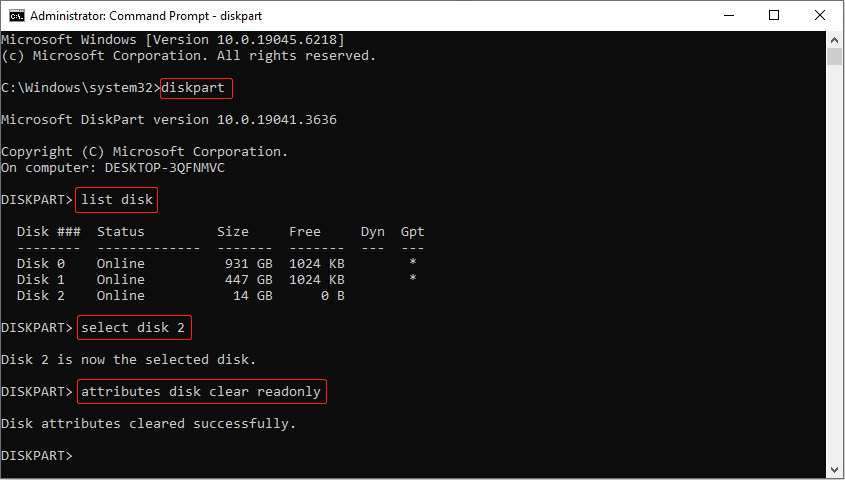
Step 4: Type exit to quit the DiskPart.
Fix 3: Use Registry Editor to Remove Write Protection
This method applies when write protection is enabled by system policies.
The Registry Editor allows you to modify system settings that control write access. By setting the WriteProtect value to 0, you can disable write protection and restore write access to the SD card.
Step 1: Open the Registry Editor
Right-click the Windows button and choose Run to open the Run dialog. Type regedit and press Enter to open Registry Editor.
Step 2: Locate the relevant path
Go to the following address: Computer\HKEY_LOCAL_MACHINE\SYSTEM\CurrentControlSet\Control
Step 3: Create or modify a WriteProtect key
3.1: Right-click the Control folder and click New > Key to create a new key named StorageDevicePolicies.
3.2: Under the StorageDevicePolicies folder, right-click on a blank space in the right pane and choose New > DWORD (32-bit) Value to create a new value named WriteProtect.
3.3: Double-click WriteProtect to modify the value data to 0, and click OK.
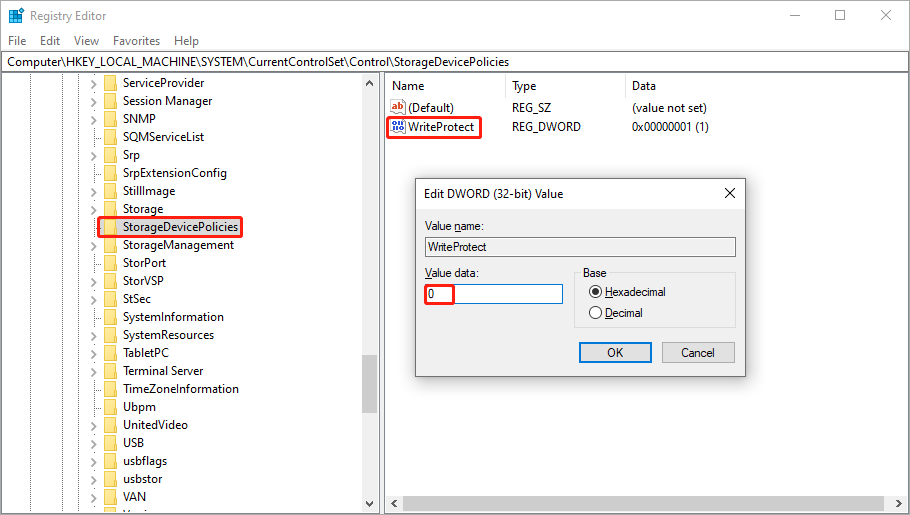
Step 4: Apply changes
Close Registry Editor, remove and reinsert the SD card, or restart the computer for changes to take effect.
If this guide helps solve your problem, consider sharing it with others facing similar issues.
Fix 4: Scan Your SD Card for Viruses
This method helps if the SD card becomes read-only due to a virus infection.
Scanning for viruses helps detect and remove malicious programs that may restrict write access to your micro SD card. It also ensures the computer is not exposed to potential threats when the card is connected in the future.
Follow the steps below to scan your SD card using Windows Defender.
Step 1. Open Settings and navigate to Update & Security > Windows Security > Virus & threat protection.
Step 2. Click Scan options > Custom scan > Scan now.
Step 3. In the pop-up File Explorer window, select your SD card and click Select Folder.
Wait for the process to complete. If Windows Defender detects viruses, it will prompt you to remove them. After removing, your SD card should be unlocked.
That’s all the information about how to remove write protection on micro SD card. If the issue persists, the SD card may be physically damaged or permanently locked. In such cases, the card should be replaced.
What if Your SD Card Is Corrupted
Sometimes, write protection is caused by file system corruption, and even after removing it, you may still be unable to access your data. In these cases, you’ll need to attempt data recovery.
To ensure the security of your data, it is recommended that you use MiniTool Power Data Recovery to recover data from a corrupted SD card.
Recover Files from a Corrupted SD Card
Here’s why you should choose MiniTool Power Data Recovery:
- Various damage scenarios: Whether it’s accidental deletion, formatting, card inaccessibility, file system errors, or even an SD card showing as RAW, MiniTool can perform a deep scan and attempt to recover data.
- Multiple file types: It can recover common file formats like photos, videos, documents, and audio, making it particularly suitable for SD cards in devices like cameras, phones, and drones.
- Highly secure: The software doesn’t write to the original data during the scan process, eliminating the risk of secondary damage or data overwriting.
- Simple operation and user-friendly interface: Even non-technical users can complete scanning and recovery through clear steps, without complex settings or command line operations.
This free file recovery software allows you to restore 1 GB of files without spending a cent. Now, download and install it to do an SD card recovery.
MiniTool Power Data Recovery FreeClick to Download100%Clean & Safe
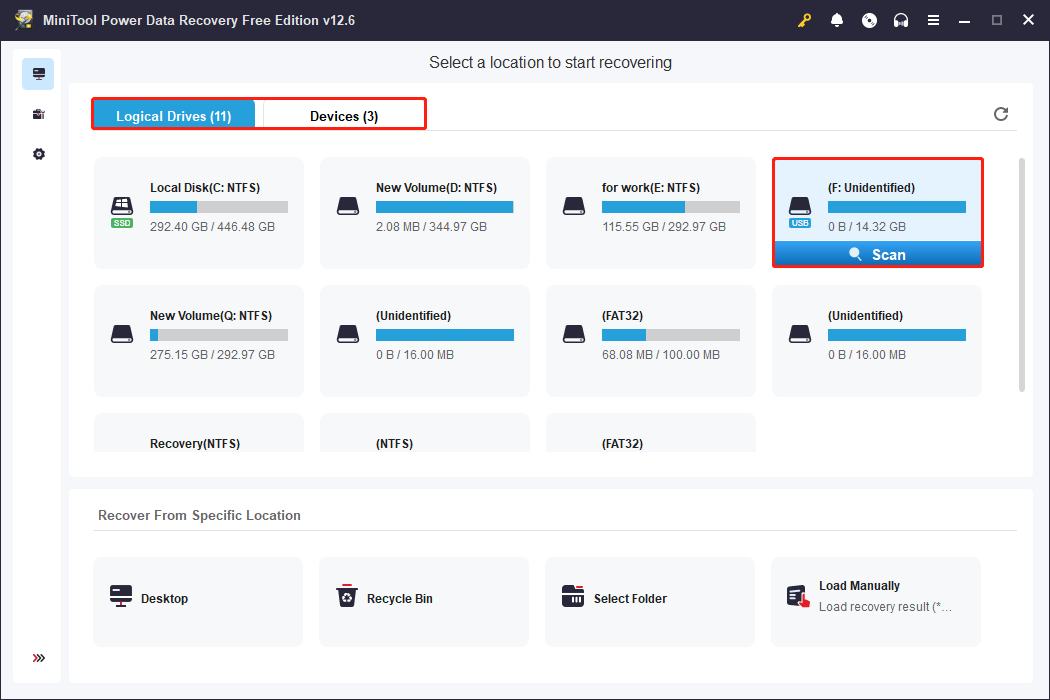
Step 1: Open the software and scan your SD card
Launch MiniTool Power Data Recovery. When you enter the main interface, all the partitions, including existing partitions, lost partitions, and unallocated space, are listed under the Logical Drives tab.
Find your SD card, move the cursor to the section, and click Scan to scan for data. Alternatively, you can scan your whole card in the Devices section.
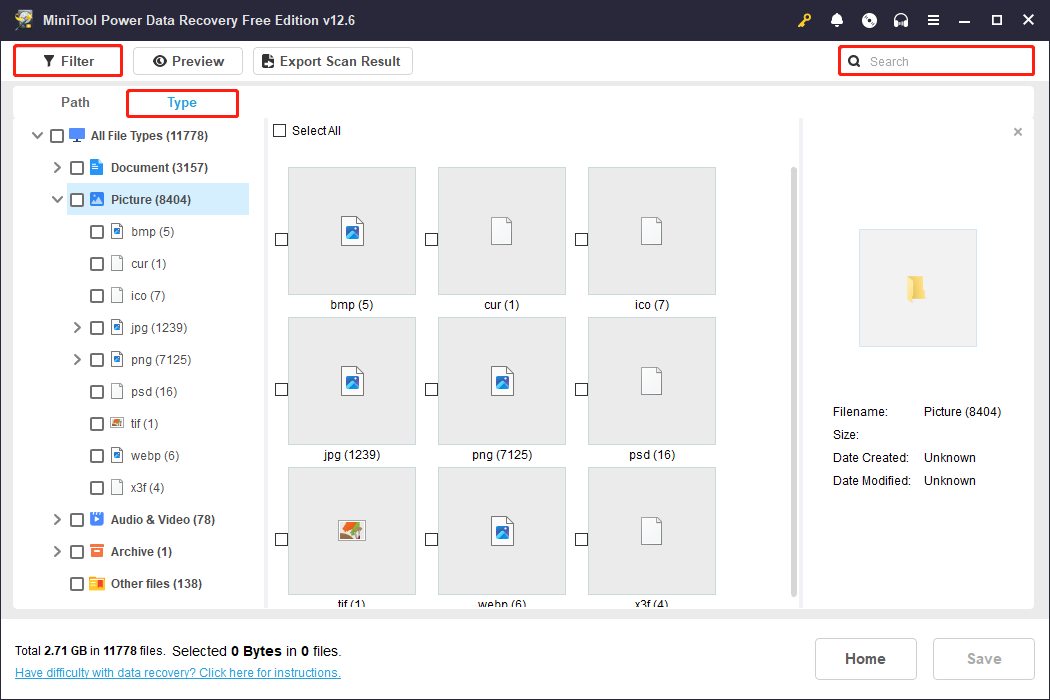
Step 2: Locate files by selecting the Type, applying Filters, and using the Search bar
When the scan is complete, all files will be listed under the Path tab. This feature allows you to find files according to the file structure. One downside is that it can be a bit difficult to find. If you don’t have to locate files according to the file structure, you can try the following features:
- The Type feature automatically categorizes scanned files by type, such as images, documents, videos, and audio files. This allows you to quickly locate the file type you want to recover.
- The Filter feature allows you to further refine your results based on file type, modification date, file size, and file category. This is ideal for narrowing down your search results when you have a large number of files.
- The Search feature allows you to quickly locate files by file name or partial keyword. Enter a file name (or part of it) you remember in the search bar and press Enter, and the software will match the relevant files in the scan results.
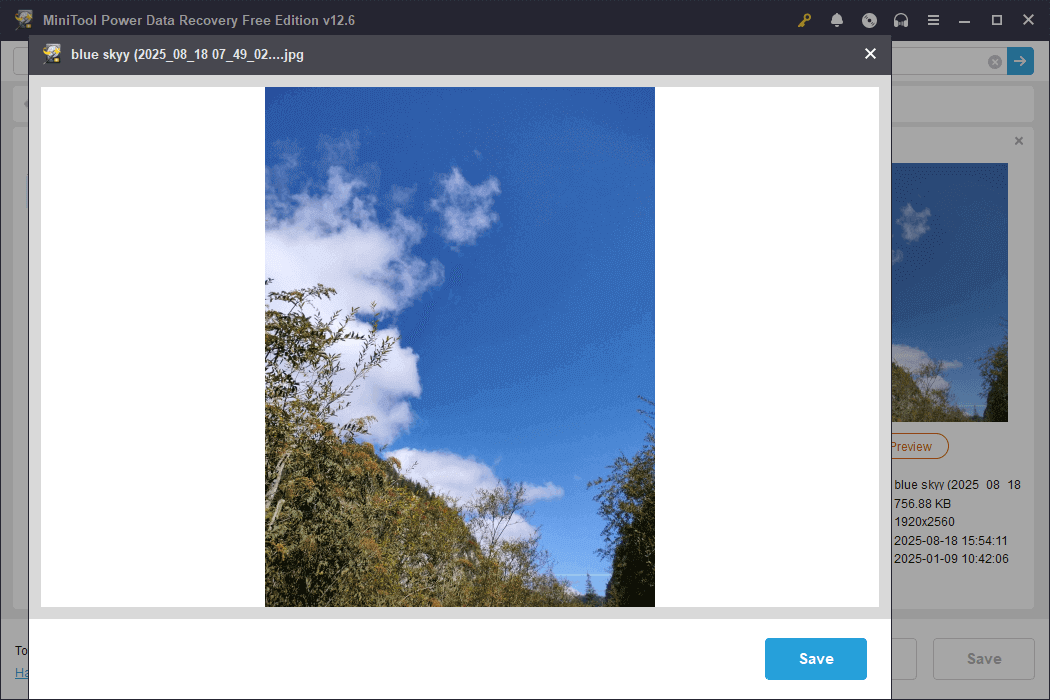
Step 3: Preview files after finding them to confirm their contents
After finding the target files, you can enable the preview function by double-clicking the files one by one. The software will pop up a window to display the contents of the file.
This allows you to confirm whether it is complete or the file you really need before recovery. It supports previewing common formats such as pictures, documents, and videos to help you improve recovery accuracy.
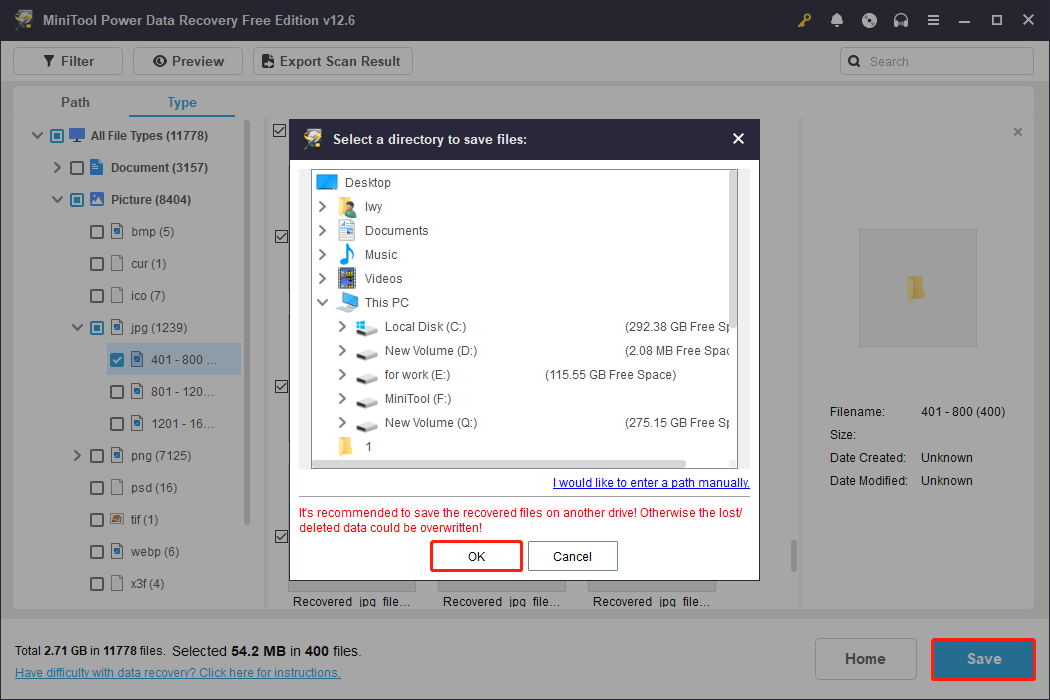
Step 4: Recover the selected files to a new location
After confirming the files, tick them and click Save. A window will pop up prompting you to choose a destination to store the recovered files. Remember to select a new one and hit OK. If the files exceed 1 GB, upgrade to a full edition. It gives you more authority.
How to Avoid Accidentally Being Write Protected
The key to preventing SD card write protection lies in developing good usage habits and paying attention to hardware details.
1. Check the physical lock switch.
Before using an SD card, check the physical lock switch on the card or card reader to ensure it is not in the “Lock” position. This small switch is often overlooked, but it is the most direct cause of write protection.
2. Eject and use the SD card properly.
Do not suddenly remove the SD card while it is being read or written, or operate the card when the device battery is low.
These actions can easily damage the file system, potentially forcing the card to read-only. It is recommended to always use the “Safely Remove Hardware” function to eject the device.
3. Regularly back up data and check the health of the card.
Use a disk utility to scan for errors, or choose a high-quality brand that supports health monitoring. These actions can effectively extend the life of the card and reduce the risk of write protection being triggered due to hardware aging.
Keeping the card dry and away from high temperatures and strong magnetic fields is also a key measure to protect it.
4. Run chkdsk to fix errors on the SD card.
Running chkdsk can prevent your SD card from being mistakenly identified as write-protected. When file system errors or bad sectors occur, Windows automatically sets the device to read-only to protect data.
By scanning and repairing these logical faults, chkdsk can clear the abnormal flags that cause write restrictions, restoring normal read and write permissions and avoiding non-physical write-protection issues. This operation allows the system to trust your SD card again.
Step 1: Type cmd in the Windows search bar, right-click Command Prompt, and choose Run as administrator. When prompted by UAC, click Yes to continue.
Step 2: Type chkdsk F: /f /r in the window and press Enter. Replace F with the drive letter of your SD card.
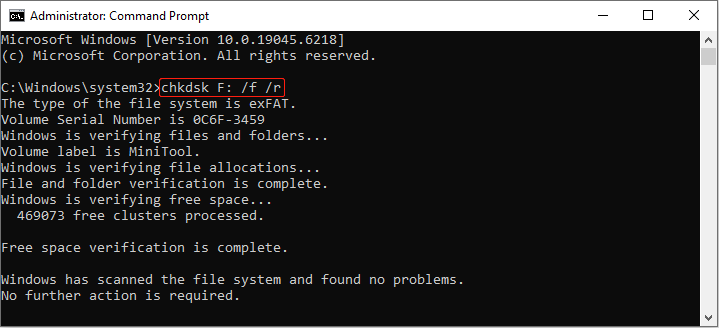
- F represents the drive you want to check.
- /f repairs errors.
- /r locates bad sectors and recovers readable data.
Final Words
How to remove write protection on micro SD card? Now, you can unlock the card, edit the registry, scan for viruses, and run DiskPart to remove it. After that, check if your card is corrupted. If so, use MiniTool Power Data Recovery to recover data.
Please also remember to use the SD card correctly and back up important files frequently.
First time using it? You may have some questions. Please contact us through [email protected].
About The Author

Position: Columnist
Shirley holds a bachelor’s degree in English and has been an editor at the MiniTool Team for many years. She specializes in IT-related content, with a focus on data recovery, file backup, disk management, and other technical topics. She is committed to delivering clear, accurate, and practical solutions to help users resolve common computer issues.
User Comments :