Does Scan and Fix delete files? Read this post to better understand the Scan and Fix function. Learn how to fix the issue and recover data using MiniTool Power Data Recovery. It also covers how to prevent this prompt from appearing in the future.
In today’s increasingly digital world, external storage devices such as USB flash drives and mobile hard drives have become indispensable tools for our work and study.
However, when these devices are connected to the Windows system and file system errors are detected, the Scan and Fix prompt may occur. Many users find that files have disappeared after performing this operation. Now, let’s fix the problem of Scan and Fix delete files.
Does Windows Scan and Fix Delete Files
Hello, I scanned and fixed my flash drive, and the results were that some of my files were deleted. I tried googling how to recover them, and all that showed up were fishy programs being advertised to recover files. Is there a safe program or way to recover my files? Please and thank you. I see posts about Found.000 file and root directory stuff, but I couldn’t find a post giving steps to find those hidden and root files.www.reddit.com
Will Scan and Fix delete files? According to the responses of many users, this is possible.
When you plug in a USB or external hard drive, Windows may prompt “Do you want to scan and fix Removable Disk?”.
If you choose to scan and fix the USB drive, the system will try to correct file system errors, but this may delete damaged or unclosed file records. And some files may be marked as invalid and cleared, resulting in data loss.
Here are some possible causes.
- The scan process was interrupted. If you unplug the device, lose power, or force shut down the computer during the repair process, the file system may not be fully repaired, resulting in data loss.
- The drive has bad sectors. The Scan and Fix tool attempts to repair bad sectors by migrating data from damaged areas to spare areas. If the spare sectors are exhausted, the original data may not be recovered, resulting in direct file loss.
- The file system structure is rebuilt. During the repair process, Windows may rebuild the file system metadata and mark damaged files as unusable or deleted, especially for FAT32 or exFAT formatted devices.
About Scan and Fix
Before fixing this problem and recovering deleted files, let’s have a better understanding of Scan and Fix.
What Is Scan and Fix
Scan and Fix is a pop-up window when Windows detects file system errors on usually the external storage devices. It allows you to scan the device to fix potential errors and ensure normal operation of the device.
It says, “Do you want to scan and fix USB Drive” with two options: Scan and fix (recommended) and Continue without scanning.

What Does Scan and Fix Do
Scan and Fix is designed to repair file system errors and prevent further data damage. It makes external storage devices operate safely and stably on Windows.
- Scan the device file system: Check for logical errors or damaged structures (such as FAT32, exFAT, NTFS).
- Fix errors: Use Windows’ CHKDSK tool to repair file tables, directory structures, bad sectors, and other issues.
- Improve device stability: Prevent data loss or unrecognizable devices due to file system errors.
- Isolate bad sectors: Mark unusable disk areas as unwritable to avoid future write failures.
What Are Trigger Conditions
Windows may pop up the Scan and Fix prompt when the following situations occur:
- The device is unplugged without being ejected safely.
- The device has bad sectors or the file system is damaged.
- The device is connected to Windows after being used in another system.
Some Possible Side Effects
Although the Scan and Fix feature is designed to repair file system errors on external storage devices, in some cases, it may bring some side effects:
1. File loss or quarantine
During the repair process, the damaged file may be deleted by the system or moved to the Found.000 folder. Then it turned into a .CHK file that cannot be opened directly.
If the power is cut off or the device is unplugged during the scan, it may cause further damage to the device or complete data loss.
2. Data structure changes
Windows may rebuild the FAT32 or NTFS file system structure. It changes the original directory or file path. Some files may become inaccessible or lose their original names.
3. Conflict with viruses or malware
Some viruses may disguise themselves as file system errors. After Scan and Fix repairs, they trigger virus behavior and cause data corruption.
The following tips help you reduce the risk of these side effects.
- Back up important data on your device before performing Scan and Fix.
- Use professional data recovery tools to scan your device and save files.
- If the device prompts an error, choose Continue without scanning first and then handle it manually.
What Is a CHK File
When Windows repairs file system errors, it generates fragments of corrupted or orphaned files called CHK files. These files are created by the built-in CHKDSK tool during its repair process.
CHKDSK will be invoked in the background when you run Scan and Fix. If CHKDSK encounters corrupted or incomplete file records, it saves the recoverable parts as CHK files. They are placed in a hidden folder called Found.000.
When are CHK files created?
- When the device unexpectedly shuts down or loses power while operating on a file.
- When a device is improperly removed (for example, unplugging a USB drive without safely ejecting it).
- When you run Scan and Repair or CHKDSK to repair a corrupted file system.
Where are CHK files stored?
CHK files are stored in the hidden folder called Found.000. To view them, open File Explorer, navigate to the root directory of the drive, and enable Show Hidden Files. The CHK files will then appear.
Differences Between Automatic and Manual Scans
Scan and Fix is an automatic detection by the system. In addition to this method of repairing the disk, you can also repair it manually. Learn the differences between them.
Features of automatic Scan and fix:
- Triggering time: Automatically triggered when the system detects a device problem.
- User operation: Just click Scan and fix; no manual settings are required.
- Applicable scenarios: Ordinary daily use, such as minor problems after files are not safely removed.
- Repair depth: Mainly for file system errors, the repair is relatively basic.
Advantages of Manual Scan and Repair:
- Triggering method: Actively uses tools (such as the chkdsk command) or manually performs a check in disk properties.
- High degree of customization: Allows to add parameters to achieve more functions, such as: chkdsk G: /f /r. (/f Automatically repair errors; / Check bad sectors and try to recover them.).
- Suitable for advanced users or regular maintenance: Comprehensively detects the health of the disk, even the system disk can be checked.
- More in-depth repair: Includes directory structure, index errors, and even physical bad blocks.
How to Cope With Scan and Fix Prompt Properly
When Windows pops up a Scan and Fix prompt, dealing with it correctly can keep your data safe and avoid device damage.
However, if you haven’t backed up important files, select Continue without scanning when prompted to scan and fix. Then, immediately back up the files you want. After that, proceed with the repair. Alternatively, close the prompt directly, back up your data, and then perform the disk repair.
Here, MiniTool ShadowMaker is recommended. This tool allows you to fully back up the entire system, disk, partition, or specific folder, and supports a variety of storage devices, including HDD, SSD, USB, etc.
Step 1: Download and install MiniTool ShadowMaker, and then launch it.
MiniTool ShadowMaker TrialClick to Download100%Clean & Safe
Step 2: Go to the Backup section on the left menu bar. In the Source area, choose the drive you need to back up. In the Destination area, select the location to save the backup file.

Step 3: Click Options to set backup schedule (daily, weekly, monthly), and select the backup scheme.
Step 4: After the settings are done, click Back Up Now to start the backup process.
When the backup is complete, you can run Scan and Fix. During the scanning process, keep in mind:
- The scanning process may take several minutes or even longer, depending on the size of the disk and the severity of the problem.
- Do not close the window or unplug the device during the repair process to avoid data corruption.
Step 1: Click Scan and Fix
In the pop-up window, click Scan and fix (recommended). Windows will automatically run the disk checking tool (chkdsk) to scan and repair file system errors.
Step 2: Wait for the repair to complete
The repair process may take several minutes, especially if the device has a large capacity. Do not unplug the device in the middle.
If the device cannot be repaired or the prompt appears repeatedly, you can manually run the disk check command.
Step 1: Open Command Prompt (Administrator privileges)
Type cmd in the Windows search bar, right-click Command Prompt, and select Run as Administrator.
Step 2: Run the chkdsk command
Type chkdsk G: /f in the pop-up black window and press Enter. Replace G with the drive letter you want to check. /f means automatically repair detected errors.
If you want to view bad sector information, you can also type this command: chkdsk G: /f /r and press Enter. /r is used to locate bad sectors and recover readable information.

What if Files Cannot Open After Scan and Fix
If you find that the files in your device cannot be opened after scan and repair, it may be because the repair process modified or isolated part of the file structure, resulting in file corruption or restricted access. Don’t worry, here are some solutions you can try.
Fix 1: Repair Corrupted Files
The scan and fix process may have repaired the drive, but the file itself is partially damaged. You can try using a file repair tool to repair corrupted files.
Fix 2: Check the File Permissions
The file cannot be opened because it is encrypted or the permissions have been changed. In this case, administrator privileges or restoring the original user settings are required.
Right-click the file that cannot be opened, and select Properties > Security. And check if the current user has read permissions.
Fix 3: Open the File With Another Program
Sometimes the original program cannot recognize the format of the repaired file. You can right-click and select Open with to try to open it with other compatible software.
Fix 4: Check the Drive Manually Again
The scan did not completely repair it. You can repair it manually again according to the previous part. Run the chkdsk G: /f /r command in the administrative Command Prompt.
Fix 5: Check the Event Viewer
The error log in Event Viewer may have system-level information about the cause of the file corruption. Go and check it.
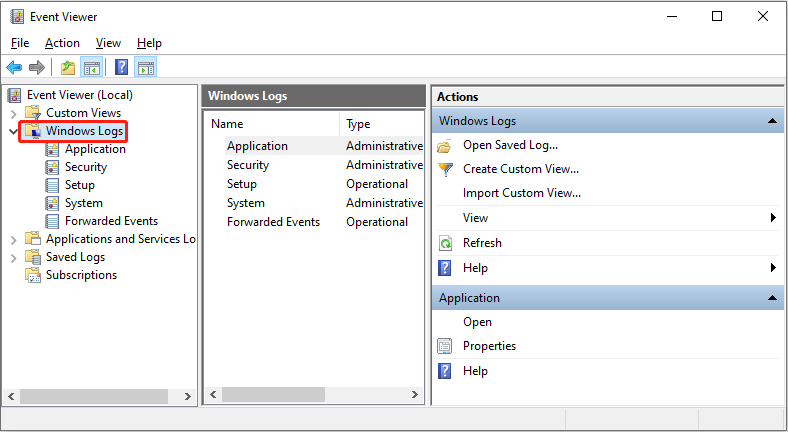
Step 1: Open Event Viewer
Press the Win + R keys to open the Run dialog, enter eventvwr or eventvwr.msc, and then press Enter.
Step 2: Find the error entry
After opening Event Viewer, expand Windows Logs > Application or System. Look for the entry with a red Error icon (Error) in the right window, which indicates a system or program error event.
Step 3: View error details
Double-click the error entry to view detailed information, including the error source, event ID, time, related files, etc. If you know the time after which the file cannot be opened, you can locate the related error entry based on the time range.
How to Recover Scan and Fix Delete Files
How to recover Scan and Fix deleted files? Here are some ways. Before starting, please check your disk status.
If the drive is physically damaged or cannot be recognized, don’t operate on your own to avoid further damage. You can contact a professional recovery agency for lossless recovery.
If your device can be recognized normally, try restoring lost files from backup or using a file recovery tool.
Method 1: Restore From Backup
If you use OneDrive, Google Drive, or a local backup tool (such as MiniTool ShadowMaker), you can restore Scan and Fix delete files directly.
Option 1: Restore from cloud backup (such as OneDrive or Google Drive)
If you backed up the file to the cloud, log in to OneDrive and Google Drive, and find and download the backup file. And then, copy them to your disk.
Option 2: Use Windows Previous Versions feature
If you have Windows File History enabled before data loss:
Step 1: Connect the disk to your computer.
Step 2: Open File Explorer and click This PC.
Step 3: Right-click the drive and select Properties.
Step 4: Switch to the Previous Versions tab, select a backup point in time, and click Restore.
Option 3: Restore from backup tool
If you have backed up files using the backup software before, then restoring files becomes very easy. These backup tool supports fast restoration of files, systems, or entire disks from backup images. Now, open the software and restore If you use OneDrive, Google Drive, or a local backup tool (such as MiniTool ShadowMaker), you can restore Scan and Fix delete files directly.
Method 2: Use MiniTool Power Data Recovery
No backups? Don’t worry. MiniTool Power Data Recovery will save your life. It is a robust tool for recovering lost files.
This tool is capable of recovering files lost due to accidental deletion, formatting, virus attack, system crash, etc. It supports data recovery from multiple devices such as USB, SD card, external hard drive, etc.
Having a simple operation and an intuitive interface, it is suitable for everyone. Additionally, this free file recovery software allows you to restore 1 GB of files for free. Now download and install it to restore Scan and Fix delete files.
MiniTool Power Data Recovery FreeClick to Download100%Clean & Safe
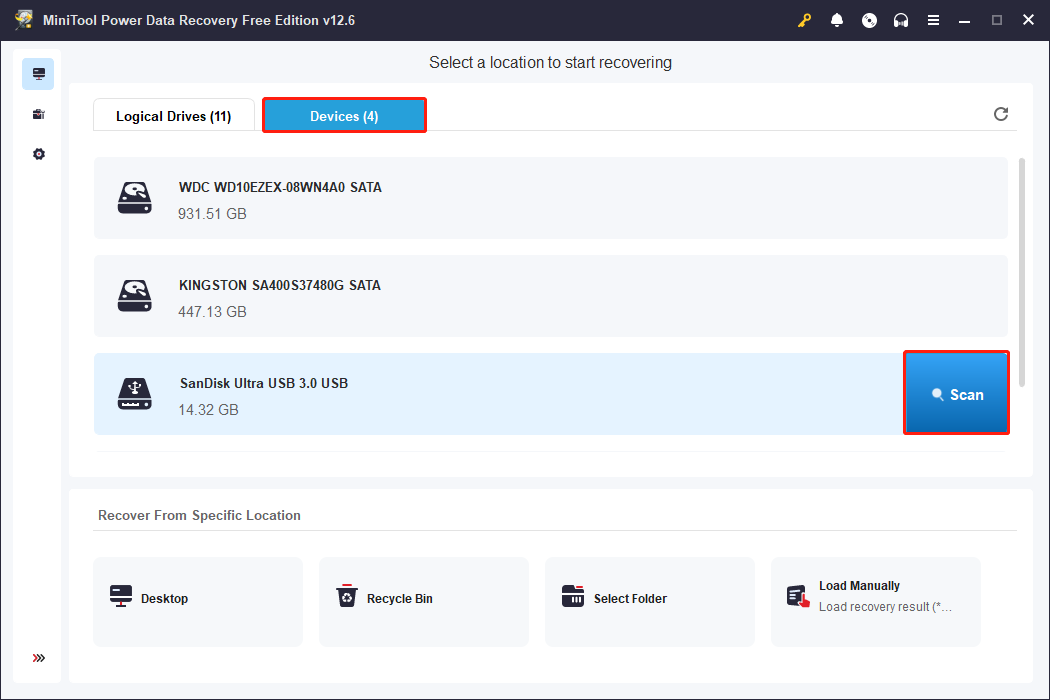
Step 1: Launch the software and scan the partition
Open the MiniTool Power Data Recovery software. Under the Logical Drives tab, it displays all the partitions. The Devices section includes all the disks connected to your computer. Find your device and click Scan to scan for data.
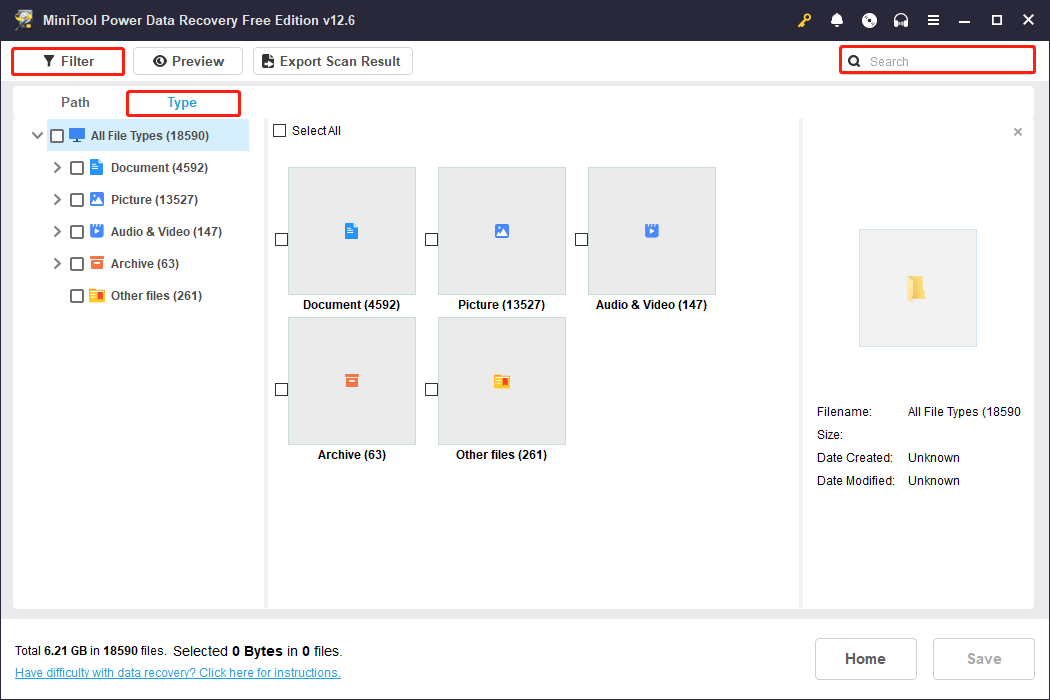
Step 2: Find target files using Type, Filter, Search
This scan process takes some time to complete. For the best scan results, you need to wait for it to complete. When it ends, files are listed under Path by default.
Since not all files may need to be restored, this tool provides some filter features. They can help you find files quickly.
- Type: Locate files by file type, such as documents, audio, videos, pictures, etc.
- Filter: Set multiple filter conditions at once to narrow the scope based on file type, modification date, file size, and file directory.
- Search: Quickly locate the specific file by searching for the full or partial file name.
Step 3: Preview files to guarantee recovery accuracy
To avoid recovering unwanted files, this tool allows you to preview files. Select the file and click the Preview button. The content will show up.

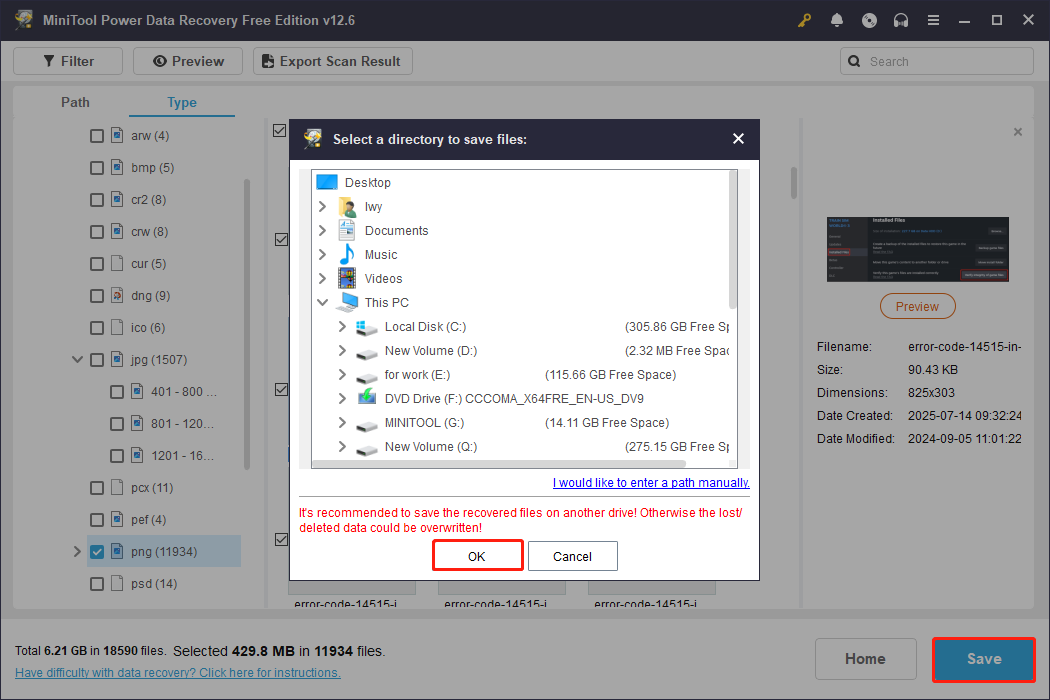
Step 4: Save files to a new destination
After confirming all the files, tick them and click Save. Choose a new location and click OK in the window. The file recovery will start.
How to Prevent the Scan and Fix Prompt From Appearing
Way 1: Eject the Device Correctly
Use Windows’ Safely Remove Hardware feature instead of unplugging the device directly. This will avoid file system errors, and Windows will not prompt you to scan and repair.
Click the USB icon in the taskbar and select Eject Device to ensure that the system completes the write operation.
Way 2: Avoid Power Outages or Unplugging the Device During Writing
A sudden power outage or unplugging the device while it is writing data will cause file system errors. And Windows will pop up a Scan and Repair prompt the next time you plug it in or start it.
So, when writing data, ensure that the power supply is stable. And wait for all write operations to complete before unplugging the device.
Way 3: Scan for Viruses and Malware
Viruses or malicious programs can cause file system errors, so it is best to perform virus scans regularly.
Step 1: Open Settings
Right-click the Windows icon and choose Settings.
Step 2: Find scan options
Click Update & Security > Windows Security > Virus & threat protection > Scan options.
Step 3: Start scanning viruses
Choose a scan option in Quick, Full, Custom, and Microsoft Defender Offline scans, and click Scan now.
Way 4: Disable the Shell Hardware Detection Service
Scan and Fix is triggered by the Shell Hardware Detection service. After disabling it, the system will no longer actively detect the device status, and the prompt will not appear.
Step 1: Open the Service Manager
Press the Win + R keys, enter services.msc, and then press Enter.
Step 2: Find the service item
In the pop-up Service window, find the service named Shell Hardware Detection.
Step 3: Modify the startup type
Double-click the service. Select Disabled in the Startup Type drop-down menu, and click Stop > OK.

Step 4: Restart the computer
To ensure that the settings take effect, it is recommended to restart the computer.
Wrapping Things Up
Scan and Fix delete files? Don’t worry. This article takes a deep dive into what Scan and Fix is, reveals how this operation fixes file system errors, and teaches you how to make the safest choices when you encounter such problems.
It also teaches you how to recover lost files using MiniTool Power Data Recovery and how to prevent the Scan and Fix prompt from appearing again. Take action now! Hope they can work for you.
If you have any questions using MiniTool products, you can contact us via [email protected].
About The Author

Position: Columnist
Chelsea graduated from university with a major in English. She has a strong interest in English writing. It is this passion for writing that led her to become an English editor. Her articles mainly focus on data recovery and other computer industry news. As an energetic and outgoing girl, Chelsea enjoys listening to music, singing, riding bikes, and eating in her spare time.
User Comments :