Why Does My Computer Keep Saying Preparing Automatic Repair
Preparing Automatic Repair is a repair mode that Windows automatically enters when it detects issues during startup.
The message indicates that the system is attempting to diagnose and repair startup problems, such as damaged system files, disk errors, or corrupted startup configurations.
Sometimes, the computer may get stuck Preparing Automatic Repair during startup and cannot boot into Windows. The common triggering causes include:
- Missing or corrupted system files: Critical Windows files or the registry may be corrupted, preventing the system from starting normally.
- Disk problems: The hard drive has bad sectors, file system errors, or insufficient partition space.
- Boot configuration data error: Boot configuration data (BCD) is missing or corrupted.
- Driver or update error: An incorrect driver update or failed system upgrade causes startup failure.
- Partition attribute error: The partition is set to read-only or hidden and cannot be accessed by the system.
- Hardware issues: Hardware failures, such as memory corruption, can prevent the system from booting normally.
After knowing about its factors, the next step is to resolve this boot issue.
How to Fix the Windows Preparing Automatic Repair Loop
The methods involve troubleshooting in Safe Mode, updating BIOS firmware, reinstalling Windows, and more. Now, try them one by one until your computer can boot normally.
Fix 1: Force Restart Your Computer
When stuck in Preparing Automatic Repair on Windows 10/11, try forcing a restart of your computer first.
Unplug the battery (if possible) and power adapter. Then reconnect the power and press and hold the Power button for 20 seconds to see if the computer starts normally.
If this method does not work, keep trying the following ones.
Fix 2: Boot into Safe Mode
If you suspect that the system fails to boot due to incompatible drivers or conflicting software, try entering Safe Mode. Safe Mode loads only the most essential drivers and services, helping you troubleshoot the issue.
Step 1: Access WinRE (Windows Recovery Environment)
Repeat the following operations until the “Automatic Repair couldn’t repair your PC” message appears.
- Press and hold the Power key for 10 seconds to shut down your PC.
- Press the Power button to turn on your computer.
- Then, press the Power button again for 10 seconds to turn off the device.
Then, click Advanced options to enter the WinRE screen.
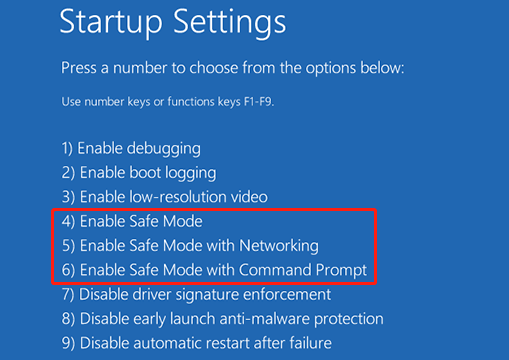
Step 2: Enter Safe Mode
Select Troubleshoot > Advanced options > Startup Settings > Restart. Finally, press F4, F5, or F6 to enter Safe Mode.
- Press F4: Enable Safe Mode.
- Press F5: Enable Safe Mode with Networking.
- Press F6: Enable Safe Mode with Command Prompt.
Step 3: Perform some basic checks
When the system successfully boots into Safe Mode, it typically indicates that default settings and basic drivers are not causing the BSOD.
In Safe Mode, try the following common troubleshooting steps:
- Run a virus scan
- Uninstall suspicious software
- Update Windows
- Update hardware drivers
- Run DISM and SFC to repair system files
- …
Fix 3: Switch TPM Access to Hidden in BIOS
TPM (Trusted Platform Module) is an encryption chip designed to enhance computer security. If your computer has TPM enabled, the system’s secure boot path may change, causing Windows to be unable to verify the boot environment.
Therefore, try disabling TPM in the BIOS to resolve this issue.
Step 1: Enter BIOS
Press and hold the Power button until the computer shuts down completely. Press the Power button again, and immediately press the corresponding BIOS hotkey (usually F2, F12, Esc, or Delete). Then you will enter the BIOS interface.
Step 2: Disable TPM access
Go to the Security tab and switch TPM access to Hidden or Disabled.
Fix 4: Update BIOS Firmware
Incompatible BIOS firmware can also cause issues with the boot process. Updating it can fix underlying compatibility problems and ensure that the hardware and system boot together correctly.
Step 1: Download the latest BIOS
Locate your motherboard model. Visit the motherboard manufacturer’s official website. Then, download the latest BIOS version that is exactly compatible with your motherboard model to a USB drive.
Step 2: Enter BIOS
Restart your computer and press the appropriate key to enter the BIOS setup interface.
Step 3: Update the BIOS firmware
In the BIOS menu, locate the BIOS Update or EZ Flash option. Select the update file from the USB drive and follow the on-screen instructions to complete the update.
After the update is complete, your computer may restart automatically.
Fix 5: Run DISM and SFC
Damaged or missing system files may cause the computer to not boot normally. Running DISM and SFC can repair or replace these files.
Step 1: Enter WinRE according to the previous method, and then click Troubleshoot > Advanced options > Command Prompt.
Step 2: Type DISM /Online /Cleanup-Image /RestoreHealth in the prompt window and press Enter.
Step 3: Continue typing SFC /scannow and press Enter.
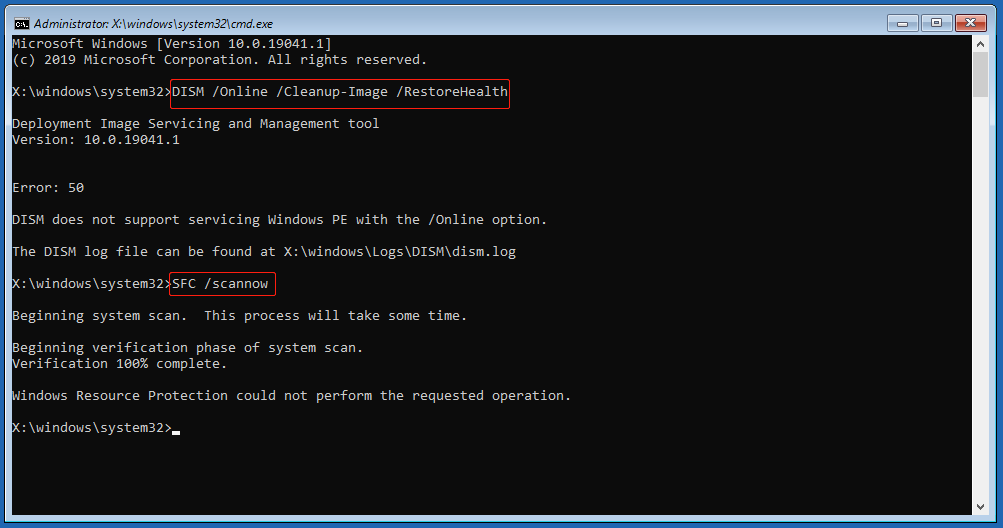
When the process completes, check if your PC can boot into Windows.
Fix 6: Execute CHKDSK to Repair Disk Errors
Running CHKDSK can detect and repair file system errors on the disk, ensuring the system can boot normally.
Step 1: In WinRE, click Troubleshoot > Advanced options > Command Prompt.
Step 2: In the prompt window, type notepad and press Enter.
Step 3: Click File > Open. In the new window, go to the This PC section, identify the system drive by looking for system folders such as Program Files or Windows, and note the drive letter.
Step 4: Type chkdsk drive letter: /f /r and press Enter. Replace drive letter with the drive letter you just checked.
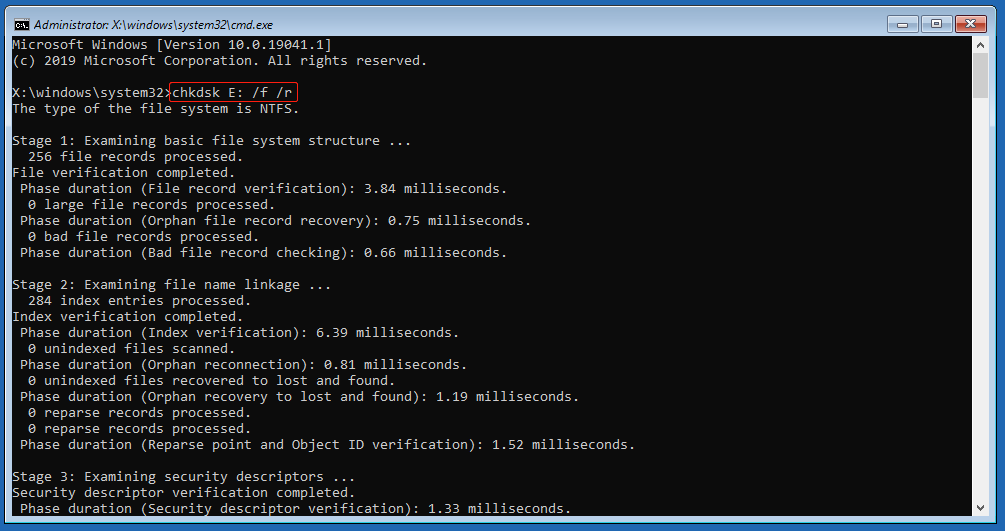
Wait for the process to complete and check if you can access your PC.
Fix 7: Set Your Actual Boot Drive as the Priority
Setting the actual boot disk as the priority ensures that the system loads from the correct drive and boots successfully.
Step 1: Enter BIOS
Restart your computer and press the corresponding shortcut key when the boot logo appears to enter the BIOS.
Step 2: Set boot drive priority
In the BIOS menu, go to the Boot or Startup tab. Locate the hard drive/SSD where you actually install Windows (usually displayed as the brand and model). Move this drive to the top of the boot priority list.
Step 3: Save and exit
Follow the prompt to save the settings (usually F10), and then exit the BIOS. The computer will restart and boot from the drive you set.
Fix 8: Run Startup Repair
Running Startup Repair can automatically fix common problems that prevent Windows from starting normally.
Step 1: In WinRE, click Troubleshoot > Advanced options.
Step 2: Select the Startup Repair module to automatically fix common system issues.
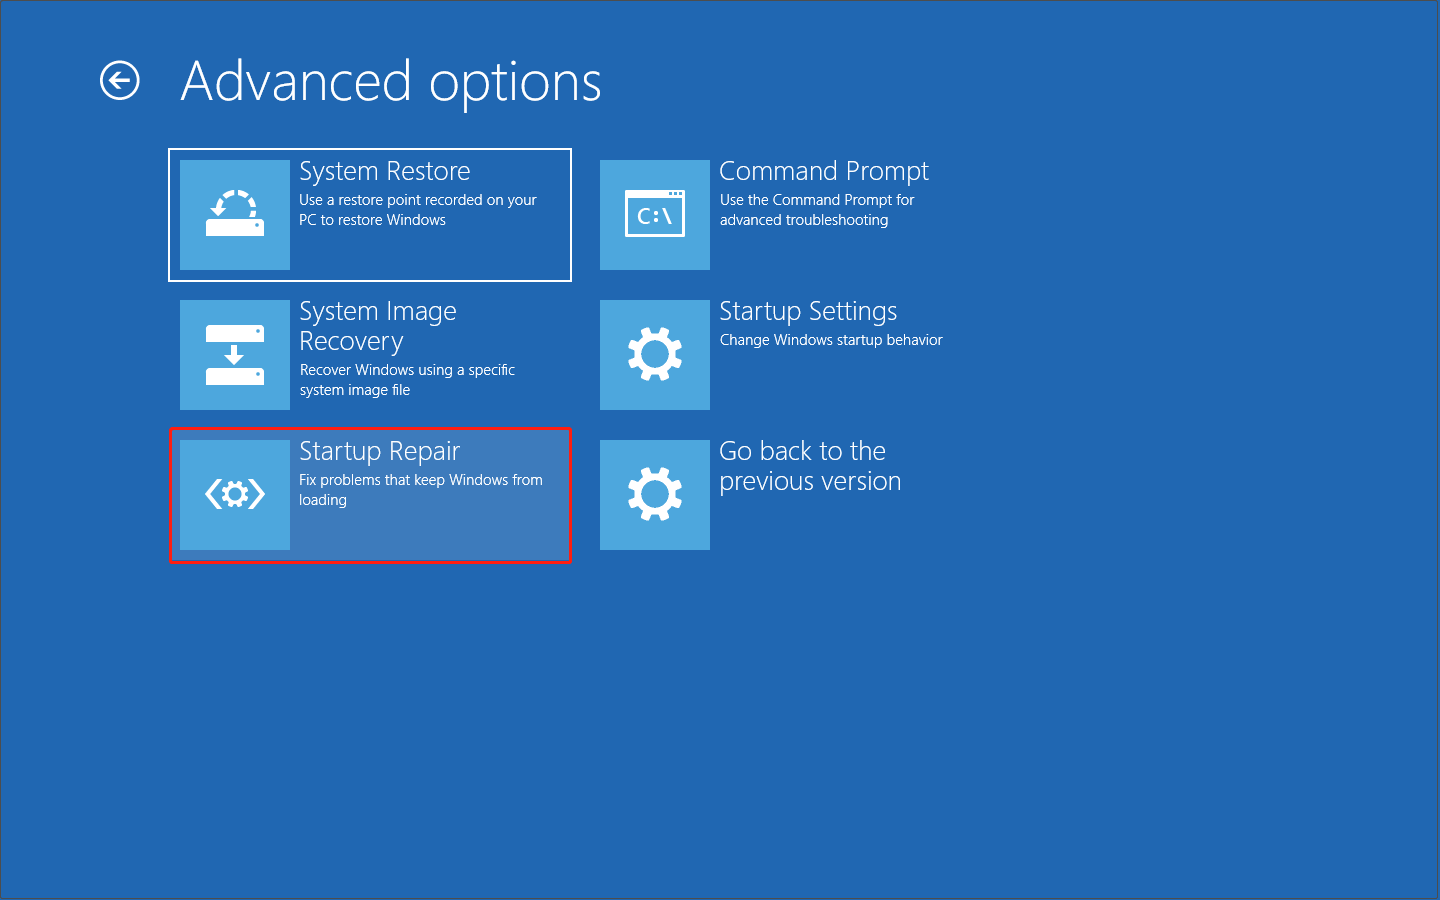
When the repair is complete, check if your computer boots normally.
Fix 9: Disable Secure Boot
When the Preparing Automatic Repair loop occurs, disabling secure boot can bypass verification restrictions, allowing repair tools or drivers to load correctly.
Step 1: Enter UEFI/BIOS
Restart your computer. During startup, repeatedly press the specific key (e.g., F2, F12, Esc, or Delete) to enter the setup menu.
Step 2: Navigate to secure boot settings
Use the arrow keys to find the Security, Boot, or Authentication tabs. Then, find the Secure Boot option.
Step 3: Disable secure boot
Select the Secure Boot option and change its setting to Disabled. Finally, save changes and exit. The PC reboots.
Fix 10: Extend System Reserved Partition
One common cause of the Preparing Automatic Repair loop is insufficient space in the system reserved partition, preventing the system from properly loading startup files.
Extending the system partition provides enough space for boot configuration data and recovery tools, preventing the repair process from getting stuck in a loop.
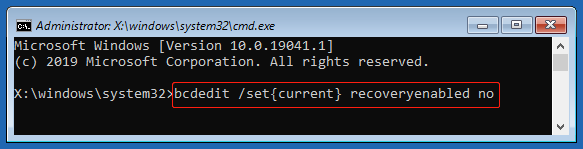
Fix 11: Disable Automatic Repair at Startup
If automatic repair repeatedly fails and causes your computer to get stuck in a startup loop, you may need to disable automatic repair at startup.
This prevents the system from being forced into repair mode every time it boots up. It allows you to manually troubleshoot or use other tools to resolve the issue.
Here are two options:
Option 1: Through Command Prompt
Step 1: In the WinRE interface, choose Troubleshoot > Advanced options > Command Prompt.
Step 2: Type the following command and press Enter:
bcdedit /set {current} recoveryenabled no
Option 2: Through Startup Settings
Step 1: In WinRE, navigate to Troubleshoot > Advanced options > Startup Settings > Restart.
Step 2: Press F9 to disable automatic restart after failure.
Fix 12: Restore the Windows Registry
Restoring the registry can revert the system to a previous valid configuration, thereby fixing critical system settings and resolving startup issues.
Step 1: Click Command Prompt in the Advanced options page from WinRE.
Step 2: Type the commands below one by one and press Enter after each:
- dir
- mkdir configBak
- copy config configBak
- cd config\RegBack
- dir
- copy * ..\*
Step 3: Then, type All and press Enter to restore all data.
Step 4: Close the window and click Continue to boot to Windows.
Fix 13: Perform a System Restore
If the system detects recent changes that are preventing Windows from starting properly, a system restore need be performed.
This will restore the computer to its previous stable state without affecting personal files, thus resolving the startup problem.
Step 1: Launch System Restore
Enter Advanced options and select System Restore. The system will prompt you to select the target operating system, and then click Next.
Step 2: Select and perform a restore
The System Restore wizard will display previously created restore points. Select a restore point with a suitable date and time (usually the state before an update or software installation).
Follow the prompts to confirm the restore. The system will restart and begin the recovery process, which may take several minutes.
After the restore is complete, the computer will automatically restart and boot into Windows.
Fix 14: Reset Your PC
Resetting your PC can quickly fix system problems and restore your computer to a clean, usable state.
Step 1: In WinRE, click Troubleshoot > Reset this PC.
Step 2: On the Choose an option window, select Keep my files.
Step 3: Select a method to reinstall Windows and follow the on-screen instructions to complete the operation.
If none of the above methods work, perform a clean installation by using an installation media.
Fix 15: Perform a Clean Installation
If both automatic and manual repair fail to restore normal operation, performing a clean install is the ultimate solution. It ensures the computer can restart and regain stability.
A clean install will delete all data, including programs and personal files. Reinstalling Windows directly is not wise. Read the following sections and do some preparatory work first.
What if I lost my data? – Recover files from a non-bootable computer
How to recover data if your computer is stuck in the Preparing Automatic Repair loop and cannot start normally?
MiniTool Power Data Recovery can create a bootable media, allowing direct access to the hard drive and file recovery without booting into Windows. It is simple to use and highly secure.
Here are some of its key features. Learn about them to make use of this tool effectively.
- Comprehensive functionality. This tool supports data recovery from scenarios such as deleted files, formatted disks, lost partitions, and system crashes. It can recover almost all file types, such as documents, pictures, videos, and audio.
- Wide compatibility. This software can handle data recovery from various devices, including HDDs, SSDs, and removable drives. It is compatible with Windows 11/10/8.1/8.
- High data security. The original data is not modified during the recovery process, ensuring file integrity and reducing the risk of secondary damage.
- Ease of use. MiniTool offers an intuitive graphical interface. Even without a professional background, you can easily complete data recovery.
Phase 1: Create a bootable disk on a working computer
Step 1: Download and install MiniTool Power Data Recovery Bootable on another working PC.
Step 2: Launch the software. From the main interface, click the Bootable Media icon located in the upper right. Then, plug in a blank USB flash drive to the computer and select WinPE-based media with MiniTool plug-in.
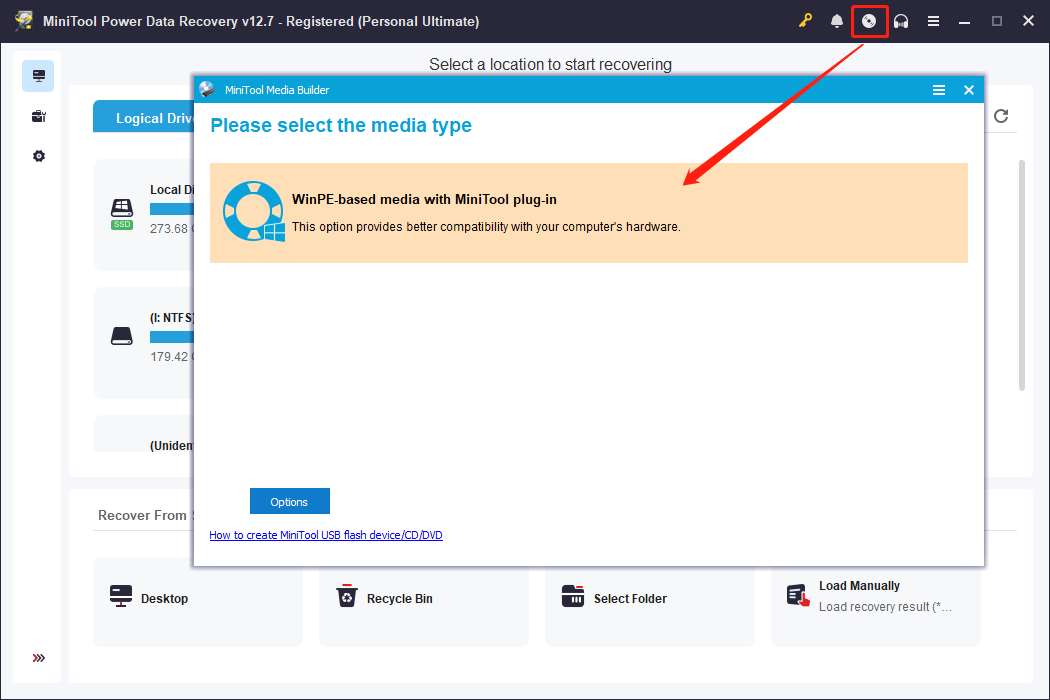
Step 3: Select the USB Flash Drive option to create the bootable disk.
Phase 2: Boot the non-bootable computer from the disk
Step 1: Connect the prepared USB boot disk to the computer that cannot start.
Step 2: Restart the computer and enter the BIOS setup window (commonly accessed with F2, F12, Esc, or Delete during boot).
Step 3: Navigate to the Boot tab, set the USB device as the first boot option, and the system will launch into the MiniTool WinPE environment.
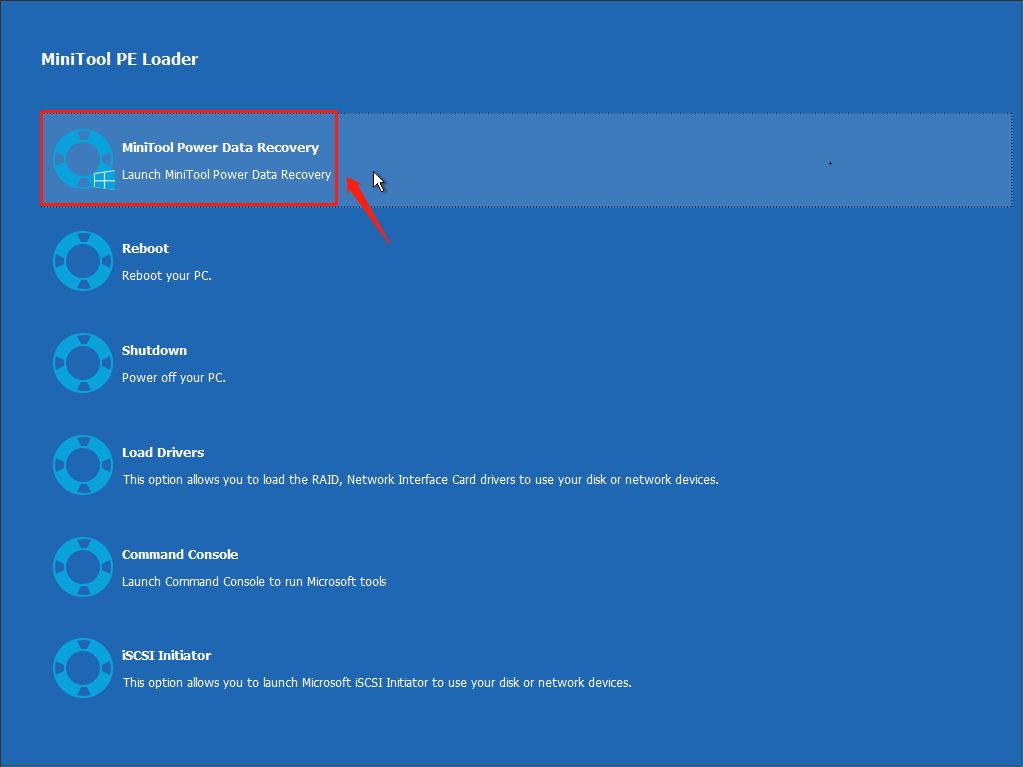
Phase 3: Recover data via MiniTool Power Data Recovery
Step 1: In the MiniTool PE Loader interface, select MiniTool Power Data Recovery to launch it.
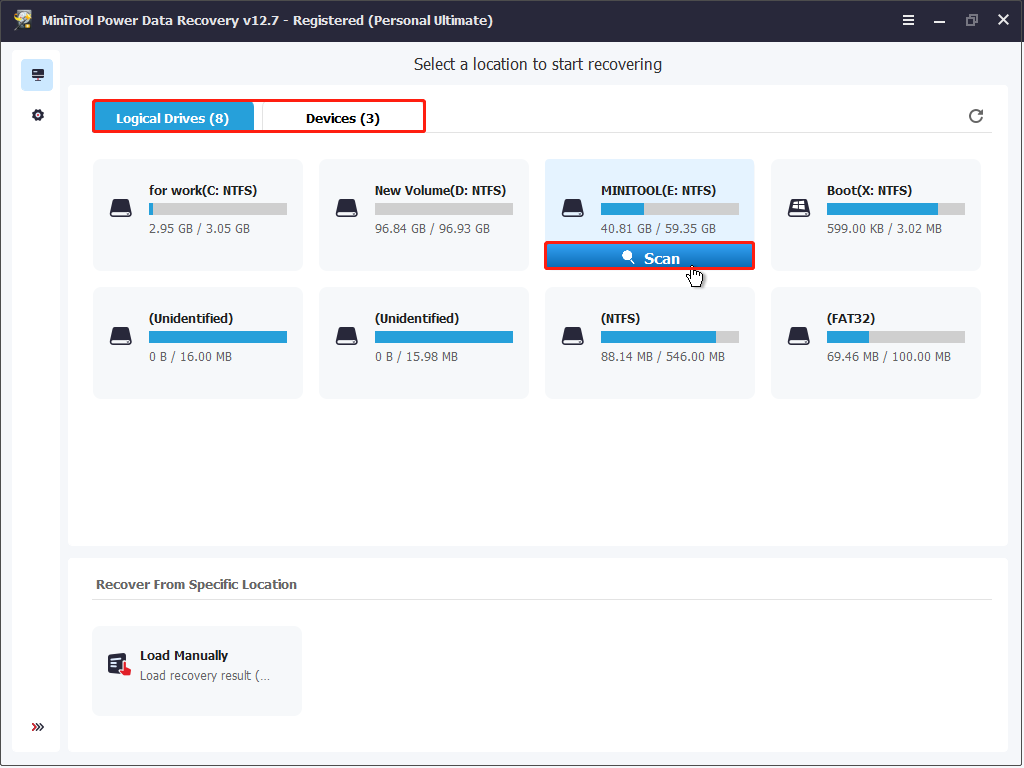
Step 2: In the main interface, find the target scan location under the following modules:
- Logical Drives: This section displays all disk partitions, including deleted partitions, existing partitions, and unallocated space. In WinPE, the system partition might not appear as drive C:. Identify the drive through its volume size.
- Devices: This section lists the entire physical hard drive, not just its partitions.
After locating the target drive, select it and click Scan.
Step 3: Wait for the scan process to end. When it ends, find the required files using Path, Type, Filter, and Search.
- The Path feature displays scan results according to the file’s original path. Expand Deleted Files, Lost Files, or Existing Files to locate your files.
- The Type feature categorizes found files based on file type, such as documents, images, videos, and audio. This is suitable when you want to recover a specific type of file.
- The Filter feature offers various filtering criteria, including file type, modification date, file size, and file category. Further narrow down your search by setting specific criteria.
- The Search feature allows you to directly enter the filename to find the target file. It is especially suitable when you remember the filename or some keywords, greatly improving recovery efficiency.
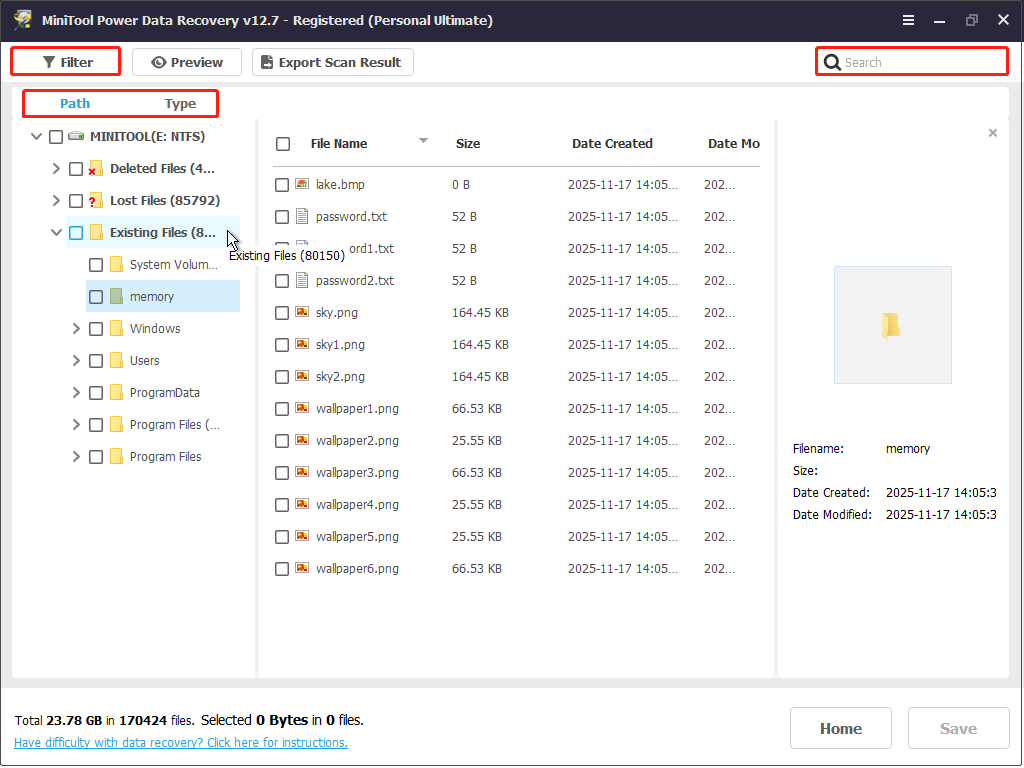
Step 4: When the needed files are found, double-click them to preview to make sure they are the correct ones.
Step 5: Select the wanted files and click Save. In the directory window, choose a safe path for the recovered data and click OK to start the recovery.
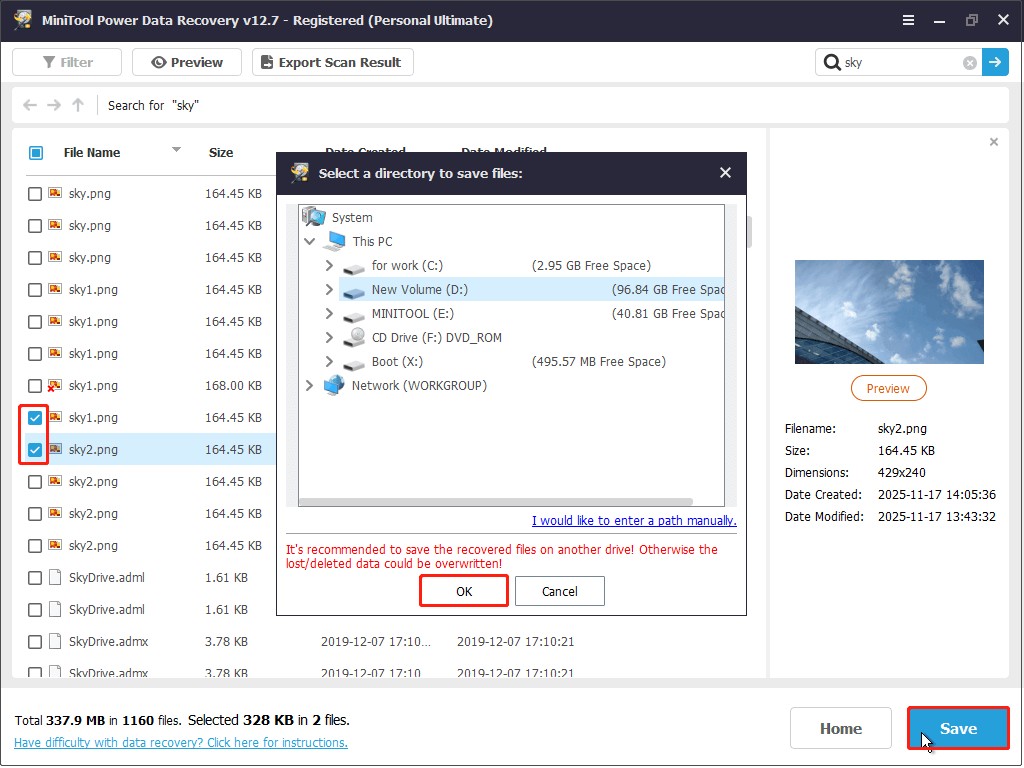
When the Recovery Completed window pops up, your files have been restored to the specified location.
Steps to reinstall Windows
After the data recovery is complete, learn how to reinstall the operating system.
Step 1: Obtain an installation media
On a normally running computer, download the Windows Media Creation Tool from the Microsoft website.
Step 2: Create a bootable USB drive
Insert a USB drive with at least 8 GB of storage into the working PC. Run the Media Creation Tool, select Create installation media (USB flash drive, DVD, or ISO file) for another PC, and click Next, to create a bootable USB drive.
Step 3: Enter BIOS/UEFI
Insert the bootable USB drive into the unbootable computer. Then, restart your computer and press the F2, F12, Esc, or Delete key to enter the BIOS settings. Set the USB drive as the first boot device. Your computer will enter the Windows installation interface.
Step 4: Customize Windows
On the installation interface, select the language, time, and keyboard or input method. On the next page, click Install now to continue.
Step 5: Enter the product key
Enter your product key (if needed), or select I don’t have a product key and activate it later.
Step 6: Install Windows
Select Custom: Install Windows only (advanced) and choose a location to install Windows.
Wait for the installation to complete. The system will automatically copy files and restart multiple times.
When the process ends, your PC will be completely clean.
Next, keep reading the differences between automatic repair and manual repair.
Automatic Repair vs. Manual Repair
When a Windows system malfunctions, you often face two different repair methods: automatic repair and manual repair.
Understanding these two repair methods will help you choose the most appropriate solution when your system crashes or fails to boot.
| Automatic Repair | Manual Repair | |
| Trigger | Starts automatically when Windows fails to boot | Enter WinRE or use tools actively |
| Scope of Fixes | Startup files, boot configuration issues | More extensive issues associated with the registry, disks, and more |
| Ease of Use | Very simple, no input required | More complex and requires selecting or entering commands |
| Success Rate | Can solve common startup problems, but may cause a boot loop | Higher for complex issues, more targeted solutions |
| Risk | Stuck in a repair loop, unable to access Windows | Improper operation may result in data loss |
| Best Use Case | Quick attempt for everyday boot failures | When automatic repair fails, or advanced troubleshooting is required |
Wrapping Things Up
Faced with the Preparing Automatic Repair loop, try booting into Safe Mode, updating BIOS firmware, running startup repair, disabling secure boot, or reinstalling Windows to fix it.
Before a clean installation, use MiniTool Power Data Recovery to restore data from a non-bootable computer.
For any inquiries about the MiniTool product, don’t hesitate to contact us at [email protected].
About The Author

Position: Columnist
Chelsea graduated from university with a major in English. She has a strong interest in English writing. It is this passion for writing that led her to become an English editor. Her articles mainly focus on data recovery and other computer industry news. As an energetic and outgoing girl, Chelsea enjoys listening to music, singing, riding bikes, and eating in her spare time.
User Comments :