This MiniTool post focuses on how to recover Zoom recordings from local and cloud. For cloud recording recovery, check the cloud trash in the Zoom web portal. For local recording recovery, check the Recycle Bin, or use professional data recovery software.
Zoom is a popular remote communication tool that facilitates smooth meetings, webinars, and collaborative sessions worldwide.
Meanwhile, Zoom allows you to record meetings locally on a computer or to the cloud by clicking the Record button in the toolbar.
However, you may lose Zoom recordings due to accidental deletion, system malfunctions, storage issues, or network disruptions.
This leads to the question: Is it possible to recover deleted Zoom recordings? And if it is, which tools and methods offer the greatest chance of success?
This guide will explore how to recover Zoom recordings from the cloud and local storage. Before discussing the recovery methods, learn about Zoom recording storage.
How Does Zoom Save Recordings
It is essential to understand how Zoom stores recordings, as this determines the appropriate recovery approach.
Zoom offers two primary storage options: Local recordings (saved directly to your computer) and Cloud recordings (stored on Zoom’s servers).
>> Local Recordings:
- How it works: After a meeting ends, Zoom processes the recording and stores it directly on your hard drive.
- Default Location: Usually located in Documents/Zoom on Windows (C:\Users\username\Documents\Zoom or C:\Users\username\AppData\Roaming\Zoom\).
- Access: Directly from your computer’s File Explorer.
>> Cloud Recordings:
- How it works: Video, audio, and chat messages are uploaded straight to the Zoom cloud, conserving local storage and facilitating easier sharing.
- Access: Log in to Zoom, and then go to Recordings > Cloud Recordings.
- Features: Provides options for different layouts, including speaker, gallery, and shared screen, and automatic transcription.
Zoom recordings are saved in various formats, including .mp4(video), .m4a(audio), and .vtt (text/chat).
To effectively recover deleted Zoom recordings, read on to identify the root cause of Zoom recording loss.
Why Do Zoom Recordings Get Deleted or Lost
Understanding why recordings go missing can help you select the most appropriate Zoom recording recovery method and prevent similar issues in the future.
The following are the most common causes of Zoom recording loss:
# Accidental Deletion
You may mistakenly delete a local file from your PC or a cloud recording from the Zoom web portal.
In this situation, the local recording can usually be restored from the Recycle Bin or by using a data recovery tool.
However, cloud recordings are typically permanently deleted unless a backup was saved.
# Storage Capacity Limitations
Exceeding storage limits may cause recording loss.
If the cloud limit is reached, new recordings may fail to save. Sometimes, existing recordings could be automatically deleted if scheduled for deletion after a set number of days.
# Network Connectivity Issues
Poor internet connectivity during a meeting can disrupt cloud recording synchronization.
If the connection drops while uploading to Zoom, the file may become corrupted or fail to save, leading to partial or missing recordings.
In such a situation, the recording cannot be recovered.
# System Crashes or Hardware Failure
Local recordings are highly vulnerable to system crashes or hardware failure.
If your PC shuts down unexpectedly during a meeting due to a power outage, overheating, or software malfunction, the recording file may not be properly saved and may be unrecoverable.
Additionally, hard drive failures, whether from physical damage or logical errors, can make local Zoom recordings inaccessible.
# Third-Party Application Interference
Using third-party recording tools with Zoom can lead to software conflicts.
If you like using AI note-taking or screen recording apps, you may be misled by the “recording in progress” message and think Zoom is recording when it isn’t.
This can cause missed recordings if the third-party tool doesn’t capture the meeting properly.
# Incorrect Account or Meeting ID Access
In some situations, you may find it difficult to find recordings since you are signing in to the incorrect Zoom account or typing the incorrect meeting ID.
If you have several Zoom accounts or arranged meetings under a different email, recordings could be stored in an account that you are not currently logged into.
After learning the common causes of Zoom recording loss, explore the most effective recovery methods for both local and cloud recordings.
How to Recover Deleted Zoom Recordings From Cloud
If you had to be a licensed Zoom user with Cloud recording enabled, consider recovering cloud recordings from Zoom’s trash when they were lost.
Here’s how to recover Zoom cloud recordings from the cloud trash:
Step 1. Sign in to the Zoom web portal.
Step 2. Click Recordings and Transcripts in the navigation menu.
Step 3. Click the Trash tab in the top right corner.
Step 4. Find the desired recording and click on Recover.
Moreover, to effectively locate wanted recordings, type the meeting ID in the search box and click Search.
Step 5. Click Recover again to confirm the action.
On the Recordings page, check if your recording is accessible.
How to Recover Deleted Zoom Recordings From Local
In this part, you will learn two practical methods to recover Zoom local recordings, including restoring from the Recycle Bin and using professional data recovery software.
Keep reading to get the detailed instructions.
Method 1. Check the Recycle Bin
If you have accidentally deleted a local Zoom recording but have not emptied the Recycle Bin, you can easily recover it using the following steps:
Step 1. Double-click the Recycle Bin icon on your desktop to open it.
Step 2. Use the search bar or scroll through the list to locate the deleted Zoom recording. Right-click on the wanted recording and select Restore.
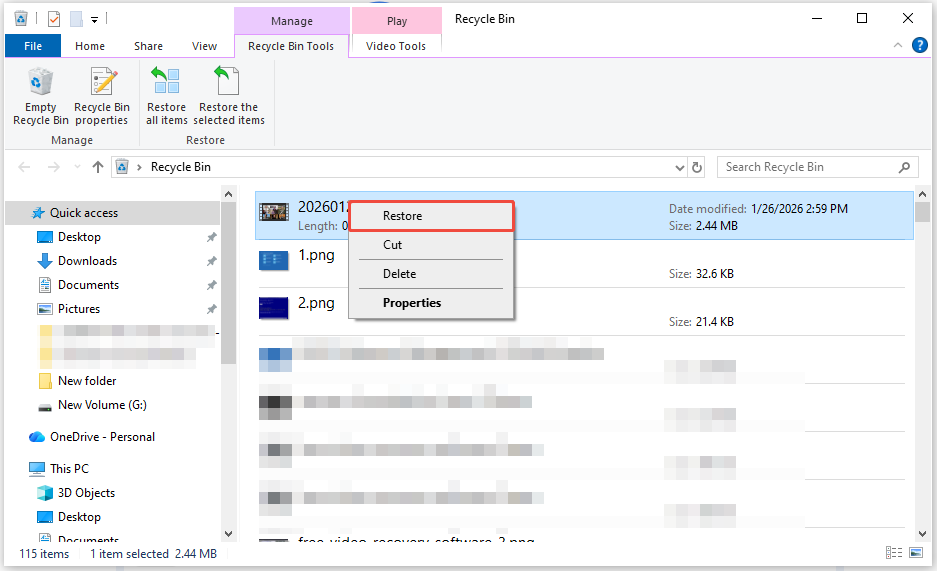
The restored file will be returned to its original location, typically the “Documents/Zoom” folder.
Method 2. Use MiniTool Power Data Recovery
If you’ve emptied the Recycle Bin, or if the file was deleted using the “Shift + Delete” command, you’ll need to use data recovery software.
For local Zoom recordings that have been permanently deleted, MiniTool Power Data Recovery is the perfect solution.
This free data recovery tool stands out among data recovery tools for several reasons:
- Support for Various File Types & Formats: It supports various file types, like videos, documents, audios, and so on. Additionally, it supports over 2000+ file formats, such as MP4 and M4A, the formats used by Zoom recordings.
- Wide Compatibility: It supports Windows 8.1/8/10/11, and works with all major file systems, including NTFS, FAT12, FAT16, FAT32, exFAT, and more.
- Comprehensive Recovery: It can recover files lost due to accidental deletion, formatting, hard drive failure, system crashes, and more.
- User-Friendly Interface: The software features an easy-to-use interface that helps you complete the recovery process easily.
- File Preview Option: It allows you to preview files before restoring them, enabling you to choose the needed recordings and prevent unnecessary use of storage space.
- Read-Only Recovery: The software uses a read-only method, which means it does not change or overwrite the original data during the recovery procedure, preserving data integrity.
Now, click the button below to download and install MiniTool Power Data Recovery.
MiniTool Power Data Recovery FreeClick to Download100%Clean & Safe
After installing, follow these steps to recover deleted local Zoom recordings:
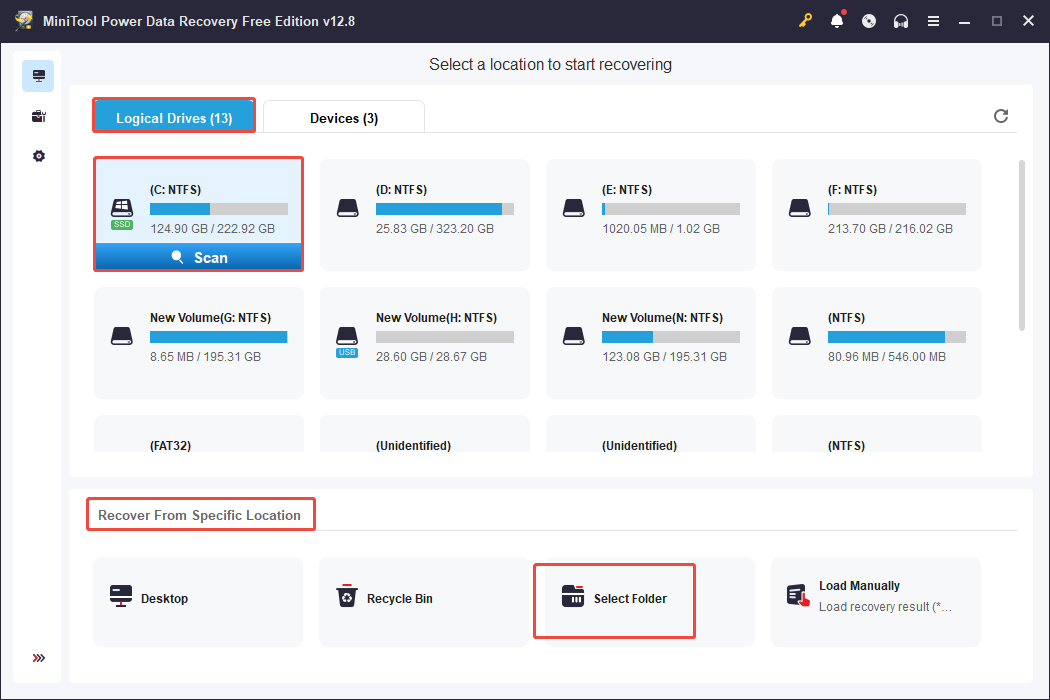
Step 1. Launch MiniTool Power Data Recovery.
On the home page, select the drive where your Zoom recordings were originally saved under the Logical Drives tab (typically the C: drive) and click Scan.
For more targeted recovery, go to the Recover From Specific Location section, choose Select Folder, and click Browse. Then, select the Documents or Zoom folder and click Select Folder.
Step 2. Once the scan is complete, the software will display all recoverable files in a list under the Path tab.
To locate the desired recordings by file types, switch to the Type section and click Audio & Video or other types to locate your recordings.
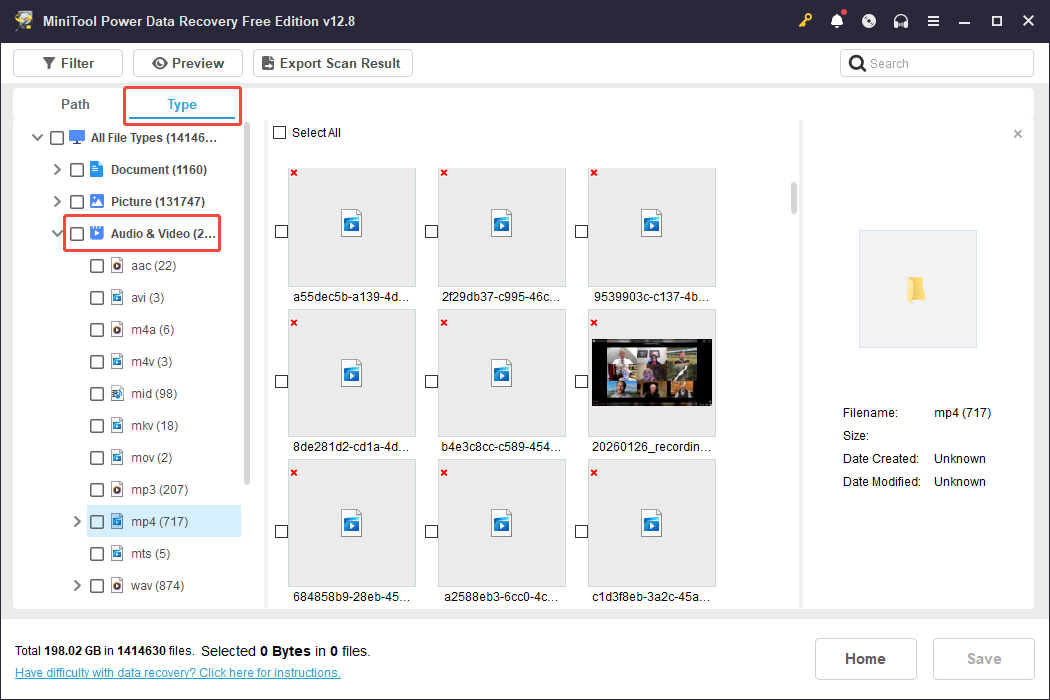
Additionally, use the following features to locate your Zoom recordings efficiently:
- Filter: Click the Filter button to sort files by file type, file size, file category, or date modified. For instance, select Video or Audio to narrow down the results.
- Search: Type part or all of the recording’s file name (for example, the meeting topic or date) into the search bar and press Enter to find specific files.
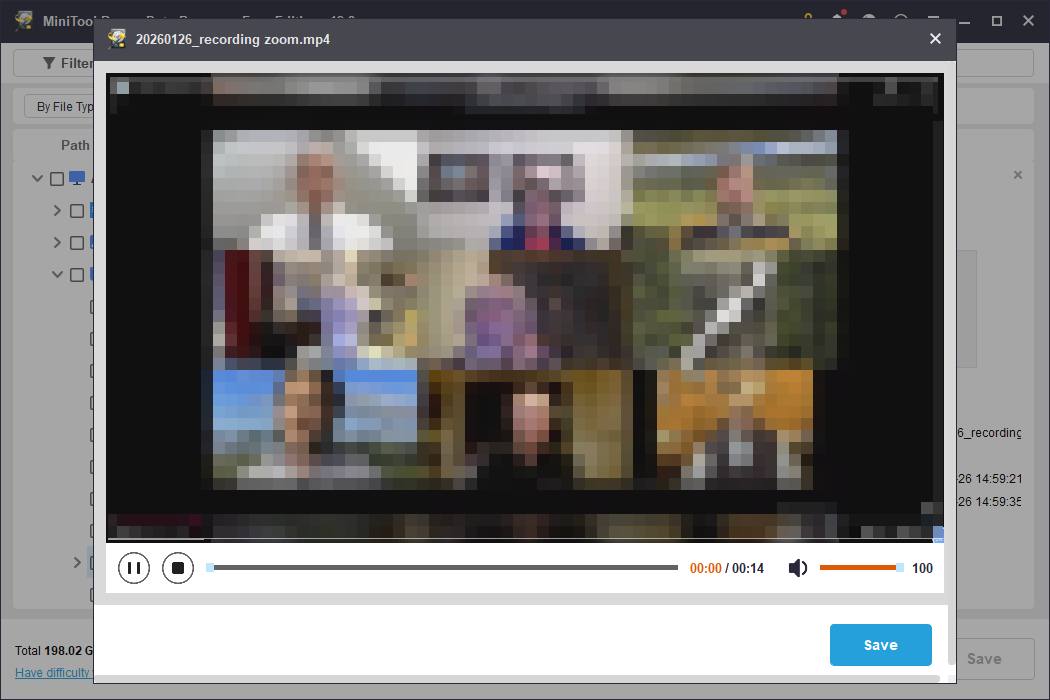
To ensure you are recovering the correct files, double-click on a file to preview it.
Step 3. Select all the Zoom recordings you want to recover by checking the boxes next to the file names. Then click the Save button.
Choose a new location to save the recovered files. Do not save the files to the same drive where they were originally lost, as this may overwrite the original data.
Click OK to start the recovery process.
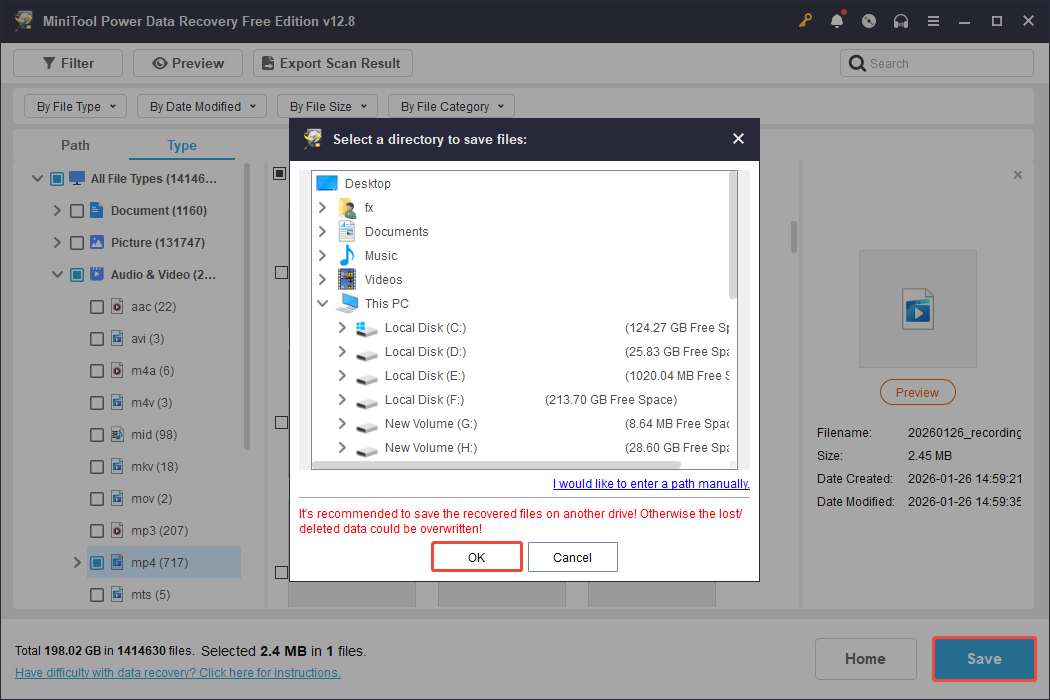
Once completed, you can access the recovered recordings from the specified location.
How to Protect Zoom Recordings
While MiniTool Power Data Recovery and cloud storage are effective solutions for recovering deleted Zoom recordings, prevention is always better than a cure.
Follow these recommended practices below to reduce the chances of losing Zoom recordings.
Option 1. Download Zoom Recordings from Cloud to Computer
If you are a licensed user of Zoom, to protect Zoom recordings from data loss, consider downloading cloud recordings to a secure backup location.
This is helpful for recording recovery if the cloud recording is accidentally deleted or becomes inaccessible.
Here are the steps to download Zoom cloud recordings:
Step 1. Sign in Zoom web portal, navigate to the Recordings tab, and then select the Cloud Recordings tab.
Step 2. Select one recording you want to download and click on More (the three-dot icon).
Step 3. Choose Download.
Option 2. Back Up Zoom Recordings
To protect Zoom local recordings, use external hard drives or cloud storage services, like Google Drive, Dropbox, or OneDrive, to avoid data loss.
If you frequently forget to back up recordings manually or create duplicate backups, opt for a robust backup tool to automatically back up Zoom recordings.
MiniTool ShadowMaker is an easy-to-use backup tool for precise and customized backup tasks. By using this software, you can tailor your backup settings to your requirements.
This backup software allows you to implement various backup types, such as Full Backup, Incremental Backup, and Differential Backup.
In addition, it enables you to set up automatic backups on a daily, weekly, monthly, or event-triggered basis.
MiniTool ShadowMaker Trial allows you to explore these backup functionalities for free for 30 days.
Now, download and install this application to back up your Zoom recordings on your computer.
MiniTool ShadowMaker TrialClick to Download100%Clean & Safe
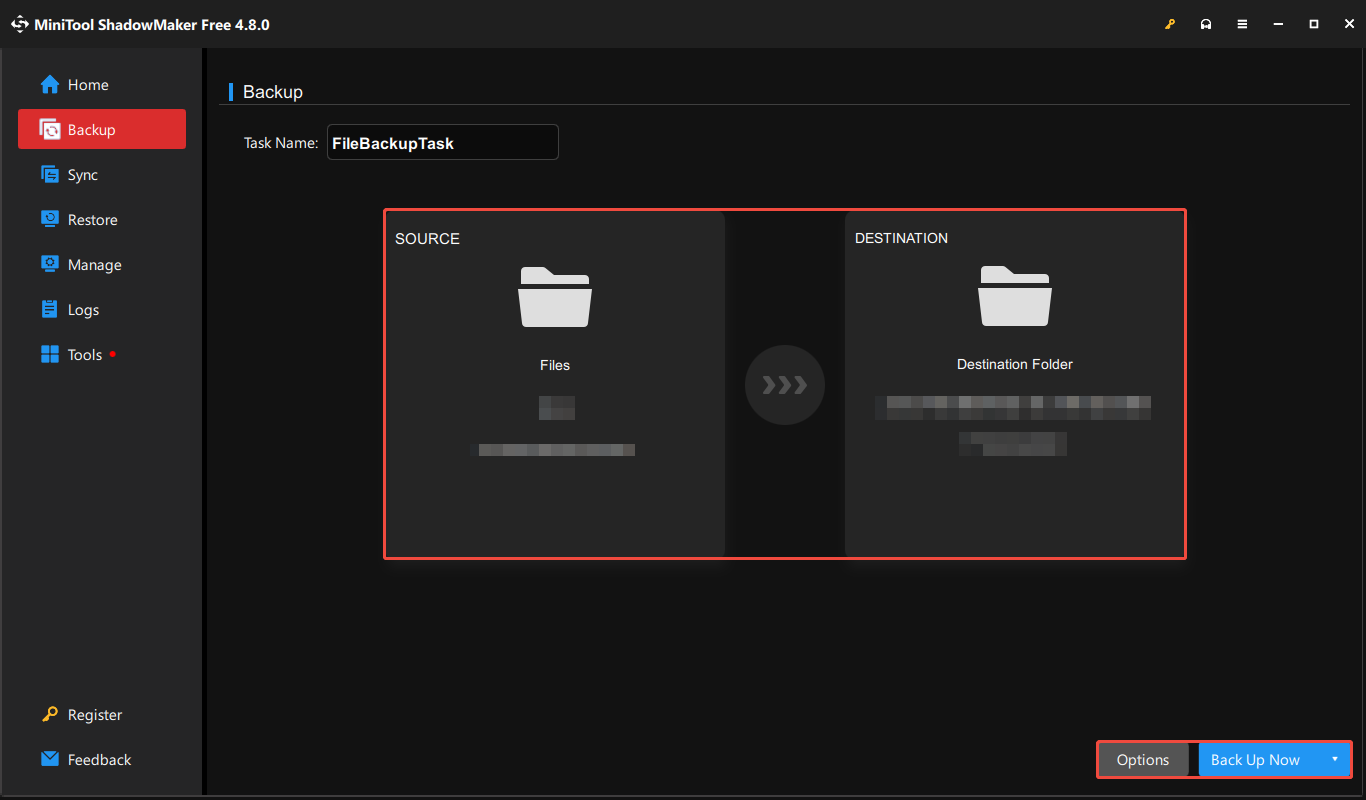
Step 1. Open MiniTool ShadowMaker and click Keep Trial to access the main interface.
Step 2. Choose Backup from the left sidebar.
Step 3. Select SOURCE > Folders and Files. You should go to the path C:\Users\username\Documents\Zoom or C:\Users\username\AppData\Roaming\Zoom\ to find the recordings you wish to back up.
Click OK to go back to the Backup interface.
Step 4. Click DESTINATION to choose a save location and then click OK.
Step 5. Before starting the backup process, click the Options button to set up Backup Options, Backup Scheme, and Schedule Settings.
Next, click Back Up Now to begin the backup process.
Other Suggestions:
- Usage of Local Recording: Save recordings directly to your computer and ensure sufficient disk space. Avoid using external or network storage during recording to prevent data corruption.
- Retention Settings: Use the Zoom web portal to set “Delete cloud recordings after a specified number of days” to avoid unwanted deletions.
- Passcodes: Secure cloud recordings with strong passwords.
- Authentication: Limit access to authorized users within your domain.
- Device Encryption: Ensure only your devices can decrypt and access recordings to protect against server-side data loss.
Wrap Up
This post introduces the default location for cloud and local Zoom recordings, reasons for recording loss, and three methods for recovering Zoom recordings from cloud and local.
To recover Zoom recordings, check your cloud trash for lost/deleted cloud recordings, and use the Recycle Bin or MiniTool Power Data Recovery for local recording recovery.
After recovery, try the mentioned protections to protect your Zoom recordings.
If you have any questions when using MiniTool’s products, please send an email to the support team via [email protected].
About The Author

Position: Columnist
Sandy became an English editor after graduation. She is devoted to finding effective solutions for diverse IT problems and provides articles on data recovery, data backup, and computer partitions and drives. In her spare time, she likes listening to music and playing games.
User Comments :