To recover files from a password-protected USB, first unlock it using the password or a recovery key. If you don’t have the password or key, consider formatting the USB drive. Afterwards, use a professional MiniTool data recovery tool to rescue your USB drive data.
Encrypted and password-protected USB drives are commonly used to protect sensitive photos, business files, and personal data.
Sometimes, you may face a frustrating data loss situation: forget the password, lose the recovery key, encounter drive corruption, or accidentally format the encrypted drive.
This guide explains whether encrypted USB data recovery is possible, how to unlock the drive or format it, and how to recover data after formatting/unlocking.
First, read on to learn about the possibility of password-protected USB data recovery.
Is It Possible to Recover Files From an Encrypted USB Drive
The answer is yes, but it depends on whether you can unlock the encryption. Encryption renders data unreadable unless you have the valid password or recovery key.
Data recovery software cannot read or restore encrypted data while the drive remains locked.
Below, we break this into two situations:
Situation 1. You have the password or recovery key for the USB drive.
If you still have the original password, recovery key, or authentication file, full data recovery is highly feasible.
In this case, just unlock the drive normally, access existing files, and use data recovery tools to recover deleted or lost data.
Situation 2. You do not have the recovery key or password for the USB drive.
If you forget the password and lose the recovery key, it is impossible to unlock or decrypt the drive through normal methods.
In this situation, the only solution is to format the USB drive and then recover data from the formatted USB drive.
There are two options for USB formatting: Quick format and Full format.
- Quick format: It is possible to recover formatted USB data, as the data remains on the drive.
- Full format: It is extremely difficult to recover formatted USB data, as it is completely wiped.
If you don’t want to format your drive, turn to professional data recovery services for hardware-level decryption.
Now, based on your actual scenario, select the relevant part to recover your encrypted USB data.
Situation 1. Unlock an Encrypted USB Flash Drive
In this part, we outline three safe solutions to unlock the password-protected USB drive on Windows.
Method 1. Manually Unlock a Physically Encrypted USB Drive
Some high-end USB drives feature hardware encryption with physical keypads, fingerprint sensors, or built-in authentication systems.
To unlock these drives:
- Safely eject the USB drive and then reconnect it to your PC.
- Type the PIN using the physical keypad or scan your fingerprint.
- After verification, the drive will appear in File Explorer, allowing you to access your files.
- If the drive is detected but the files are missing, use data recovery software to recover them.
Some USB flash drives come equipped with a hardware write-protection switch, allowing you to set the drive to read-only mode to avoid data modification or malware attacks.
To unlock these drives:
- Locate the switch: Carefully inspect the sides or bottom of the USB drive for a small slider switch.
- Slide to the unlock position: If the switch is set to the “Lock” (or “On”) position, move it to the “Unlock” (or “Off”) position.
- Reconnect the drive: Insert the USB drive back into your computer and verify if you are now able to access the data.
Method 2. Decrypt a USB Drive with a Password
If you have the correct password, you can decrypt the USB drive in the Control Panel or File Explorer. Proceed using one of the two methods below:
Option 1. Via Control Panel
Step 1. Plug the password-protected USB drive into your computer. Press Win + S to open the Windows search bar, type Control Panel, and press Enter.
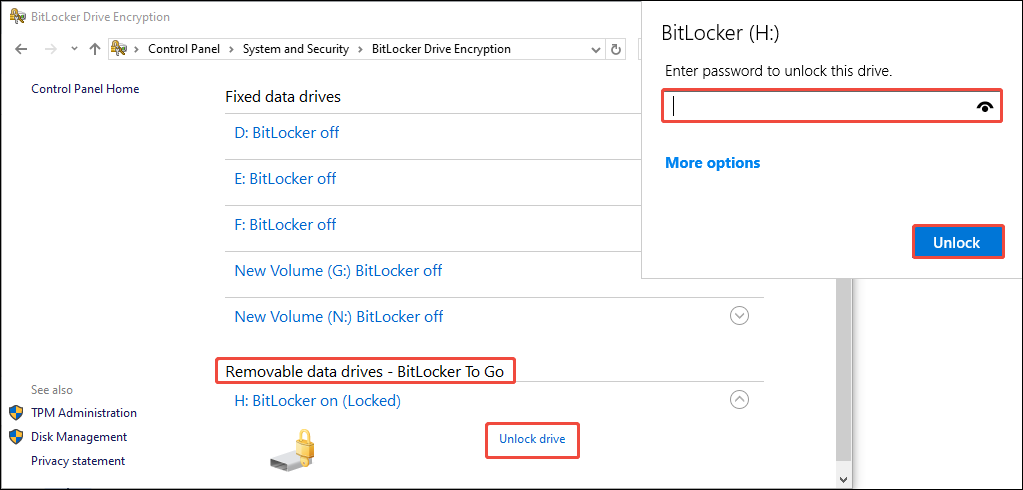
Step 2. Navigate to System and Security > BitLocker Drive Encryption.
Step 3. Locate your USB drive in the Removable data drives – BitLocker To Go section.
Step 4. Click on Unlock drive next to the name of the encrypted USB drive.
Step 5. In the pop-up window, type your BitLocker password in the dialog box.
Step 6. Click the Unlock button to decrypt the drive.
Option 2. Via File Explorer
Step 1. Press Win + E to launch File Explorer.
Step 2. In the left panel, go to This PC and locate your encrypted USB drive.
Step 3. Right-click on the drive and select Unlock Drive.
Step 4. A new window will appear. Type the password and click on Unlock to access the drive.
The lock icon on the drive will vanish once it’s unlocked.
Method 3. Unlock a USB Drive Using the Recovery Key
If you have forgotten the password but have the 48-digit BitLocker recovery key saved, follow these methods to unlock the drive:
Option 1. Using File Explorer
Step 1. Insert the encrypted USB drive into your Windows PC. Launch File Explorer and navigate to This PC.
Step 2. Right-click on the locked USB drive and choose Unlock Drive.
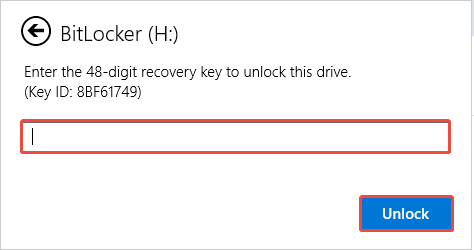
Step 3. In the password dialog, click on More options > Enter recovery key.
Step 4. Type the 48-digit BitLocker recovery key and click Unlock.
Option 2. Use Command Prompt
Step 1. Open Windows Search, type Command Prompt, and press Shift + Ctrl+ Enter to run it as administrator.
Step 2. In the pop-up window, type the following command “manage-bde -unlock H: -RecoveryPassword YOUR-RECOVERY-KEY” and press Enter.
- Replace the letter H with the drive letter of your USB drive.
- YOUR-RECOVERY-KEY refers to your BitLocker recovery key.

Once the drive is unlocked, change the password through BitLocker settings to prevent future problems.
Situation 2. Format the Password-Protected USB Drive
When you cannot unlock the encrypted drive (no password or recovery key), consider formatting it.
Here, we provide three methods to format the password-protected USB drive:
Option 1. Use File Explorer
Formatting a drive in the File Explorer is the easiest solution. Follow these steps to do it:
Step 1. Insert the USB drive into your PC, open File Explorer, and then go to This PC.
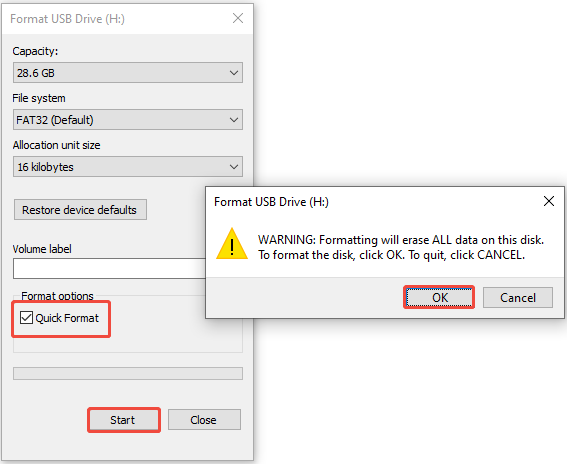
Step 2. Right-click the locked USB drive and select Format.
Step 3. Choose a file system and check the Quick Format option.
Step 4. Click Start and click OK to confirm the action.
Wait for formatting to finish. The USB drive will now be unlocked and usable.
Option 2. Use Disk Management
Disk Management is an alternative tool for formatting the USB drive. Here’s how to do it:
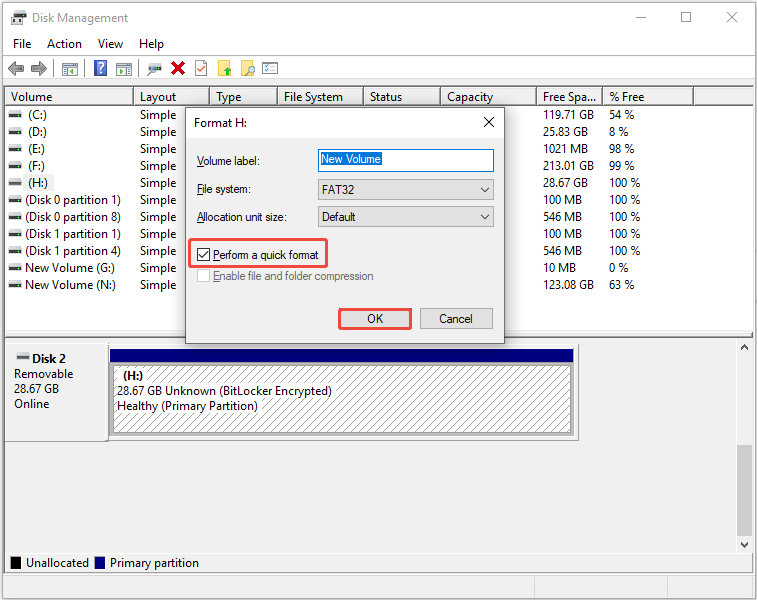
Step 1. Press Win + X to open the Power User menu and select Disk Management from the list.
Step 2. Locate your encrypted USB drive, right-click its volume, and select Format.
Step 3. Assign a drive letter, select the file system, set a volume label, then check the Perform a quick format option.
Step 4. Click OK and confirm the format operation.
The drive will be formatted and ready for use within seconds.
Option 3. Use Third-Party USB Formatter
If Windows built-in tools fail to format the password-protected USB drive, use a trusted third-party USB formatter.
MiniTool Partition Wizard is the best choice, which is a professional tool for managing disks and partitions.
It allows you to format the USB drive for free in just a few clicks.
MiniTool Partition Wizard FreeClick to Download100%Clean & Safe
Here are the steps to format a USB drive using this tool:
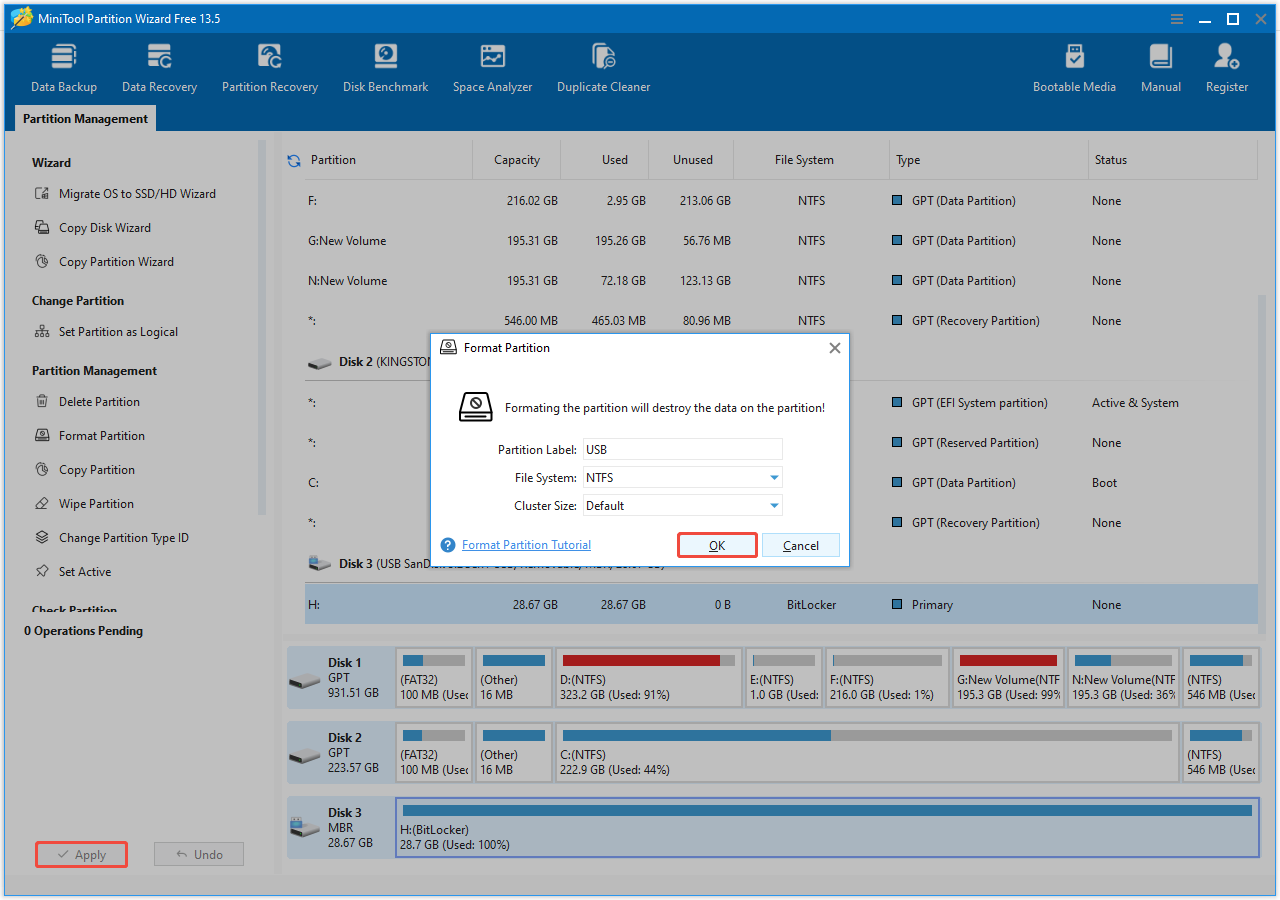
Step 1. Connect the USB drive to your computer. Open MiniTool Partition Wizard, locate the USB drive, right-click its partition, and select Format.
Step 2. In the pop-up window, specify the Partition Label, File System, and Cluster Size. Then, click OK.
Step 3. Click Apply to run the operation.
After unlocking or formatting the encrypted USB drive, use professional data recovery software to recover lost, deleted, or formatted files.
Following Step: Recover Files From a Password-Protected/Formatted USB Drive
To recover data from a formatted USB flash drive, we recommend MiniTool Power Data Recovery.
Due to its high success rate, read-only safety, and full compatibility with formatted USB drives, this free data recovery software is worth trying.
Below are some key features of MiniTool Power Data Recovery:
- Compatible storage media include USB drives, SD cards, hard drives, SSDs, and CDs/DVDs.
- Supported Windows version include Windows 11, 10, 8, and 8.1.
- Supported 2000+ file formats, including photos, videos, audio files, documents, archives, and more.
- Supported file deletion/loss situations involve formatting, accidental deletion, virus infections, file system corruption, and errors during file transfers.
- The file preview feature allows you to view documents, photos, videos, audio, and various other types of files before recovery.
- Allows you to recover up to 1 GB of files for free.
Now, download and install this MiniTool data recovery software to recover files from the USB drive.
MiniTool Power Data Recovery FreeClick to Download100%Clean & Safe
Step 1. Scan the Target USB Drive
Launch the data recovery tool to enter its main interface. Choose your USB drive from the Logical Drives or Devices tab and click Scan to start the scanning process.
- Logical Drives: This section displays all deleted or existing partitions on your drives, with the partition for the USB flash drive marked by a USB icon.
- Devices: This section shows the physical disks attached to your computer, allowing you to find and scan your USB by its name and storage size.

Step 2. Locate and Preview Desired Files
Once the scanning process is finished, locate the wanted files.
By default, files are displayed in the Path section, where they are organized into categories such as Deleted Files, Lost Files, and Existing Files.
To recover files of a specific file type or format, select the Type section.
This section categorizes all files by their type and format rather than their original path structure, such as pictures, documents, or videos.

To make it easier to find the files you need, use these features:
- Filter: This feature allows you to narrow down files based on criteria like file type, modified date, file size, and file category. You can apply multiple filtering options at the same time.
- Search: This enables you to perform a specific search. Simply type a complete or partial file name in the search bar located in the upper right corner and press Enter.

When you locate a file and want to know if it is needed, select the file and click the Preview button to confirm it.
This function allows you to view documents, photos, and videos to ensure accurate recovery.

Step 3. Recover the Wanted Files
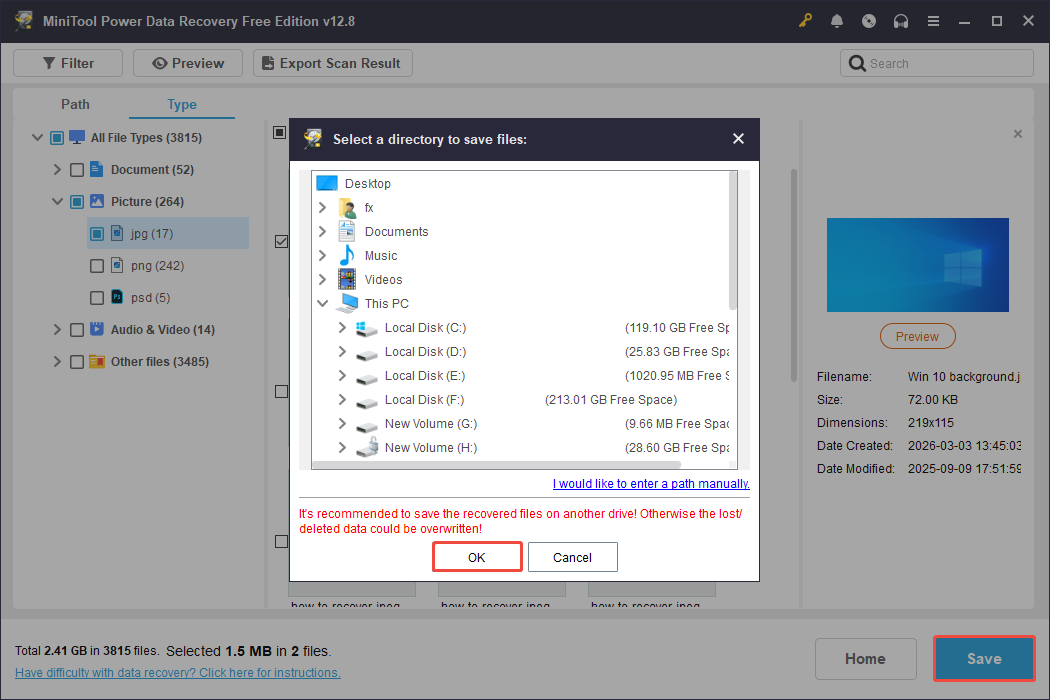
Check the boxes for all the files you want to recover, and then click the Save button.
In the pop-up window, choose a different and secure location to store the recovered files and click the OK button.
Bottom Line
In a word, this stepwise guide shows how to recover files from a password-protected USB drive in two situations.
If you remember the password or have saved the recovery key, unlock the USB drive first, and then recover data from it.
If you don’t have the password or recovery key, consider formatting the encrypted USB drive. After formatting, recover files using MiniTool Power Data Recovery.
If you have any doubts about MiniTool software, don’t hesitate to send an email to [email protected].
About The Author

Position: Columnist
Sandy became an English editor after graduation. She is devoted to finding effective solutions for diverse IT problems and provides articles on data recovery, data backup, and computer partitions and drives. In her spare time, she likes listening to music and playing games.
User Comments :