Windows Defender Deleted Files – Need Help
Windows Defender (now Microsoft Defender Antivirus) is Microsoft’s official built-in antivirus solution, integrated into the Windows operating system. It is designed to provide you with real-time, comprehensive security protection.
Windows Defender automatically scans files and programs on your system. To ensure system integrity and your data security, if it finds suspicious content, it will:
- Quarantine the file: Moves the file to quarantine, preventing it from running but not immediately deleting it. This mechanism ensures system security while providing an opportunity to correct false positives.
- Delete the file: If the threat is severe or you select Delete, the file will be permanently removed without going to the Recycle Bin.
However, Defender may sometimes misidentify files. This causes normal files to be incorrectly marked and deleted, potentially leading to the loss of critical data.
I just had 2 months’ worth of code for a cheat I’ve been making, which was deleted by Windows Defender. Is there any way to get this back, or do I have to recode 90% of it again?www.reddit.com
If you also encounter this situation and wonder how to restore files from Windows Defender, the following part will help you. Keep reading!

Restore Windows Defender Deleted Files from the Quarantined Folder
When dealing with files deleted by Windows Defender, the preferred method is to restore them from the Quarantined Items folder. This is because it’s a controlled environment specifically designed by Defender to store suspicious files safely.
Compared to full deletion, quarantining doesn’t erase the file, but rather moves it to a restricted directory, preventing it from being executed while preserving the possibility of recovery.
Here are two ways to restore quarantined files in Microsoft Defender Antivirus.
Option 1: Use Windows Security
As Defender’s native control center, Windows Security is the most reliable way to restore quarantined files securely and intuitively.
Step 1: Access Windows Security
Press Win + I to open the Settings app. Click Update & Security and then switch to the Windows Security tab.
Step 2: View protection history
In the right menu, click Virus & threat protection under Protection areas. In the Current threats section, hit Protection history.
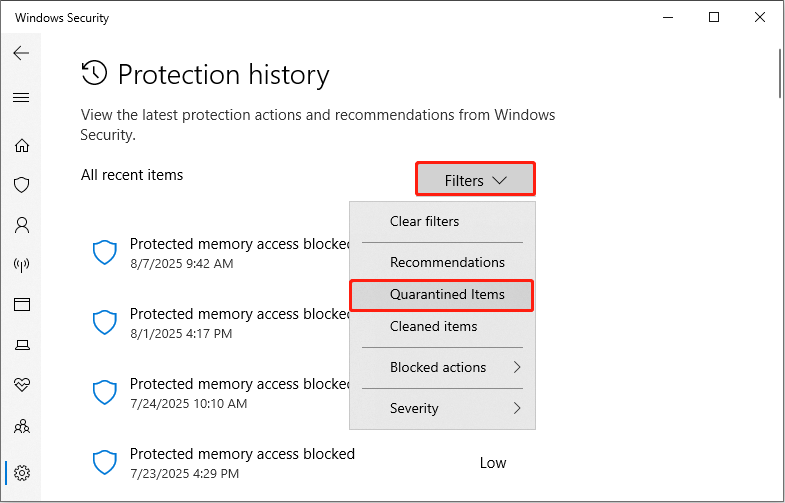
Step 3: Filter and restore quarantined files
In the new page, click Filters and choose Quarantined Items. Browse the list and select the file you want to restore. Then hit Actions, and choose Restore.
Option 2: Run the MpCmdRun Command
You can also use the MpCmdRun command to restore files deleted by Windows Defender. It provides precise command-line control, suitable for scenarios where the graphical interface isn’t available or quarantine records are missing.
Step 1: Open Command Prompt with administrator privileges
Type cmd in the Windows search bar, right-click Command Prompt, and select Run as administrator.
Step 2: Run the command
Type the following command in the prompt window and press Enter. Replace the <filename> section with the exact name of the file you want to restore from the Quarantined Items folder.
“%ProgramFiles%\Windows Defender\MpCmdRun.exe” -Restore -Name <filename>
Defender will attempt to restore the specified quarantined file to its original location. You will see a message such as “Restored successfully” or “The specified item was not found.” If it fails, try the following ways.

Other Ways to Restore Windows Defender Deleted Files
If you don’t see the lost files in the quarantined file list, they were deleted. How to recover them? Don’t worry, backup files and third-party recovery software can help you get them back.
Way 1: From Backup Files
Backup files provide pristine copies in case files are completely wiped or quarantine records are lost. If you backed up your files before they were lost, this is a reliable and fast method.
Now, go to your backup destination to restore files deleted by Windows Defender. No backups? Go check the next method.
Way 2: Via MiniTool Power Data Recovery
Professional data recovery software is a universal rescue solution for lost files. In most cases, lost data can be recovered through it. Here, I recommend MiniTool Power Data Recovery to you.
This MiniTool recovery software features low-level data scanning capabilities. This enables it to identify and recover original data at the sector level even when files have been completely deleted by Defender.
This tool is not limited to internal hard drives; it can also perform data recovery from external hard drives, SD cards, USB flash drives, and other storage devices.
MiniTool supports recovery of various file formats, including documents, images, videos, and compressed archives. And it offers a pre-recovery preview to ensure you’re getting the right file.
The clean interface and simple operation make it easy for non-technical users to quickly complete recovery in just a few steps. This free file recovery software even supports recovering files up to 1 GB for free.
What are you waiting for? Download and install it now to save your files!
MiniTool Power Data Recovery FreeClick to Download100%Clean & Safe
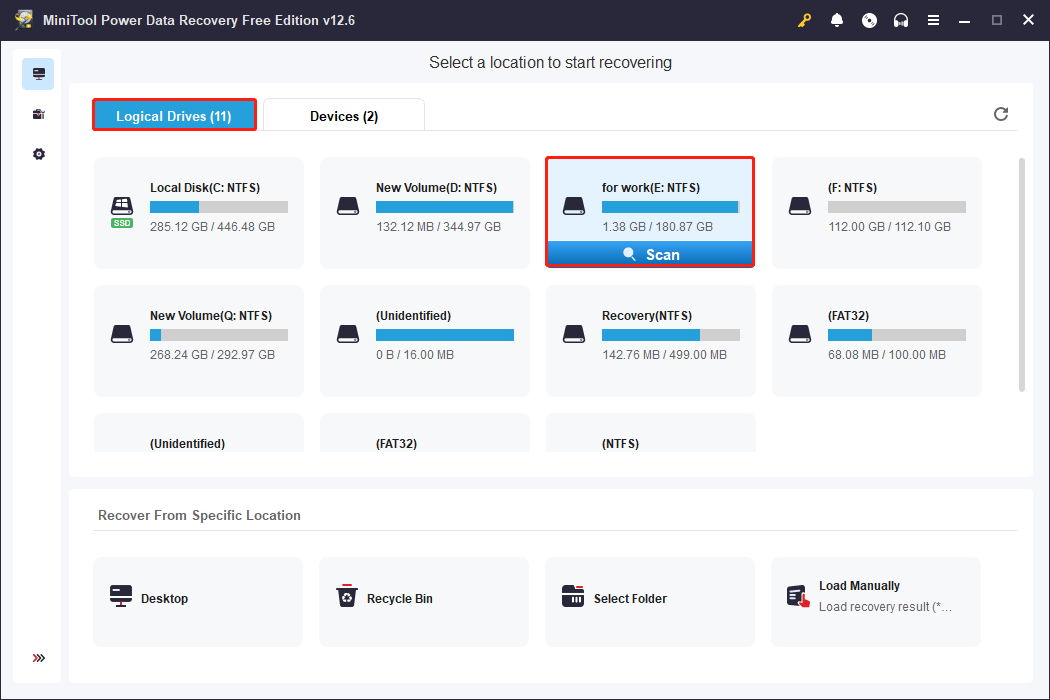
Step 1: Launch the software and scan the target partition
When the installation is done, open MiniTool Power Data Recovery. In the Logical Drives section, find the partition where your deleted files were stored and click Scan.
Step 2: Find the files using Type, Filter, or Search
The scanning process will take some time. Please be patient and wait for it to complete.
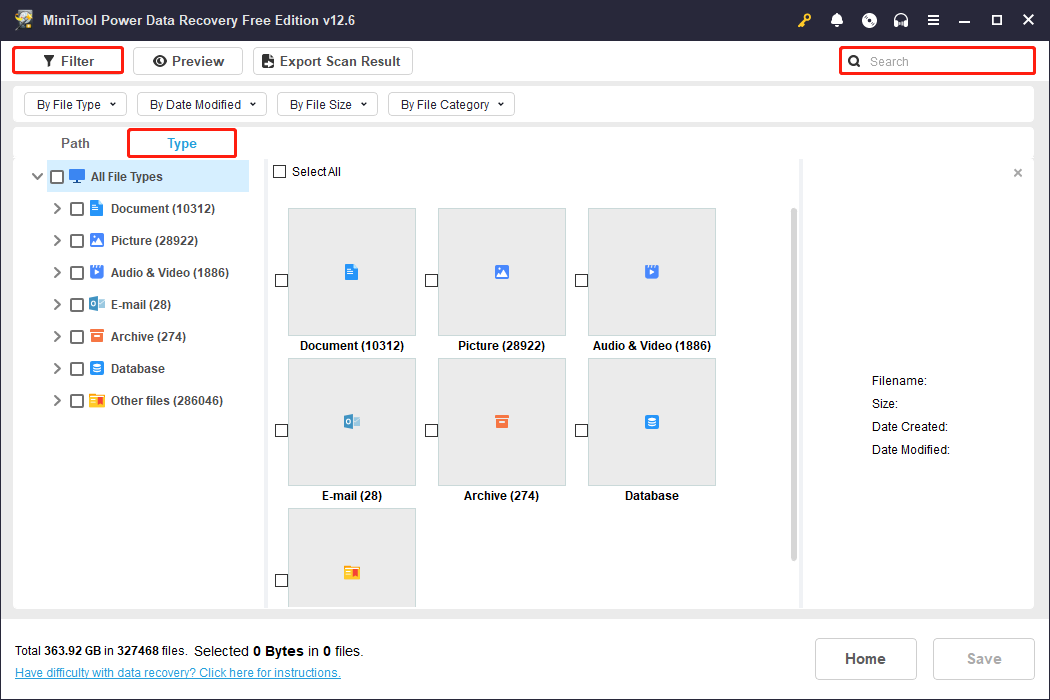
After the scan is complete, the files will be organized according to their file structures below the Path tab. You can now expand the list to locate the files.
Additionally, you can switch to Type to find files based on file type, such as documents, pictures, audio, videos, and so on.
The Filter feature in the upper-left corner is also a good helper in finding files. It allows you to set four conditions at once: file type, date modification, file size, and file category, narrowing the scope.
If that’s still not fast enough, try the Search feature in the upper-right corner. You can type the full or partial file name in the box and press Enter to display all matching files.
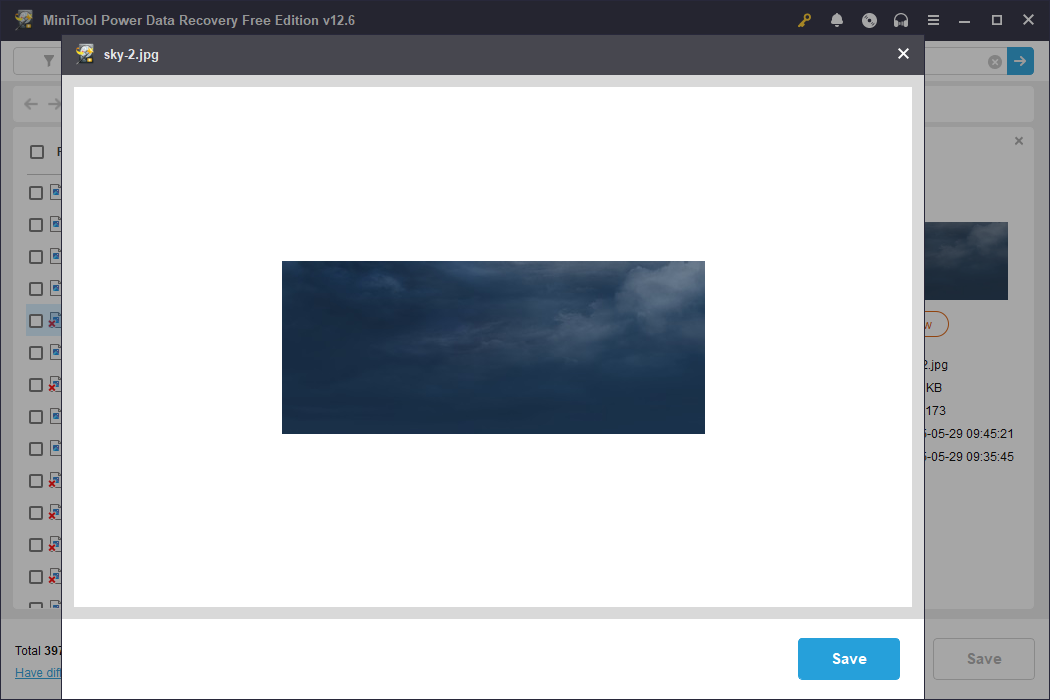
Step 3: Preview the files before recovery
When you find the files you want, it is best to preview the specific content first. MiniTool’s Preview feature can help you do this. Just double-click the files you want to preview, and the preview window will pop up.
This can help you check whether the file content is complete and avoid misoperation or waste of recovery capacity.
Step 4: Save the files to a new and safe location
After confirming all the files, tick them and click the Save button. Then, you have to choose a path to store your recovered files. Finally, click OK to start the recovery.
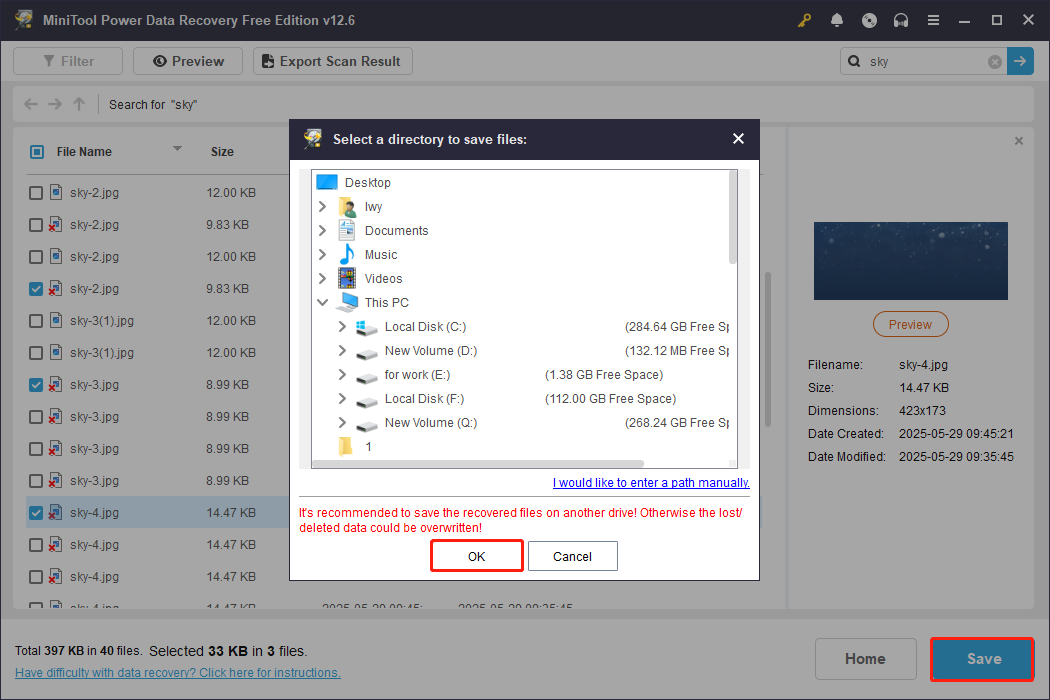
In the Recovery Completed window, check the size of the recovered files and the remaining free recovery capacity. When the free 1 GB is used up, upgrade to a full edition.

How to Prevent Windows Defender from Deleting Files
After recovering accidentally deleted files, don’t exit this article just yet. To prevent critical files from being deleted by Windows Defender again, you can add exclusions or disable Windows Defender. This will effectively prevent the file from being deleted.
1. Add Files/Folders to Defender’s Exclusion
Adding files or folders to Windows Defender exclusion allows these contents to skip virus scanning and real-time monitoring. This prevents them from being mistakenly identified as malware and quarantined or deleted.
Step 1: Enter the Windows Security page
Press Win + I to open Settings. Click Update & Security and switch to the Windows Security tab.
Step 2: Access exclusions settings
Click Virus & threat protection under Protection areas. In the Virus & threat protection settings section, hit Manage settings.
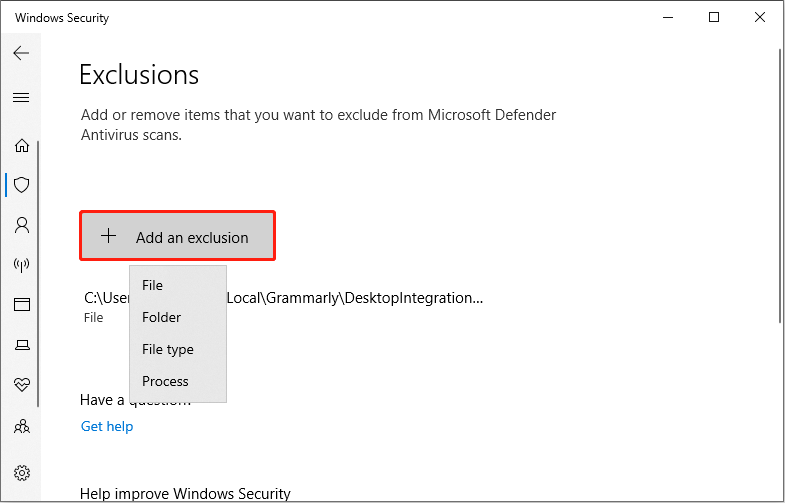
Step 3: Add exclusions
Scroll down to the Exclusions section. Click Add or remove exclusions and click Yes in UAC. Then, hit the Add an exclusion button. Select the type of exclusion you want to make: file, folder, file type, or process.
Step 4: Browse and select the target
Browse your computer and select the file or folder you want to exclude. Once selected, it will automatically be added to the exclusion list.
2. Disable Windows Defender Temporarily or Permanently
Disabling Windows Defender temporarily bypasses your system’s security protections. This can be used to install or run programs that Defender mistakenly identifies as threats, or to prevent antivirus software from interfering with certain processes.
Be aware that this action exposes your system to potential risks. Take your own risk.
You can choose to temporarily disable or permanently disable Windows Defender based on your needs.
Option 1: Disable Windows Defender in Windows Security
The easiest and most intuitive way to turn off Defender’s real-time protection is through the Windows Security graphical interface. This only temporarily disables real-time protection, and it will automatically re-enable itself later.
Step 1: Type Windows Security in the Windows search bar and press Enter.
Step 2: Click Manage settings under the Virus & threat protection settings section.
Step 3: Toggle the Real-time protection button from On to Off, and then click Yes in UAC to confirm the operation.
Now, you have temporarily disabled Windows Defender successfully. The next time your computer restarts, it will automatically turn on. If you want to permanently disable it, continue with the next method.
Option 2: Disable Windows Defender via Local Group Policy Editor
Using Local Group Policy Editor can permanently disable Windows Defender. This prevents it from automatically resuming after a system reboot.
Step 1: Disable Tamper Protection
Open Settings, click Update & Security > Windows Security > Virus & threat protection. Click Manage settings. Turn off Tamper Protection; otherwise, Defender will automatically re-enable it.
Step 2: Open the Local Group Policy Editor
Right-click the Windows button and choose Run to open the Run dialog, type gpedit.msc, and press Enter to open the Local Group Policy Editor.
Step 3: Navigate to Defender settings
Expand the following paths in sequence: Local Computer Policy > Computer Configuration > Administrative Templates > Windows Components > Microsoft Defender Antivirus.
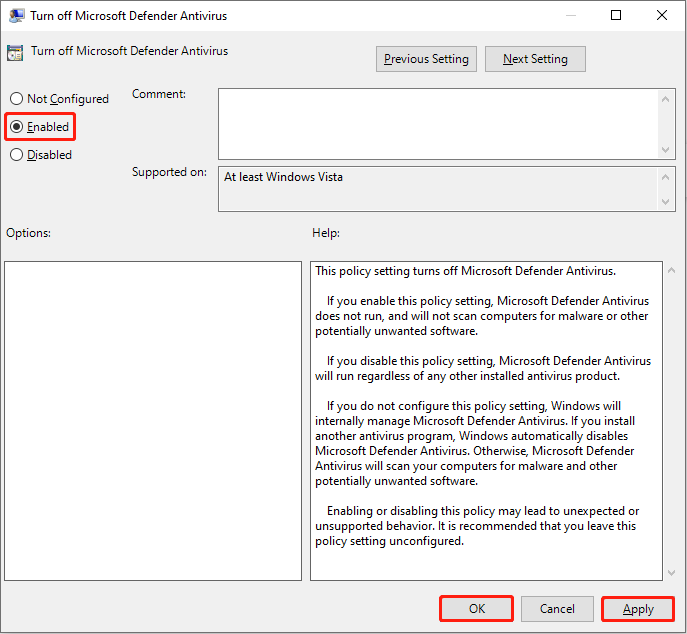
Step 4: Disable Windows Defender
Find the option Turn off Microsoft Defender Antivirus on the right. Double-click it to open it. Select Enabled. Click Apply > OK.
Step 5: Restart your computer
After making the above settings, restart your computer for the changes to take effect. Windows Defender will be disabled.
If you need to turn it back on, repeat the above steps, set the Turn off Microsoft Defender Antivirus policy to Not Configured or Disabled, and then restart the system to restore Defender.
Option 3: Disable Windows Defender with Registry Editor
Using Registry Editor, you can deeply modify the system configuration. This can also achieve the complete disabling of Windows Defender.
Step 1: Open the Registry Editor
Press Win + R to open the Run dialog, type regedit, and press Enter. If a UAC prompt appears, click Yes to continue.
Step 2: Navigate to the Defender settings directory
In the Registry Editor, navigate to the following directory:
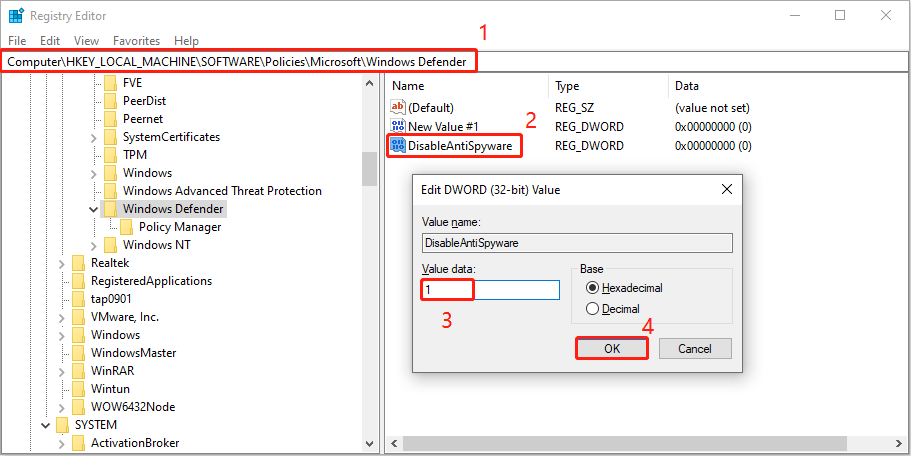
Computer\HKEY_LOCAL_MACHINE\SOFTWARE\Policies\Microsoft\Windows Defender
Step 3: Create a disabled key value
Right-click the blank space in the Windows Defender folder, choose New > DWORD (32-bit) Value, and name it DisableAntiSpyware. Double-click the key value, set its value to 1, and hit OK.
Step 4: Restart your computer
After making the changes, close the Registry Editor. Restart your computer for the changes to take effect.
Verdict
To restore Windows Defender deleted files, first check the quarantine history in the Windows Security app. If the files aren’t there, you need to recover files from backups or use MiniTool Power Data Recovery. For future prevention, add the file’s location to the Windows Defender exclusion list.
If you have any questions when using the MiniTool product, do not hesitate to contact us through [email protected]. We will answer you as soon as possible.
About The Author

Position: Columnist
Chelsea graduated from university with a major in English. She has a strong interest in English writing. It is this passion for writing that led her to become an English editor. Her articles mainly focus on data recovery and other computer industry news. As an energetic and outgoing girl, Chelsea enjoys listening to music, singing, riding bikes, and eating in her spare time.
User Comments :