In the digital world, SD cards are virtually everywhere. As practical tools for storing photos and videos, they are widely used in mobile phones, cameras, and other devices.
However, you might encounter a frustrating problem: the SD card keeps deleting files by itself. This phenomenon is not only annoying but can also lead to data loss.
Why does this problem happen? This article will start with its causes, gradually dissecting how to solve the problem of the SD card deleting files by itself.
Why Does My SD Card Keep Deleting Files by Itself
Many reasons can cause this problem. Here are some common and possible ones.
- Physical damage or quality issues: Inferior or aging SD cards are prone to bad blocks, causing data to fail to be saved properly. Files may mysteriously disappear during use.
- Insufficient storage space: When the SD card is out of space, the system may automatically clean up or overwrite files.
- File system corruption: If the SD card’s file system is corrupted, the host device may be unable to recognize the files. This may cause files to disappear or be automatically deleted.
- Virus or malware infection: If the SD card is infected with a virus on your computer or mobile phone, the virus may delete or hide files.
- Compatibility issues: Different devices have inconsistent compatibility with SD cards. Incompatibility may result in files not being saved correctly or being deleted by the system.
- Unsafe removal or power failure: Suddenly removing the SD card or powering off the device during data writing may cause data loss or even file system errors.
After knowing the factors, it’s easy to find the corresponding solution. Before that, perform the following simple checks on your SD card.
Pre‑Check Essentials
Some simple checks can eliminate some complex steps. Here is how to check it.
Check 1: Remove and re-insert the card
When an SD card automatically deletes files, it is recommended to remove and reinsert the card. This forces the system to re-establish the connection with the storage medium. It can refresh the read/write cache and rule out temporary contact problems or recognition errors.
This check helps confirm whether the problem stems from a system recognition error, rather than physical damage to the card itself or a file system error.
Check 2: Check for hidden files
Sometimes, files aren’t deleted, but rather their attributes are changed to hidden by the system or malicious programs. This makes them invisible in the normal view.
In such cases, showing hidden files becomes a crucial troubleshooting step. Here is how to show them.
Step 1: Right-click the Windows icon and choose File Explorer.
Step 2: Under This PC, find and select your SD card.
Step 3: In the top toolbar, switch to View and check the Hidden items option.
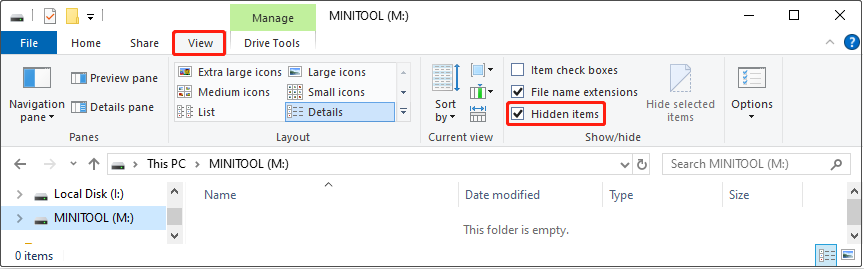
After that, the File Explorer will display files and folders that were previously hidden.
Check 3: Delete the Nomedia file
When the SD card deletes files by itself, it doesn’t always mean the files have actually disappeared. Sometimes it’s because a Nomedia file exists.
If a Nomedia file is mistakenly placed in your photos or music directory, these media files will be ignored and will not be displayed in the gallery or music player. Deleting this file and rescanning your media library will restore the ignored files.
Access your SD card, find the Nomedia file, and delete it.
However, if the files don’t appear, then they’re deleted. It’s best to recover them as soon as possible.
Urgent Action: Recover Deleted SD Card Files
In most cases, the files that the SD card deleted itself can be recovered. This section provides several options on how to restore lost files on the SD card.
Option 1: Restore from Cloud Storage Backup
If you synced or backed up the SD card files to a cloud storage service before losing them, then restoring from the cloud backup is the simplest method.
Files in cloud storage are unaffected by SD card hardware failures, viruses, or system errors, ensuring data integrity and security.
Step 1: Log in to your cloud storage account
Open and log in to the cloud service you use (such as OneDrive, Google Drive, or Dropbox).
Step 2: Locate the backup location
Navigate to the corresponding folder or backup directory and identify the SD card files that were previously synced or saved.
Step 3: Download or copy the files you want
For the web version, right-click the files or folders you want to restore and click Download. For the desktop client, copy the files back to your local hard drive.
After restoring files, visit them to confirm that the content is complete and usable.
If you don’t back them up, proceed with the next method.
Option 2: Retrieve from the Antivirus Quarantine Folder
If your SD card files were “deleted” by antivirus software, recovering from the quarantine folder is effective.
When antivirus software detects suspicious files on your SD card, it doesn’t immediately delete them. Instead, it places them in a safe quarantine folder. This prevents the files from spreading risk, but they are still retained.
Here we take Windows Defender for example to show you how to recover quarantined files.
Step 1: Type Windows Security in the Windows search bar and press Enter.
Step 2: Click Virus & threat protection in the left-hand menu.
Step 3: Click Protection history under Current threats.
Step 4: Filter on Quarantined Items. Then, click the needed item and select Restore.
If the files are not in the quarantine folder, it means that the problem is not with the antivirus software, but with the SD card itself. In this case, try using data recovery software to recover files.
Option 3: Recover with MiniTool Power Data Recovery
Deleting files from an SD card can be caused by file system corruption, bad blocks, or compatibility errors. MiniTool Power Data Recovery covers various file loss scenarios, making it ideal for recovering deleted SD card files.
Besides SD cards, this software can recover data from hard drives, USB flash drives, and CDs/DVDs. It is capable of recovering over 2000 file types, including document, picture, video, and audio.
The recovery process does not modify or overwrite the original SD card data, ensuring data security and preventing secondary damage.
The software interface is intuitive, with clear steps, allowing for quick data recovery in just a few steps. It is compatible with Windows 11/10/8/8.1. Download and install this free file recovery software to recover 1 GB of files for free.
MiniTool Power Data Recovery FreeClick to Download100%Clean & Safe
Step 1: Launch the software and scan your SD card
Open MiniTool Power Data Recovery and enter the main interface. Then, find and scan your SD card. Here are two options for you to perform a scan.
- In Logical Drives: All the partitions, including existing partitions, deleted partitions, and unallocated space, are displayed here. Select the target drive and click Scan.
- In Devices: It lists all the disks connected to your computer. Select the SD card and click Scan.

Step 2: Find and preview the needed files
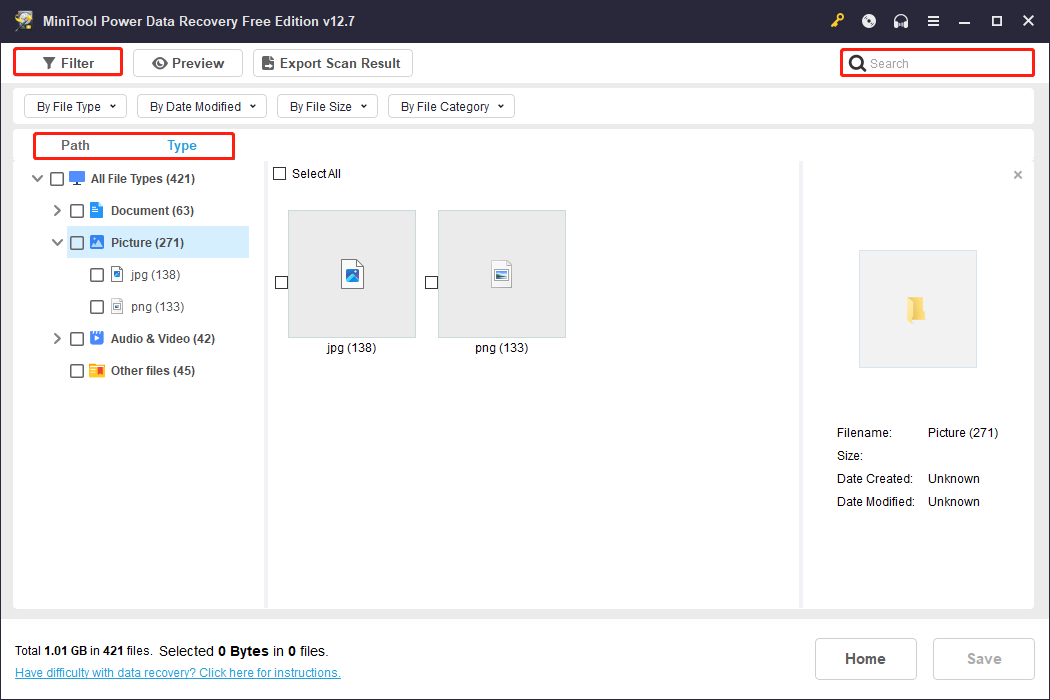
This scan process may take some time. When it ends, use the following features to locate the required files.
- The Path feature displays scan results according to the folder path structure, allowing you to quickly locate specific folders on your SD card.
- The Type feature categorizes scan results based on file type, such as picture, video, audio, and document. This is especially useful when you want to recover a specific type of file.
- The Filter feature provides multiple filtering criteria, including file type, modification date, file size, and file category. It can quickly narrow down a large number of scan results.
- The Search feature allows you to enter the filename to search for target files. It can avoid manual search, saving a significant amount of time.
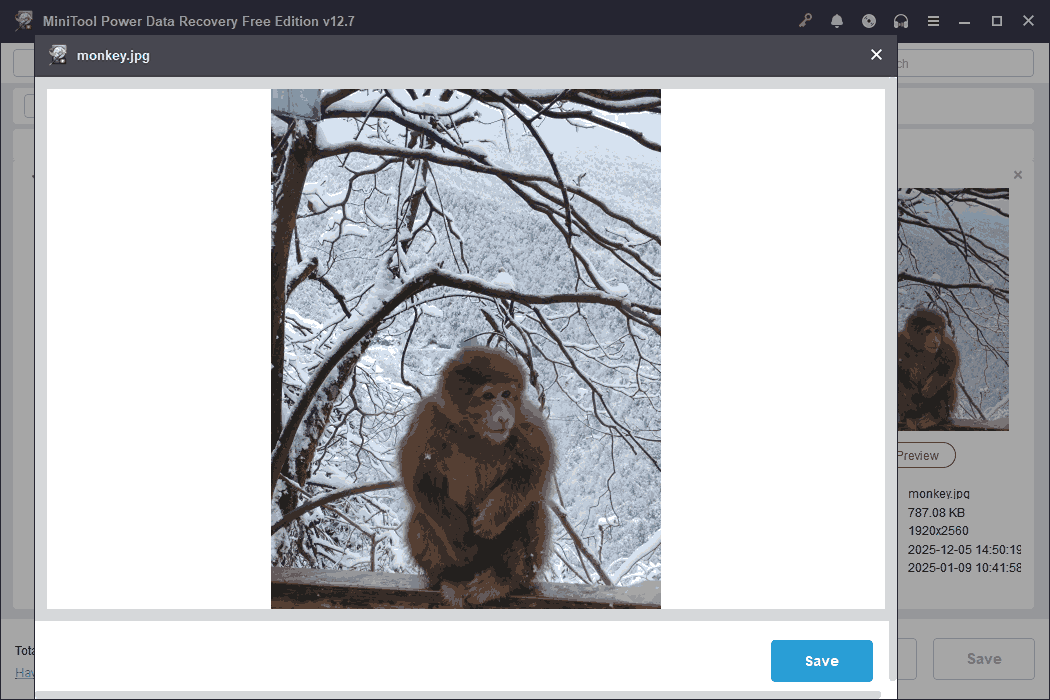
After finding the files, double-click them to preview. Checking the file content helps confirm if the files are correct, avoiding unnecessary recovery.
Step 3: Save files to a safe location
When the files are confirmed, select them and click Save. There will be a window prompting you to choose a path to store the recovered files. Choose a safe one and click OK. The recovery will start.
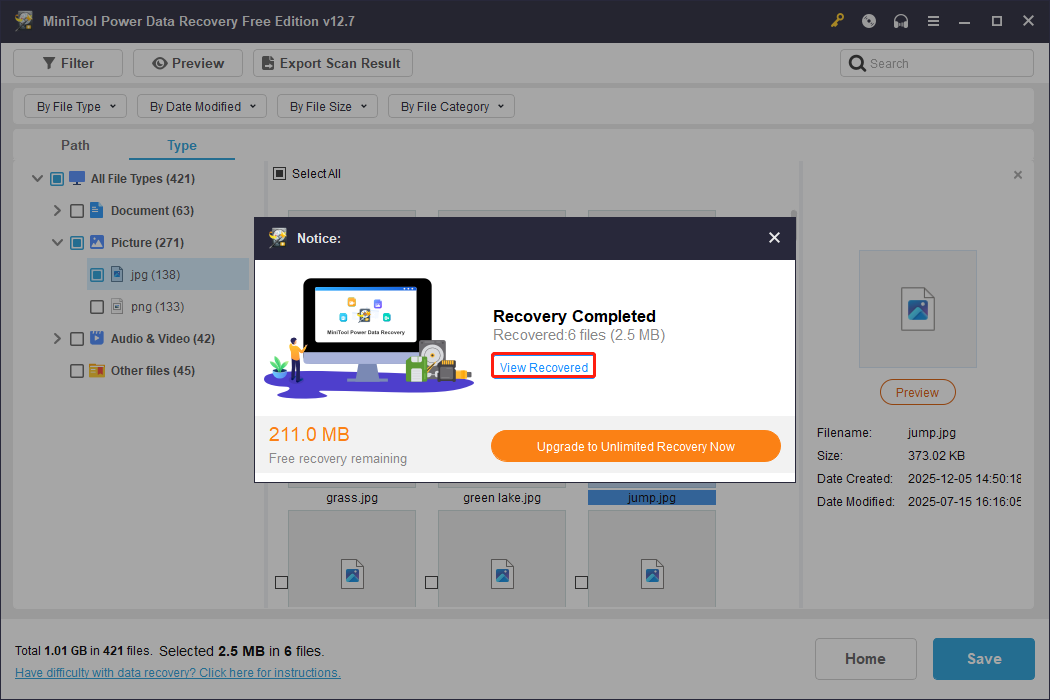
When the Recovery Completed window shows, click the View Recovered button to check your SD card files.
After recovering the deleted files, the next step is to prevent your SD card from deleting files automatically.
How to Stop the SD Card from Deleting Files by Itself
This section provides several advanced methods to stop your SD card from deleting files.
Approach 1: Check for Counterfeit
Many counterfeit SD cards manipulate their firmware to falsely display their capacity. As a result, when you write data exceeding the actual capacity, older files are overwritten or lost, appearing as if they are automatically deleted.
Therefore, when an SD card keeps deleting files by itself, the first step is to verify the card’s true capacity.
If it’s not a capacity issue, attempt the following solution.
Approach 2: Run the CHKDSK Command
When a corrupted file system or the presence of bad sectors causes “SD card deleting files by itself”, try CHKDSK. Running this command can scan and repair file system errors, mark bad sectors, and recover readable data.
Step 1: Type Command Prompt in the Windows search bar, right-click the best match, and choose Run as administrator.
Step 2: When prompted by UAC, click Yes to continue.
Step 3: Input chkdsk M: /f /r /x and press Enter. The letter M should be replaced by the drive letter of your SD card.
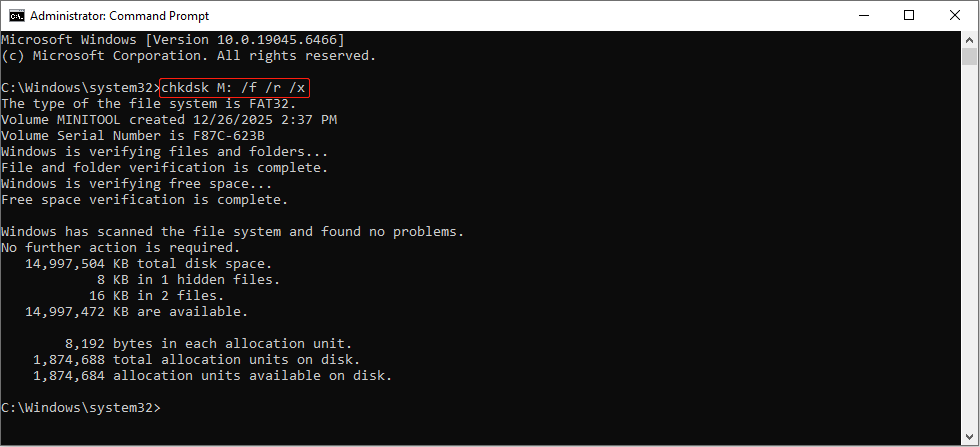
Wait for the process to end, and then place files onto the card and check whether they are still deleted automatically. If the issue persists, try the next one.
Approach 3: Scan for Viruses
Scanning for viruses can detect and remove potential malicious code, ensuring the security of your device and SD card. This prevents further data loss.
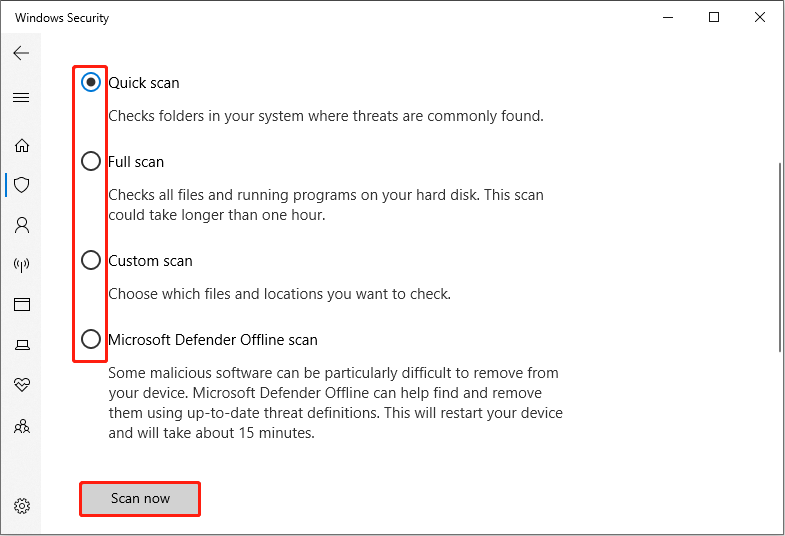
Step 1: Type Windows Security in the Windows search box and press Enter.
Step 2: Click Virus & threat protection > Scan options.
Step 3: Choose a scan option based on your needs and click Scan now.
When the scan ends, test your card. If it doesn’t work, move on to the next technique.
Approach 4: Format Your SD Card
The last method is to format your SD card. Formatting can rebuild a file system, clearing away the original damaged or messy structure. This enables the device to recognize and store data reliably.
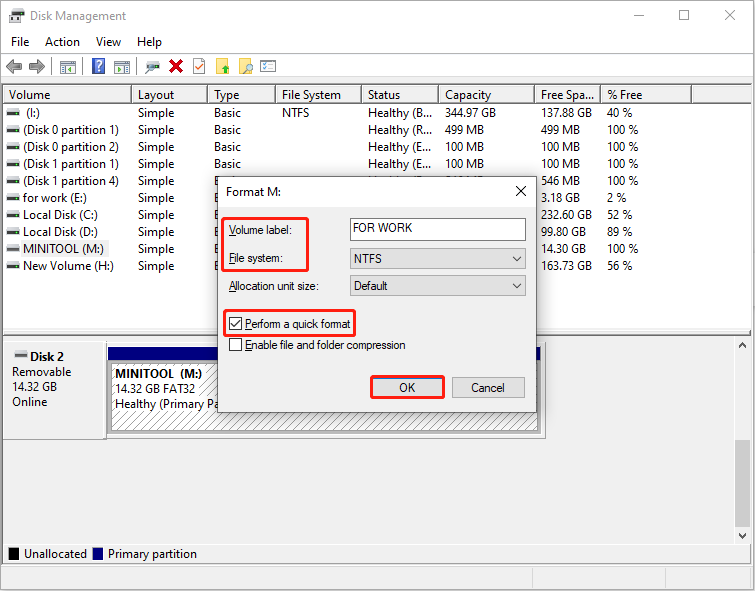
Step 1: Press Win + X and select Disk Management.
Step 2: Right-click the target disk and choose Format.
Step 3: Set a volume label, choose a file system, and check the Perform a quick format option.
Step 4: Finally, click OK to make the change take effect.
You now essentially have a brand-new SD card, which can work properly.
Final Words
When the problem of the SD card deleting files by itself occurs, do some prechecks, such as reinserting the card or showing hidden files.
If the above methods are ineffective, restore the deleted files from the backup or quarantine folder, or use MiniTool Power Data Recovery.
When files are restored, try some methods to prevent further deletion. It involves running CHKDSK, scanning for viruses, and formatting the drive.
For assistance, contact us at [email protected]. We’re available to answer any questions you have about our MiniTool products.
About The Author

Position: Columnist
Chelsea graduated from university with a major in English. She has a strong interest in English writing. It is this passion for writing that led her to become an English editor. Her articles mainly focus on data recovery and other computer industry news. As an energetic and outgoing girl, Chelsea enjoys listening to music, singing, riding bikes, and eating in her spare time.
User Comments :