
Dropped iPhone in Water Accidentally
Now, almost everyone has a cell phone in the information age and many users like using iPhones because of their excellent performance and secure iOS system.
However, according to a survey, users accidentally dropping their iPhones in water such as in the toilet, in the bathtub, or any liquid containing water is a common occurrence.
Therefore, what should you do if you drop your iPhone into the water carelessly? Please keep calm, and follow these steps to dry out the iPhone at first. If you are lucky, you can get iPhone back in working order soon.
Here’s what to do when your iPhone has a water contact.
- Take the iPhone out of the water as soon as possible.
- Turn the iPhone off.
- Remove the SIM card from your iPhone if you have one.
- Remove all other peripherals such as earbuds, as well as protective covers.
- Dry out the iPhone with a towel. Here, you are prohibited to dry it off with a blow dryer as this could melt the circuit board and other parts.
- Put iPhone into a rice bag (or a bag of silica gel packets, if you happen to have a bunch of those). Leave the device in the rice for at least 24 hours and preferably 48 hours.
In some cases, the iPhone can escape water damage and you can continue using the device as normal. However, what if the iPhone is completely dead and beyond repair? Is it possible to recover data from a dead iPhone?
Keep reading to see how to recover data from water damaged iPhone that won’t turn on.
How to Recover Data from a Water-Damaged iPhone
Recovering data from a water-damaged iPhone depends largely on whether the device can still be accessed. If the screen is unresponsive, the iPhone cannot turn on, or you cannot complete the required connection authorization, a computer may not be able to access the device.
According to Apple’s device security requirements, connecting an iPhone to a new computer requires you to unlock the device and confirm the Trust This Computer prompt. Without the necessary authorization, third-party recovery software, including PhoneRescue for iOS, may not be able to scan the device directly.
Fortunately, when a water-damaged iPhone cannot be operated, you can try the Recover from Backup or Recover from iCloud module in PhoneRescue for iOS.
Method 1. Recover Data from iTunes Backup
PhoneRescue for iOS provides a Recover from Backup feature that lets you scan an existing iTunes backup, preview its contents, and selectively retrieve the files you need without restoring the entire backup to your iPhone.
This method does not require you to connect or operate the damaged iPhone, as long as you already have a compatible backup saved on your computer.
Phone Rescue for iOS (Windows)Click to Download100%Clean & Safe
Phone Rescue for iOS (Mac)Click to Download100%Clean & Safe
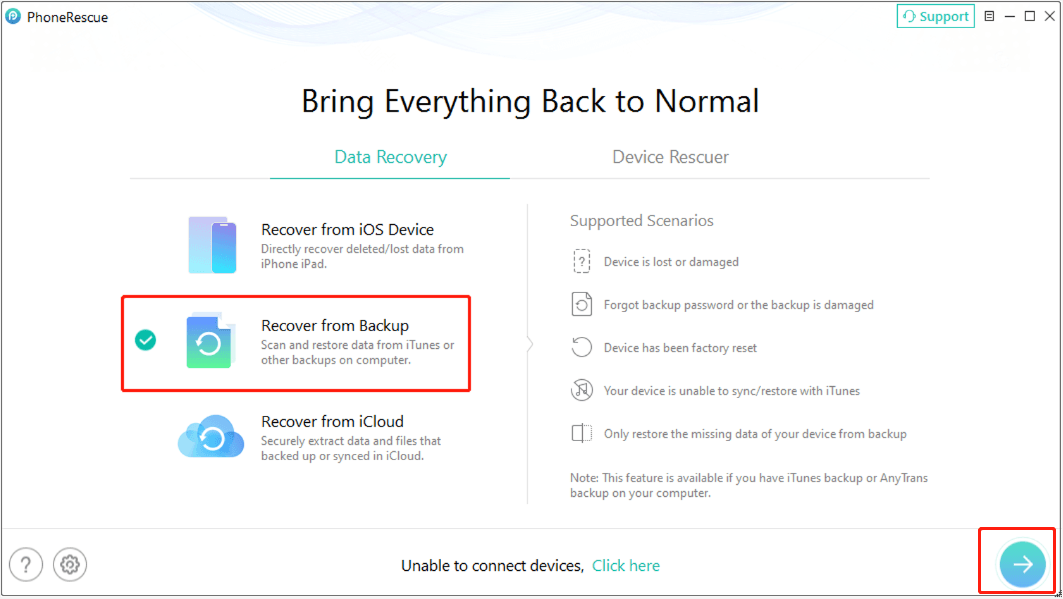
Step 1. Launch PhoneRescue and Select Recover from Backup
Launch the recovery program and select the Recover from Backup option from the main interface.
Step 2. Select a Backup to Scan
PhoneRescue will display the available iTunes backups on your computer. Choose the backup containing the data you want to recover and proceed to the next step.
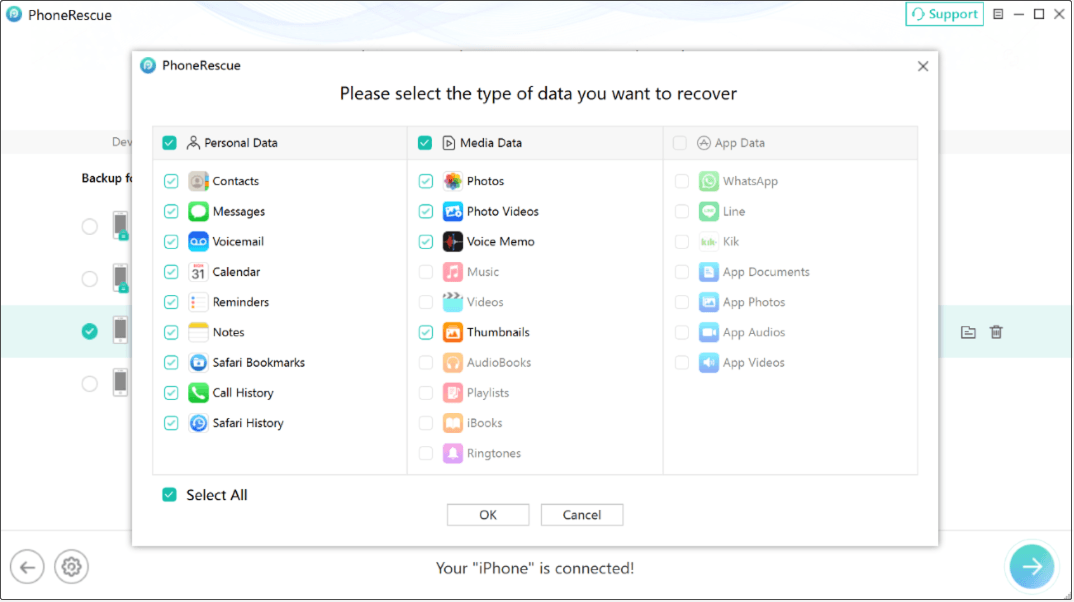
Step 3. Scan the Backup Files
In the new window, select the file types you want to scan, such as contacts, photos, videos, messages, and more.
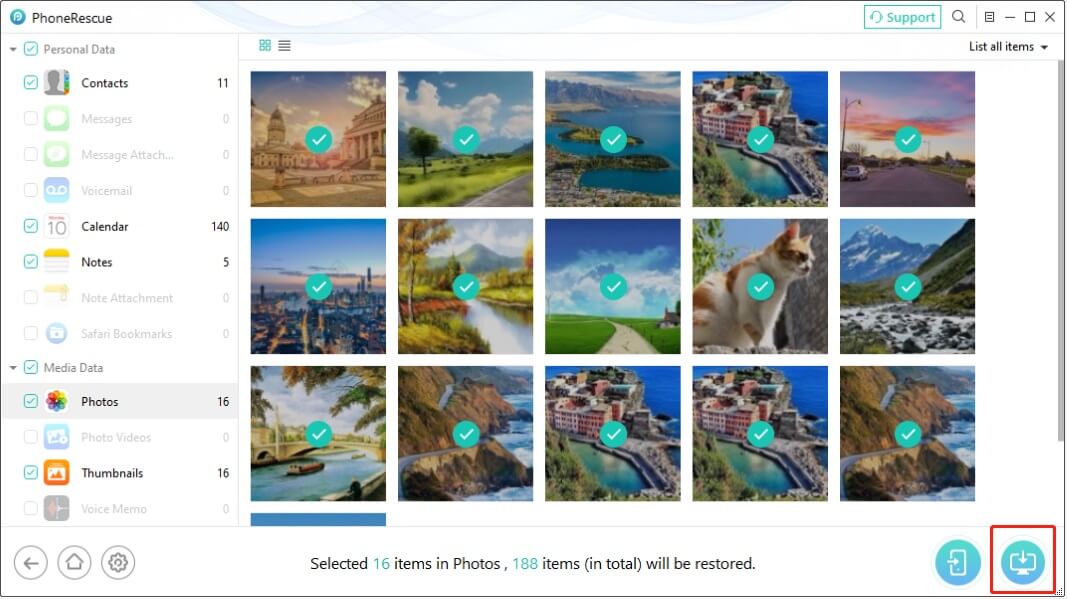
Step 4. Preview and Recover Your Data
Once the scan is complete, browse the available data categories and preview the recoverable items.
Select the photos, videos, messages, contacts, or other files you want to retrieve, then click the appropriate recovery button to save the selected data to your computer.
Method 2. Recover Data from iCloud
If you previously enabled iCloud backup or synced important information with iCloud, you can also retrieve your lost data without accessing the water-damaged iPhone.
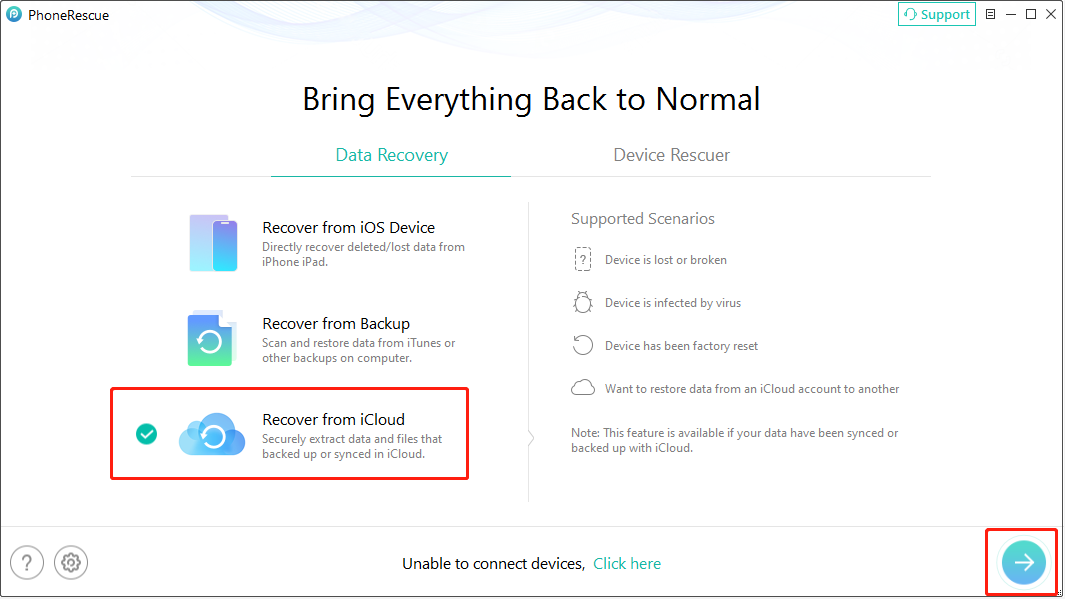
Step 1. Choose Recover from iCloud
Launch PhoneRescue for iOS on your computer. On the main interface, select Recover from iCloud to start the recovery process.
Step 2. Sign In to Your iCloud Account
Follow the on-screen instructions to sign in with your Apple Account. Complete any required authentication and select the relevant data categories.
Step 3. Scan and Preview Available Data
PhoneRescue will access the available iCloud data and analyze the selected content. After the scan, browse the results and preview the files you want to recover.
Step 4. Select and Recover the Needed Files
Choose the photos, videos, messages, contacts, or other available data you want to retrieve. Click the recovery option and save the selected files to your computer.
Wait for the process to finish and check the recovered files.

Useful Tips for Protecting Data on iPhone
1. Back up Your iPhone Data With iTunes or iCloud.
In the information age, it is recommended to back up the iOS data with iTunes/iCloud or back up the iPhone to an external hard drive since data loss happens frequently.
Ensures that you have a duplicate of your data available in the event that your device is replaced, lost, or damaged.
2. Protect Your iPhone From Water Damage.
There is a high probability that the iPhone will not turn on after being dropped into water. Now, you can try using the following methods to protect your iPhone against water damage.
- On rainy days, keep it in your pocket, put it in your bag, do whatever you can to keep it covered, and resist taking it out to check when the rain will stop.
- Keep your iPhone well away from food or beverages when they are involved in your activities. If you’re out at the time, consider leaving it in a pocket.
- Please don’t keep phones in the bathroom for a long time.
- Use a waterproof case. If you need to use iPhone while swimming, you had better use a waterproof case to protect your device.
Conclusion
After seeing the above introductions, you should know how to dry out a wet iPhone and how to recover data from water damaged iPhone.
Should you have any questions when you use PhoneRescue for iOS, you can leave a message in the comment zone below. You can also share your ideas and suggestions about iPhone data recovery here.
Water Damaged iPhone Data Recovery FAQ
2. Remove the SIM card if your iPhone has one.
3. Remove all other peripherals such as earbuds, as well as protective covers.
4. Dry out the iPhone with a towel.
5. Put the iPhone into a rice bag and leave the device in the rice for at least 24 hours and preferably 48 hours.
About The Author

Position: Columnist
Shirley holds a bachelor’s degree in English and has been an editor at the MiniTool Team for many years. She specializes in IT-related content, with a focus on data recovery, file backup, disk management, and other technical topics. She is committed to delivering clear, accurate, and practical solutions to help users resolve common computer issues.
User Comments :