There’s nothing more frustrating than suffering from login failed error 0xc0210000 when rebooting your computer. How to get rid of it from your system? If you have no idea at the moment, then this guide on MiniTool Website might be useful to you.
BitLocker Key Required to Unlock the Volume Wasn’t Loaded Correctly 0xc0210000
When you restart your system after updating a Hyper-V enabled Windows 10/11, you might receive BitLocker key wasn’t loaded correctly error 0xc0210000 with either of the error messages below:
- Error 0xc0210000. The operating system couldn’t be loaded because BitLocker key required to unlock the volume wasn’t loaded correctly.
- Error 0xc0210000. A required file couldn’t be accessed because your BitLocker key wasn’t loaded correctly.
Many reasons can contribute to Windows login failed error 0xc0210000, so we come up with several solutions aimed at different conditions. You can choose the proper one according to your actual need.
You will never know when errors like login failed error 0xc0210000 will happen and such errors might cause data corruption or system crashes. Therefore, it is strongly recommended to create a backup of important data with a PC backup software MiniTool ShadowMaker in advance. When data loss or corruption happens, the backup images will come in handy and your daily work won’t be delayed.
MiniTool ShadowMaker TrialClick to Download100%Clean & Safe
How to Fix Login Failed Error 0xc0210000 on Windows 10/11?
Fix 1: Power Cycle Your Computer
When you encounter any error on your computer, the first solution that comes to your mind must be performing a power cycle of your computer. This might solve most temporary glitches or bugs on your computer. Here’s the detailed process:
Step 1. Remove all the peripheral devices except the keyboard and mouse.
Step 2. Log out of your system and shut down your computer.
Step 3. Press the power button for 15 to 20 seconds and enter the BitLocker keys if needed.
Fix 2: Disable BitLocker
Also, you can try disabling or suspending BitLocker to get rid of login failed error 0xc0210000. Here’s how to do it:
Step 1. Type control panel in the search bar and hit Enter.
Step 2. Go to System and Security > BitLocker Drive Encryption > Turn off BitLocker.
Step 3. Click on Turn off BitLocker on the new dialog to disable BitLocker on the specific device. After the process is done, repeat the steps above to disable BitLocker on other devices.
If your computer cannot boot, you need to enter WinRE to disable or suspend BitLocker.
Step 1. Shut down your computer and press the power button to reboot it.
Step 2. When you see the Windows logo, press and hold the power button again to power off your computer.
Step 3. Repeat the step two or more times until you see the Automatic Repair window and hit Advanced options.
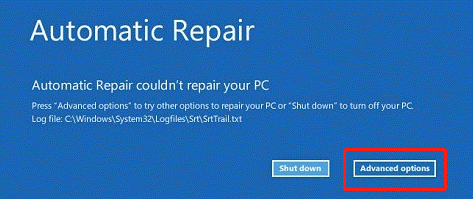
Step 4. Go to Troubleshoot > Advanced options > Command Prompt and execute the following command:
manage-bde -status c:
If you receive a locked status, run the following command to use the 48 digit numerical recovery password separated by a hypen in a 6 digit group to unlock it.
manage-bde -unlock c: -rp <your 48-digit recovery password>
now, the drive is unlocked and you can run the command below to suspend the protection:
manage-bde -protectors -disable c:
Step 5. Reboot your computer and now you can resume BitLocker protection.

Fix 3: Disable Hyper-V
To fix login failed error 0xc0210000, another workaround is to disable Hyper-V before applying any system updates, TPM, or UEFI firmware updates on Windows 10/11. Here’s how to do it:
Step 1. Open Control Panel.
Step 2. Go to Programs > Programs and Features > Turn Windows features on or off.
Step 3. Locate Hyper-V and uncheck it.

Step 4. Click on OK to save the changes.
Fix 4: Disable Virtualization Based Security
It is reported that disable Virtualization Based Security is also useful. Just follow these steps:
Step 1. Press Win + R to launch the Run box.
Step 2. Type gpedit.msc and hit Enter to open Local Group Policy Editor.
Step 3. Navigate to the following path:
Computer Configuration > Administrative Templates > System > Device Guard
Step 4. In the right-side pane, double-click on Turn On Virtualization Based Security to edit its properties.
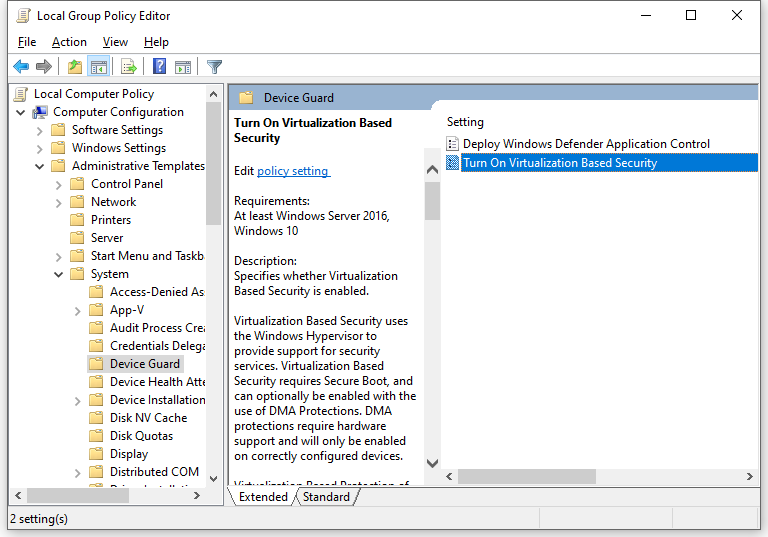
Step 5. Tick Disable or Not Configured.
Step 6. Click on Apply & OK to save the changes.
User Comments :