Generally, your Windows will turn off the devices you don’t use to save energy and prolong the lifespan of the battery. Windows users can configure this setting in Device Manager. But you may encounter an issue that the Allow the computer to turn off this device to save power option is grayed out. How to fix it? MiniTool gives solutions in the following content.
Allow the Computer to Turn Off This Device to Save Power Overview
To save energy, Windows will turn off the idle devices. Thus, sometimes you can’t find the connected external hard drives. Luckily, you can change the settings by yourself in the Device Manager.
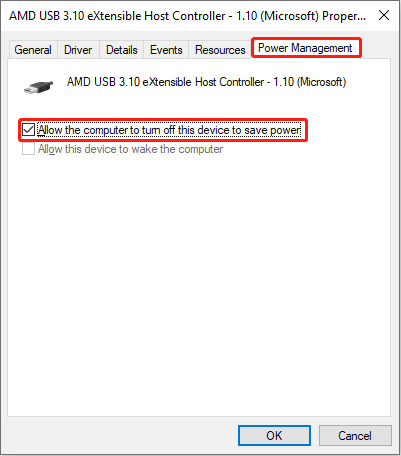
How to disable allow the computer to turn off this device to save power? You can follow the next steps to set.
- Press Win + X and select Device Manager from the WinX menu.
- Find and expand Universal Serial Bus controllers.
- Right-click on the device and select Properties.
- Switch to the Power Management
- Uncheck the Allow the computer to turn off this device to save power and click OK.
How to Fix Allow the Computer to Turn Off This Device to Save Power Grayed Out
However, some people find that Allow the computer to turn off this device to save power is grayed out on the interface when they try to configure the setting. If you want to enable this option, please try the following methods to fix this problem.
Method 1: Change the Registry Editor
Windows Registry contains important information, options, settings, and other values for programs and installed hardware on Windows operating systems. It is powerful in fixing most Windows issues, but you should be very careful in making changes to Registry keys. To fix the problem that Allow the computer to turn off this device to save power is grayed out, you can change the PnPCapabilities key, which is responsible for the option.

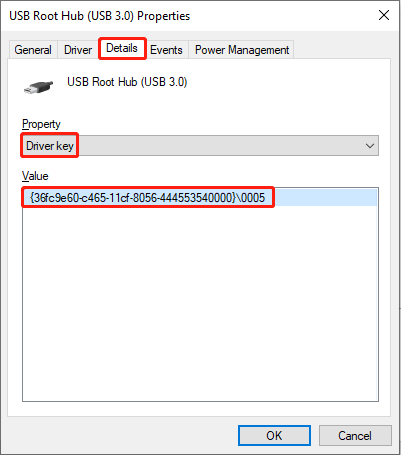
Here we take USB Root Hub as an example:
Step 1: Press Win + X and select Device Manager to open it.
Step 2: Find and right-click on the USB Root Hub.
Step 3: Choose Properties > Details.
Step 4: Change the Property to Driver key and copy the path under the Value section.
Step 5: Press Win + R to open the Run window.
Step 6: Type regedit in the text box and hit Enter.
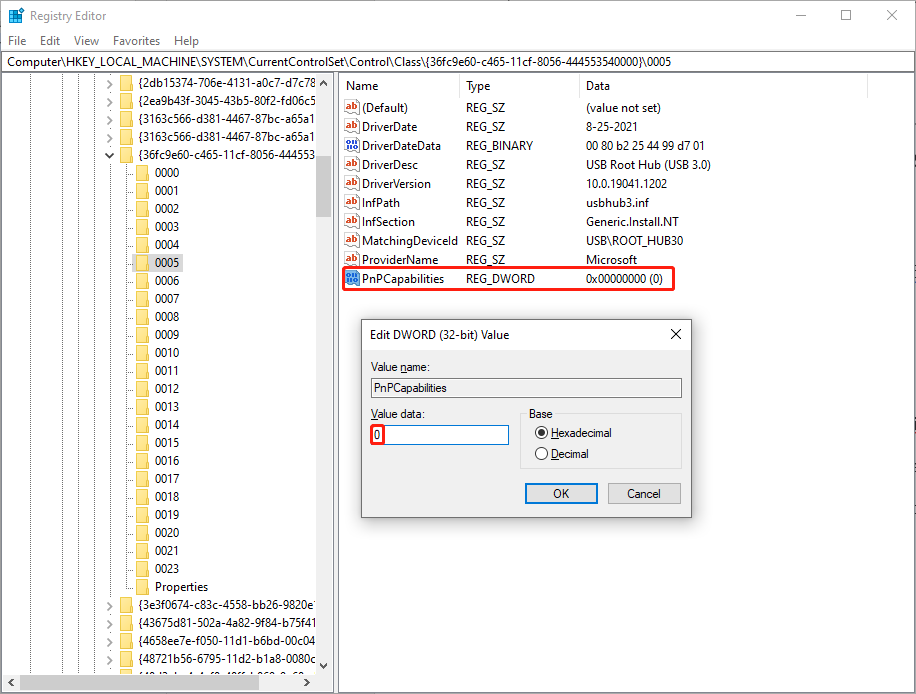
Step 7: Navigate to HKEY_LOCAL_MACHINE > SYSTEM > CurrentControlSet > Control > Class > {36fc9e60-c465-11cf-8056-444553540000}\0005
You can replace {36fc9e60-c465-11cf-8056-444553540000}\0005 with the value you copy from the Properties window.
Step 7: Find the PnPCapabilities key.
If you can’t find it, right-click on the right panel and choose New > DWORD (32-bit) Value. Then, rename the new registry key as PnPCapbilities.
Step 8: Double-click this registry key and change the Value data to 0.
Step 9: Click OK and restart your computer to apply the changes.
Method 2: Run Hardware and Device Troubleshooter
Hardware and Device troubleshooter is a Windows built-in tool to help Windows users fix hardware issues. You can run Hardware and Device troubleshooter to check if this problem is caused by the USB port.
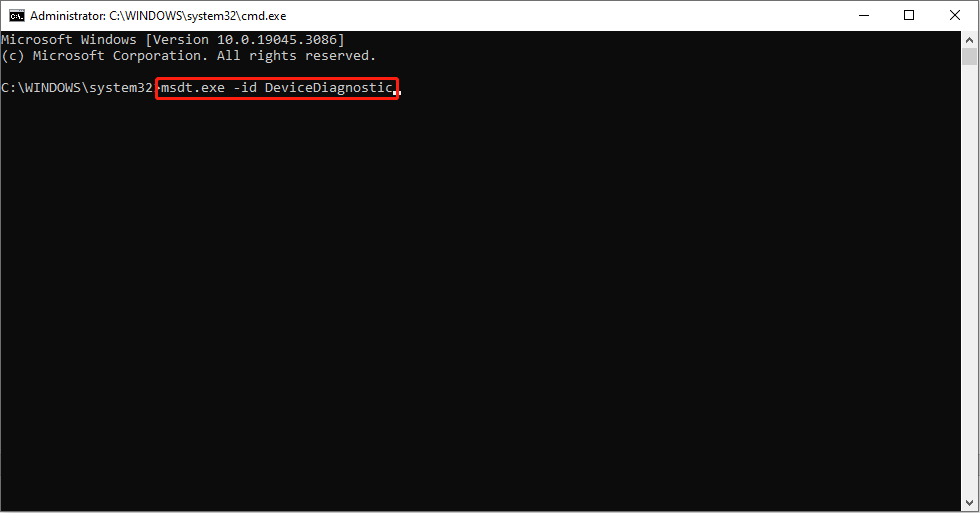
Step 1: Press Win + R to open the Run window.
Step 2: Type cmd in the text box and press Shift + Ctrl + Enter to run Command Prompt as administrator.
Step 3: Type msdt.exe -id DeviceDiagnostic and hit Enter to open the Hardware and Device troubleshooter.
Step 4: Click Next and finish with the following instructions.
You can read this post to find out how to fix if the Hardware and Device troubleshooter is missing.
Bottom Line
If you need to recover lost or deleted files, we heartily recommend MiniTool Power Data Recovery, which is the best free data recovery software for Windows. You can try the free edition to help you at first.
MiniTool Power Data Recovery FreeClick to Download100%Clean & Safe
After reading this post, hope you can fix the problem that allow the computer to turn off this device to save power is grayed out with the above methods.
User Comments :