If you want to know how to fix the CMOS checksum error, you need to read this post. It will show you two major reasons for this error. In addition, it will provide you with several useful solutions to fix this error. Right now, you can get these feasible methods from the MiniTool website.
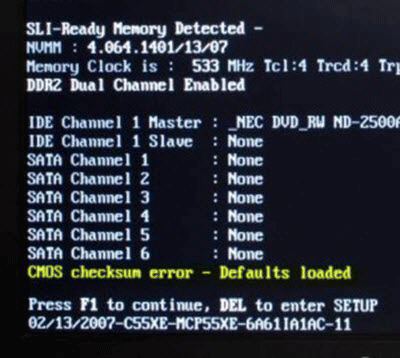
The CMOS checksum error is an issue that affects many users of different versions of Windows, and it often occurs anywhere. This issue can occur during the BIOS boot screen, and your computer will be prevented from loading the operating system.
Don’t worry, this post will show you how to fix the CMOS checksum error step by step.
Causes of the CMOS Checksum Error on Windows
There are not many reasons for this error, and they are very relevant to the BIOS itself. However, two different causes can still be identified, and all troubleshooting methods are based on them.
1.Your CMOS battery needs to be replaced
CMOS batteries don’t last a lifetime, and after a few years, they don’t provide enough voltage to boot the BIOS, and the problem arises.
2.BIOS settings are corrupt
This error can also be caused by incorrect BIOS settings, which could be related to new devices that you have added.
Solution 1: Replace Your CMOS Battery
One of the main causes of the CMOS checksum error is CMOS batteries. If the battery is a few years old, it’s time to replace it with a new one.
Step 1: Open the computer case and find the CMOS battery connected to the computer motherboard.
Step 2: Grab the edge of the battery with your finger, pull it up out of the socket and secure it in place if it is a coin cell battery.
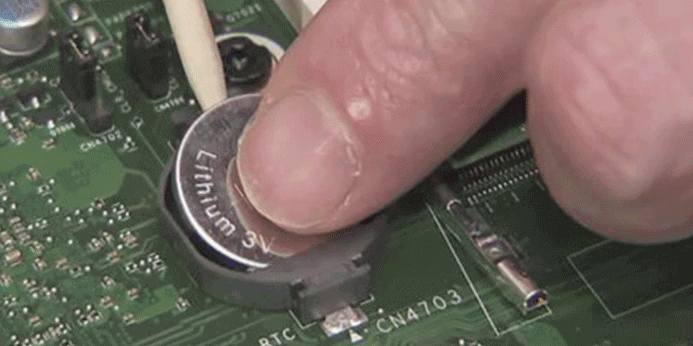
Step 3: Leave the battery for 10 minutes to remove, take another, input in a similar way, and boot your computer.
After finishing the steps above, you may fix the CMOS checksum error.
Solution 2: Reset BIOS Settings to Default
Faulty BIOS settings is another main cause of this issue. If you can access BIOS, you can try to reset BIOS settings to default to fix this issue.
Step 1: Press the BIOS key to enter the BIOS settings when the system is about to boot. The BIOS key is usually on the boot screen showing “Press _ to enter Setup” or something like that. The usual BIOS keys are Del, F1, F2, etc.
Step 2: Depending on the BIOS version on your Dell computer, the option to load the default settings is displayed in two places on the BIOS screen.
Step 3: On the initial screen of BIOS settings, click the Restore Settings button at the bottom, choose BIOS defaults and click OK. Click Exit to restart your computer.
Step 4: You may need to locate at Exit on the initial BIOS screen by pressing the Right Arrow on your keyboard until you find it. Press the Down Arrow until you reach the Restore Defaults or Load Setup Defaults option, and then press Enter.
Step 5: Press Enter again when your computer prompts Load Setup Defaults and waits for the computer to start again.
After completing the steps, you can check to see if the CMOS checksum error is gone now.
Solution 3: BIOS Recovery (Intel Desktop Boards)
If you have an Intel desktop board, please follow the steps below.
Step 1: Find the latest version of the BIOS available for setup. Be sure to enter information about the setup so you can find the required files. Be sure to download it to your computer.
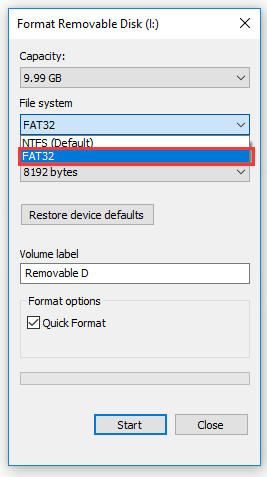
Step 2: Ensure that the file is formatted as FAT32 before you copy it to a USB drive. Open Libraries entry or any folder on your computer and click This PC.
Step 3: Right-click the USB Removable Drive you want to format and select the Format… option.
Step 4: Under File system, choose the FAT32 file system and click Start.
Step 5: Be sure to copy this file to a USB device and it should be in the root folder.
Step 6: Plug the USB device into the USB port of the target computer, turn off the computer, and unplug the power cord. Open the case and remove the BIOS configuration jumper.
Step 7: Power up your computer and wait a few minutes to complete the update. The computer will turn off automatically, or you should turn it off manually. Then remove the USB device and put the BIOS configuration jumper back in place
Step 8: Close the case of your computer and reboot the computer.
Now, check to see if the CMOS checksum error still appears on your computer.
Bottom Line
This post has shown you two main causes of the CMOS checksum error. Meanwhile, it also shows you some feasible solutions to fix this issue. Hope this post can help you.
User Comments :