Corruption Was Found While Examining Files in Directory
The Corruption was found while examining files in directory error message indicates that there is some corruption in the file system or directory being examined. This error usually appears when you are trying to access files or folders on a computer or an external storage device.
When this error occurs, it will lead to various issues like data loss, system crashes, or application errors. Therefore, you must solve corruption due to bad sectors was found while examining files in directory as soon as possible.
How to Fix Corruption Was Found While Examining Files in Directory?
Fix 1: Run CHKDSK Utility
First, you can run the CHKDSK utility to fix any issues with the hard drive. To do so, simply follow these instructions:
Step 1. Type cmd in the search bar to locate Command Prompt.
Step 2. Right-click on it to choose Run as administrator.
Step 3. In the command window, type chkdsk G: /f /r and hit Enter. Replace G: with the drive letter of the partition you want to repair.
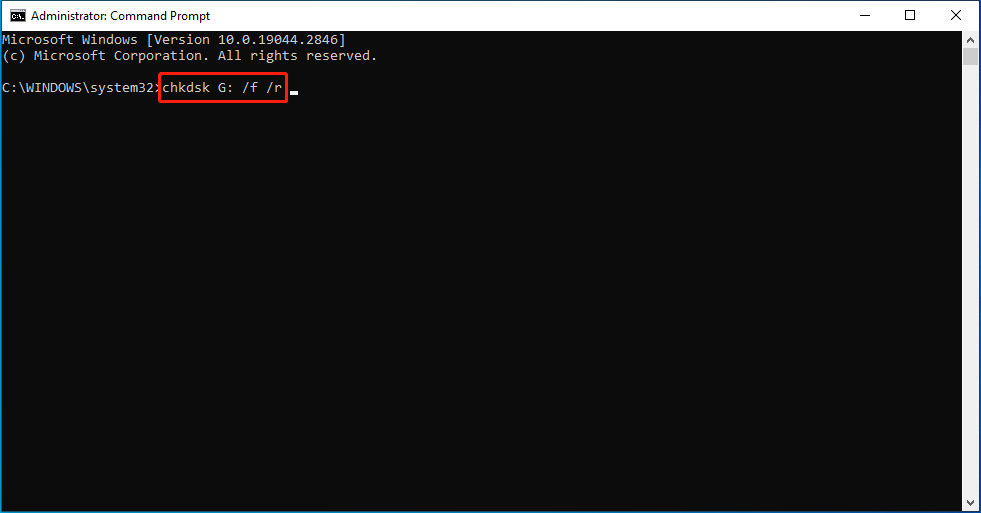
Step 4. As soon as the process is done, reboot your system.
Fix 2: Move the File to a Different Directory
If you are trying to open a specific folder or file, another fix for CHDDSK Corruption was found while examining files in directory is to move the file to a different directory.
Step 1. Locate the influenced disk partition according to the hints of the error message.
Step 2. Right-click on the file and select Cut.
Step 3. Find a different directory, right-click on the blank area in it and choose Paste.
Step 4. Restart your computer to see if the problem is fixed.
Fix 3: Format the External Hard Drive
If none of the solutions works for you, the last option is to format the drive. Formatting the target drive will clear all the files on it, so you must back up the crucial files on the drive before performing formatting.
Move 1: Back up the Data on the Hard Drive
Speaking of backup, a piece of free backup software will save your day. This freeware supports backing up files, folders, systems, disks, and partitions on Windows devices within just a few steps. Here’s how to create a backup with it:
Step 1. Launch MiniTool ShadowMaker and go to the Backup section.
MiniTool ShadowMaker TrialClick to Download100%Clean & Safe
Step 2. In this section, go to SOURCE > Folders and Files, and then you can choose the files you need to protect. In DESTINATION, you can choose a storage path for the backup task.

Step 3. Click on Back Up Now to start the process immediately.
[Guide] How to Back up Your Computer to an External Drive
Move 2: Format the Hard Drive
As for formatting, you can try a reliable partition and disk management – MiniTool Partition Wizard. This tool is so powerful that it allows you to format partitions, wipe disks, resize partitions, rebuild MBR and more. Simply follow these steps to format your target drive.
Step 1. Run MiniTool Partition Wizard and select the partition that needs formatting.
MiniTool Partition Wizard FreeClick to Download100%Clean & Safe
Step 2. Right-click on the target partition and select Format.
Step 3. Choose a desired file system and hit OK.
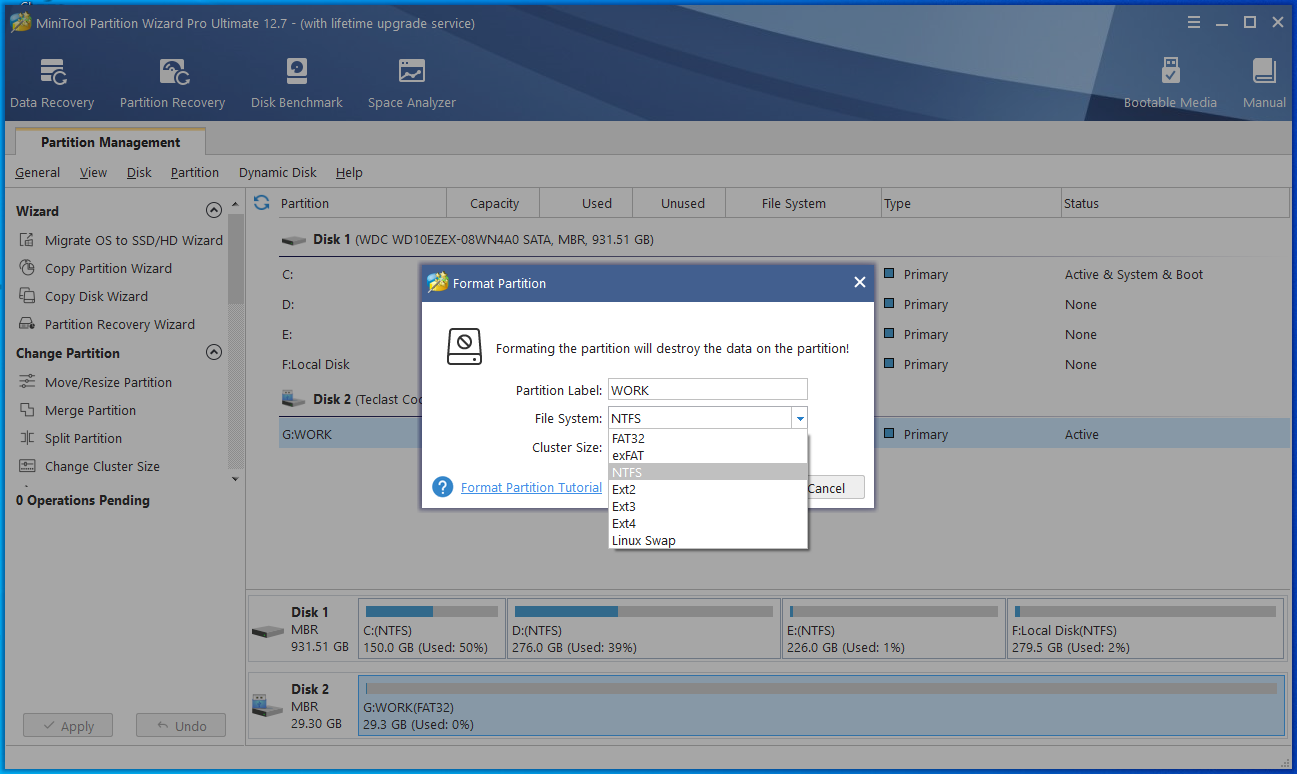
Step 4. Click on Apply and hit Yes to confirm this action.
Step 5. After the process is complete, exit MiniTool Partition Wizard.
User Comments :