What is the DHCP? What is the error that DHCP Is not enabled for WiFi? How to fix the issue that DHCP is not enabled for WiFi? This post from MiniTool will show you how to solve the DHCP error.
What Is DHCP Is Not Enabled for WiFi?
Some computer users complain that they come across the error that DHCP is not enabled for WiFi when they want to connect to the Internet. DHCP stands for Dynamic Host Configuration Protocol, which is a standardized network protocol that assigns reusable IP addresses within a network.
However, the error that DHCP is not enabled for WiFi may be caused by various reasons including the following but not limited to:
- Network issues
- Software conflict
- Malware
- Out-of-date or faulty drivers
- Incorrect settings
After knowing what may cause the error that DHCP is not enabled for WiFi, do you know how to fix this issue? If not, keep on your reading and the following part will show you how to fix this error.

5 Ways to DHCP Is Not Enabled for WiFi Windows 10
In this part, we will show you how to fix the error that DHCP is not enabled for WiFi.
Way 1. Run Network Troubleshooter
To fix the error that DHCP is not enabled for WiFi, you can choose to run the network troubleshooter.
Now, here is the tutorial.
- Press Windows key and R key together to open Run.
- Type ncpa.cpl in the box and click OK to continue.
- Then locate your WiFi connection. Right-click it and choose Properties.
- Next, run the Network Troubleshooter. You will see the error that DHCP is not enabled for wireless network connection.
- Then click Try these repairs as administrator.
- Follow the on-screen instruction to continue.
When it is finished, reboot your computer and check whether the error that DHCP is not enabled for WiFi is fixed.
Way 2. Configure Network Adapter Settings
The error that DHCP is not enabled for WiFi Windows 10 may be caused by the incorrect adapter settings. So, in order to solve this error, you can choose to configure Network Adapter Settings.
Now, here is the tutorial.
- Open Network and Sharing Center.
- Then click Change Adapter Settings.
- Locate your wireless network connection and right-click it to choose Properties.
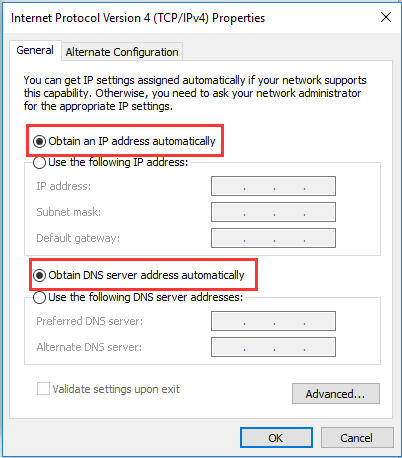
- In the pop-up window, double-click the Internet Protocol Version 4 (TCP/IPv4).
- Check Obtain an IP address automatically.
- Check Obtain DNS server address automatically.
- Then save these changes.
When it is finished, reboot your computer and check whether the error that DHCP is not enabled for WiFi is fixed.
Way 3. Turn on DHCP Client
In order to fix the error that DHCP is not enabled for WiFi, you can choose to open DHCP client.
Now, here is the tutorial.
- Open Run dialog.
- Type services.msc in the box and click OK to continue.
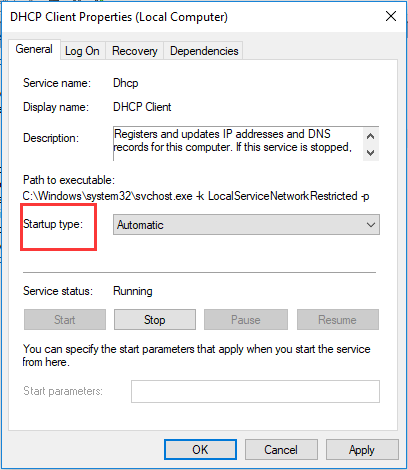
- Then locate the DHCP Client and double-click it.
- Change its Startup type to Automatic.
- Click Apply and OK to save its change.
After that, reboot your computer and check whether the error that DHCP is not enabled for WiFi is solved.
Way 4. Reinstall Network Driver
The issue that DHCP is not enabled for WiFi could be caused by the faulty driver. In order to fix this issue, you can choose to reinstall network driver.
Now, here is the tutorial.
- Press Windows key and R key together to open Run.
- Type devmgmt.msc in the box and click OK to continue.
- Expand the Network adapters. Right-click your WiFi adapter and choose Uninstall device.
- Check the option Delete the driver software for this device and click Uninstall to continue.
- Then download the correct driver and put it to a USB drive on another computer.
- Plug the USB drive to the computer and install the driver.
- After that, reboot your computer and check whether the issue that DHCP is not enabled for WiFi Windows 10 is removed.
Way 5. Reset Winsock and TCP/IP
As for how to fix the issue that DHCP is not enabled for WiFi, you can choose to reset Winsock and TCP/IP.
Now, here is the tutorial.
1. Open Command Prompt as administrator.
2. In the Command Line window, type the following commands and hit Enter after each command.
ipconfig /flushdns
nbtstat –r
netsh int ip reset
netsh winsock reset
3. Wait for the process to be finished.
When all steps are finished, reboot your computer and check whether the error that DHCP is not enabled for WiFi is fixed.

Final Words
To sum up, this post has shown 5 ways to fix the error that DHCP is not enabled for WiFi. If you have come across the same error, try these solutions. If you have any better solution to fix it, you can share it in the comment zone.
User Comments :