Overview of Windows Thumbnails
Windows thumbnails are miniature representations of images or videos. They are used to quickly identify and preview files without having to open each of them individually. This feature is useful especially when there are a lot of media files in the location.
However, Windows thumbnails also have disadvantages. For example, Windows thumbnails will occupy system resources and cause system performance to decrease. Or, sometimes thumbnails are slow to load.
With these in mind, many users want to know how to disable thumbnails in Windows 10. So, in the next part, we will walk you through the detailed steps to disable thumbnail preview.
MiniTool Power Data Recovery FreeClick to Download100%Clean & Safe
How to Disable Thumbnails in Windows 10
Way 1. Disable Thumbnail Preview Using File Explorer
The easiest way to turn off thumbnail preview is to use File Explorer. With a few simple clicks, the thumbnails will no longer appear.
Step 1. Press the Windows + E keyboard shortcut to access File Explorer.
Step 2. In File Explorer, go to the View tab and click the Options icon.
Step 3. In the new small window, move on to the View tab, and then tick the checkbox next to Always show icons, never thumbnails.

Step 4. Click the Apply and OK buttons sequentially to make the above change take effect.
Way 2. Disable Thumbnail Preview Using Windows Settings
If File Explorer is not responding or crashes, you can remove thumbnails from image files from Windows Settings.
Step 1. Open Windows Settings by pressing the Windows + I key combination.
Step 2. Click System.
Step 3. Move on to the About tab in the left panel, then click Advanced system settings under Related settings.
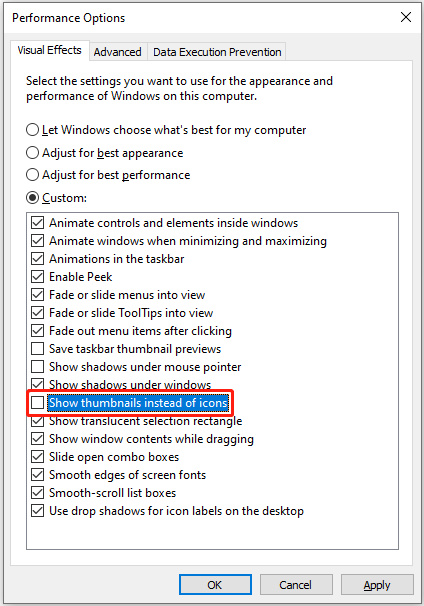
Step 4. Click Settings under Performance.
Step 5. Uncheck the Show thumbnails instead of icons option, then click Apply and OK.
Step 6. Restart your PC and check if the thumbnails are removed.
Way 3. Disable Thumbnail Preview Using Registry Editor
If you are a proficient registry user, you can disable thumbnail preview by editing Windows registries.
MiniTool ShadowMaker TrialClick to Download100%Clean & Safe
How to disable thumbnails in Windows 10 by using Registry Editor? Apply the steps below.
Step 1. In the Windows search box, type regedit and click Registry Editor from the best match result.
Step 2. In the pop-up UAC window, select Yes.
Step 3. In Registry Editor, navigate to the location below:
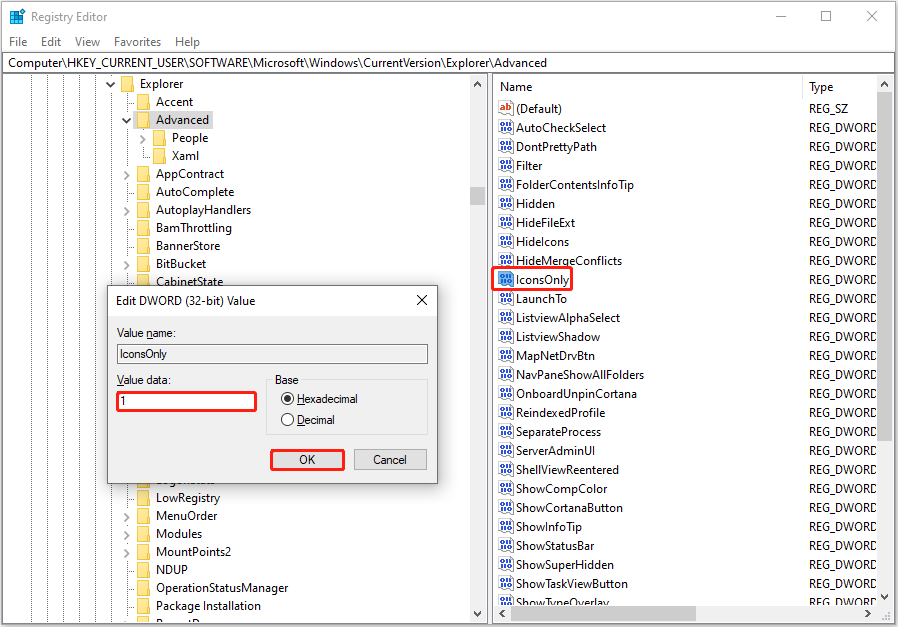
Computer\HKEY_CURRENT_USER\SOFTWARE\Microsoft\Windows\CurrentVersion\Explorer\Advanced
In the right panel, find and double-click the IconsOnly option. Then set up its value data to 1, then click OK.
Step 4. Reboot the computer and check if the thumbnails are turned off.
Way 4. Disable Thumbnail Preview Using Local Group Policy Editor
Alternatively, you are supported to disable thumbnails in Windows 10 via Local Group Policy Editor.
Step 1. Press the Windows + R key combination, type gpedit.msc in the text box, and then click OK.
Step 2. Navigate to: User Configuration > Administrative Templates > Windows Components > File Explorer.
Step 3. In the pop-up window, double-click the Turn off the display of thumbnails and only display icons option. Once a new window pops up, select the Enabled option.

Step 4. Click Apply > OK.
Wrapping Things Up
This post explains how to disable thumbnails in Windows 10 from File Explorer, Windows Settings, Registry Editor, and Local Group Policy Editor with step-by-step instructions.
Besides, if you want to recover deleted files from your computer or other file storage devices, try MiniTool Power Data Recovery.
MiniTool Power Data Recovery FreeClick to Download100%Clean & Safe
Should you have any questions about Windows thumbnail removal or MiniTool software, feel free to contact us via [email protected].
About The Author

Position: Columnist
Shirley holds a bachelor’s degree in English and has been an editor at the MiniTool Team for many years. She specializes in IT-related content, with a focus on data recovery, file backup, disk management, and other technical topics. She is committed to delivering clear, accurate, and practical solutions to help users resolve common computer issues.
User Comments :